Configuring the Microsoft Windows Embedded POSReady 2009 Wireless PCWS 2015 Using the Ralink WLAN Utility

All network configuration and security settings are dependent upon the site’s infrastructure and configuration of the wireless network. If you encounter problems with the wireless network, see your site administrator.

To connect the POSReady 2009 Wireless PCWS 2015 to a wireless network using (WPA-PSK) Wi-Fi Protected Access with Pre-Shared Key with the Ralink WLAN Utility and Ralink Configuration Tool:

  1. Start the Ralink WLAN Utility.

    After the installation of the wireless network module, this utility automatically opens.

  2. Click the Profile tab, and then click the Add button.
  3. Click the System Config secondary tab.
  4. In the SSID field, enter the SSID for your Access Point. Note that this is case sensitive.
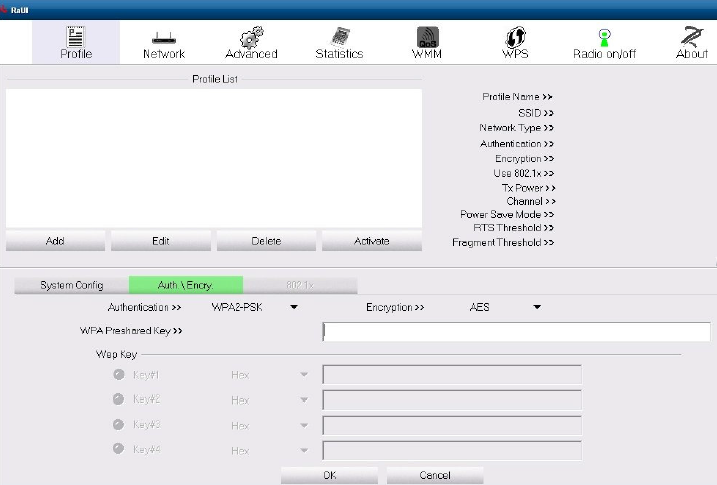
  5. Click the Auth/Encry secondary tab.

    Figure 13-2 The Authorization and Encryption tab of Ralink WLAN Utility Tool for the PCWS 2015


    This figure shows the Authorization and Encryption tab of the Ralink WLAN Utility Tool for the PCWS 2015.

  6. If your Access Point is using WPA2-PSK Personal Mode:
    1. For Authentication, select WPA2-PSK.
    2. For Encryption, selectAES.
    3. In the WPA Preshared Key field, enter the secure paraphrase that matches the one entered on your Access Point.
    4. Click OK.
  7. If your Access Point is setup with WPA2 Enterprise Mode using AES Encryption and EAP Authentication:
    1. For Authentication, select WPA2.
    2. For Encryption, selectAES.
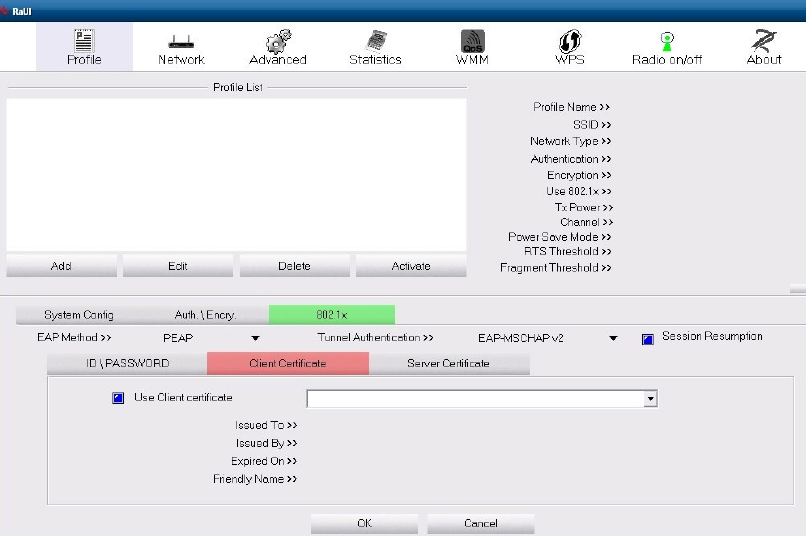
    3. Click the 802.1x secondary tab.
    4. Click the Client Certificate subtab, and then select Use Client Certificate.
    5. Select the certificate, and then click OK.

      Figure 13-3 The 802.1x tab of Ralink WLAN Utility Tool for the PCWS 2015


      This figure shows the 802.1x tab of Ralink WLAN Utility Tool for the PCWS 2015.

  8. Select the profile you created, and then click Activate.
  9. If you are using DHCP:
    1. Verify that you have an IP address, sub mask, and default gateway assigned.
    2. Click OK to close the Ralink Configuration Utility.
    3. Run the MICROS CAL normally.
  10. If you are using a static IP address:
    1. Click OK to close the Ralink Configuration Utility.
    2. Click Start, click Settings, and then click Network Connections.
    3. Right-click Wireless Network Connection, and then click Properties.

      The Internet Protocol Properties dialog box opens.

    4. Select Use the following IP address, and then enter the IP, subnet, and gateway addresses.
    5. Click OK twice to close and save.
    6. Run the MICROS CAL normally.