Configuring the Microsoft Windows Embedded POSReady 2009 Wireless PCWS 2015 with the Windows Wireless Zero Configuration (WZC) Service

All network configuration and security settings are dependent upon the site’s infrastructure and configuration of the wireless network. If you encounter problems with the wireless network, see your site administrator.

To connect the POSReady 2009 Wireless PCWS 2015 to a wireless network using (WPA-PSK) Wi-Fi Protected Access with Pre-Shared Key with the Microsoft Windows Wireless Zero Configuration (WZC) Service:

  1. Click Start, click Settings, and then click Network Connections.
  2. Right-click the Wireless Network Connection icon, and then select Properties.

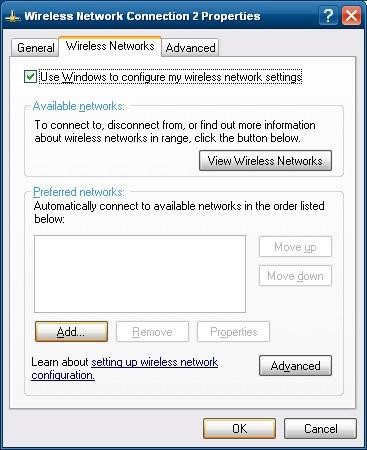
    The Wireless Network Connection Properties dialog box opens.

    Figure 13-1 Wireless Network Properties for the POSReady 2009 Wireless PCWS 2015


    This figure shows the Wireless Network Properties for the POSReady 2009 Wireless PCWS 2015.
  3. Click the Wireless Networks tab, and then click Add. The Wireless Networks Properties dialog box opens.
    1. In the Network Name (SSID) field, enter the SSID for your Access Point. Note that this is case sensitive.
    2. In the Network Authentication drop-down list, select WPA2-PSK.
    3. In the Data Encryption drop-down list, select AES.
    4. In the Network Key field, enter the secure paraphrase that matches the one entered on your Access Point.
    5. Click OK to close and save.
  4. Select your network, and then click Connect.
  5. If you are using DHCP, click OK and let the PCWS 2015 make an association with the selected Access Point.
  6. If you are using a static IP address, do not click OK. Instead, do the following:
    1. Select Internet Protocol (TCP/IP), and then click Properties.

      The Internet Protocol Properties dialog box opens.

    2. Select Use the following IP address, and then enter the IP, subnet, and gateway addresses.
    3. Click OK.
  7. Click OK to close and save.
  8. Run the MICROS CAL normally.