Configuring the Microsoft Windows CE Wireless WS5A for (WPA2-PSK) Wi-Fi Protected Access 2 with Pre-Shared Key

All network configuration and security settings are dependent upon the site’s infrastructure and configuration of the wireless network. If you encounter problems with the wireless network, see your site administrator.

To connect the Microsoft Windows CE Wireless WS5A to a wireless network using (WPA2-PSK) Wi-Fi Protected Access 2 with Pre-Shared Key:

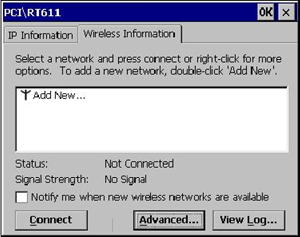
  1. Power on the workstation. If the card has never been configured, the WS5A displays a Wireless Configuration dialog box on the desktop asking you to configure the wireless network.

    Figure 10-1 Adding a New Wireless Network for the Microsoft Windows CE WS5A


    This figure shows the Wireless Configuration dialog box that appears when adding a new wireless network for the Microsoft Windows CE WS5A.
  2. Double-click Add New.

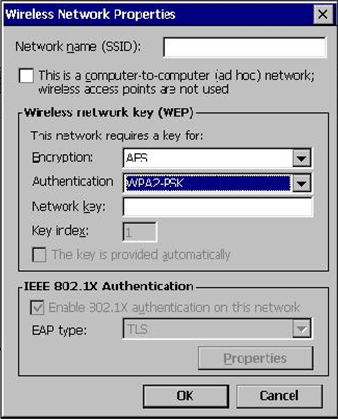
    The Wireless Network Properties dialog box opens.

    Figure 10-2 Wireless Network Properties for the Microsoft Windows CE Wireless WS5A


    This figure shows the Wireless Network Properties for the Microsoft Windows CE Wireless WS5A.
  3. On the Wireless Network Properties dialog box, enter the following:
    1. In the Network Name (SSID) field, enter the SSID for your Access Point. Note that this is case sensitive.
    2. In the Encryption drop-down list, select AES.
    3. In the Authentication drop-down list, select WPA2-PSK.
    4. In the Network Key field, enter your network key.

      This is a passphrase and must match the WPA2-PSK passphrase of your network. Use a strong password policy that includes upper and lower case, numeric and special characters.

    5. Click OK to close and save.
  4. Select your network, and then click Connect.

    Once you have a wireless network association, you can keep the Wireless network card on the default DHCP setting.

  5. To set a static IP address:
    1. Click Start, click Settings, and click select Network and Dial-Up Connections.
    2. Double-click the Wireless Card (PCI-E1Y51CE61) icon, and then enter a static IP address, subnet mask, and gateway if using a router.
  6. Run the MICROS CAL normally.