4 Start Configuring DIVArchive
This chapter describes initial DIVArchive configuration and includes the following information:
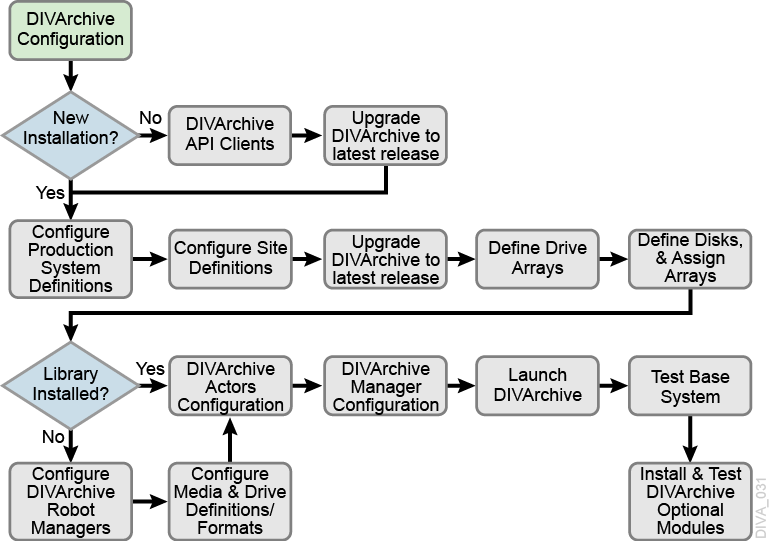
There are many interrelated components in a DIVArchive System. The following figure shows the basic configuration workflow.
The configuration of DIVArchive is hierarchical and top-level parameters such as Production Systems, Sites, Arrays, and Disks need to be configured before configuring other components such as DIVArchive Actors.
If you intend to modify an existing DIVArchive system, you must always start by backing up the existing DIVArchive installation, configuration files, and especially the DIVArchive Oracle and Metadata Databases.
Contact Oracle Support before making any modifications to your DIVArchive platform if you are unsure about any steps in the procedures, or require clarification.
Defining Production Sites and Other Sites
A Production System is a logical group within DIVArchive that associates Actors to your sources and destinations. It enables splitting DIVArchive resources among different applications, or prioritizing specific functions over others within the platform. This is accomplished by assigning more DIVArchive Actors to one Production System over another. Although DIVArchive Actors cannot be shared between Production Systems, it is possible to share a source or destination. In this case, you can declare the specific source or destination more than one time, but each instance declared must have a unique name. All installations must have at least one Production System defined.
For applications requiring extremely high bandwidth, the Production System concept also enables you to dedicate an Actor to an individual source.
For example, you may have a Production System used for on-air transmission, and another Production System for offline editing. The Production System concept enables fine-tuning your resource allocation between the two systems based on the workflow and bandwidth requirements of each system.
A Site enables you to associate an Actor tape library or disk with a physical location. DIVArchive determines the most optimal use of resources during event execution. For example, a remote installation connected over a WAN that is used for disaster recovery purposes for the primary site. All installations have at least one Site Definition.
You identify Production Systems and Site Definitions under the Configuration Utility's System tab.

Defining Sources and Destinations
A Source is defined as any connected system that contains content intended to be transferred to DIVArchive. A Destination is defined as any connected system that requires content to be transferred to it from DIVArchive. Examples of both are Broadcast Video servers, FTP servers, and disk file systems.
These entries are defined in the Sources and Destinations frame of the System tab in the Configuration Utility. See Appendix C for details on specific settings for each type.
Use the following procedure to define a source or destination:
-
Open the Configuration Utility.
-
Click the System tab.
-
Click the + button at the top of the Sources and Destinations frame.
-
Enter the following information in the appropriate fields on the Sources and Destinations Entry dialog box:
- Source Name
-
Enter a unique source name in this field. You can have multiple entries for the same physical source if they have different names. Multiple entries enables sharing the source with multiple Production Systems.
- IP Address
-
Enter the IP Address or host name of the source. If you use host names they must be resolvable by the Actor host computers. Some Source Types, such as Disk, do not require an IP Address and can be left blank for those Source Types.
- Source Type
-
Select a Source Type from the list. The Actor uses the Source Type to select the correct communications protocol for the device.
- Prod. System
-
This field specifies this source's dedicated Production System.
- Site
-
Select the Site location from the list. This field identifies the physical location of the source.
- Connect Options
-
Enter any parameters required to connect to the source. For example, the user name and password.
- Root Path
-
Enter the root directory path (if any) for accessing content on the source.
- Max. Throughput (Mb/s)
-
This setting limits the total bandwidth used in transfers to or from this source. This is useful when the source does not natively provide any bandwidth throttling. This is typically set to a higher value than the source can provide (that is, unthrottled).
- Max Accesses
-
Enter the maximum combined simultaneous read and write operations permitted to the source. For example, if this value is five and there are five requests active, any additional requests will be set to Waiting for Resources until at least one of the other requests has completed.
- Max Read Accesses
-
The Max Read Accesses and Max Write Accesses enable fine tuning of transfers to and from the source. For example, you can allocate more restore operations than archive operations.
If the Max Read Accesses value is zero, this component is only used as a Source.
- Max Write Accesses
-
The Max Write Accesses and Max Read Accesses enable fine tuning of transfers to and from the source. For example, you can allocate more restore operations than archive operations.
If the Max Write Accesses value is zero, this component is only used as a Destination.
- First Utilization Date
-
This is a read-only field that displays the first date this component was put into service.
The remaining fields are related to Checksum Support and identified here for completeness. See the Oracle DIVArchive Checksum Support User's Guide in the Oracle DIVArchive 7.5 Additional Features documentation library for detailed information.
- External Checksum Source
-
Select the appropriate option to identify whether the checksum source is external (Yes) or internal (No).
- Checksum Type
-
Select the type of checksum (MD5, SHA256, and so on) in use from the list.
- GC Mode
-
Select the Genuine Checksum (GC) mode from the list.
- Verify Following Archive (VFA)
-
Select the check box to enable VFA on this source. Deselect the check box to disable VFA.
- Verify Following Restore (VFR)
-
Select the check box to enable VFR on this source. Deselect the check box to disable VFR.
-
Click OK to save your configuration.
Source and Destination Overview
This section describes additional Source and Destination configuration and expands on the previous section.
Source and Destination Configuration Limitations
If you configure a Source/Destination with the -rxml option, a proper MD5 checksum is generated only if the object contains a single file. If the object contains more than one file, no checksums are generated. You typically use this configuration in DIVAnet configurations for restoring to a second DIVArchive system with checksums.
When this is the case, and an object that contains more than one file is restored, the resultant .xml Metadata file will not have checksums present. A Source/Destination on the receiving side configured with GC active will fail to archive the object because the checksum verification will fail (there is no matching checksum).
Source Type
The Source Type parameter of the Source or Destination definition establishes the specific protocol for the interface between the DIVArchive Actor and the target device or file system.
The source types supported by DIVArchive are predefined and selection is limited to the listing from the Source Type list.
Deprecated indicates that this is a software feature or function within DIVArchive that has subsequently been replaced by an improved feature set, however the feature or function is still supported by DIVArchive in the current release. The following is a list of source types available in the current DIVArchive release:
- AM Communicator
-
Avid Archive Manager interface
- TM Communicator DET Interface
-
AVID Unity interface using the Dynamically Extensible Transfer (DET) protocol.
- TM Communicator DHM Interface
-
AVID Unity interface using the Data Handling Module (DHM) protocol.
- CIFS
-
A disk source (that is assumed to be) visible to all Actors in the associated Production System. Buffered I/O will be used for transfers to and from this source.
- Disk
-
A disk source (that is assumed to be) visible to all Actors in the associated Production System. Direct I/O will be used for transfers to and from this source.
- EXPEDAT
-
DataExpedition (Expedat) Server
- FTP_STANDARD
-
FTP protocol for RFC959 compliant servers.
- LEITCH
-
This source type is deprecated, and is only provided for backward compatibility for older Leitch servers. Newer servers must use the FTP_STANDARD source type.
- LOCAL
-
Represents a disk partition bound to a specific Actor.
- MEDIAGRID
-
Omneon MediaGrid
- METASOURCE
-
Used for accommodating multiple servers sharing the same online storage.
- MSS
-
AVID MediaStream servers
- OMNEON
-
Omneon Spectrum servers using unique FTP site commands
- PDR
-
GVG Profile servers
- QUANTEL_ISA
-
Quantel Q or sQ servers utilizing the Quantel Power Portal
- QUANTEL_QCP
-
Older Quantel servers utilizing the QCP protocol
- SEACHANGE_BMC
-
SeaChange Broadcast Media Clusters or Media servers using Vstream Streaming API
- SEACHANGE_BML
-
SeaChange Broadcast Media libraries using FTP or CIFS protocols
- SEACHANGE_FTP
-
SeaChange FTP support; this Source Type is deprecated
- SFTP
-
Secure Shell (SSH) FTP protocol
- SONY_HYPER_AGENT
-
For use with Sony Newbase FTP server
- SIMULATION
-
For simulator platforms only. This creates simulated Sources and Destinations
One record is required for each Content Director that DIVArchive has to move data to and from. The following list identifies the Content Director attributes:
Connect Options
You define the Default Quality Of Service for DIVArchive transfer requests and additional protocol specific parameters (for example, user name and password) in the Connect Options field.
The Connect Options enable the DIVArchive Actor to establish a connection to the target device or disk file system. This applies to both requests submitted through the Control GUI or from third party archive initiators using the DIVArchive API.
See Appendix C for details on specific Connect Options for supported Broadcast Servers and file system types.
Root Path
You can explicitly specify the directory path at the request level. However, you can define the default directory path for the source, or a disk mount point for disk and local sources, in the Root Path field. The specified Root Path is appended before any Files Path Root specified in an archive, restore, or partial file Restore request unless the Files Path Root specified in the request is an absolute path.
The benefit of the Root Path approach is that you can specify the server's directories at the source and destination configuration level rather than at the request level. You can alter it without affecting commands issued from DIVArchive clients.
See Appendix C for details on the interaction of the Files Path Root and Root Path parameters.
Metasource
The optional Metasource enables DIVArchive to combine two or more existing Source/Destinations, which use common storage, or multiple Drop Folder Monitors, into a single Source/Destination configuration.
The Metasource feature offers load balancing and fault tolerance from within DIVArchive if an individual server or DFM fails. DIVArchive automatically attempts to use the next server (or DFM) in the Metasource configuration if the attached server (or DFM) is unavailable for a request.
Arrays and Disks
DIVArchive's disk management defines each physical disk, how it is attached (or mounted) to the system, and then groups the disks together to perform specific roles within the archive.
Defining an Array
The first step to disk management is to define an array. In DIVArchive an array is a logical grouping of one or more disks for the storage of DIVArchive objects. You define arrays in the Arrays frame of the Disks tab in the Configuration Utility.
Use the following procedure to define an array:
-
Open the Configuration Utility and connect to the DIVArchive Database.
-
Click the Disks tab.
-
Click the + button at the top of the Arrays frame to open the Add new row in Arrays dialog box.
-
Enter the following information in the fields on the dialog box:
- Id
-
The array's ID is automatically generated by the system. The Id field is not editable.
- Array Name
-
Enter a name for the array in the Array Name field. This is symbolic and typically represents the purpose of the stored objects.
- Description
-
Enter a description for the array in the Description field. This is arbitrary and typically denotes the array's function.
- Format
-
Select the array format from the list. Options are AXF and Legacy. The AXF format is required for complex objects.
- Max Allowed Disk Space For Repack (%)
-
Enter the percentage of disk space available for use by repack requests.
- Verify Write (VW)
-
You select whether to enable Verify Write from the list. Verify Write is not compatible with complex objects.
- Default Checksum Type
-
The MD5 algorithm is the Default Checksum Type. This field is not editable in this dialog box.
-
Click OK to save the array configuration.
You highlight a desired array and click Edit on the top of the Arrays frame to edit an existing array. When you finish making changes, click OK to save your changes.
Note:
Existing arrays cannot be edited or removed while they are referenced by a disk, or contain DIVArchive objects.Defining Disks
Next you define the physical disks that are going to be used by DIVArchive, and assign them to arrays based on their intended function. You configure disks in the Disks frame of the Disks tab.
Each configured disk represents a distinct physical volume. Logical associations of disks to DIVArchive are performed in the Actor-Disk Connections frame
You can assign each disk declaration in this frame to only one Array. If you intend to share a physical disk between two or more arrays, you can declare the disk multiple times, but each declaration must have a unique name.
Defining how the disks are actually interfaced to DIVArchive is performed in the Actor-Disk Connections frame of the Disks tab.
Use the following procedure to define a disk:
-
Open the Configuration Utility and connect to the DIVArchive Database.
-
Click the Disks tab.
-
Click the + button at the top of the Disks frame to open the Add new row in Disks dialog box.
-
Enter the following information in the fields on the dialog box:
- Disk Name
-
Enter a symbolic name for the disk in the Disk Name field. Oracle recommends that the name describes its function or its location.
- Array
-
Assign the disk to an array selected from the menu list. Only arrays configured in the Arrays frame are listed.
- Site
-
Select the Site that defines the location of this disk. This parameter is taken into consideration by DIVArchive for optimum allocation of disk resources in the array if the Site Selection parameter is enabled in the DIVArchive Manager configuration file
- Status
-
Set the current status of the disk using the list (ONLINE or OFFLINE). OFFLINE indicates that the disk is offline and not to be used. During DIVArchive operations, the status may be set Offline by DIVArchive if an unexpected disk I/O error occurs.
- Min. Free Space, MB
-
You set the minimum free space of the disk in this field. When the remaining free space reaches this amount, DIVArchive considers the disk full. Use this setting on disks that are shared with other applications, or with file systems that suffer poor or degraded performance when approaching 100% capacity.
- Verify Write (VW)
-
You select whether to enable Verify Write from the list. Verify Write is not compatible with complex objects.
- Default Checksum Type
-
The MD5 algorithm is the Default Checksum Type. This field is not editable in this dialog box.
-
Click OK to save the disk configuration.
You highlight a desired disk and click Edit on the top of the Disks frame to edit an existing disk. When you finish making changes, click OK to save your changes.
Configuring Oracle Archive Cloud for DIVArchive
You can use your Oracle Archive Cloud account for operations in DIVArchive. Any disks added to cloud arrays are considered cloud disks.
You must create an array with a storage class of ARCHIVE or STANDARD. Content stored using the ARCHIVE storage class requires a minimum of four hours retrieval time. Content stored using the STANDARD storage class is immediately available for retrieval. The NONE storage class is reserved for non-cloud arrays.
In the Actor-Disk Connections frame a cloud disk must be designated with the new cloud interface type, and must have a mount point that points to a cloud account. When you select a cloud interface during the creation or modification of an Actor-Disk connection, the corresponding Mount Point updates with a list of all cloud accounts and you can select the appropriate cloud account from the list.
Note:
The cloud account name must not contain a colon and cannot start withcifs.Cloud accounts are defined in the Cloud Accounts frame. You must specify a unique Account Name, Login, Password, URL, Service Name, and Identity Domain. These five parameters are configured when you creates an account through Oracle's Cloud Configuration site (https://cloud.oracle.com). The parameter controlling the number of threads used by an Actor in writing content to the cloud is also configurable in the Cloud Accounts frame.
Actor-Disk connections including a disk belonging to an array with an ARCHIVE or STANDARD storage class must have the Cloud Interface setting and a Mount Point pointing to a cloud account name.
The Actor-Disk connection interface must be the same for all disks of a specific array, that is, either all cloud interfaces or all non-cloud interfaces.
Using an Actor-Disk connection with a cloud interface must be identified as STORAGE ONLY. Cache and Nearline are not supported for cloud content.
The ability of an Actor to archive or restore from the cloud is configurable in the Actor Settings tab of the Actor Settings Entry dialog box. Only Actors with Cloud Archive enabled will be used for transfers to the Oracle Archive Cloud. Only Actors with Cloud Restore enabled will be used for transfers from the Oracle Archive Cloud.
For example, when you are copying from tape to the cloud, the Manager will only use Actors configured for Cloud Archive. When you are copying from the cloud to tape, the Manager will only use Actors configured for Cloud Restore. Both Cloud Archive and Cloud Restore require Direct Archive and Direct Restore respectively. These settings are enabled when the corresponding cloud settings are configured.