5 Operations and Monitoring
This chapter describes operation and monitoring the DIVArchive Backup Service, and includes the following information:
Configuring the Metadata Database
You must set the following two parameters on the Manager Setting tab of the Configuration Utility to enable complex object workflows and Metadata Database backups:
- Enable Metadata Database
-
Select this check box to enable use of the Metadata Database.
- Metadata Database Location
-
Enter an empty directory path that exists in the file system in the Metadata Database Location field.
Note:
Changes made to these parameters require you to restart the Manager and Backup Service. When it is necessary to change the Metadata location, you must confirm that you have copied all of the Metadata files from the old location to the new location.Oracle highly recommends that you store the Metadata Database files on a RAID disk array. The Metadata Database should not be on a standard disk due to decreased performance and the real-time backup functionality that a RAID array affords the system.
Metadata Database files stored on a standard disk are vulnerable to data loss if a single disk failure occurs until the information is replicated with the DIVArchive Backup Service. Storing the Metadata Database files on a RAID array isolates the data from these types of failures.
Sizing the Metadata Database
You can use the following formula as a rough guide to determine the minimum disk space required to support the Metadata Database:
(100+avg_path_file_name_size)*1.15*avg_number_component_files*number_objects
When planning, enough Metadata Database disk space should be allocated to ensure expected, or unexpected, growth of your environment. You must allocated the same disk space for the Metadata Database on all of the remote backup systems.
Example:
avg_path_file_name_size = 60-
this/nested/subdir01/As_The_World_Turns_24fps_scenes1-10.avi avg_number_component_files = 200,000-
This is the average number of files and folders within the complex object.
num_objs = 50,000-
This si the number of complex objects to be archived.
In this example, the recommended minimum disk space allotment would be for a Metadata Database size of approximately 1.67 TB.
Database Backup Recovery Window
The Recovery Window defines how much history (in days) of backups the DIVArchive Backup Service must retain, and delete obsolete backups that are outside of the Recovery Window range. Preserving considerable days of backups is very important because it enables the flexibility to roll back the system to any earlier state if a situation arises.
The Recovery Window value is configured using the DB_FBM_RECOVERY_WINDOW_DAYS parameter in the configuration file. The default value is 10 days.
When a complex object is deleted, the Manager only deletes the entries in the Oracle Database, and retains the complex object's Metadata file in the Metadata Database until the end of the Recovery Window period.
The following example describes the typical sequence of events when a complex object is deleted. For this example, the current Recovery Window is 10 days and the Backup Service clean-up is scheduled to run every day at 2:00 AM. Therefore, the Recovery Windows parameters are configured as follows:
DB_FBM_RECOVERY_WINDOW_DAYS = 10
CLEANUP_START_HOUR_24 = 2
CLEANUP_START_MINUTE = 0
CLEANUP_FREQUENCY_HOURS = 24
-
ComplexObject-A is deleted on September 10, 2016 at 10:00 AM. Only the entries in the Oracle Database are deleted, and the complex object's Metadata file is retained on the Metadata Database Location identified in the Configuration Utility.
-
The Backup Service tracks the time and date of deleted complex objects until the end of the Recovery Window period.
-
While running the clean-up task at 2:00 AM on September 21, 2016, the DIVArchive Backup Service detects that the 10 day recovery period has expired.
Because the deletion of ComplexObject-A occurred 11 days ago (on September 10, 2016), which is outside the Recovery Window period, the Database Backup Cleanup process deletes the corresponding Metadata file from the Metadata Database.
-
The DIVArchive Backup Service retries any failed Metadata file deletions again during the next execution (on September 22, 2016 at 2:00 AM).
Database Backup Cleanup
It is impossible to preserve all of the backups. Therefore, any backups outside of the Recovery Window period must be deleted to clean up disk space. The DIVArchive Backup Service checks for obsolete backups every 24 hours (by default) that were created beyond the Recovery Window and deletes them. The cleaning of obsolete backups works differently for the Oracle Database and Metadata Database.
Backup Interval Overrun
A Backup Interval Overrun occurs when a specific backup is taking a longer time to complete beyond the next scheduled iteration.
The following example is called a Backup Interval Overrun because the Backup Service must run the next incremental backup by 12:15 PM, but it cannot because the backup process started at 12:00 PM is still running.
-
The Oracle Incremental Backup is schedule to run every 15 minutes:
INCREMENTAL_FREQUENCY_MINUTES = 15
-
The incremental backup starts at 12:00 PM and runs at the value set for the
INCREMENTAL_FREQUENCY_MINUTESparameter; in this case every 15 minutes. -
At 12:15 PM the incremental backup is incomplete and still running, causing a Backup Interval Overrun.
The DIVArchive Backup Service sends a Backup Timeout Warning to the Manager when a Backup Interval Overrun occurs. The Manager broadcasts this warning to all connected Control GUIs, and records the warning in the event log. If a Backup Timeout occurs three consecutive times, the timeout warning messages are elevated to an error message. You must take immediate and necessary action to modify the backup's frequency by updating the configuration file to avoid future Backup Interval Overrun occurrences.
Note:
Updating the configuration file requires a Backup Service restart. Execute dbbackup restart to perform a restart, ordbbackup restart -conf {config_file_name} if you must specify a specific configuration file.Monitoring the DIVArchive Backup Service
The DIVArchive Backup Service notifies the Manager about all backup errors and warnings. The Manager broadcasts the backup errors and warnings to all connected DIVArchive Control GUIs. The Control GUIs display a dialog box indicating the specific error or warning, and records them in the event log.
You use the list menu to the right of the Suppress Alerts label to snooze alerts. The list menu enables you to snooze the error or warning as follows: Never (never allow this message type to be snoozed), One Hour, Three Hours, and Eight Hours. The system snoozes the specific message type displayed in the dialog box and suppresses future messages for the same error or warning. Snoozing a message dialog box has no effect on the currently displayed error or warning; it only affects future messages about the same error or warning that has been snoozed.
When you start the Control GUI, the system queries the logged events to determine if there are any Backup Service errors within the last 24 hours. When an error is detected, the Error Icon on the bottom right of the Control GUI is enabled and red in color. When you click the icon, it displays all errors generated in the last 24 hours in the Manager Events panel. The last error in the logged events will be displayed in a dialog box.
When an error notification is received by the Control GUI, the Error Icon will flash 10 times, indicating arrival of a new error message. The icon will flash continually if the error received is a Backup Service error. Clicking the Error Icon opens the Events in the Manager panel to display only the Backup Service errors received within the last 30 minutes, and then resets the Error Icon. The Status Bar at the bottom of the Control GUI also displays the incoming error, warning and informational messages.
All messages generated by the Backup Service are also written to the Database Event Log and marked as Backup Service Messages. If no Control GUI is connected, you can review all of the backup errors and warnings by navigating to the Logged Events panel under the Analytics tab in the Control GUI.
Events in the Logged Events panel may be filtered using the filter check boxes and fields to reduce the number of entries being viewed simultaneously. The following figure shows that the screen has been filtered to show only Warnings and Errors because their associated check boxes are selected in the filter area. It is readily apparent there are three warning events that have been logged about the Database Backup Manager timing out during an incremental backup attempt. If the timeout occurs again, the warning is elevated to an error (after three warnings) and displayed in red (rather than yellow).
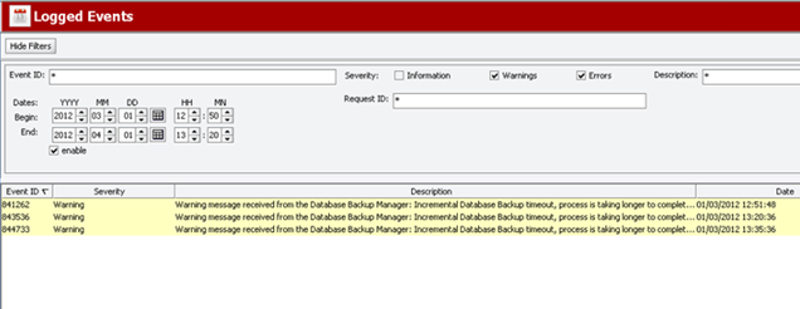
Error messages are prefixed with the process that generated the error or warning, and where applicable, post fixed with the start of the process and elapsed time. The elapsed time is the time the process ran before generating the error.
The following table describes the different warning and error notifications displayed on the Control GUIs.
Table 5-1 DIVArchive Backup Service Errors and Warnings
| Message Type | Code | User Message | Posted to Manager |
|---|---|---|---|
|
|
0 |
Completed successfully |
Yes, informational |
|
|
1 |
Running |
No, internal only |
|
|
2 |
Failure: Refer to the Backup Service logs for more details. |
Yes, error |
|
|
3 |
Timeout: The process is taking longer to complete than the configured intervals. The Backup Service continues to display timeout messages as a warning. If the timeout occurs three consecutive times, the message will be elevated to an error message and displayed. |
Yes, warning |
|
|
4 |
DIVArchive Backup Service failed to start. Refer to the Backup Service logs for more details. |
Yes, error |
|
|
5 |
Scheduling Backups |
No, internal only |
|
|
6 |
Timeout: The process is taking longer to complete than the configured interval. |
Yes, error |
|
|
1000 |
Invalid Configuration Error. Refer to the Backup Service logs for more details. |
Yes, error |
|
|
6000 |
The Metadata Database Location does not exist. Refer to the Backup Service logs for more details. |
Yes, error |
|
|
7000 |
The Metadata Database file deletion failed. Refer to the Backup Service logs for more details. |
Yes, error |
|
|
7001 |
Failed deleting the Metadata Database. |
Yes, error |
|
|
8000 |
An error occurred while copying backups to remote backup destinations. Refer to the Backup Service logs for more details. |
Yes, error |
|
|
8002 |
An I/O error occurred while copying backups to remote backup destinations. Refer to the Backup Service logs for more details. |
Yes, error |
|
|
8003 |
A timeout occurred while copying backups to remote backup destinations. Refer to the Backup Service logs for more details. |
Yes, warning |
|
|
8005 |
A timeout occurred while copying backups to remote backup destinations. Refer to the Backup Service logs for more details. |
Yes, error |
|
|
9000 |
Database connection error. Refer to the Backup Service logs for more details. |
Yes, error |
|
|
9001 |
Database SQL error. Refer to the Backup Service logs for more details. |
Yes, error |
|
|
9002 |
Database Rollback error. Refer to the Backup Service logs for more details. |
Yes, error |
Monitoring Minimum Disk Space
The DISK_MIN_SPACE_THRESHOLD_PERCENT is a notification threshold percentage of the available space for each drive accessible by the Manager. The default value is 5 percent. For example, DISK_MIN_SPACE_THRESHHOLD_PERCENT=25 sets the notification threshold to 25 percent. This function does not monitor removable media and drives.
When the configured threshold of available space on the media is reached, warning notifications are sent out. After the available space reaches 80 percent of the designated percentage (in the dbbackup.conf file), an error message is sent out.
When the configured percentage is reached, a dialog box will be displayed as shown in the following figure.

The Suppress Alerts list at the bottom of the dialog box functions identically to the other warning and error dialog boxes. In the previous figure a warning was issued to notify the operator that the DISK_MIN_SPACE_THRESHHOLD_PERCENT was reached.
Snoozing this alert causes no additional disk space warnings or errors to be displayed. Clicking OK without setting a suppression level enables future alerts for this particular warning to be displayed.
In the previous figure, when 80 percent of the threshold percentage is reached (2.4 GB on C drive and 24.8 GB on D drive), this dialog turns into an error rather than a warning.
When the dbbackup status command is executed, additional information is displayed including available space, threshold warnings and errors, and additional information about recent backup attempts.
The following is the additional information displayed after executing the dbbackup command:
Last process: METADATA Database Replication Start time:Tue Sep 06 13:26:30 EDT 2016
Last status: Completed Successfully.
Last Error:

System Statistics

OS: Windows 2003
Version: 5.2
: x86
Available processors (cores): 4

Total Free memory: 52 MB
Total used memory: 9 MB

Total available memory: 61 MB

Warning:  D:\ minimum space threshold of 20.0% of capacity has been reached.

percent Available: 16.605641010200685
Total space: 124.037 GB
Free space: 20 GB
Usable space: 20.597 GB

Last Metadata Database Actions
No records found
No records pending deletion

Number of Database backup's performed in the last 24 hours is  89

Type         Status     Start                  End                    DurationARCHIVELOG   FAILED     2016-09-05 13:37:52.0  2016-09-05 13:38:00.0  0.13
ARCHIVELOG   FAILED     2016-09-05 13:52:50.0  2016-09-05 13:53:00.0  0.16
ARCHIVELOG   FAILED     2016-09-05 14:07:52.0  2016-09-05 14:08:00.0  0.13
DB FULL      COMPLETED  2016-09-05 19:38:48.0  2016-09-05 19:45:24.0  6.6
ARCHIVELOG   COMPLETED  2016-09-05 19:47:34.0  2016-09-05 19:47:41.0  0.11
ARCHIVELOG   COMPLETED  2016-09-05 20:02:43.0  2016-09-05 20:02:53.0  0.16
ARCHIVELOG   COMPLETED  2016-09-05 23:23:06.0  2016-09-05 23:23:18.0  0.2
Email Notifications
The DIVArchive Backup Service incorporates the ability to send out emails for issues arising from the process of backing up the Oracle Database and Metadata Database files. In order to take advantage of this feature, DIVArchive must be configured to connect to an SMTP mail provider. The email notifications are configured through the DIVArchive Configuration Utility under the Manager Setting tab.
Use the following procedure to enable email notifications:
-
Open the Configuration Utility and connect to the database.
-
Click the Manager Setting tab.
-
Set the values for the following email notification parameters as required:
Caution:
If the following parameters are misconfigured, notifications will go out to all connected Control GUIs and entries into the Manager Event Log will be made. However, email notification will not be sent.- Enable E-Mail Notification
-
If you select the check box (enabled), the Manager attempts to send out email using the configured values.
- (SMTP) Outgoing Mail Host
-
Enter the URL of the email provider for outgoing mail in the (SMTP) Outgoing Mail Host field. This is provided by your Email Administrator.
- (SMTP) Outgoing Mail Port
-
The port value is port 25 by default. However, many email providers are using a different port for security reasons. The correct port number is provided by your Email Administrator. Enter the correct port number in the (SMTP) Outgoing Mail Port field.
- E-Mail Subject
-
Enter the value to be used in the E-Mail Subject field if an email subject is not provided when an error is generated.
- (SMTP) Outgoing Mail Required Authentication
-
Many email providers require you to log in to the email server to allow sending emails. You must select the (SMTP) Outgoing Mail Required Authentication check box, and provide a valid account name and password (using the following two fields) if required to log in to the email server.
- Account Name
-
Enter the full senders email address in the Account Name field if the (SMTP) Outgoing Mail Required Authentication check box is selected.
- Account Password
-
You must enter the password associated with the senders email address in the Account Password field if you have entered an email address in the Account Name field.
- DIVArchive System Administrator's E-mail Address
-
Enter the full email address for the DIVArchive System Administrator in the DIVArchive System Administrator's E-mail Address field so they receive a copy of any email notifications.
- Notification E-Mail Recipients
-
You must enter the full email addresses for anyone who should receive the email notifications in the Notification E-Mail Recipients field. This should be a comma-delimited list with no spaces.
After you have configured the values, if the Manager is already running you must notify the Manager of any changes. When the Manager starts, or when it receives notifications from the Configuration Utility, reads the configured values and attempts to send out a test email. If the test is successful, all recipients on the Notification E-Mail Recipients list will receive a Test Successful email notification. Otherwise, they will receive an email notifying them of any error that occurred.
Events are logged in the Logged Events panel of all connected Control GUIs. A dialog box is displayed notifying you of the email failure error if you are logged in to the Control GUI as an Administrator.
DIVArchive Backup Service Status Command
The Backup Service status command delivers comprehensive service status information and provides the information outlined in the following sections. The command line syntax is dbbackup status.
Backup Service Running Normally
When the Backup Service is running, the following information is displayed when the status command is executed:
-
Running release of the service
-
IP address and port the service is running on
-
System statistics
-
Operating system information
-
Memory information
-
Disk array information
-
Database backup statistics including:
-
Last executed backup command and the current status
-
Number of Metadata Database files backed up
-
A list of the last 25 Metadata files backed up including the object name and creation date
-
The information output to the console is also saved in the logs directory in a text file named dbbackup.status. This file, and the log files, must be included when submitting issues to Oracle Support.
Backup Service Not Currently Running
When the Backup Service is not currently running, the following information is displayed when the status command is executed:
-
Running release of the service
-
IP address and port the service runs on
-
An extract from the DIVArchive Backup Service log files from the last error, or irrecoverable error, reported
Backup Service Failed to Start
If the Backup Service fails to start, execute dbbackup status to find out why the service failed to start. After you identify the cause of the failure, correct the issue, and then try to start the service again. If you require assistance contact Oracle Support.
Failure Scenarios and Recovery Procedures
There are two types of failure scenarios; non-failover, and failover.
Non-failover Scenarios
If the Main DIVArchive Manager computer is still fully operational, and there has been no RAID Disk failure, you can restore and recover the DIVArchive system and its database from failure without moving the DIVArchive Manager or database to a Backup DIVArchive Manager computer.
The following are non-failover scenarios and recovery actions (in sequence) to correct them. Contact Oracle Support if you require assistance or need to restore from a backup.
- Manager Failure
-
-
Restart the Manager
-
Apply a cumulative path (if available) and restart the Manager
-
Upgrade your DIVArchive installation
-
- Oracle Database Instance Failure
-
-
Restart the Oracle instance
-
Reinstall Oracle and restore the database from a backup
-
- Oracle Database Data File Corruption
-
Restore the data file from an Oracle Secure Backup.
- Oracle Database Parameter File or Control File Corruption
-
Restore the parameter file, or control file, from an Oracle Secure Backup.
- Oracle Online Redo Logs Corruption
-
Restore the database using an Oracle Secure Backup.
- Oracle Archive Redo Logs Corruption
-
Shut down the database and perform a full backup.
- Replication (RSYNC) of RMAN Backup Files Failure
-
The DIVArchive Backup Service sends a failure notification to Manager. The Manager generates error events, broadcasts messages to all connected Control GUIs, and records it in the event log. Each connected Control GUI displays a dialog box notification indicating the need for user action. The possible causes are network issues, the Remote Backup System is unavailable, or the RSYNC service is not running on the Remote Backup System.
- Replication (RSYNC) of Metadata Database Files Failure
-
The DIVArchive Backup Service sends a failure notification to Manager. The Manager generates error events, broadcasts messages to all connected Control GUIs, and records them in the event log. Each connected Control GUI displays a dialog box notification indicating the need for user action. The possible causes are network issues, the Remote Backup System is unavailable, or the RSYNC service is not running on the Remote Backup System.
Failover Scenarios
If the main DIVArchive Manager computer fails, is not operational, or a RAID disk fails, you must restore and recover the DIVArchive Manager and database on the Backup DIVArchive Manager computer to restore DIVArchive back to an operational state.
The following are failover scenarios and recovery actions (in sequence) to correct them. The recovery actions are the same for all of the listed scenarios.
Contact Oracle Support if you require assistance or need to restore from a backup.
The following are possible failures that require failover recovery actions:
-
Main DIVArchive Manager Computer Failure
-
RAID Disk Failure where Oracle Data Files are Stored
-
RAID Disk Failure where Oracle RMAN Backups are Stored
-
RAID Disk Failure where Metadata Database Files are Stored
You use the following recovery sequence to complete the failover if any of the previous failures occur:
-
Failover to the Backup DIVArchive Manager computer.
-
Restore and recover the Oracle Database from an Oracle Secure Backup.
-
Execute
dbbackup reconcileto discover if any complex objects are missing Metadata files. -
Start the DIVArchive Manager.
Failover Procedures
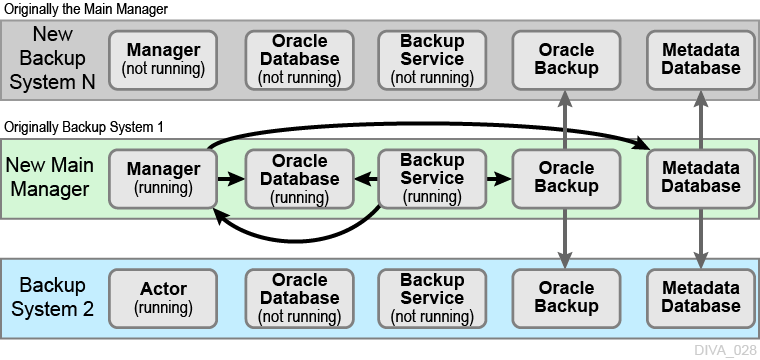
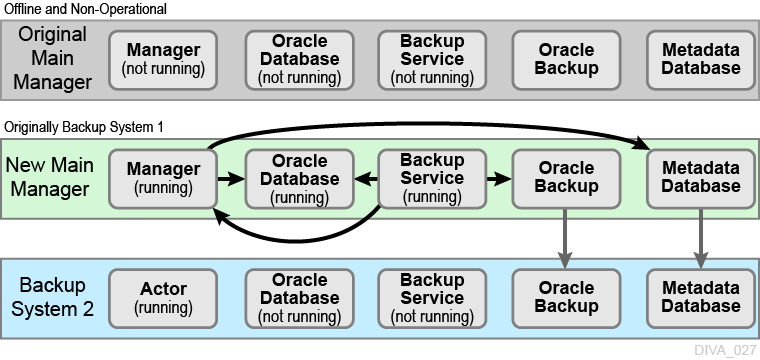
You use the following procedure to recover the DIVArchive system if a failure occurs. The first figure is a typical DIVArchive System configuration showing the connections between the different modules, the second displays a failover case, and the third depicts a recovered, operational system. The Main Manager and Backup System 1 are configured identically. However, the Backup Service, Manager, and Oracle Database are not running until they are started (see the third figure). The Backup Service creates the backups on the Main Manager computer and then pushes copies of them to the Backup System 1, Backup System 2, and Backup System N. The N represents additional system numbering if applicable, for example Backup System 3, Backup System 4, and so on.
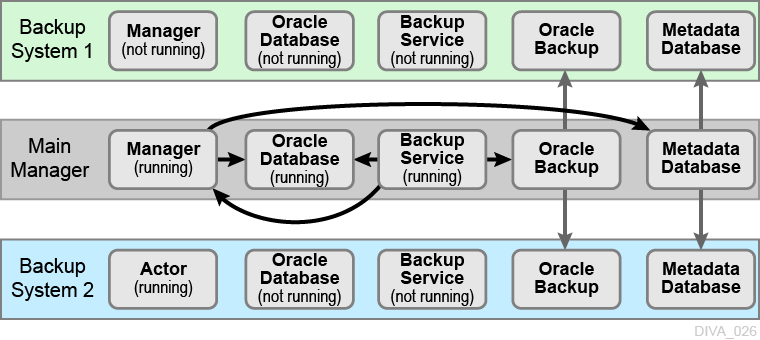
For this example, assume the Main Manager computer failed and is offline. The following procedure is the easiest, and fastest, way to get the system back online. You are effectively switching the Original Backup Manager to be the New Main Manager and the Original Main Manager will be the New Backup Manager (they are trading places), resulting in the least amount of time the system is offline.
-
Restore the Oracle Database on the New Main Manager from the latest Oracle Database backup. Execute the
restore.batscript located in the%DIVA_HOME%\Program\DBBackup\rman\binfolder. The syntax for the command is as follows:restore {"default_dir"} {sid} {"source_dir"} [-syspwd=system_password] [-nocomnp]Note:
You must use double quotation marks to enclose the directory paths.The commands are defined as follows:
default_dir-
This parameter is the default directory where the backup files are normally stored on local server.
sid-
This parameter is the database instance ID.
source_dir-
This parameter is the directory containing the backup files to use as a source for the restore. These files can be backup files coming from another server, or you can use the same directory as
default_dirto restore from the local backup. When the two directories are different, the contents of thedefault_dirare erased and replaced by a copy of the files from thesource_dir, and then the restore will take place. -syspwd-
This parameter is the database system user password. When not specified, the
sidis used instead. Current RMAN releases seem to ignore this value. -nocomp-
This parameter tells the system to not recompress backup files after a restore.
Example:
To perform a local restore you would use the command
restore "H:\oraback\lib5" LIB5 "H:\oraback\lib5".To perform a failover restore from Manager1 to Manager2, you would execute the command
restore "H:\oraback\lib5" LIB5 "H:\oraback\mgr1\lib5"on Manager2. -
On the New Main Manager, adjust the Manager configuration file and Backup Service configuration file to point to the Oracle Database that has just been restored (see the previous step).
Update the
DB_BACKUP_REMOTE_DESTINATIONSandFBM_BACKUP_REMOTE_DESTINATIONSparameters in the Backup Service configuration file, adding the Backup System 2 as a Remote Backup system on the New Main Manager system. You use the following statements for each of your Backup System computers; do not include the system that is now offline:DB_BACKUP_REMOTE_DESTINATIONS=rsync://Backup_System_N_IP_Address/ModuleName/OracleBackupFolderName FBM_BACKUP_REMOTE_DESTINATIONS=rsync://Backup_System_N_IP_Address/ModuleName/MetaFolderName
-
Update the Metadata Database Location to the location where the Metadata Database files were backed up on New Main Manager system (the Original Backup System 1). You update the parameter under the Manager Setting panel in the Control GUI on the New Main Manager computer.
-
Run the Backup Service
dbbackup reconcilecommand on the New Main Manager system. This command lists all of the complex objects that are missing the Metadata file in the Metadata Database.If a complex object is missing the Metadata file, it must be restored from the Original Main Manager, or Backup System 2. Complex objects are unusable without the associated Metadata file.
-
Start the Manager and Backup Service on the New Main Manager.
After the Original Main Manager system is restored, recovered from its failure, and is operational, it is converted to the New Backup System N with no downtime.
-
Update the
DB_BACKUP_REMOTE_DESTINATIONSandFBM_BACKUP_REMOTE_DESTINATIONSparameters in the Backup Service configuration file on the New Main Manager system by adding the New Backup System N (the Original Main Manager) as the additional remote backup location. -
Restart the Backup Service on the New Main Manager for your configuration changes to take effect.
-
Copy the existing Oracle Database backups and Metadata files from the Backup System 2 (or New Main Manager) to the New Backup System N in the background.