2 Oracle DIVArchive Concepts
This chapter describes the different concepts used in the DIVArchive system and includes the following information:
Oracle DIVArchive Sources and Destinations
A source is defined as any connected system that has content intended to be transferred to DIVArchive. A destination is defined as any connected system that requires content to be transferred to it from DIVArchive. Examples of both are Broadcast Video servers, FTP servers, or Disk Storage.
Actors in the Linux operating system do not support UNC paths for CIFS sources and destinations. However, you can define a local path to a mounted SMB share.
UNC paths are supported for SMB Source/Destinations and managed disks if the UNC path is directly mounted on the Windows Actors.
The sources and destinations that are used in DIVArchive requests are pre-defined in the DIVArchive configuration and are accessible by the Sources Destinations button under the Home tab. In DIVArchive's Source/Destination configuration, each server type or disk file system is given a unique name and are configured as follows:
- Source Only
-
DIVArchive will only archive files from the server or disk file system.
- Destination Only
-
DIVArchive will only restore files to the server or disk file system.
- Source and Destination
-
DIVArchive will archive and restore files to and from the server or disk file system.
Although a detailed explanation of the configuration of a source or destination is beyond the scope of this guide, a brief overview of the configuration is included because they can influence how requests are issued to them, and influence how two or more simultaneous requests to them are managed in the Current Requests Queue.
Generally, each source and destination has the following parameters configured. These are common to all requests that involve that Source/Destination
-
The Source Type is the protocol or access method used when interacting with the target device.
-
The maximum number of read and write transfer sessions and the total maximum number of read/write sessions combined. This identifies the limits on the number of simultaneous requests that DIVArchive will execute concurrently on the target device, or prioritizing write (restore) operations over read (archive) operations.
-
Define the maximum bandwidth allowable to DIVArchive for transfers to or from the device. This may be used to throttle data transfers where the target device is shared with other production systems or third party applications.
-
The Default Quality of Service (QOS). This is the QOS used when Default is specified in a request's Quality of Service field.
-
Define Connect Options that must be provided (or that can also be optionally specified) for the specific protocol or access method of the target device. Examples of Connect Options are recursive subfolders, user names or passwords, or other options specific to the selected source type. DIVArchive ignores this parameter if no options are specified.
-
The Root Path to the files to be archived on the source, or restored to on a destination. This is always specified as an absolute directory path on the target device. For example
c:\Exported\MPEG2for Windows based file systems, or/Movies/MPEG2on Linux based file systems. The Root Path configuration also depends on the source type, and can be left blank in some cases (and will be ignored by DIVArchive).For Local or Disk source types, the Root Path specifies the mount point of the device in the local file system.
If the Connect Options and Root Path parameters have been defined for a Source/Destination configuration, they may not be appropriate for every request submitted. DIVArchive allows these parameters to be specified in a DIVArchive request to that source or destination (at the request level). Whether a request can override these Source/Destination attributes depends on the source type. See the DIVArchive Sources and Destinations Table in the Oracle DIVArchive Installation and Configuration Guide in the Oracle DIVArchive 7.5 Core documentation library for a comprehensive list of these options, paths, and how they interact with those specified at the request level.
The Files Path Root specified in a request can either be appended to the Root Path specified in the Source/Destination configuration, or override the Root Path entirely if it is specified as an absolute path.
Data Expedition Integration
DIVArchive can (optionally) interface with the Source/Destination named Data Expedition Expedat Source/Destination Server. The Expedat Server (also known as servedat) is very similar to the DIVArchive FTP_STANDARD server and CIFS, and offers AES encryption capabilities. The main difference among them is the protocol used for operations.
The Expedat Client API is integrated into the Actor computer and the Expedat server is integrated into DIVArchive (either on an Actor computer or other additional server within the system) just like the FTP_STANDARD server and CIFS, but is faster when used on high latency networks when using the Data Expedition Expedat MTP Protocol (a high performance file transfer protocol), which provides better bandwidth utilization.
One record is created for each Expedat Server that DIVArchive has to move data to or from. Although the initial solution for DIVAnet transfer and restore is still functional in DIVArchive 7.5, the functionality has been enhanced and now includes complex objects. With the new functionality, there are only 2 steps required for archiving objects through DIVAnet instead of 3 steps as previously required.
Note:
Actors in the Linux operating system do not support UNC paths for CIFS sources and destinations. However, you can define a local path to a mounted SMB share.Source and Destination Configuration
One record is created for each Expedat server DIVArchive must move data from or to. The following are the parameters and examples for Expedat sources and destinations:
- IP Address
-
This is the IP address of the Expedat server.
Example:
10.80.114.21
- Source Type
-
Set this to EXPEDAT.
- Connection Options
-
The following are connection options. Some are mandatory while others are optional.
-loginusername-
This is mandatory if the server is configured with authentication parameters. For example,
-login moon. -passpassword-
This is mandatory if the server is configured with authentication parameters. For example,
-pass ph4!hi4. -portportNumber-
This must be supplied because there is no default value. For example,
-port 8080. -licenselicenseCode-
This is mandatory and is the Expedat license number. For example,
-license 46FE464A98. -encryption-
This is optional and there are no additional parameters. For example,
-encryption. -seq_buffer_sizemegabytes-
Defines the size of the Data Expedition internal buffer for each transfer. The default value is 16 MB and will be sufficient for most transfers. A large buffer allows Data Expedition to continue moving data during times when the sender or receiver may not be able to process it. A small buffer will consume less memory. For example,
-seq_buffer_size 16. -exp_maxratekilobytes-
This option sets an approximate limit on the number of kilobytes per second, per transfer. The default is unlimited but can be used as an alternate method of controlling bandwidth. For example,
-exp_maxrate 1024. -exp_mindatagrambytes-
This transfer protocol is over UDP. This option can define a minimum size for each network datagram payload that Data Expedition will send. The purpose is to prevent Data Expedition from sending too small of a packet over the network. Set this value between 2848 and 8544 when using a very fast network path (gigabit or later) and every device along the path supports Jumbo Frames (MTU 9000). Using large datagrams can greatly reduce CPU overhead. However, using this setting without Jumbo Frames being fully supported can cause severe performance issues or loss of connectivity. For example,
-exp_mindatagram 2848.
Oracle DIVArchive Arrays, Disks, and Cache
DIVArchive uses Hard Disk Drive (HDD) technologies for both the storage of DIVArchive objects and for transient storage during data transfers (disk cache).
Any disk that DIVArchive uses is assigned to an array. An array is a logical association of one or more disks for the storage of DIVArchive objects. Disks that are configured as cache disks are also assigned to an array, typically named CACHE.
The storage of an object on a disk in DIVArchive is identified by the array's name rather than an individual disk itself. DIVArchive automatically allocates objects among two or more disks within any array.
Each disk in any array may be connected to a DIVArchive system either directly in an Actor host's hardware, as Network Attached Storage (NAS), or connected through a Storage Area Network (SAN) using Fibre Channel. In the case of SAN, it can also employ additional file system sharing software on the hosts if the disk is to be accessed simultaneously from multiple Actors.
Individual disks in an array may be configured as follows:
- Storage Only
-
The disk will only be used for storage of DIVArchive objects. These types of disks will employ some level of RAID technology to ensure data redundancy and protection against individual hard disk failure.
- Storage and Cache
-
The disk will be used for the storage of DIVArchive objects and also for caching operations. Both types will use separate subfolders on the disk. These types of disks will employ some level of RAID technology to ensure data redundancy and protection against individual hard disk failure.
- Cache Only
-
The disk will only be used for caching, tape to tape copying, tape spanning, or tape repacking operations. These types of disks may employ RAID technology to improve performance (for example, RAID 0).
- Storage and Nearline
-
The disk will be used for the storage of DIVArchive objects, and also for Nearline operations. Both types will use the same subfolder on the disk. These types of disks will employ some level of RAID technology to ensure data redundancy and protection against individual hard disk failure.
- Cache and Storage and Nearline
-
The disk will be used for the storage of DIVArchive objects, caching, and Nearline operations. Both storage and Nearline types will use the same subfolder on the disk. However, the cache type will use a separate subfolder. These types of disks will employ some level of RAID technology to ensure data redundancy and protection against individual hard disk failure.
DIVArchive also enables individual disks to be configured for Read-Write access, Read-Only access, or can be disabled temporarily.
The file system of any DIVArchive managed disk should never be manipulated directly by any file manager or utility (such as Windows Explorer) or equivalent. If the folder structures or files are moved, renamed or deleted, this may cause DIVArchive to mark that disk as Out of Order.
Caution:
Using such a utility in any fashion will completely destroy the file system on that disk.Disks that have file sharing software installed to provide shared host access (for example, SNFS or MetaSAN) can appear as an unknown file system or as not initialized to utilities such as Windows Disk Manager.
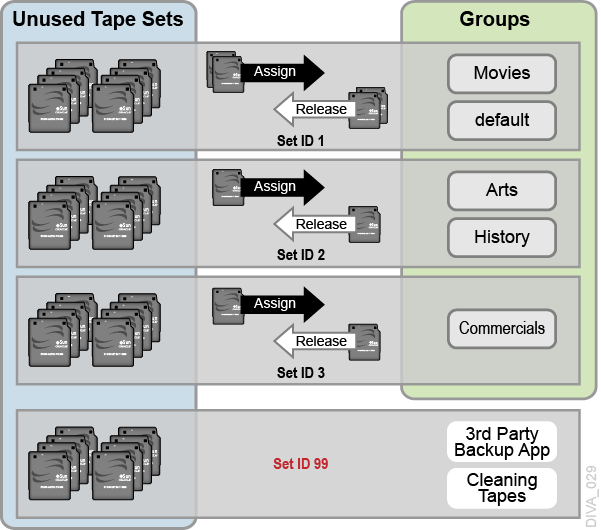
Oracle DIVArchive Tape Groups and Sets
Disks are logically assigned to arrays for the storage of objects, but tapes are logically associated together in Groups.
Tapes are initially divided into Sets, and assigned a number called a Set ID. A Set ID enables partitioning of pools of tapes in a library and assigning them for use with specific groups. A group draws upon the pools by associating the group with a Set ID.
More than one group may use the same Set ID. An unused tape will not actually belong to any of those groups until DIVArchive writes the first object to that tape. When all objects have been deleted from a group-assigned tape, it will be unassigned from that group, and may subsequently be assigned to another group using the same Set ID.
Since groups are a user-defined concept they can differ from one DIVArchive installation to another. The exception is the Default group, which exists in all installations and can neither be renamed nor removed. In a DIVArchive system, groups are created and managed in the Configuration Utility's Sets, Groups & Media Mapping tab.
When a tape is assigned a Set ID of 99 it indicates to DIVArchive that the tape is not to be used and is not related to the operation of DIVArchive. Examples are tapes that belong to a non-DIVArchive application in a shared library environment or the library's cleaning tapes.
The following figure shows how tape sets and groups are associated and used:
Sony ODA Drives
Sony ODA ODS-D55U and ODS-D77F drives are supported starting with DIVArchive 7.2. These are Blu-ray optical drives and the media is WORM media using a UDS format. Only AXF formatted objects may be written to Blu-ray discs. The drives are controlled by the Robot Manager and the media is viewed as a tape cartridge.
These drives will be shown as Unknown Medium Changer under the Medium Changer devices section in the Windows Device Manager because there are no device drivers for them. The drive itself will also appear as an Optical SCSI Device with the make and model number under the Disk Drives section.
There are six different types of disc media available for use with the Sony Optical Drives:
-
SONY-ODC300R
-
SONY-ODC300RE
-
SONY-ODC600R
-
SONY-ODC600RE
-
SONY-ODC1200RE
-
SONY-ODC1500R
Using Optical Drives and Discs
The following list is additional information related to the use of the optical drives and discs:
-
In the DIVArchive Control GUI the optical discs are displayed under the Drives tab.
-
Write-Once media must be finalized, and therefore zero remaining space will be reported to the Manager.
-
Objects are spanned when there is 100 MB remaining on the disc so that there is enough space left to finalize the disc. Once an object is spanned, the disc is considered full and is automatically finalized.
-
The Actor will auto-finalize the discs when there is 500 MB of space remaining (unless an object was spanned); however you can finalize a disc manually through the Optical Disc Archive Utility.
-
If a drive is manually mounted and viewed in Windows Explorer, the numeric value at the beginning of each object's file name identifies the object's location on the tape.
Tape Spanning
When the capacity of a tape group begins to reach full capacity (that is, the group's associated Set ID has no more blank tapes to draw upon), DIVArchive may attempt to maximize the storage utilization of the existing tapes in the group by filling the remaining free space of each tape by segmenting the object across two or more tapes (tape spanning).
By default, the tape spanning feature is configured in the DIVArchive Manager Configuration (file) to only span across two tapes. If an object cannot be spanned across the remaining free space of two tapes within that group the request will be terminated by DIVArchive. Tape spanning may be set to span across more than two tapes at your site, or disabled altogether in the manager.conf configuration file.
During the restore of a spanned object, DIVArchive will mount all associated spanned tapes and automatically join the spanned object back together. It cannot do this directly, and must copy all segments of the spanned file to a cache disk first. Therefore, restoring a spanned object must use a Cache Only or Cache and Direct QOS. A Direct QOS results in the request terminating.
For Write-Once media, objects are spanned when there is 100 MB remaining so that there is space left and the disc can be finalized. Once an object is spanned the disc is considered full and is automatically finalized.
Note:
Tape spanning is not compatible with the Associative Copy function.Protected Mode
When a tape is ejected from the library it is automatically set to Protected Mode. When this attribute is set it prevents further archive operations from being performed on the tape and prevents the tape from being repacked.
DIVArchive assumes that when a previously ejected tape is re-inserted into a library to perform a restore operation it will then subsequently be ejected and put back into offline storage. Without the Protected Mode feature new DIVArchive objects may get written to the tape while it is temporarily in the library and prevent it from being ejected without first moving these required objects to another tape.
No write operation on a protected tape is allowed unless the protected attribute is set back to false in the DIVArchive Configuration Utility after the tape is re-inserted to the library. This attribute does not prevent delete operations on instances located on these tapes (whether internalized or externalized).
You may also need to reset this attribute on a tape if the tape was mistakenly ejected from a library, or if the tape was stuck in a tape drive and removed by opening the library door and manually ejected from the library. When the library is then re-synchronized with the DIVArchive database the missing tape will be deemed externalized and Protected Mode set to true (the tape is protected).
Tape Label Management
When a tape is first mounted and objects written to it, DIVArchive writes a Label to the beginning of that tape. The label contains important information relating to the management of objects written to or deleted from the tape during archive operations. From an operational perspective the most important information in the tape label is that of the Barcode Number of that tape. The barcode is an alphanumeric number on the physical label adhered to the back of the cartridge, and is also written to the label on the magnetic media of the tape.
Whenever a tape is mounted DIVArchive automatically checks the label written on tape to verify that it matches the tape barcode label it instructed the tape library to mount.
This mechanism provides the following two safety features:
-
Confirmation that the mapping between the physical drives in the library matches that of the logical connections to each tape drive from the Actor. This prevents data being written to the wrong tape if there is a configuration mismatch between the physical drives in the library.
-
Prevents tapes with foreign labels (that is, tapes previously used by another archive system) from being overwritten in error. This behavior is for environments where DIVArchive shares a library with another archive application and the tapes used by that archive application have not been set to Set ID
99.
If DIVArchive identifies a mismatch between the expected label and that of the tape, it will generate an I/O Label Error, and the tape will be set to Not Writable and will not be selected for any further write operations.
Oracle DIVArchive Media Storage Formats
This section discusses the media formats available in DIVArchive.
AXF Disk and Tape Storage Formats
Archive Exchange Format (AXF) is an open format that supports interoperability among disparate content storage systems and ensures the content's long-term availability regardless of how storage or file system technology evolves.
An AXF object is an IT-centric file container that can encapsulate any number, and any type, of files in a fully self-contained and self-describing package. The encapsulated package contains its own internal file system, which shields your valuable data from the underlying operating system and storage technology. It's like a file system within a file that can store any type of data on any type of storage media.
AXF Release Identification
DIVArchive Actor can read instances with a format of AXF 0.9 and AXF 1.0, but can only write to the AXF 1.0 format. DIVArchive displays the release level of AXF in use by an instance. In the Control GUI, the media format for an instance will be Legacy, AXF 0.9, or AXF 1.0. Tapes, groups, and arrays configured as AXF will remain AXF as these media can hold AXF instances of version 0.9 or 1.0.
Storage Media Format
In DIVArchive, a tape group or disk array has a Media Format parameter that indicates which storage media format to use when creating new archived objects. The Media Format can be set to either DIVArchive Legacy format or AXF format. You can change this setting at any time and it does not influence content already stored. Therefore, it is possible to have more than one storage media format within tape groups and disk arrays.
A DIVArchive writes an object instance in one and only one media format. Therefore, if an object spans tapes, each tape used as part of an object instance will be written in the same media format. In DIVArchive 7.5, an object can contain multiple instances, each of which can be stored in either Legacy or AXF format.
Complex objects introduced in DIVArchive 7.0 must be stored in AXF format. Because all complex objects are written in the AXF format, every instance of a complex object will be in the AXF format.
Tape Storage Media Format
Although a tape group can contain more than one storage format, an individual tape has (at most) one storage media format. DIVArchive assigns the tape media format to an empty tape when it writes the first object to that tape. The tape is assigned the format of the tape group that appears in the request. After the media format for a tape is assigned, it cannot be changed unless all objects on the tape are deleted. After deletion of all objects from a tape, the tape's format becomes unassigned until DIVArchive writes content to the tape again. If the tape was in use, the tape format cannot change unless it is empty and cleared.
Both Legacy and AXF formatted tapes can exist in the same group. Objects in AXF format will only be written to AXF formatted tapes, and objects in Legacy format will only be written to Legacy formatted tapes even though they are in the same tape group.
In the current release of DIVArchive, a Repack request will always write the destination tape in the same media format as the source tape. Similarly, tape spanning operations will always use the same format across all tapes storing spanned objects.
Disk Storage Media Format
Unlike tapes, disks do not have a format. DIVArchive allows storing objects in different media formats on the same disk. If a disk contains objects in Legacy format and that disk is then assigned to an AXF formatted array, it will still contain objects in Legacy format. However, new objects written to the disk will be in AXF format.
Object Instances Media Format
Every tape and disk object instance is assigned a format of Legacy or AXF. The format of a tape or disk instance is assigned when the instance is created and is the format of the tape on which the instance resides. All instances on a tape must have the same format.
If a disk instance is non-complex and permanent (not a cache instance) it is stored in the format of the destination array. If a cache instance is non-complex it is stored in the format of the group specified in the request.
Groups or arrays used by complex object requests must be in an AXF format because complex objects cannot be stored in Legacy format and therefore any instance of a complex object will be in the AXF format.
You must use a migration job to change a tape format from Legacy to AXF: repacking a tape will not change the tape format. Repacking of existing Legacy format objects retains the format of the tape even if the tape group format was updated in the configuration from Legacy to AXF.
Oracle DIVArchive Objects
Each asset that is archived to DIVArchive is called an object.
An object is a DIVArchive logical container for all files consisting of an asset from the original source. Assets from some sources may have separate video, audio and metadata files. When archived in DIVArchive all of these files are referenced as a single object. When the object is restored to a destination, all files that were originally associated with that asset are automatically restored by DIVArchive.
An object is uniquely identified in DIVArchive by its name and category. The object name does not necessarily need to match that of the source file being archived. DIVArchive will always restore the archived files as they were archived, regardless of the DIVArchive object name. The same source file can therefore be archived more than once in the same category, if each instance has a unique object name.
After an object exists within DIVArchive, it cannot be replaced unless it is first deleted. If an Archive request uses the same name and category of an existing object, DIVArchive will automatically stop the request. However, multiple copies (or instances) of an object can be created once the asset is archived.
If a source asset is to be stored in a variety of encoding formats (for example, MPEG2 Long GOP, DV50, or low resolution proxies), you can use specific categories to archive the same object based on its encoding format.
Oracle DIVArchive Complex Objects
When the Metadata Database feature is enabled, the complex object feature is available. DIVArchive can track significantly more than the 10,000 file per object limit set for non-complex objects using complex objects. The actual amount scales with system processing power and storage capacity. A complex object stores more information about the files and folders in an archive, such as subtotals for each directory.
When an object is archived, DIVArchive determines whether the new object should be complex or non-complex based on its number of components (files). If the number of components is greater than 1,000 (the default complex object threshold - configurable), the object becomes a complex object: otherwise, the object is non-complex. Once an object is deemed a complex object, it will always be complex - even if it is copied using the Copy As command, or imported using the Oracle DIVArchive Export/Import Utility.
Complex versus Non-Complex Objects
A complex object differs from a non-complex object in some key ways. For example, the file and folder metadata information of a complex object is stored in a file not in the Oracle database. The file contains the file names, folder names, checksums, and files sizes. The directory that contains these files is the Metadata Database Root Directory (the following section describes how to configure this parameter). A complex object must be stored in AXF format either on tape or on disk.
A complex object can contain hundreds of thousands of files. In the DIVArchive Control GUI the entire set of files on a tape are not displayed in the Object Properties and Tapes dialog boxes - only a single placeholder file is shown to represent the complex object.
Not all DIVArchive operations are supported for complex objects. For example, the Delete on Source feature is disabled for complex objects. The checksum features Verify on Archive and Verify on Restore are also disabled for complex objects. Oracle DIVAnet does not currently support replication of complex objects.
Certain DIVArchive API operations used in Oracle DIVArchive Avid Connectivity (such as GetByFilename and DeleteByFilename) are not currently supported for complex objects.
A complex object maintains information about the folders and files in the archive. Complex objects store subtotals for each folder, including the total number of files and subdirectories within the folder, and the total size of all files within the folder and any subfolders.
The Complex Object Threshold is a configurable parameter used by DIVArchive to determine whether a new object should be complex. If a new object has many components (files) that exceeds the threshold, the object automatically becomes a complex object. This value is set in the manager.conf configuration file. Oracle recommends leaving the threshold at the default value (1000 components) unless there is a specific reason to adjust the value.
Metadata Database
To effectively operate with large volumes of files and folders and other metadata, DIVArchive stores the metadata separately from the Oracle database in the DIVArchive Metadata Database. The DIVArchive metadata database contains files stored in a file system local to the DIVArchive Manager. The directory that contains these files is the Metadata Database Root Folder.
The metadata database has very high performance and almost unlimited scalability. The Metadata Database should be treated with the same caution as the Oracle database: it should be backed up at regular intervals using the DIVArchive Backup Service.
Complex Objects and FTP
When archiving Complex Objects with the FTP protocol and using FileZilla with default settings, the transfer will typically fail when archiving any object with more than approximately 3900 files. There are two reasons for this possible failure:
-
The Actor connection times out before the size of the object can be computed.
-
A request stops in the middle of the transfer because the FTP server (for example a FileZilla server) is consuming all of the available sockets.
Note:
Oracle only supports Linux-based FTP servers on DIVArchive systems running in the Linux environment, not FileZilla and IIS FTP servers.
Actor connection timeouts can be resolved by setting the following two parameters either in the Source/Destination Command Options, or in the options of the command itself as follows:
-transfer_timeout 1200
-list_timeout 600
Oracle also recommends setting the corresponding parameters in the FileZilla server under the General Settings:
Connections Timeout = 600
No Transfer Timeout = 1200 (this is the default)
If a termination occurs, which may happen during transfer, there are two registry parameters that must be created or modified (typically created):
TcpTimedWaitDelay = 10
MaxUserPort = 90000
Oracle recommends contacting Oracle Support for more information on these parameters and to make FTP server and computer registry changes if no qualified personnel are on site.
Oracle DIVAnet Complex Object WAN Transfers
DIVArchive 7.5 has (optional) WAN acceleration functionality built in that allows it to take full advantage of long distance, high latency, network paths (such as private site to site links or the public Internet), and can perform transfers of complex objects efficiently using the Data Expedition MTP/IP protocol.
Example:
The procedure is as follows:
-
DIVA1restores the complex object to theDIVA2system by first creating a new AXF file on theDIVA2system's Data Expedition server. -
DIVA1restores all of the files from the local storage to the new AXF file created on theDIVA2Data Expedition server. -
The
DIVA2system creates a new AXF file on the destination (tape, disk, and so on). -
The
DIVA2system archives all of the files from the Data Expedition AXF file (created byDIVA1on the Data Expedition server) to the newly created AXF file on the destination.
See the Oracle DIVAnet Installation, Configuration, and Operations Guide in the DIVAnet documentation library, or contact Oracle Support for more information and assistance (if necessary).
Oracle DIVArchive Object Instances
The storage managed by DIVArchive falls into three distinct categories:
-
Online Storage (tapes within a library)
-
Nearline Storage (disks)
-
See Appendix A for Oracle DIVArchive options and licensing information.
-
-
Offline Storage (externalized tapes)
The name and category of an object in DIVArchive must be unique. However, multiple copies of that object can be created in one or all three of the above classes. Each copy of an object (including the original archived object itself) is known as an instance.
Apart from creating backup copies, the object instances concept also allows life-cycling of material within DIVArchive. An object may initially be created in online storage for rapid access and also backup instances created on one or more tapes. When the object is no longer required for online or Nearline access the disk instance can be deleted and the tape externalized. Automatic life-cycling of objects, based on their age and location within the archive can be provided by the DIVArchive Storage Plan Manager (SPM) option.
The first instance of an object is created when it is first archived to DIVArchive. Additional instances of the archived object can then be created with the Copy and Associative Copy commands.
An additional instance of an object cannot be created by re-archiving the original object with the same name and category. This request will be automatically stopped by DIVArchive with the Object already exists within DIVArchive error.
Instances are initially numbered sequentially with the original object that is archived to DIVArchive being Instance 0. As new instances are created and older instances deleted, the instance numbering may no longer be sequential when an object's properties are viewed in the Control GUI's Objects View (under the Manage tab). However, an instance number from a previously deleted instance may be subsequently reused by DIVArchive in additional copy requests.
The following restrictions apply to creating new instances of an object within DIVArchive:
-
A tape group can contain two instances of the same object if both can be located on separate tapes. If no additional tapes for that group are available to store the second instance the copy request is terminated.
-
A disk array can contain two instances of the same object if both can be located on separate disks within the array. If no additional disk is available, the copy request is terminated.
When an object has multiple instances within the archive and a Restore request is issued, DIVArchive will perform as follows:
-
If no instance number is specified in the request, DIVArchive will choose the instance that will allow the request to complete in the shortest possible time. A disk instance is preferred over a tape instance. However, a tape instance may be selected in some configurations if the QOS specified in the request is Cache Only or Cache and Direct.
-
If no instance number is specified in the restore request and a disk instance exists, but the disk is offline, the tape instance will automatically be selected.
-
If two or more instances are present on tape and no disk instances exist, and one tape is currently in use by another request (or is externalized), the tape containing the other instance will automatically be selected.
-
If two or more instances exist on tape, and a read error occurs on the first instance selected, the request will automatically be attempted on the other instances until the request can be completed successfully. If no instances can be read, the request will be terminated.
-
If a specific Instance Number is specified in the restore request, DIVArchive will only use that instance. If the media containing the instance is offline (for disks), externalized (for tapes), or an I/O or read error occurs, the request will be aborted.
Requiring and Releasing Instances
Requiring and releasing instances enables an application, such as a third party Media Asset Management (MAM) system, or a DIVArchive user, to flag the DIVArchive objects (or instances) that are externalized but need to be restored (Required), and which instances are no longer needed and can be externalized (Released). The release mechanism is a more precise alternative to a group externalization approach for externalizing instances.
The Required Release view in the Control GUI's Manage tab is provided to check instances whose internalized/externalized status is in discrepancy with their Released/Required status. This view also provides a fast easy method for identifying which tapes are to be entered in the library or can be externalized.
By default, object instances are assumed to be available in DIVArchive. The Release command must be invoked on instances before ejecting their corresponding tapes. However, the Eject command provides an option that automatically performs the release on every instance entirely located on the tapes to be ejected.
After being created by a copy or an archive request, an instance is assumed to be required to be available, so its status is INSERTED and REQUIRED. Executing a Require command on a released instance results in a Required Instance. Correspondingly, releasing a required instance results in a Released Instance.
Oracle DIVArchive Requests
A request is a command that is issued to DIVArchive to perform an operation. Requests can be issued through the Control GUI or an Archive Initiator.
The most common request types are for transferring content to the archive (referred to as an Archive request), or transferring content out of the archive (referred to as a Restore or Oracle DIVArchive Partial File Restore request).
You use other request types for managing the objects within the archive once they have been created. Examples of other request types are Copy, Delete, and Repack Tape requests.
Each request is automatically given a unique identifier by DIVArchive (called the Request ID), which can be later used to retrieve event logs or other properties of each request. DIVArchive stores the records of up to fifty thousand requests in its database.
Because multiple requests may be received simultaneously by DIVArchive, they are all placed into a queue and are executed on a first come, first served basis. The execution order of requests can be prioritized using the Request Priority parameter. The Current Requests frame of the Manager View in the Control GUI displays the queue of requests that are currently being processed by DIVArchive.
When restoring the same file to the same destination twice in parallel, the behavior on Windows and Linux is different. On Windows, the first restore (they cannot arrive exactly at the same time) will lock the file so that the second one will terminate. On Linux, there is no such lock at the file system level. Both restores are executed at the same time, and both will write to the same file. The content of the resultant file is not predictable.
DIVArchive 7.5 enables the following Request Options:
- Archive Requests
-
-delete_on_source - Restore Requests
-
-do_not_overwrite-do_not_check_existence-delete_and_write
Request Options take precedence over the normal Additional Service specification. Also, the normal Additional Service specification takes precedence over the Source/Destination Connect Options.
You can also specify the Additional Services available for a Restore request in the Source/Destination Connect Options. If specified, the Source/Destination will use the Additional Service setting as a default. This can be overridden by specifying the Additional Service at a request level in the normal way, or as a new Request Option. Because these connect options are specific to a Restore request, the options are ignored for any other type of requests using the Source/Destination.
Oracle DIVArchive Request Types
This section describes the various DIVArchive request types available.
When connected to the DIVArchive Manager, you access the Action tab from any view in the Control GUI. This tab enables you to execute requests to be issued to DIVArchive. You can use a third party initiator application (for example, an Automation System) instead of, or in addition to the Control GUI interface. The options in this area are only accessible when you are logged in with the Administrator profile.
The different requests available under the Control GUI's Action tab are as follows:
- Archive
-
Copies a file from a source to DIVArchive.
- Delete
-
Deletes all instances, or a selected instance, of a DIVArchive object.
- Require
-
Sets an object's status to Required. The associated tape must be inserted into a DIVArchive managed library.
- Release
-
Sets an object's status to Released. After an object is released, it can be externalized.
- Cancel
-
Cancels a previously submitted request by either specifying the Request ID or selecting a request beforehand in the Current Requests view.
- Change Priority
-
Increases or decreases the pending requests scheduler priority.
- Assign Storage Plan
-
Assigns a Storage Plan to the selected object.
- Restore
-
Copies a file from DIVArchive to a single destination.
- Partial Restore
-
Copies only part of a file (based on timecode, byte offsets, folders, or DPX frames) from DIVArchive to a destination.
- Multiple Restore (or N-Restore)
-
Restores an object from DIVArchive to more than one destination simultaneously.
- Copy
-
Enables an existing object to be copied to another group.
- Copy As
-
Enables an existing object to be copied to another name, group, or category.
- Associative Copy
-
Enables multiple objects from various locations in the archive to all be copied to a single tape with a single command.
- Repack Tape
-
Issues a manual Repack request for the selected tape.
- Verify Tape
-
Issues a Verify Tape request for the selected tape.
- Insert Tape
-
Used to insert tapes into a DIVArchive library through its CAP (Cartridge Access Port).
- Eject Tape
-
Ejects the selected tape(s) from the library to the CAP.
- Export Tape
-
Enable exporting a tape (and its objects) from one DIVArchive system to another.
- Migrate Content
-
Transfers the existing content of a tape group to another group or array.
- Automatic Repack
-
Issues an Automatic Repack request for the selected tape.
Oracle Storage Cloud Transfers
The Oracle Storage Cloud is an object storage solution that offers two types of accounts usable with DIVArchive: metered and non-metered accounts. Visit http://docs.oracle.com/cd/E60880_01/VLPFN/whatis.htm#BABDADAE for information on Oracle Storage Cloud storage accounts.
The non-metered account enables the creation of standard class containers. Objects written inside standard containers are accessible immediately at any time.
With a metered account, DIVArchive can archive to standard and also to archive class containers. With archive containers, objects written to a deep archive storage device require a restoration process before they can be downloaded.
An object located in deep archive requires a maximum of 4 hours to restore to a configured DIVArchive destination because the content will first be transferred from tape to Cloud cache, and then transferred from cache to the final destination.
When a Restore request is made for an object with a cloud instance, DIVArchive will always attempt to restore a local (non-cloud) instance of an object. If all local instances are offline, no local instances exist, or when a cloud instance is explicitly requested (a Restore Instance request), then DIVArchive will restore from a cloud instance.
Only Actors configured for CLOUD ARCHIVE can transfer content to the cloud. Only Actors configured for CLOUD RESTORE can transfer content from the cloud. See Appendix A for Oracle DIVArchive options and licensing information.
True Remaining Tape Size and Last Written Position
For some specific tape drives (Oracle T10K and IBM LTO) the Actor now returns the True Remaining Size on the tape and the Last Written Position on tape to the Manager during a transfer of content to tape. The remaining size is given in number of bytes of uncompressed data.
The Manager uses the remaining size and last written position (instead of relying on the size of the tape type) to obtain the true total and remaining size on the tape in all tape based operations.
Export and import operations also now include the total tape size.
Archive Requests
An Archive operation is defined as the transfer of files to DIVArchive. The files are then stored as a DIVArchive object. You issue an Archive request by selecting the Archive option from the Control GUI Action tab. The request submits an object Archive request to the DIVArchive Manager for processing.
The following fields are included in the Send Archive Request screen:
- Object Name
-
The name of the object to be archived.
- Category
-
The category of the object to be archived.
- Source
-
The name of the source (for example, a video server, browsing server, and so on). This name must be known to the DIVArchive configuration.
- Media
-
This field designates either a group of tapes or an array of disks declared in the configuration where the instance must be created. When this parameter is a null string, the default group of tapes named DEFAULT is used.
- Files Path Root
-
The root folder for the files (see the examples in the following section).
- Storage Plan
-
This field defines the Storage Plan to use for this object. If no Storage Plan is assigned the default Storage Plan will be used.
- Add. Service
-
Select this check box to delete the original file after it has been archived.
Note:
Delete on Source is not supported for Broadcast Servers. - Quality of Service
-
One of the following codes:
- DIVA_QOS_DEFAULT
-
Archiving is performed according to the default Quality of Service (currently direct and cache for archive operations).
- DIVA_QOS_CACHE_ONLY
-
Use cache archive only.
- DIVA_QOS_DIRECT_ONLY
-
Use direct archive only - no disk instance is created.
- DIVA_QOS_CACHE_AND_DIRECT
-
Use cache archive if available, or direct archive if cache archive is not available.
- DIVA_QOS_DIRECT_AND_CACHE
-
Use direct archive if available, or cache archive if direct archive is not available.
Additional and optional services are available. To request those services, use a logical
ORbetween the previously documented Quality of Service parameter and the following constant: - DIVA_ARCHIVE_SERVICE_DELETE_ON_SOURCE
-
Delete source files when the tape migration is done. Available for local sources, disk sources, and standard ftp sources. This feature is not available for complex objects.
- Priority
-
The priority level for this request. The level can be in the range zero to one hundred, or the value DEFAULT. The value zero is the lowest priority and one hundred the highest priority. Move the slide control to increase or decrease the request priority.
There are six predefined values as follows:
-
MIN
-
LOW
-
NORMAL
-
HIGH
-
MAX
-
DEFAULT
If the DEFAULT check box is selected, the slide control becomes inactive and the priority defined in the Manager configuration is used.
-
- Files
-
The file names to be archived from the source. If multiple file names are specified, all are referenced by the DIVArchive object name.
- Comments
-
Optional information describing the object. This field is optional and can be left empty.
- Options
-
Additional options for performing the transfer of data from the source to DIVArchive. These options supersede any options specified in the DIVArchive configuration database. Currently the possible values for Options are as follows:
- No Entry
-
No entry in this field specifies no options.
- -r
-
Using -r specifies that every name in filenamesList that refers to a folder must be scanned recursively. This also applies when FilesPathRoot is specified and an asterisk designates the files to be archived. This option can be used when archiving from a local source or from a standard FTP Server.
- -login
-
A user name and password is required to log in to some sources. This option obsoletes the -gateway option from earlier releases.
- -pass
-
The password used with -login.
Archive Request Files Path Root and Files Parameters
The Files Path Root and Files parameters in the Archive Request window determines the main folder location, and the subfolders and files to be archived. Each serves a different purpose, yet both parameters work with each other. Identify a logical business object before filling in these parameters and executing the request.
The Files Path Root field identifies the path to the main file folder (the top folder). For example, c:\DROPFOLDER\Media\Object1\.
What you enter in the Files field text box identifies the individual files under the main folder (the identified Files Path Root) and any additional subfolders and files. For example, subfolder1\file3.
The Files field may contain an absolute path. However, this is not recommended because it prevents the object from being restored to a different root folder.
Assuming a Files Path Root is identified, do not use the full file path in the Files field. You must only use the folder names and file names that are located under the identified Files Path Root folder. Alternatively, the Files Path Root field can be left blank and the full file path and name may be entered into the Files field.
The following are examples of how these parameters can be utilized:
Correct Examples
The following entries will archive only the specified files located in C:\DROPFOLDER\Media\Object1\ and the subfolder1\file3.
- Files Path Root
-
C:\DROPFOLDER\Media\Object1\ - Files
-
file1
file2
subfolder1\file3
The following entries will archive all folders and files located in C:\DROPFOLDER\Media\Object1\.
- Files Path Root
-
C:\DROPFOLDER\Media\Object1\ - Files
-
*
The following entries are correct but not recommended, because in the future the object cannot be restored to a different location. The system will lose flexibility and compatibility with other storage devices and in some scenarios, transcoding and Partial File Restore capabilities will also be limited. In this example, the Files Path Root was left blank and the absolute paths are entered in the Files field.
- Files Path Root
- Files
-
C:\DROPFOLDER\Media\Object1\file1
C:\DROPFOLDER\Media\Object1\file2
C:\DROPFOLDER\Media\Object1\subfolder1\file3
Archive Request with Delete on Source
There are instances where you must delete content, and possibly the parent folder, on a server. There are two options available to satisfy all possible scenarios:
- -r
-
Recursive delete
- -delete_fpr
-
Recursive deletion including the parent folder
The two options work either separately or together as indicated in the following workflow examples:
Example 1
- Files Path Root
-
C:\source\root - Files
-
* - Options
-
-r
DIVArchive will delete the content of C:\source\root recursively because of these settings.
Example 2
- Files Path Root
-
C:\source\root - Files
-
* - Options
-
-r-delete_fpr
DIVArchive will delete the content of C:\source\root recursively and the parent folder (root) because of these settings.
Example 3
- Files Path Root
-
C:\source\root - Files
-
* - Options
DIVArchive will delete only the content of C:\source\root because of these settings.
Example 4
- Files Path Root
-
C:\source\root - Files
-
* - Options
-
-delete_fpr
DIVArchive will delete only the content of C:\source\root, and eventually the parent folder (root) if it is empty, because of these settings.
Example 5
- Files Path Root
-
C:\source\root - Files
-
object\* - Options
-
-r
DIVArchive will delete the content of C:\source\root\object recursively and the parent folder (object) because of these settings.
Example 6
- Files Path Root
-
C:\source\root - Files
-
object\
* - Options
-
-r-delete_fpr
DIVArchive will delete the content of C:\source\root\object recursively, then delete C:\source\root\object, and finally delete C:\source\root if it is empty because of these settings.
Example 7
- Files Path Root
-
C:\source\root - Files
-
object1\*
object2\* - Options
-
-r
DIVArchive will delete the content of C:\source\root\object1 recursively, delete C:\source\root\object1, delete the content of C:\source\root\object2 recursively, and delete C:\source\root\object2 because of these settings.
Example 8
- Files Path Root
-
C:\source\root - Files
-
object1\*
object2\* - Options
-
-r-delete_fpr
DIVArchive will delete the content of C:\source\root\object1 recursively, delete C:\source\root\object1, delete the content of C:\source\root\object2 recursively, delete C:\source\root\object2, and delete C:\source\root if it is empty because of these settings.
Example 9
- Files Path Root
-
C:\source\root - Files
-
object1\*
object2\* - Options
-
-r -delete_fpr
DIVArchive will delete the content of C:\source\root\object1 recursively, delete C:\source\root\object1, delete C:\source\root\object2\subfolder\clip.mov, delete C:\source\root\object2\subfolder if it is empty, delete C:\source\root\object2 if it is empty, and delete C:\source\root if it is empty because of these settings.
Restore Requests
A Restore is defined as the transfer of a DIVArchive object to a destination. You can initiate a Restore request from the Control GUI Action tab. Alternatively you can use the Objects view under the Manage tab by right-clicking the object to restore and selecting Restore from the resulting menu.
This request submits an Object Restore request to the DIVArchive Manager and the Manager chooses the appropriate instance to be restored. The request will fail if the requested object is on media that is not available.
The following fields are included in the Restore Request screen:
- Object Name
-
The name of the object to be restored.
- Category
-
The category assigned to the object when it was archived. This parameter can be left empty but this may result in an error if several objects have the same name.
- Instance
-
If multiple instances of an object reside in DIVArchive, you can specify which particular instance to restore. If left blank, DIVArchive will select the instance that provides the most optimum transfer.
- Destination
-
Destination (for example, a video server or browsing server) for the object files. This name must be known by the DIVArchive configuration. Use the drop-down list to select the desired Destination.
- Files Path Root
-
The root folder on the destination where the object files will be placed. This option appends or overrides the FPR used in the original archive request. If left empty, the files will be placed in the Files Path Root folder specified when archiving the object.
- Options
-
Additional options for performing the transfer of data from DIVArchive to the destination. These options supersede any options specified in the DIVArchive configuration database. Currently the possible values for Options are as follows:
- No Entry
-
No entry in this field specifies no options.
- -login
-
A user name and password is required to log in to some sources. This option obsoletes the -gateway option from earlier releases.
- -pass
-
The password used with -login.
- Quality of Service
-
One of the following codes:
- DIVA_QOS_DEFAULT
-
Restoring is performed according to the default Quality of Service (currently direct and cache for restore operations).
- DIVA_QOS_CACHE_ONLY
-
Use cache restore only.
- DIVA_QOS_DIRECT_ONLY
-
Use direct restore only - no disk instance is created.
- DIVA_QOS_CACHE_AND_DIRECT
-
Use cache restore if available, or direct restore if cache restore is not available.
- DIVA_QOS_DIRECT_AND_CACHE
-
Use direct restore if available, or cache restore if direct restore is not available.
- DIVA_QOS_NEARLINE_ONLY
-
Use Nearline restore only. Nearline restore will restore from a disk instance if one exists. Otherwise it will create a disk instance and restore from the newly created disk instance.
- DIVA_QOS_NEARLINE_AND_DIRECT
-
Use Nearline restore if available, or direct restore if Nearline restore is not available.
Additional and optional services are available. To request those services use a logical
ORbetween the previously documented Quality of Service parameter and the following constants: - DIVA_RESTORE_SERVICE_DO_NOT_OVERWRITE
-
Do not overwrite existing files on the destination server.
- DIVA_RESTORE_SERVICE_DO_NOT_CHECK_EXISTENCE
-
Do not check for the existence of the clip on the server.
- DIVA_RESTORE_SERVICE_DELETE_AND_WRITE
-
Force delete and rewrite if object exists on the server.
- DIVA_RESTORE_SERVICE_DEFAULT
-
Operate using the default setting in the Manager configuration.
- Priority
-
The priority level for this request. The level can be in the range zero to one hundred, or the value DEFAULT. The value zero is the lowest priority and one hundred the highest priority. Move the slide control to increase or decrease the request priority.
There are six predefined values as follows:
-
MIN
-
LOW
-
NORMAL
-
HIGH
-
MAX
-
DEFAULT
If the DEFAULT check box is selected, the slide control becomes inactive and the priority defined in the Manager configuration is used.
-
- Additional Services
-
Use the menu list to select whether DIVArchive will terminate the request if the file name on the destination already exists.
Archiving and Restoring in AXF Mode
In DIVArchive 7.5, an archive request for an AXF file results in DIVArchive automatically detecting that the file is an AXF file. Instead of archiving the AXF file itself, DIVArchive will archive the contents of the AXF file, retrieving the Checksums and Provenance of the object.
The restore request optional parameter -axf instructs DIVArchive to restore the original asset into an AXF file. Instead of purely restoring the content of an object to the destination, DIVArchive will restore the content into a new AXF Wrapper. When combined with -rm or -rxml, you can use this option to export an object with metadata information and then drop it into a DFM Watch Folder.
The AXF archive and restore functionality includes the following:
-
Archive the content of an AXF file using auto-detection.
-
Identifies the
.axffile name extension -
Confirms it is a single file
-
Checks the beginning of the file for specific AXF properties
-
Checks for metadata information
-
-
Restores an object into a new single AXF file. Previously this operation would have resulted in multiple files.
-
Preservation of checksums
-
Preservation of metadata
-
Preservation of provenances
-
Complex object support
This options works with FTP_STANDARD, LOCAL, DISK, CIFS, and EXPEDAT Source/Destinations.
Oracle DIVArchive Partial File Restore Requests
DIVArchive supports four types of Partial File Restore. The type of Partial File Restore implemented is determined by the format parameter in the request. This request submits a Partial Object Restore request to the DIVArchive Manager and the Manager chooses the appropriate instance to be restored. If the requested object is on media that is not available the request will fail.
The following list describes each type of Partial File Restore:
- Files and Folders
-
This type of Partial File Restore enables extracting entire files from the archive or extracting entire directories and their contents. You can extract multiple files and directories in the same request. The files are restored with the file names and path names that were specified in the archive. There is no valid renaming option in File and Folder Partial File Restore. For example, a file archived as
misc/12-2012/movie.aviwill be partially restored to amisc/12-2012subdirectory with the namemovie.avi.When a folder is specified in a File and Folder Partial File Restore, all files within that folder (and the folder itself) are restored. Additionally, each directory to be restored can include the -r option to recursively restore all folders nested within the target folder.
- Byte Offset
-
This type enables extraction of a range of bytes from a particular file in the archive. For example, you can extract bytes 1 to 2000 (the first 2000 bytes of the file), or byte 5000 to the end of the file (or both) and store them to an output file such as
movie.avi.Note:
The result of the Byte Offset Partial File Restore is usually not playable when applied to video files. The Actor will not apply the header, footer, and so on, according to the video format. - Timecode
-
This type of Partial File Restore enables you to select a portion of a particular media file based on a timecode. For example, you could extract from 00:00:04:00 to 00:10:04:00 (a 10 minute segment starting 4 seconds in and ending at 10 minutes and 4 seconds), and place that segment into an output file such as
movie.avi. The resulting file is a smaller version of the original movie file.Note:
The result of the Timecode Partial File Restore is a valid clip when applied to video files. The Actor will apply the header, footer, and so on, according to the video format. If the Actor cannot parse the format, the request will be terminated. This type of Partial File Restore can only be applied to a valid video clip. - DPX
-
This type of Partial File Restore enables extracting a range of DPX files from the archive. The entire object is viewed as a single media item, with one DPX file representing one frame of media. Only files with a
.dpx,.tif, and.tiffextension in the archive are considered frames for the purposes of this command.The first
.dpxfile (or.tif, or.tifffile) in the archived object is considered frame 1, the second.dpxin the archive is frame 2, and so on.In the unlikely event that the
.dpx,.tif, and (or).tifffiles are mixed, the first sequential file of any of the three extensions will determine which files are considered to be part of the sequence. For example, if a stray.tiffile is mixed with a collection of.dpxfiles and it came first in the sequence, the sequence is interpreted as a.tifsequence and.dpxfiles are ignored, even if this was not your intention.For example, to extract frames 10 through 15 using DPX Partial File Restore, it restores the tenth
.dpxfile that appears in the archive, the eleventh.dpxfile, and so on, ending with the fifteenth.dpxfile, for a total of six files. Any other files (such as.wavfiles) are skipped by DPX Partial File Restore.Special frame numbers 0 and -1 may be used to refer to the first and last frame respectively. Frame 0 is valid as the start of a frame range and Frame -1 is valid as the end of a range.
Valid frames and ranges are as follows:
-
Frame 0 = first frame (select the Start of File check box)
-
Frame 1 = the first frame in the sequence
-
Frame n = the nth frame in the sequence
-
Frame -1 = last frame (select the End of File check box)
-
Specifying
Frame 0as the last frame is considered invalid. -
Specifying
Frame 0 to 0is currently invalid and will not return the first frame as might be intended. -
Specifying
Frame 0 to 1orFrame 1 to 1will return the first frame. -
Specifying the
Frame -1in the first frame currently produces an error. You also cannot specifyFrame -1 to -1to return the exact last frame if the exact number of the last frame is unknown.
Examples:
startRange=0 - endRange=1-
Restores only the first frame.
startRange=600 - endRange=635, startRange=679 - endRange=779-
Restores frames 600 through 635, and frames 679 through 779.
startRange=810 - endRange=-1-
Restores all frames from frame 810 to the end of the archive.
The actual file name may (or may not) match the frame number in DIVArchive. After restore DIVArchive interrogates the archive, finds the file order, and determines the Frame Number from the resulting file order found, it does not consider the file name. The first
.dpx,.tif, or.tifffile found is considered Frame 1.You must be careful when archiving DPX files to ensure they can be partially restored properly because DPX Partial File Restore does not examine the file name or the DPX header information to determine which file is assigned to which frame. The assignment is based purely on the order in which the
.dpxfiles appear in the archive. By default this order is based on ordering established by the source and is typically alphanumeric. For example, NTFS DISK Source/Destinations order files and folders case insensitively as a general rule, except where diacritical marks, such as',`,^, and so on are applied.By default, when DIVArchive encounters a subfolder it recursively processes all of the children of that folder (including subfolders) before continuing with other files. If a folder appears in the alphanumeric folder listing it is archived recursively in the order it appears, but this can potentially create some issues. For example, if you want all of the subdirectories of a given directory processed first, followed by the files in the directory. Or, you might want all files processed first, then subdirectories.
DPX Partial File Restore looks at an entire object as a single piece of media. If multiple reels or clips appear in an archive, they can be stored in folders and partially restored using File and Folder Partial File Restore, but to DPX Partial File Restore they are viewed as one long movie clip. If this is a desired effect, you must ensure that the directories are sorted alphanumerically in the order the frames should be arranged.
DIVArchive does not perform any special audio handling for DPX media (other than what might be embedded in DPX files). DIVArchive can support transcoding of DPX media, but a transcoder may change the file names and (or) file order of the DPX archive.
-
Submitting a Partial File Restore Request
You can submit a Partial File Restore request clicking on the Partial Restore button under the Action tab. Alternatively you can view the Archived Objects under the Manager tab, right-clicking the desired object and selecting Partial Restore from the resulting menu.
Either method results in the Partial Restore Wizard being displayed. If no object is selected and the Partial Restore icon (under the Action tab) is used, the wizard opens to Step 1 (of 3) and the Object Name and Category must be entered manually.
If an object was selected and the (right-click) context menu was used, the wizard will open to Step 1 (of 2). This step is similar to Step 2 using the previous method to open the wizard window.
Use the following procedure to navigate through the wizard:
-
Enter the Object Name and Category, or select the object in the left pane.
-
Click Next to proceed.
-
Select the type of Partial File Restore to perform using the menu list.
Each type of Partial File Restore has different options associated with it, except for Files and Folders Partial File Restore, which does not have any specific options associated with it.
-
Drag-and-drop the objects from the left pane to the right pane to add them to the request.
-
Click Next to proceed.
-
You must include additional parameters for the following Partial File Restore types by double-clicking the object name after you moved it to the right pane.
- Byte Offset
-
No offset is entered until you open the Options dialog box and manually enter one. Add the required Offset parameters and click Add to include them in the request.
- Timecode
-
The File Format list is enabled after selecting the Timecode Partial File Restore. Select the proper file format from the drop-down list.
Double-click the object to open the Options dialog box. Add the required Offset parameters and click Add to include them in the request.
- DPX
-
Double-click the DPX Frames in the right pane to open the Options dialog box. Add the required Offset parameters and click Add to include them in the request.
-
After selecting the Partial File Restore type and associated options for each object, click the Next Button to go to the final screen.
-
Complete the required information on the final screen and click Send to send the request.
Note:
Partial File Restore requests for AVI format files must include the same offset range (TCin, TCout) for all object components (for example, clip.avi, clip_1.wav, clip_2.wav).The following list describes the parameters in the final Send Partial File Restore request screen:
- Instance
-
If there are multiple instances of an object, DIVArchive will select the instance which will allow the request to complete in the least amount of time (for example, a disk instance will be selected over a tape instance). Specifying an instance number in this field will override this behavior and target the specific identified instance.
- Destination
-
Destination (for example, a video server or browsing server) for the object files. This name must be known by the DIVArchive configuration. Use the drop-down list to select the desired Destination.
- Files Path Root
-
The root folder on the destination where the object files will be placed. If left empty, the files will be placed in the Files Path Root folder specified when archiving the object.
- Options
-
Additional options for performing the transfer of data from DIVArchive to the destination. These options supersede any options specified in the DIVArchive configuration database. Currently the possible values for Options are as follows:
- No Entry
-
No entry in this field specifies no options.
- -login
-
A user name and password is required to log in to some sources. This option obsoletes the -gateway option from earlier releases.
- -pass
-
The password used with -login.
- Quality of Service
-
One of the following codes:
- DIVA_QOS_DEFAULT
-
Restoring is performed according to the default Quality of Service (currently direct for restore operations).
- DIVA_QOS_CACHE_ONLY
-
Use cache restore only.
- DIVA_QOS_DIRECT_ONLY
-
Use direct restore only - no disk instance is created.
- DIVA_QOS_CACHE_AND_DIRECT
-
Use cache restore if available, or direct restore if cache restore is not available.
- DIVA_QOS_DIRECT_AND_CACHE
-
Use direct restore if available, or cache restore if direct restore is not available.
Additional and optional services are available. To request those services use a logical
ORbetween the previously documented Quality of Service parameter and the following constants: - DIVA_RESTORE_SERVICE_DO_NOT_OVERWRITE
-
Do not overwrite existing files on the destination server.
- Additional Services
-
Use the menu list to select whether DIVArchive will terminate the request if the file name on the destination already exists.
- Priority
-
The priority level for this request. The level can be in the range zero to one hundred, or the value DEFAULT. The value zero is the lowest priority and one hundred the highest priority. Move the slide control to increase or decrease the request priority.
There are six predefined values as follows:
-
MIN
-
LOW
-
NORMAL
-
HIGH
-
MAX
-
DEFAULT
If the DEFAULT check box is selected, the slide control becomes inactive and the priority defined in the Manager configuration is used.
-
Multiple Restore (N-Restore) Requests
If an object is required on multiple destinations simultaneously, the Multiple Restore (or N-Restore) request enables specification of all necessary destinations in one command and submits it as a single request (as opposed to multiple standard Restore requests for each destination). This is also beneficial when the restore involves a tape instance because the tape is accessed once for the transfer rather than multiple read operations for single restore requests of the same object. Up to five simultaneous destinations are currently supported.
If the object to be restored is part of a spanned tape set, it must be restored to cache before the transfer to all destinations. If the transfer to one of the destinations fails, the others will still proceed (if possible) and the request status will be Partially Aborted.
If multiple renaming rules are defined DIVArchive will process the rule for each Source/Destination independently.
Use the following procedure to execute a Multiple Restore request:
-
On the Action tab of the ribbon bar, select the Multiple Restore button to open the Multiple Restore Request dialog box.
-
Enter the required parameters in the appropriate fields.
To add multiple destinations, select the desired destination from the Destination menu list and click the double right-facing arrows to add the selected destination to the destination list text box field. Repeat this process until all required destinations are added to the list.
-
Click Send to process the request.
Delete and Delete Instance Requests
Use the Delete command to delete all instances of an object, or only a specific instance of the object from DIVArchive. You must use this command with caution. This command submits an object Delete request to the DIVArchive Manager and the Manager deletes every instance of the object (unless otherwise specified).
The Instance field of the Delete request determines exactly what will be deleted from DIVArchive. If this field is left empty, then all instances of that object will be deleted. A specific number entered into this field will only delete the specified instance.
You initiate the Delete request with the Delete button on the ribbon bar. You can also initiate it from the Objects view under the Manage tab by right-clicking the object to delete and selecting Delete from the resulting menu. If the Delete command is selected from the Objects view, the instance field is updated automatically with the selected instance. Only specific instance deletion is supported from this view.
Note:
Deletes and repacks do not clear WORM media because these are Write-Once media. The instances are deleted but the space is not recoverable.The following fields are included in the Send Delete Request screen:
- Object Name
-
The name of the object to be deleted.
- Category
-
The category assigned to the object when it was archived. This parameter can be a null string, but this may result in an error if several objects have the same name.
- Instance
-
If multiple instances of the object reside in DIVArchive, you can specify which specific instance to delete. If no number is entered in this field then DIVArchive will delete all instances of that object.
- Media
-
The media can be an existing tape group or disk array. The drop-down list will only contain those items already configured in the DIVArchive configuration.
- Priority
-
The priority level for this request. The level can be in the range zero to one hundred, or the value DEFAULT. The value zero is the lowest priority and one hundred the highest priority. Move the slide control to increase or decrease the request priority.
There are six predefined values as follows:
-
MIN
-
LOW
-
NORMAL
-
HIGH
-
MAX
-
DEFAULT
If the DEFAULT check box is selected, the slide control becomes inactive and the priority defined in the Manager configuration is used.
-
Copy Requests
Use the Copy command to create an instance of an existing object in the same or another group or array. This is useful for creating a backup copy of the object on another media.
Submits a request for copying an archived object to a new object, with another name and (or) category, to the DIVArchive Manager and the Manager chooses the appropriate instance as the source of the copy. All types of transfers (disk to disk, disk to tape, tape to disk, and tape to tape) are supported.
In the event the requested object is on media that is not available, the request will fail.
When a Copy request is issued with no instance specified, and there are multiple instances of that object, DIVArchive will select the instance that will execute the copy operation in the shortest possible time (for example, a disk instance will be selected over a tape instance). If an instance number is entered in the Instance field of the request, the copy operation will use that specific instance only.
You initiate the Copy request with the Copy button on the ribbon bar, or the Objects View under the Manage tab by right-clicking the object to copy and selecting Copy from the resulting menu.
The following fields are included in the Copy Request screen:
- Object Name
-
The name of the source object.
- Category
-
The category of the source object.
- Instance
-
If multiple instances of the object reside in DIVArchive, you can identify which specific instance to copy. If no instance is specified, DIVArchive will select the instance that will provide the most optimal execution time.
- Destination Media
-
The Destination Media can be either a tape group or disk array. If the new instance is being created in the same group or array, the request will only succeed if it can be copied to a separate tape or disk.
- Priority
-
The priority level for this request. The level can be in the range zero to one hundred, or the value DEFAULT. The value zero is the lowest priority and one hundred the highest priority. Move the slide control to increase or decrease the request priority.
There are six predefined values as follows:
-
MIN
-
LOW
-
NORMAL
-
HIGH
-
MAX
-
DEFAULT
If the DEFAULT check box is selected, the slide control becomes inactive and the priority defined in the Manager configuration is used.
-
Copy As Requests
When an object is archived to DIVArchive, it is uniquely identified by its Object Name and Object Category. Neither the name nor the category can be altered once it exists within the DIVArchive database. The Copy As command allows creation of a new object in DIVArchive with a new Object Name and (or) Category, and then the original object can be deleted if desired or necessary (the latter must be performed manually).
You initiate the Copy As request with the Copy As button on the ribbon bar. You can also use the Objects View in the Manage tab and right-click the object, and select Copy As from the resulting menu.
For any DIVArchive object, the Object Name may not necessarily match that of the file name of the essence stored within it. If you use the Copy As command to create a DIVArchive object, it will still be restored using the same name with which it was originally archived.
Example:
If a file named xyz is archived from a server, regardless of what object name was given to it in DIVArchive, it will always restore to a destination as xyz regardless of its DIVArchive Object Name.
When a Copy As request is issued directly from the Objects View, the Instance field of the request is automatically left empty (you can enter an instance number manually before the request is issued). If this field is left empty when the request is submitted and there are multiple instances of that object, DIVArchive will select the instance that will complete the transfer in the shortest possible time by default (that is, a disk instance will be selected over a tape instance). This depends on the QOS specified and the DIVArchive configuration.
When the Copy As request is issued from the Object Properties View, the Instance field of the request is automatically updated with the number of the selected instance, and only that specific instance is copied. Commands that are issued from the Objects Properties View must always specify an Instance Number.
The following fields are included in the Copy As Request screen:
- Source Object Name
-
The name of the source object.
- Source Object Category
-
The category of the source object.
- Destination Object Name
-
The name of the destination object.
- Destination Object Category
-
The category of the destination object.
- Instance
-
If multiple instances of the object reside in DIVArchive, you can identify which specific instance to copy. If no instance is specified, DIVArchive will select the instance that will provide the most optimal execution time.
Selecting Performance Optimized Instance instructs DIVArchive to use the instance that will achieve the request in the shortest time possible (for example, a disk instance will be selected over a tape instance).
- Destination Media
-
The Destination Media can be either a tape group or disk array. If the new instance is being created in the same group or array, the request will only succeed if it can be copied to a separate tape or disk.
- Destination Storage Plan
-
The Storage Plan to assign the new object on the destination.
- Comments
-
Comments added here will be added to the new object's properties.
- Priority
-
The priority level for this request. The level can be in the range zero to one hundred, or the value DEFAULT. The value zero is the lowest priority and one hundred the highest priority. Move the slide control to increase or decrease the request priority.
There are six predefined values as follows:
-
MIN
-
LOW
-
NORMAL
-
HIGH
-
MAX
-
DEFAULT
If the DEFAULT check box is selected, the slide control becomes inactive and the priority defined in the Manager configuration is used.
-
Associative Copy Requests
The Associative Copy request works with the Archived Objects View and enables you to copy multiple objects sequentially to a single tape in a specified group. An example is backing up the selected objects to a single tape so it can subsequently be externalized.
You initiate the Associative Copy request with the Associative Copy button on the ribbon bar. Alternatively, you can use the Objects View under the Manage tab by right-clicking the object to copy and selecting Associative Copy from the resulting menu.
The DIVArchive objects available for an Associative Copy request must first be obtained by executing a query in the Archive Objects view. You can target specific object by name, category, and (or) creation date.
Associative copying involves reading and writing files from the source group(s) to the destination group one file at a time. DIVArchive guarantees that these instances are stored sequentially on tapes with the following exceptions:
-
It is not compatible with tape spanning. If no tape is currently available for copying all of the selected objects to a single tape, the request terminates (and is retried once) instead of spanning. If the sum of the size of the objects to copy exceeds the capacity of every individual tape present in the library, the request terminates.
-
Two or more instances of an object on the same tape are not permitted. This may reduce the range of tapes that can be selected for the Associative Copy. If no appropriate tape is available to meet this condition, the request will be terminated.
-
The request is complete only when every object has been copied onto the same tape.
-
If a drive or tape failure during a write operation occurs, instances currently written are erased and the request is retried once.
-
Choice of the tape to be used for the copy follows the policy used for the archive operation (written tapes with enough remaining size regardless of optimizations).
The following fields are included in the Associative Copy Request screen:
- Main Display Field
-
All objects returned from the query in the Archived Objects view are displayed in the Associative Copy request. However, only those selected when the command was issued are highlighted. The highlighted entries can be subsequently selected or deselected by using either the
CTLorSHIFTkeys in combination with the mouse. - Destination Group
-
Only tape groups currently configured in the Configuration Utility will be displayed in this list. You must select your destination group from the list.
- Priority
-
The priority level for this request. The level can be in the range zero to one hundred, or the value DEFAULT. The value zero is the lowest priority and one hundred the highest priority. Move the slide control to increase or decrease the request priority.
There are six predefined values as follows:
-
MIN
-
LOW
-
NORMAL
-
HIGH
-
MAX
-
DEFAULT
If the DEFAULT check box is selected, the slide control becomes inactive and the priority defined in the Manager configuration is used.
-
Require and Release Requests
Requiring or releasing objects is primarily a database entry for instances that are, or can be, externalized from the tape library. Tapes that can be externalized or must be internalized are determined through the Require Instances view.
Require indicates to the DIVArchive Manager that this instance must be inserted. This request has no effect if the instance is already required. You can retrieve a list of instances that are REQUIRED and EJECTED from the Control GUI.
You initiate the Require or Release request with the Require/Release button on the ribbon bar. You can also use the Objects view under the Manage tab and right-click the desired object and selecting either Require or Release from the resulting menu.
The following fields are included in the Send Require Request screen:
- Object Name
-
The name of the required object.
- Category
-
The category assigned to the object when it was archived. This parameter can be left empty but this may result in an error if several objects have the same name.
- Instance
-
No value entered here forces the function to apply to every instance of the given object.
Release indicates to the DIVArchive Manager that this instance can be externalized. This request has no effect if the instance has already been released. You can retrieve a list of instances that are RELEASED and INSERTED from the Control GUI. A releasable tape is one that only contains released instances.
The following fields are included in the Send Release Request screen:
- Object Name
-
The name of the required object.
- Category
-
The category assigned to the object when it was archived. This parameter can be left empty but this may result in an error if several objects have the same name.
- Instance
-
No value entered here forces the function to apply to every instance of the given object.
Eject Tape Requests
The Eject Tape request ejects the selected tapes from the associated library. You can select one or more tapes simultaneously. You initiate the Eject Tape request with the Eject Tape button on the ribbon bar, or in the Tapes View under the Home tab by right-clicking the tape to eject and selecting Eject Tape from the resulting menu.
The following fields are included in the Eject Tape Request screen:
- Comments
-
Comments can be added when the tape is ejected. These may refer to its location or other information. you can view comments later by examining that tapes properties in the Tapes View.
- Release instances on tape(s)
-
When selected all DIVArchive object instances on the tape being ejected are released.
- Priority
-
The priority level for this request. The level can be in the range zero to one hundred, or the value DEFAULT. The value zero is the lowest priority and one hundred the highest priority. Move the slide control to increase or decrease the request priority.
There are six predefined values as follows:
-
MIN
-
LOW
-
NORMAL
-
HIGH
-
MAX
-
DEFAULT
If the DEFAULT check box is selected, the slide control becomes inactive and the priority defined in the Manager configuration is used.
-
Insert Tape Requests
This request enables inserting a tape into a library through its CAP. You can only enter the tapes in the CAP after this command is issued with some library configurations.
Note:
Contact Oracle Support for instructions on bulk loading of tapes into a library.You initiate an Insert Tape request using the Insert Tape button located under the Action tab on the ribbon bar, and then the Tape Actions button.
The Sony PetaSite PSC software enables you to enter a tape in its CAP and manually place it within the PetaSite. In this case, DIVArchive is not informed of the action by the PSC and will not recognize the tape until the library is audited using the Configuration Utility.
The following fields are included in the Insert Tape Request screen:
- Require instances on tape
-
When selected, any Released instances on the inserted tape are set to Required.
- Robot Manager Name
-
This list specifies the DIVArchive Robot Manager controlling the associated library for insertion of the tapes. See Appendix A for Oracle DIVArchive options and licensing information.
- CAP ID
-
This list is for libraries with multiple CAPs. Some libraries will not unlock the CAP, enabling the tape to be inserted, until the Insert Tape command is issued. You can specify which CAP to unlock from this list.
- Priority
-
The priority level for this request. The level can be in the range zero to one hundred, or the value DEFAULT. The value zero is the lowest priority and one hundred the highest priority. Move the slide control to increase or decrease the request priority.
There are six predefined values as follows:
-
MIN
-
LOW
-
NORMAL
-
HIGH
-
MAX
-
DEFAULT
If the DEFAULT check box is selected, the slide control becomes inactive and the priority defined in the Manager configuration is used.
-
Repack Tape Requests
The Repack Tape request sends a repack request for the selected or specified tape. A tape repack operation reclaims unusable space on a tape due to object deletions, and removes fragmentation.
Caution:
The repack tape function is not intended to move material from a tape that is already known to be generating read errors. Contact Oracle Support for advice in these situations.You initiate the Repack Tape request with the Repack Tape button on the ribbon bar, or the Tapes View under the Home tab by right-clicking the tape to repack and selecting Repack Tape from the resulting menu.
Tape repacking can be a lengthy process and DIVArchive, by default, considers tape repacks a low priority operation. If higher priority requests are issued a tape repack request can be temporarily suspended while the higher priority requests are completed. If higher priority requests are issued sporadically it can result in frequent mount and dismount operations of the drive performing the repack. Therefore, Oracle recommends that tape repack operations should be run during off-peak periods where the frequency of higher priority requests is limited. Some installations may have a drive dedicated solely to tape repacking to prevent this scenario from occurring.
The repack process involves the following tasks (in order):
-
Mounting the source tape and reading all objects to temporary disk cache of an Actor enabled for repack operations.
Note:
If the temporary disk cache is filled before reading all objects from the source tape, DIVArchive will begin proceed to Step 2 until the cache is cleared. DIVArchive will then proceed to read the remaining objects from the source tape. This process is repeated until all objects are read. -
Mounting a tape from the Unused Tapes Sets pool associated with the Set ID of the group from the source tape.
-
Writing all objects from the temporary cache in Step 1.
-
Deleting the objects from the temporary cache after all objects have been successfully written to the new tape.
-
The original source tape is released to the Unused Tapes Sets pool and unassigned from the group.
If a read error occurs at some point during the repack process from the source tape or a write error occurs on the destination tape, the entire repack request is terminated and no objects from the source tape are deleted. If the cache filled during the repack request and objects were successfully written to another tape before the cache was cleared, those objects will remain on the destination tape.
If a read error occurred, the source tape will have the repack status and write status disabled. If a write error occurred, the destination tape will have its write status disabled and will not be used for any tape write operations. You can view the write and repack states of both tapes in the Tape States frame of the Configuration Utility.
During the manual repack of WORM media, the usual dialogs display, but a warning is included notifying you that the space on the source media will not be recoverable after the repack is complete. Deletes and Repacks do not clear WORM media because these are Write-Once media. The instances are deleted, but the space is not recoverable.
You initiate the Repack Tape request with the Repack Tape button on the ribbon bar, or the Tapes View under the Home tab by right-clicking the tape to repack and selecting Repack Tape from the resulting menu.
The following fields are included in the Repack Tape Request screen:
- Repack WORM (Write-Once media) with barcode
-
Barcode of the tape to be repacked.
- Priority
-
The priority level for this request. The level can be in the range zero to one hundred, or the value DEFAULT. The value zero is the lowest priority and one hundred the highest priority. Move the slide control to increase or decrease the request priority.
There are six predefined values as follows:
-
MIN
-
LOW
-
NORMAL
-
HIGH
-
MAX
-
DEFAULT
If the DEFAULT check box is selected, the slide control becomes inactive and the priority defined in the Manager configuration is used.
-
Verify Tape Requests
The Verify Tape request initiates a system read-back through every object on the selected tape one at a time and verifies all of the checksum values.
You initiate the Verify Tape request with the Verify Tape button on the ribbon bar, or the Tapes View under the Home Tab by right-clicking the tape to verify and selecting Verify Tape from the resulting menu.
The following fields are included in the Verify Tape Request screen:
- Verify Tape with barcode
-
Barcode of the tape to be verified.
- Priority
-
The priority level for this request. The level can be in the range zero to one hundred, or the value DEFAULT. The value zero is the lowest priority and one hundred the highest priority. Move the slide control to increase or decrease the request priority.
There are six predefined values as follows:
-
MIN
-
LOW
-
NORMAL
-
HIGH
-
MAX
-
DEFAULT
If the DEFAULT check box is selected, the slide control becomes inactive and the priority defined in the Manager configuration is used.
-
Export and Import Tape Requests
The Export Tape request type enables one or more tapes containing DIVArchive objects to be exported to another independent DIVArchive platform (for example, at a remote disaster recovery or partner site). See Appendix A for Oracle DIVArchive options and licensing information.
The metadata of each tape (that is, the object names and categories it contains and their location on the tape itself) are maintained in the DIVArchive Oracle Database. For complex objects this information is also in the Metadata Database. Additionally, the metadata of each tape is saved to an XML file when the tapes are exported. The XML file transfers the metadata of each tape into the other DIVArchive platform's database when the tapes are imported.
The Export Tapes command is not used for transferring tapes between two or more libraries controlled by the same DIVArchive Manager. Tapes (and the instances they contain) exported from DIVArchive using this command are also removed from the DIVArchive database. If the object being exported is the last (or only) instance of that object, it will be removed entirely from the database.
The following new parameters have been added for export and import tape functions. All XML metadata files exported from all previous DIVArchive versions will not continue to be supported.
During an export and import of WORM media, whether the media is Write-Once and the media is a cartridge is identified in the exported XML file. This information is imported with the attributes isWriteOnce and isCartridge being either true or false.
Importing WORM media is supported by DIVArchive 7.4 and later. However, the WORM flag is ignored (set to false), and logged in the Manager log, when you import DIVArchive 7.4 (or later) WORM media into a DIVArchive release earlier than DIVArchive 7.4. The device will be visible in the Control GUI as a tape but unusable if finalized, or if no WORM drive is connected to the system.
The following table describes the export and import parameters:
Table 2-1 Export and Import Parameters
| Parameter | XML Element or Attribute | Notes |
|---|---|---|
|
|
Attribute of the object element |
Not imported. A new Object ID is generated during import. |
|
|
Attribute of the object element |
Imported if present, otherwise a new UUID will be generated. |
|
|
Attribute of the object element |
|
|
|
Attribute of the object element and attribute of the tape element |
|
|
|
Attribute of the object element |
|
|
|
Attribute of the object element |
|
|
|
Attribute of the object element |
|
|
|
Attribute of the element |
If exists in database |
|
|
Attribute of the element |
If exists in database |
|
|
Attribute of the element |
If exists in database |
|
|
Attribute of the element |
If exists in database |
|
|
Element |
Valid for complex objects |
|
|
Element |
Valid for complex objects |
|
|
Element |
Not valid for complex objects |
You initiate the Export Tape request with the Export Tape button on the ribbon bar, or the Tapes View under the Home tab by right-clicking the tape to export and selecting Export Tape from the resulting menu.
The following fields are included in the Eject Tape Request screen:
- Comments
-
Enter any desired comments in this field.
- Delete from DB
-
When selected removes selected tape(s) from the Exported Tapes list.
- Exported Tapes
-
This area displays tapes selected for export. These tapes and the instances they contain will be removed from the DIVArchive Database once exported. If required, select any tapes to be removed from the Exported Tapes list and click Remove Selected.
Exported Tape Metadata Files
DIVArchive writes each tape's metadata to an XML file when the tapes are exported from your system. If an object is spanned across two (or more) tapes, the XML file will encompass every tape in the spanned set. The naming format of each tape metadata XML file is Tapeset-<Barcode>.xml (for example, Tapeset-000131.xml).
The root path where the XML files are saved is defined by the DIVAMANAGER_EXPORT_ROOT_DIR parameter in the DIVArchive Manager configuration file (consult your Site Configuration for these details). By default, the export absolute directory root path is %DIVA_HOME%\Program\Manager\bin\exported\. From this root path, the XML files from each Export Tapes command are saved in subfolders based on the date and time the command was run.
Tape Import Workflow
To use the importtapes command, first ensure that the XML metadata file and the .ffm files that were exported exist on the DIVArchive system into which they are to be imported. The files must exist in uncompressed form (unzipped) in the DIVArchive Manager's bin directory (by default). The object tape group must also already exist on the target system before the import begins. This tape group does not necessarily have to be the same group that the tape was assigned to in the source system.
There are three main ways that a tape object can be treated during the import process:
-
Imported as a new object
-
Skipped if the object is already present in the system
-
Imported as an instance of a pre-existing (in the DIVArchive database) object. This option only functions correctly if the checksums match.
See the Oracle DIVArchive Export/Import User's Guide in the Oracle DIVArchive 7.5 Core documentation library for more information.
Importing Tapes
The associated XML files from exported tapes must be copied to the DIVArchive Manager bin directory on the platform where they are to be imported. Before inserting the tapes into the library, you must import the tape metadata into the DIVArchive database. You must execute this for each tape (or spanned set) to be imported.
-
Open a command prompt window.
-
Execute the following commands in the order shown:
cd \%DIVA_HOME%\Program\Manager\bin
importtapes <destination_group> <metadata_file>
destination_group-
The tape group that the tape (or spanned set) and its instances will be assigned to in the destination system.
metadata_file-
The file name of the XML file for the tape (or spanned set).
Example:
The tape with barcode number 000131 also contains objects that are spanned across the tape with a barcode of 000120. When tape 000131 is exported, the exported XML file is named Tapeset-000131.xml. This .xml file also encompass the objects from tape 000120, and both tapes are ejected from the library.
After all objects from both tapes are exported to the XML file, all instances on each tape (and references to the tapes themselves) are removed from the DIVArchive database. The XML file is then copied to the %DIVA_HOME%\Program\Manager\bin folder of the destination DIVArchive system where it is to be imported.
You import the metadata for this tape into the group MOVIES using the following command:
importtapes MOVIES Tapeset-000131.xml
After the tape's metadata successfully imports into the database (check the Control GUI Current Requests queue), both tapes and their objects are considered externalized and can both be entered into the library with the Insert Tape command.
Migrate Content Requests
The Migrate request enables tape content migration to another tape group or disk array. For example, if you are upgrading to a new media type in your library and want to move the content from the old legacy tapes to the new AXF format.
Note:
DIVArchive includes an embedded migration service (DIVAmigrate). It is a separate internal (to DIVArchive) service which helps users to schedule and run jobs to migrate content between different media inside of a DIVArchive system. You can use the Control GUI or command line client. Contact Oracle Support for more details.You must use a migration job to change a tape format from Legacy to AXF, repacking a tape will not change the tape format. Repacking of existing Legacy format objects retains the format of the tape even if the tape group format was updated in the configuration from Legacy to AXF.
This request type is only available from the Control GUI Tapes View. It also uses the Oracle DIVArchive Storage Plan Manager (SPM) option to perform the migration (SPM must be installed - see Appendix A for SPM licensing information). Appropriate slots must be configured for the migration in the Slots Tab of the Configuration Utility. The slots indicate to DIVArchive when the migration operations are to be performed
See the Oracle DIVArchive Storage Plan Manager (SPM) Guide in the Oracle DIVArchive 7.5 Additional Features documentation library for more information). Also see Appendix A for Oracle DIVArchive options and licensing information.
A Migrate request will perform the following functions (in the order shown):
-
Mount the source tapes and issue Copy requests to DIVArchive to copy from the source tape to the destination media (disk or tape). Any objects that are spanned will require the object to be copied first into cache.
-
Delete the source instance after the object has been successfully copied to the new media.
-
The source tapes are cleared of all DIVArchive objects and returned to the Unused Tapes Sets pool.
You initiate the Migrate request with the Migrate button on the ribbon bar, or the Tapes View under the Home tab by right-clicking the tape to migrate the content from and selecting Migrate Content from the resulting menu.
The following fields are included in the Migrate Content Request screen:
- Task Name
-
Enter the name of the migration task in the field.
- Migrate content from tapes
-
This list identifies the barcodes of tapes selected for migration.
- Migrate Slot
-
Select the migration slot you want to use from the list. The slot is defined in the Slots frame of the Storage Plans tab in the Configuration Utility. The slots dictate when the migration requests will be issued to DIVArchive.
- Dest. Medium
-
The destination medium (tape group or disk array) for migrated content.
Migration service jobs now have events associated with them. All job events are displayed under the Job Events tab in Job Properties dialog box. By default, events are loaded in descending order by time and event id. The Events table under the Job Events tab highlights events using different colors based on severity. Red indicates an Error, yellow indicates a Warning, and white indicates Information. Clicking the Refresh button refreshes the entire Job Properties dialog box.
Oracle DIVArchive Metasources
The Metasource source type allows several currently defined DIVArchive Source/Destinations sharing the same online storage (or monitoring the same folder or FTP server for Drop Folder Monitors) to be combined and considered a single DIVArchive Source/Destination configuration. This unique (and optional) feature enables DIVArchive to provide automatic load balancing and failover capabilities in case of one or more of the individual Source/Destinations going offline.
When requests are issued to DIVArchive with a Source/Destination using the Metasource source type, each additional Archive or Restore request will use the next server in the Metasource list. If the server selected by DIVArchive is offline or encounters an error, DIVArchive will automatically attempt to use the next server in the Metasource list. If all servers fail to fulfill the transfer, the request will stop.
Oracle DIVArchive Symbolic Links
You can archive and restore symbolic links on Linux in DIVArchive 7.5. Symbolic links are only supported for the AXF format. When using LEGACY format DIVArchive reports an error if a symbolic link is discovered during the transfer.
Symbolic Links are only supported with an SFTP Source/Destination on Windows. You must specify the following options when configuring SFTP:
-login [login] -pass [password] -port 22 -socket_block_size 64
DIVArchive running under Linux supports CIFS, DISK, and LOCAL sources and destinations. CIFS network shares must be mounted on each Linux Actor to be supported.
When restoring an object containing symbolic links to a destination server that does not support them they are ignored and not created on the destination server.
Symbolic links created using the Windows operating system are not supported. Shortcuts created using the Windows operating system are not represented as symbolic links because they are treated as files. Only symbolic links created on UNIX platforms are archived and represented as symbolic links in DIVArchive.
In the Control GUI, the file type displays in the Components list on the Properties tab of the Object Properties window. The possible types are File (F), Directory (D) and Symbolic Link (S). Symbolic links are also displayed in the Elements list on the Instances tab of the Object Properties window, and as files under the Components tab of the Object Properties screen.
Oracle DIVArchive Storage Plan Management
Caution:
Misconfiguration of the Oracle DIVArchive Storage Plan Manager (SPM) may lead to unexpected and disastrous results! Minor changes can lead to catastrophic consequences. For example, the deletion of hundreds of thousands of instances on tape or database corruption. Without special training and familiarity with the product, it is recommended to contact Oracle Support before making any changes to SPM. Failure to do so may result in severe damage to the DIVArchive system or even permanent data loss.The Oracle DIVArchive Storage Plan Manager (SPM) software component enables object lifecycle (interacting with the DIVArchive Manager) management, and is typically installed on the same system as the DIVArchive Manager. For example, an archived object can reside on a specific medium the first day, and migrate (over time) to a different medium according to the policies and rules established by the user. DIVArchive executes the object lifecycle migration as a background activity by following the rules and policies defined in the corresponding Storage Plan.
The newest release of SPM supports disk cleaning based on the object's archived date. Earlier releases of SPM's disk cleaning feature only supported cleaning based on an object's last access time and object size.
Oracle DIVArchive Content Verification
The purpose of the DIVArchive Checksum Support and Content Verification program is to introduce additional levels of verification into the DIVArchive system. This feature introduces checksum generation and verification for each file managed by DIVArchive. The currently supported checksum algorithms in DIVArchive include MD2, MDC2, MD5, SHA, SHA-1, and RIPEMD160.
Note:
Additional checksum verification is performed at the Oracle Storage Cloud level. See the Storage Cloud documentation for information.The default and recommended checksum algorithm is MD5. Although the other algorithms are maintained for backward compatibility, only MD5 and SHA-1 are recommended for best results.
When an object contains multiple files a checksum will be generated and later verified for each of the component elements. The following three types of checksum sources are distinguishable:
-
Genuine Checksum
-
Archive Checksum
-
Deferred Checksum
The TEXT Genuine Checksum mode enables DIVArchive to archive all files and subfolders in a specified folder while comparing their checksum values against known values stored in an external checksum file. Files that do not have a matching checksum in the external checksum file are archived with DIVArchive's calculated checksum and the external checksum file will not be archived.
Note:
The TEXT Genuine Checksum is a customer-specific implementation and only supports MD5. Unicode is not supported, and checksums must be in a.md5 text file.Archive Instructions
Use the following procedure to archive objects using checksum verification through the Control GUI:
-
In the Manager Control GUI, navigate to Action and then select Archive.
-
From the Source drop-down list, select the Source/Destination entry that was created in the configuration stage.
-
Enter the desired File Path Root in the File Path Root text field.
-
Enter the path to the location of the checksum files in the Files field and append your entry with a wildcard symbol (an asterisk).
-
Enter
-rIn the Options field. -
Enter the remaining parameters in the request form and click Send.
Limitations
The following limitations apply when using checksum verification. See to the Oracle DIVArchive Checksum Support User's Guide in the Oracle DIVArchive Additional Features documentation library for additional information.
-
DIVArchive cannot open or create files on a Windows file system if their absolute path exceeds 256 characters. The Root Path must be no more than a total of 256 characters.
-
Only ASCII, non-UTF-8 encoded checksum files are supported.
-
Each line in the checksum file must begin with an MD5 checksum, followed by 2 spaces, and then the File Path to the referenced file.
Genuine Checksum using AXF Transfer
The AXF Genuine Checksum mode enables DIVArchive to archive all files and subfolders in a specified AXF file while comparing their checksum values against known values stored in the AXF file. This kind of workflow is typically combined with a Restore request with -axf in the Request Options field.
Requirements
The AXF object containing the files to be archived must contain checksum information for each file. The supplied checksum in the AXF object must be the expected type as defined in the configuration.
DIVArchive Configuration Utility Settings
Use the following procedure to properly set the configuration in the DIVArchive Configuration Utility:
-
Create a new Source/Destination entry with Source Type set to either DISK, FTP_STANDARD, or EXPEDAT as appropriate.
-
Specify an appropriate Root Path if necessary. This path, along with the input files specified during the Archive request, determines the location of the checksum file.
For example, if the Source Type is DISK the Root Path can be
D:\root. If the Source Type is FTP_STANDARD, the Root Path can be/root. -
Set the External Checksum Source to YES.
-
Set the Checksum Type to the expected checksum type (for example, MD5).
-
Set the GC Mode to AXF.
-
Click OK.
-
Select Tools, and then Notify Manager from the menu to notify the Manager of the configuration.
Archive Instructions
Use the following procedure to archive an object with Genuine Checksum through an AXF transfer:
-
In the Manager Control GUI, navigate to Action and then select Archive.
-
From the Source drop-down list, select the Source/Destination entry that you created in the Configuration procedure.
-
Set the desired File Path Root.
-
Enter in the path to the location of the AXF file in the Files field. The file extension must be
.axf. -
Enter the remaining parameters in the request form and click Send.
Limitations
The workflow described only works with AXF requests generated by DIVArchive.
Verify Following Restore (VFR) is not compatible with the -axf option. VFR was designed to read back the restored content from a video server to verify it has not been corrupted. The -axf option does not create an actual restore, but rather an object export in an AXF Wrapper. These options are mutually exclusive and should not be part of the same workflow.
See the Oracle DIVArchive Checksum Support User's Guide in the Oracle DIVArchive Additional Features documentation library for more information.
Oracle DIVArchive Quality of Service
The Quality of Service (QOS) parameter defines how a file is transferred to and from a DIVArchive tape, from a source, or to a destination. The following Request Options map to their logical quality of service:
-qos_direct_only
-qos_cache_only
-qos_direct_and_cache
-qos_cache_and_direct
-qos_nearline_only
-qos_nearline_and_direct
Request Options take precedence over the normal quality of service specification. Also, the normal Quality of Service specification takes precedence over the Source/Destination Connect Options.
NEARLINE_ONLY and NEARLINE_AND_DIRECT QOS values are now supported in the Source/Destination Connect Options. These options are only valid for a Restore request. DIVArchive ignores the setting and the usual default is applied if a source or destination server with either setting is used in any other type of request. The QOS value is no longer case-sensitive and no longer must be specified at the beginning of the options.
For example, -login test -pass test qos=nearline_only is a valid option.
The options for QOS are defined as follows:
- Direct Only (
-qos_direct_only) -
The data is transferred immediately to the source as it is read from tape. Alternately, DIVArchive writes the data to tape immediately as it is transferred from a destination. If no direct transfer service is available, the request terminates.
- Cache Only (
-qos_cache_only) -
The data is first transferred entirely to cache storage from tape, and then transferred to the destination. Alternately, the data is first transferred entirely from the source to cache storage, and then written to tape. If no cache service is available, the request terminates.
- Direct and Cache (
-qos_direct_and_cache) -
If a direct transfer is not available, for example no Actor with direct transfer enabled is available, then a cache transfer is performed.
- Cache and Direct (
-qos_cache_and_direct) -
If cache transfer is not available, for example no Actor with cache storage is available, then a direct transfer is performed.
- Nearline Only (
-qos_nearline_only) -
This is only available for Restore and N-Restore requests. If a Nearline disk instance exists, the data is transferred from Nearline disk to the destination. Alternatively, the data is first transferred entirely to Nearline storage on disk from tape, and then transferred to the destination. If no Nearline service is available, the request terminates.
- Nearline and Direct (
-qos_nearline_and_direct) -
This is only available for Restore and N-Restore requests. If Nearline transfer is not available, for example no Actor with Nearline storage is available, then a direct transfer is performed.
- Default
-
The QOS specified in the source or destination configuration is used.
If an object to be restored has both disk and tape instances, and Cache Only, or Cache and Direct QOS is used, DIVArchive may restore the tape instance as first priority over the disk instance. This behavior depends on the DIVAMANAGER_CACHE_QOS_USE_DISK setting in the DIVArchive Manager configuration. If set to true, DIVArchive will restore the disk instance regardless of the QOS specified.
The Cache transfer method is particularly important for optimum use of DIVArchive resources when the transfer speeds between tape devices and the Source/Destination vary considerably. For example, if the tape drive in the request can write data at 400 Mbps, but the source can only deliver the data at 100 Mbps, the tape drive will never achieve its optimum transfer rate. Using the Cache QOS, the file can be completely transferred to cache first, and the drive can complete its write operation at its maximum speed. This method enables the drive to be used for other requests in a shorter time compared to the same transfer using the Direct QOS.
If an object to be restored has a disk instance the Nearline Only or Nearline and Direct QOS will restore from that instance. If an object to be restored has only tape instances, the Nearline Only or Nearline and Direct QOS attempts to create a permanent disk instance and then restore from that instance. Every subsequent Nearline restore for the same object will be blocked and wait for the first restore process to create a disk instance. If the first restore fails to create a disk instance the process repeats with the next restore attempting to create a disk instance. All other restores are blocked until the disk instance has been created.
The default QOS for Restore and N-Restore requests is Nearline and Direct. If the restore request is a Transcode Restore, or if the destination server is a Movie2Me server, the Manager will switch the restore QOS to Direct Only. Other QOS types are not supported in this case.