| Oracle® Retail Functional Artifact Generator Guide Release 14.0 E48988-01 |
|

 Previous |
 Next |
The Artifact Generator tool can be used through the command line or through the GUI, depending on the installation type selected.
The Artifact Generator implements rules for customization/extension of the Business Objects that are used to create the Functional Artifacts for use in the RTG Integration systems. The tools, regardless of the installation type, will process only XSDs that have been added or modified per these rules.
The fundamental rule is that for customization of a base XSD, the ExtOf XSDs must be modified and not the original (base) XSD. The tool scans for customization/extension implemented there, and only there. Any changes to the base XSD will be ignored.
For example, if you want to add an optional element to the Currency Rate flow, use the Template Generator to provide the hooks and placeholder XSDs and then add the optional element to ExtOfCurrRateDesc.xsd and not the CurrRateDesc.xsd.
There are simple examples included in the usage sections, but for more complete scenarios and best practices on usage of the tool, see Chapter 11, "Customization and Extension," in the Oracle Retail Integration Bus Implementation Guide. See also the Oracle Retail Service Oriented Architecture Enabler Tool Guide.
The following are the prerequisites you need to consider before customizing payloads:
Familiarity with the Artifact Generator tool and Template Creator tool.
Understanding the importance of payloads and how they fit into the overall retail family of products.
Understanding the impact of customizing a payload on other applications.
The following are rules for customization and extension.
Always make a backup of the particular files being modified during customization.
Customizations/Extensions of payloads must also be made accordingly to the application side.
It is strongly recommended that only optional elements are added. The addition of mandatory elements increases complexity.
The names of the elements in ExtOfs must not be the same as the names in the parent XSD. For example, if CurrRateDesc.xsd has an element name = attr1, ExtOfCurrRateDesc cannot have an element named attr1.
Java, PL/SQL, and XML schema keywords cannot be used in the names of elements in XSDs.
This section provides examples of the directory structure for customizing and localizing payloads.
The tool creates a directory structure that contains all the libraries (integration-lib) and generally available (GA) input artifacts required to generate all supported output types.
There are output directories for each type of artifact produced. For example:
./output-database-object-types|----------- dist|---- custom-retail-public-payload-database-object-types.zip.
/output-jaxb-java-beans|----------- src|----com/oracle/retail/integration/custom/bo/extofasnindesc/v1|-----
ExtOfASNInDesc.java…ObjectFactory.javapackage-info.java|----------- dist|----
custom-retail-public-payload-java-beans.jar./output-xml-samples|----------- src
- All sample file|----------- dist - custom-retail-public-payload-xml-samples.zip
The tool creates a directory structure that contains all the libraries (integration-lib) and generally available (GA) input artifacts required to generate all supported output types.
There are output directories for each type of artifact produced. For example:
./output-database-object-types|----------- dist|----localization-retail-public-payload-database-object-types.zip.
/output-jaxb-java-beans|----------- src|----com/oracle/retail/integration/localization/bobrasnindesc/v1
|----- BrASNInDesc.java…ObjectFactory.javapackage-info.java|----------- dist|---- localization-retail-public-payload-java-beans.jar.
/output-xml-samples|----------- src - All sample xmls |----------- dist - localization-retail-public-payload-xml-samples.zip
A prerequisite to customization or localization is using the Artifact Generator tool called the Template Creator. This tool constructs the appropriate placeholders in the packaging structure in the correct locations.
The Functional Artifact Generator tool has been enhanced to generate custom and localized payloads business objects (BO) on demand, based on Oracle Retail Functional Artifact rules.
Unlike past releases, the packaging of the retail business object does not contain placeholders for the customization or localization XSDs, and the base XSDs do not contain the imports to include them. The goal is to reduce the number of functional payload objects to only those in base and those needed to satisfy the site requirements. 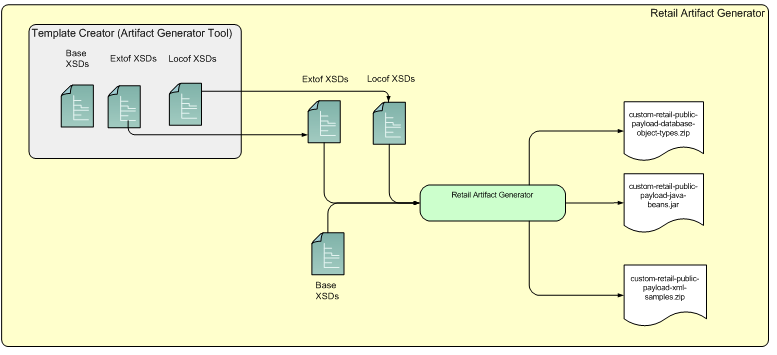
The Customization and Localization Template Creator tool is part of the Functional Artifact Generator.
The Artifact Generator tools, including the Template Creator, can be used either as a command line or GUI tool set.
The following table summarizes arguments for the Template Creator tool:
| Option | Argument | Type | Usage |
|---|---|---|---|
| -c | createCustomTemplate
createLocalizationTemplate |
Required, other than with -h option | To take input for creating custom or localization templates. For example:
-c createCustomTemplate -c createLocalizationTemplate |
| -n | complex-type name | Required with -c option | To input the name of complex-type for which template has to be generated. For example:
-n ItemDesc -n DSDDealsDesc/DSDDeals |
| -l | locale name | Required with -c createLocalizationTemplate option | To input locale name for localization template. For example:
Localization for Brazil -c createLocalizationTemplate -l Br |
| -x | path of alternate input-xsd folder relative to $AG_HOME | Optional | To use input-xsd folder other than the default input-xsd folder in AG_HOME. For example:
-x ./alternate-input-xsd |
| -h | Help | Optional | To read command line help. |
The following table summarizes valid commands for the Template Creator tool, as well as corresponding output.
| Command | Output |
|---|---|
| groovy -cp integration-lib/third-party/apache/xerces2/xalan-2.7.1.jar:integration-lib/third-party/apache/xerces2/xercesImpl.jar com/oracle/retail/integration/artifact/generator/TemplateCreator.groovy |
|
| groovy -cp integration-lib/third-party/apache/xerces2/xalan-2.7.1.jar:integration-lib/third-party/apache/xerces2/xercesImpl.jar com/oracle/retail/integration/artifact/generator/
TemplateCreator.groovy -c createCustomTemplate -n ASNInDesc/ASNInItem |
|
| groovy -cp integration-lib/third-party/apache/xerces2/xalan-2.7.1.jar:integration-lib/third-party/apache/xerces2/xercesImpl.jar com/oracle/retail/integration/artifact/generator/
TemplateCreator.groovy -c createLocalizationTemplate -n ItemDesc -l Br |
|
| groovy -cp integration-lib/third-party/apache/xerces2/xalan-2.7.1.jar:integration-lib/third-party/apache/xerces2/xercesImpl.jar com/oracle/retail/integration/artifact/generator/
TemplateCreator.groovy -c createLocalizationTemplate -n ASNInDesc/ASNInItem -l In |
|
| groovy -cp integration-lib/third-party/apache/xerces2/xalan-2.7.1.jar:integration-lib/third-party/apache/xerces2/xercesImpl.jar com/oracle/retail/integration/artifact/generator/
TemplateCreator.groovy -c createCustomTemplate -n CustomerOrder |
ExtOfCustomerOrder.xsd is created. |
| groovy -cp integration-lib/third-party/apache/xerces2/xalan-2.7.1.jar:integration-lib/third-party/apache/xerces2/xercesImpl.jar com/oracle/retail/integration/artifact/generator/
TemplateCreator.groovy -c createLocalizationTemplate -n CustomerOrder -l Br |
|
The following sections describe how you can work with the Template Creator tool using its Command Line Interface.
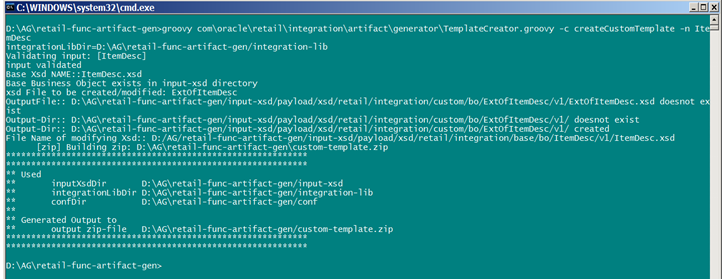
The Template Creator groovy script can be used to create custom/localization template for a base or new (having no existing base) retail business object.
Create a custom template for base retail business object
Command:
groovy -cp ./integration-lib/third-party/apache/xerces2/xalan-2.7.1.jar
Output: The following files are created.
ExtOfItemDesc.xsd in $input-xsd/payload/xsd/retail/integration/custom/bo/ExtOfItemDesc/v1/ folder.
Base XSD is modified:
ItemDesc.xsd in base/bo/ItemDesc/v1/ folder.
Create a custom template for new business object (no existing base retail business object)
Command:
$AG_HOME> groovy com/oracle/retail/integration/artifact/generator/TemplateCreator.groovy -c createCustomTemplate -n CustomerOrder
Output: The following files are created.
ExtOfCustomerOrder.xsd in $input-xsd/payload/xsd/retail/integration/custom/bo/
ExtOfCustomerOrder/v1/ folder.
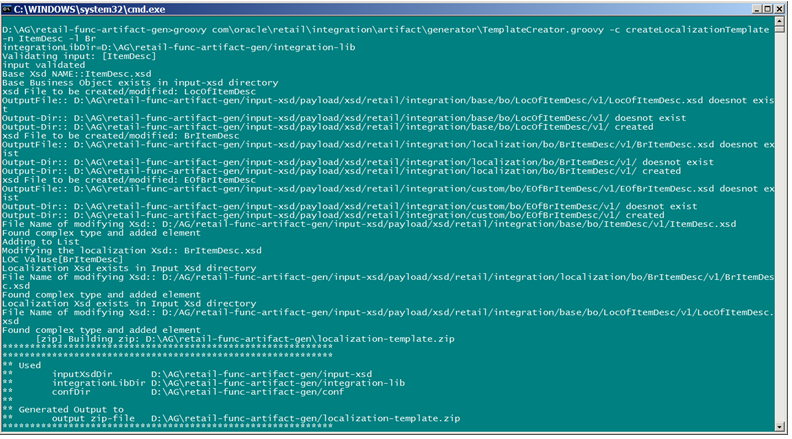
Create a localization template for base retail business object
Command:
$AG_HOME> groovy com/oracle/retail/integration/artifact/generator/TemplateCreator.groovy
-c createLocalizationTemplate -n ItemDesc -l Br
Output: The following files are created.
LocOfItemDesc.xsd in $input-xsd/payload/xsd/retail/integration/base/bo/LocOfItemDesc/v1/
BrItemDesc.xsd in $input-xsd/payload/xsd/retail/integration/localization/bo/BrItemDesc/v1/
EOfBrItemDesc.xsd in $input-xsd/payload/xsd/retail/integration/custom/bo/EOfBrItemDesc/v1/
Base XSD is modified:
ItemDesc.xsd in $input-xsd/payload/xsd/retail/integration/base/bo/ItemDesc/v1/
Create a localization template for new business object (no existing base retail business object)
Command:
$AG_HOME> groovy com/oracle/retail/integration/artifact/generator/TemplateCreator.groovy -c createLocalizationTemplate -n CustomerOrder -l Br
Output: The following files are created.
$input-xsd/payload/xsd/retail/integration/base/bo/LocOfCustomerOrder/v1/BrCustomerOrder.xsd in$input-xsd/payload/xsd/retail/integration/localization/bo/BrCustomerOrder/v1/EOfCustomerOrder.xsd in$input-xsd/payload/xsd/retail/integration/custom/bo/EOfBrCustomerOrder/v1/
After the Template Creator has been run to create the appropriate placeholders, the actual custom or localization elements can be added.
It is important to understand that the customization/extension of existing Business Objects should be performed in the ExtOfxxx XSDS of a base XSD, not the base XSD. The tool is designed to enforce this best practice.
It supports the preservation of customization/extension when there are new versions of the base objects released.
The basics of XSDs are not covered in this document.
This section explains how to add an optional element (simple type or complex type) to existing message payloads.
Edit the desired payload XSDs in ./input-xsd/ payload/xsd/retail/integration/custom/bo directory of Rib Artifact Generator tool installation. Add the optional simple or complex element to the particular message family xsd. If needed, define the type it belongs to if it does not exist.
> cd input-xsd/payload/xsd/retail/integration/custom/bo/ExtOfCurrRateDesc/v1> vi ExtOfCurrRateDesc.xsd (make changes)
The following example shows the modifications to ExtOfCurrRateDesc.xsd required to add the optional element, country.
<xs:schema elementFormDefault="qualified"    targetNamespace="http://www.oracle.com/retail/integration/custom/bo/ExtOfCurrRateDesc/v1"
    version="1.0"
    xmlns="http://www.oracle.com/retail/integration/custom/bo/ExtOfCurrRateDesc/v1"
    xmlns:retailDoc="http://www.w3.org/2001/XMLSchema" xmlns:xs="http://www.w3.org/2001/XMLSchema">
    <xs:element name="ExtOfCurrRateDesc">
        <xs:complexType>
            <xs:sequence>
                       <xs:element minOccurs="0" name="country" type="varchar23">
                       </xs:element>
             </xs:sequence>
        </xs:complexType>
    </xs:element>
        <xs:simpleType name="varchar23">
                <xs:restriction base="xs:string">
                        <xs:maxLength value="3"/>
                </xs:restriction>
        </xs:simpleType>
</xs:schema>
Run the Artifact Generator to generate various functional artifacts.
> $GROOVY_HOME/bin/groovy com/oracle/retail/integration/artifact/generator/GenArtifacts.groovy –g generateCustom
All necessary artifacts are generated as follows:
custom-retail-public-payload-java-beans.jar is generated in retail-func-artifact-gen/output-jaxb-java-beans/dist folder.
The java source files are generated in retail-func-artifact-gen/output-jaxb-java-beans/src folder
custom-retail-public-payload-database-object-types.zip is generated in retail-func-artifact-gen/output-database-object-types/dist folder.
This section explains how to add an optional element (simple type or complex type) to existing message payloads.
Edit the desired payload XSDs in ./input-xsd/ payload/xsd/retail/integration/localization/bo directory of Rib Artifact Generator tool installation. Add the optional simple or complex element to the particular message family xsd. If needed, define the type it belongs to if it doesn't exist.
> cd input-xsd/payload/xsd/retail/integration/localization/bo/BrCurrRateDesc/v1> vi BrCurrRateDesc.xsd (make changes)
The following example shows the modifications to BrCurrRateDesc.xsd required to add the optional element, country.
 <xs:schema elementFormDefault="qualified"
    targetNamespace="http://www.oracle.com/retail/integration/localization/bo/BrCurrRateDesc/v1"
    version="1.0"
    xmlns="http://www.oracle.com/retail/integration/localization/bo/BrCurrRateDesc/v1"
    xmlns:EOfBrCurrRateDesc="http://www.oracle.com/retail/integration/custom/bo/EOfBrCurrRateDesc/v1"
    xmlns:retailDoc="http://www.w3.org/2001/XMLSchema" xmlns:xs="http://www.w3.org/2001/XMLSchema">
    <xs:import
        namespace="http://www.oracle.com/retail/integration/custom/bo/EOfBrCurrRateDesc/v1"
schemaLocation="../../../../custom/bo/EOfBrCurrRateDesc/v1/EOfBrCurrRateDesc.xsd">
        <retailDoc:annotation>
            <retailDoc:documentation>It's a referenced element. For detailed description, please refer referenced element doc.</retailDoc:documentation>
        </retailDoc:annotation>
    </xs:import>
        <xs:element name="BrCurrRateDesc">
                <xs:complexType>
            <xs:sequence>
<xs:element minOccurs="0" name="country" type="varchar23">

                <xs:element maxOccurs="1" minOccurs="0" ref="EOfBrCurrRateDesc:EOfBrCurrRateDesc">
                        <retailDoc:annotation>
                                <retailDoc:documentation>Provide an extension hook to customize CurrRateDesc
                                </retailDoc:documentation>
                        </retailDoc:annotation>
                </xs:element>
            </xs:sequence>
        </xs:complexType>
        </xs:element>
        <xs:simpleType name="varchar23">
                <xs:restriction base="xs:string">
                        <xs:maxLength value="3"/>
                </xs:restriction>
        </xs:simpleType>

</xs:schema>
Run the Artifact Generator to generate various functional artifacts.
> $GROOVY_HOME/bin/groovy com/oracle/retail/integration/artifact/generator/GenArtifacts.groovy -g generateLocalization
All the necessary artifacts are generated as follows:
localization-retail-public-payload-java-beans.jar is generated in retail-func-artifact-gen/output-jaxb-java-beans/dist folder.
The java source files are generated in retail-func-artifact-gen/output-jaxb-java-beans/src folder
localization-retail-public-payload-database-object-types.zip is generated in retail-func-artifact-gen/output-database-object-types/dist folder.
The following steps must be completed to add a new custom XSD to a current set of payloads:
Add a new element to the ExtOfxxx.xsd.
Run the Artifact Generator to generate various functional artifacts.
> $GROOVY_HOME/bin/groovy com/oracle/retail/integration/artifact/generator/GenArtifacts.groovy
Upon completion of this step, all necessary artifacts are generated as follows:
custom-retail-public-payload-java-beans.jar is generated in retail-func-artifact-gen/output-jaxb-java-beans/dist folder
The java source files are generated in retail-func-artifact-gen/output-jaxb-java-beans/src folder
custom-retail-public-payload-database-object-types.zip is generated in retail-func-artifact-gen/output-database-object-types/dist folder.
To create a work area, take the following steps:
|
Note: For a base artifact, use the RibFunctionalArtifacts for RIB. For Retail Services Backbone, use the RetailFunctionalArtifacts instead. |
Navigate to Retail Artifact Generator Home. 
To create a new version workspace, select the SetupWork Areas tab. 
On the SetupWork Areas page, use the browse button to locate the RibFuncArtifact14.0.0ForAll14.0.0Apps_eng_ga.tar or the RetailFuncArtifact14.0.0ForAll14.0.0Apps_eng_ga.tar. These .tar files must be in a location that is accessible by the browser.
Click Create Work Area.
To generate artifacts, select the Generate Artifacts tab.
|
Note: At this point, the Template Creator can be used. |
Choose the artifact generator version.
Choose an artifact generation option (Custom/Localization).
If Custom/Localization is chosen, on the Generate Artifacts page, use the browse button to locate the archive file (for example, .tar, .jar, or .zip) that contains the custom/localized schemas.
This file must have the custom/localization schemas in the correct package structure, such as retail/integration/custom/bo* or retail/integration/localization/bo*.
|
Note: For information on the packaging structure and guidelines, see the Oracle Retail Functional Artifacts Guide. |
Click Generate Artifacts to start the generation process.
As the process runs, the status of its progress is displayed in the log window. When the process is complete, save file dialog windows are displayed with options to save the resulting archive files or open them for review.
The following sections describe how you can work with the Template Creator tool using its Graphical User Interface (GUI).
Take the following steps to use the Template Creator through the GUI:
|
Note: See the Creating a Work Area - Graphical User Interface section in this chapter for how to create work areas. |
Select a RIB version for customization and localization from the list of RIB versions. The list includes all versions for which the Work Area has been set up. Based on the version selected, the Activity Log panel on the right indicates recent activity, such as a list of changes saved to the server for a specific version.
When a version of RIB is selected, the contents of the Activity Log panel includes a list of files, time stamped to indicate when they were updated on the server.
Select the option to create a Custom or Localization template. If the Localization option is selected, you must select a locale from the drop down list. The following screen shows the list of locales available when the Localization option is selected. 
Based on the version selected, a list of all complex types in the form of XPath expression (such as DSDDealsDesc/DSDDeals) is available for template creation. The following screen includes the list of base business objects available for the selected version of RIB. You can also select a complex type from the list to extend/localize an existing base business object, or create a new baseless business object by providing the appropriate details as text input.
To create a new custom/localization business object, select the option to create a brand new business object and provides the complex type details in text box as shown in the following screen.
To save the created templates on the server and make them available for future use, you can select Save Changes to the Server. All successful changes are saved to the server, and the activity is logged in the Recent Activity panel.

When you click Create Template, a request is sent to the server for template creation processing.
This section provides GUI examples for the Template Creator.
Create a custom template for a base retail business object
In Panel 1, select a version (such as RIB 14.0.0). Select the custom option in Panel 2. Select the option to extend an existing base business. Select a base business object from the list (such as ASNInDesc), as shown in the following screen. You have the option of saving the changes to the server.
When Create Template is clicked, the custom-template.zip file is created. It can be downloaded, and a local copy can be saved. The zip file includes ASNInDesc.xsd and ExtOfASNInDesc.xsd.
If Save Changes on the Server is selected, the changes are copied back to the server, and the Activity Log is updated.
Create a custom template for new business object (no existing base retail business object)
In Panel 1, select a version (such as RIB 14.0.0). Select custom option in Panel 2. Select the option to create a brand new custom business object, and input the complex type (such as CustomerOrderDesc), as shown in the following screen. You have the option of saving the changes to the server.

When Create Template is clicked, the custom-template.zip file is created. It is available to download, and local copy can be saved. The zip file includes ExtOfCustomerOrderDesc.xsd. If you select Save Changes on the Server option, the changes are copied back to the server, and an Activity Log is updated.
Create a localization template for base retail business object
In Panel 1, select the version (such as RIB 14.0.0). In Panel 2, select the localization option from the drop down list (such as Brazil-Br). Select the option to localize an existing base business object. Input the complex type (such as ASNInDesc). You have the option of saving the changes to the server.
When you click Create Template, the localization-template.zip is created. It is available for download, and it can be saved on your system. The zip folder includes ASNInDesc.xsd, LocOfASNInDesc.xsd, BrASNInDesc.xsd, and EOfBrASNInDesc.xsd. If you select Save Changes on the Server option, the changes are copied to the server, and the Activity Log is updated.
Create a localization template for new business object (no existing base retail business object)
In Panel 1, select the version (such as RIB 14.0.0). In Panel 2, select a locale from the drop down list (such as Brazil-Br). Select the option to create a brand new localized business object. Input the complex type (such as CustomerOrderDesc). You have the option of saving the changes to the server.
When you click Create Template, the localization-template.zip is created. It is available for download, and it can be saved on your system. The zip file includes LocOfCustomerOrderDesc.xsd, BrCustomerOrderDesc.xsd, and EOfBrCustomerOrderDesc.xsd. If you select Save Changes on the Server option, the changes are copied back to the server, and Activity Log is updated.
After you create the template, save the generated zip file to the your system.This section explains how to add an optional element (simple type or complex type) to generated message payloads. Edit the desired payload XSDs of zip file in the following directory ”payload/xsd/retail/integration/custom/bo”. Add the optional simple or complex element to the particular message family xsd. If needed, define the type it belongs to if it does not exist.After modifying the zip file follow the steps to generate functional artifacts using GUI Generate Artifacts tab.Choose artifact generator version and artifact generation option (custom/localization).Select the saved schema archive file (custom template or localization template) by clicking on the Browse button.
Click on Generate Artifacts button to generate functional artifacts. 
As the process runs, the status of its progress is displayed in the log window. When the process completes, the save file dialog windows will display for retail-public-payload-java-beans.jar, custom-retail-payload-java-beans.jar, and the custom-retail-public-payload-database-object-types.zip with options to save the archive files or open them for review.
|
 Copyright © 2013, Oracle and/or its affiliates. All rights reserved. Legal Notices |
|