| Oracle® Retail Job Orchestration and Scheduler Oracle® Retail Job Orchestration and Scheduler Release 16.0.027 E94822-01 |
|

 Previous |
 Next |
| Oracle® Retail Job Orchestration and Scheduler Oracle® Retail Job Orchestration and Scheduler Release 16.0.027 E94822-01 |
|
Previous |
Next |
The Scheduler application JOS product suite assists in the scheduling of batch processes to run at predefined configured time intervals. A schedule determines when a job, a process, or any program must be executed, as well as the frequency of execution.
The Scheduler application runtime is based on a container-managed Java EE timer service to execute the schedules and uses Oracle WebLogic Server's implementation and management of the timer service when deployed on a WebLogic server.
The Scheduler supports various schedules ranging from simple interval schedules such as hourly, daily, and so on, to advanced cron-like scheduling.
The Scheduler supports the calling of REST services.
The Scheduler Console (Admin UI) enables runtime monitoring and administration of schedules where the user can view, create, edit, and delete schedules, manually run a schedule, enable or disable a schedule, set up notifications for schedules, and so on.
The Scheduler is a web application that provides a GUI for managing a schedule-based workload. It includes the following features:
DSL based Schedule Action - Call process flows, running any local/remote programs.
Run remote programs with REST calls.
Externalized Schedule Definition and Schedule Actions. Easily import/export schedule and action definitions.
GUI to create, edit, delete, enable, or disable schedules.
Monitor schedule executions and logs.
Monitor schedule's progress and history.
Built-in e-mail notification.
The following section describes the Scheduler concepts.
A schedule definition contains details of a schedule such as Schedule Name and Schedule Group. These indicate the logical or functional grouping of schedules and schedule description.
A schedule execution is an instance of the scheduled run of a schedule at the specified frequency.
An interval-based schedule is a schedule that repeats at fixed interval of time starting from a specific time, for example, hourly, daily, weekly, every five minutes, and so on.
A calendar-based schedule is a cron-type of schedule that specifies different times that the schedule runs. More complex schedules that can be specified as a cron expression are defined as calendar-based schedules.
The following parameters define a calendar-based schedule. These are the same as the parameters in a cron expression: Minutes, Hours, Day of Week, Day of Month, and Month.
|
Note: The Scheduler does not currently support seconds and year parameters in a calendar schedule. |
This section describes the various scheduling mechanisms.
Simple schedules are predefined schedule frequencies that are available as options for the user to choose. The following are the simple schedules that the Scheduler supports.�
Hourly
Daily
Weekly
Monthly
Weekday [Mon-Friday]
Weekend [Sat-Sunday]
Saturday
Sunday
First day of every month
Last day of every month
One time only (run once)
User-specified frequency with intervals in the units minutes, hours, days, or weeks.
The JOS Scheduler supports advanced scheduling, which is cron-like scheduling. Calendar-based schedules that can be expressed in cron-format can be set up with the advanced scheduling capability of the Scheduler. Advanced scheduling is defined with the following parameters (similar to that of cron expression) and the corresponding range of values:
Minutes: 0-59
Hours: 0-23 (12:00 a.m. - 11:00 p.m.)
Day of Week: Monday - Sunday
Day of Month: 1-31
Month: 1-12 (January - December)
If a schedule is created with multiple values for the above parameters, then the schedule will repeat at all those specified times.
The schedule frequency defines the frequency at which a schedule has to be repeated at the configured time and interval, starting from a given point of time. The schedule frequency has the following parameters that determine when the schedule must be run.
It specifies the start date and time when a particular schedule has to start executing.
For interval based schedules, this is the first time the schedule runs and then repeats based on the specified interval.
For example, a schedule with a start datetime as 2016-08-15 10:00 a.m. and a repeat of Daily will first run at 2016-08-15 10:00 a.m. and next run at 2016-08-16 10:00 a.m. and so on.
For calendar schedules (cron schedules), this defines the time when the schedule will become effective and starts executing based on the frequency. So it is not necessarily the first run of the schedule, though it very well may be.
For example, a schedule with a start datetime as 2016-08-15 10:00 a.m. (which is a Monday) but repeats every Thursday, will first run at 2016-08-18 10:00 a.m. (Thursday) and subsequently next run at 2016-08-25 10:00 a.m. (Thursday) and so on.
So the Start Datetime here signifies the datetime the schedule becomes effective. It will not run before that datetime. However, here the Start Datetime can very well be specified as 2016-08-18 10:00 a.m. (Thursday) and repeat every Thursday.
So in summary, for interval-based schedules, the first run of the Schedule equals Schedule Start Datetime. For calendar-based schedules, the first run of the Schedule may or may not be equal the Schedule Start Datetime, based on the schedule recurrence specified.
It specifies an end date and time when the schedule must stop executing and no longer run. When a schedule has no end datetime specified, it runs indefinitely.
|
Note: The end datetime is inclusive for the schedule execution, meaning if the schedule recurrence coincides with the end datetime, the schedule will execute at the end datetime and only then does not repeat. |
For example, if Schedule Start Datetime: 2016-08-15 10:00 a.m., repeat Hourly, Schedule End Datetime: 2016-08-15 11:00 a.m., then the schedule will run at 10:00 a.m. and also at 11:00 a.m. before ceasing to run.
This specifies the frequency at which the schedule repeats. This is same as described in Simple and Advanced Scheduling.
This indicates the date and time of the next occurrence of the schedule, obtained based on the configured schedule frequency.
All the date and times in the Scheduler are based on the timezone of the server (JVM) where the application is deployed.
The Scheduler Console (UI) displays the server's current date and time with timezone (the current time displayed is refreshed when the UI is refreshed).
When creating or updating a schedule and in monitoring schedule executions in Scheduler Console, users should note that the date and time are as per the timezone setup in the application server and not the local timezone.
This section describes the various schedule actions.
The Schedule Action defines what is executed when the schedule runs at the specified frequency. It is a DSL that is based on Groovy. The schedule action has a simple syntax as follows.
action {
//Define what needs to be executed, here. Say invoke a REST service.
}
Currently Schedule Action supports calling REST services. JOS process flows are called by the Scheduler as REST services.
For example, to trigger a JOS process flow named Store_Fnd_ProcessFlow_From_RMS, the following schedule action is defined.
action {
(POST[externalVariables.processFlowAdminBaseUrl + "/resources/batch/processes/operator/Store_Fnd_ProcessFlow_From_RMS"]^externalVariables.processFlowAdminBaseUrlUserAlias) as String
POST denotes the REST method.
processFlowAdminBaseUrl is an entry key in 'externalVariables' map variable used by the Scheduler runtime and specifies the BDI Process Flow Admin's base URL. The value for processFlowAdminBaseUrl is specified during install time and gets stored in the BDI System Options. For example, the value of processFlowAdminBaseUrl might be https://<host>:<port>/bdi-process-flow.
For example, https://example.com:8001/bdi-process-flow
/resources/batch/processes/operator/Store_Fnd_ProcessFlow_From_RMS is the relative REST URL to call the process flow.
It is of the form /resources/batch/processes/operator/<process flow name>.
processFlowAdminBaseUrlUserAlias is an entry key in externalVariables map variable used by the Scheduler runtime and specifies the alias name for JOS Process Flow Admin's user credentials to access the process flow REST service.
The value for processFlowAdminBaseUrlUserAlias is specified during install time and is stored in the BDI System Options.
Basic authentication is used to access the JOS process flows. The Scheduler uses processFlowAdminBaseUrlUserAlias to look up the credentials in the runtime secure wallet where the credentials specified at install-time are stored.
Scheduler by itself does not manage executions of process flows called from within the schedule action and any dependencies associated thereof. Scheduler only triggers process flows. The execution of process flows is done by the Process Flow engine.
For any dependencies between execution of process flows to be managed, it is recommended that such dependencies are defined in the JOS Process Flow Admin and not in the Schedule Action.
For example, if process-flow-2 must be run after process-flow-1 completes, use Process Flow Admin to define this dependency and not the Schedule Action.
It is recommended to avoid time-based dependency management in the execution of process flows from within the Scheduler, but rather use Process Flow Admin to coordinate such dependency execution requirements.
|
Note: For security reasons, the usage of certain keywords is not allowed in the Schedule Action DSL. When defining the schedule action in the Scheduler UI, any such forbidden keywords if used will prevent the schedule from being created or updated. A schedule cannot be run if such a keyword is present in the schedule action definition. |
There are two types of Schedule Action, Sync and Async. When creating a schedule and defining a schedule action, the user must specify whether the schedule action is sync or async. Scheduler determines the action execution statuses according to the action type specified.
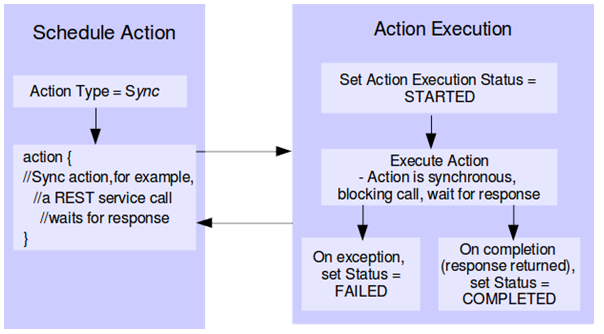
It executes synchronously and returns a result after its successful or failed completion (however long the action may run).
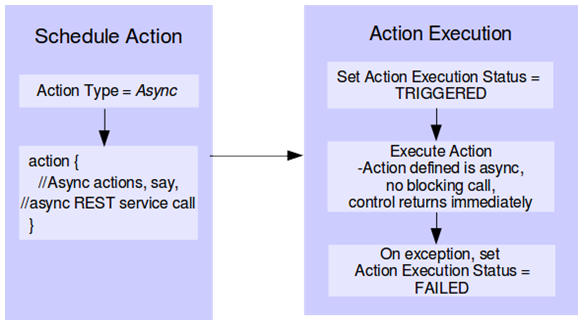
The action is asynchronous and returns a response immediately when triggered, but will continue to execute. The actual process completes at a later time. The end result of the action is not known to Scheduler in this case.
Indicates the status of execution of the schedule action when the schedule has run at the configured frequency of time.
A schedule execution can be in one of the following statuses, depending upon the Schedule Action Type and its execution.
Triggered (applicable only for Async action)
Started (applicable only for Sync action)
Failed (applicable for both Async and Sync actions)
Schedule action type determines the schedule action status during the execution life cycle.
It executes synchronously and returns a result after its successful or failed completion (however long the action may run).
When sync action starts, the Schedule Action status will marked 'STARTED'.
When the action completes and returns a successful result, the status will be marked 'COMPLETED'.
When the action does not complete because of an exception or returns a failed response (return value = ”FAILED”), then the status will be marked 'FAILED'.
The schedule action status will only be TRIGGERED when the Scheduler successfully invokes the schedule action.
In case there is an exception in invoking the action itself, then the status is 'FAILED'.
By default, all BDI process flows are asynchronous that return an execution ID when triggered, but continue to run to invoke the batch jobs that complete at a later time.
How the Action Execution Statuses are Determined
Scheduler marks the Action Execution Status as 'FAILED' when there is an exception in executing the action or when an exception is thrown from the schedule action. In order for the Scheduler to mark the execution of schedule action as 'FAILED' when the action has been executed, the action should either throw an exception or return value as 'FAILED'.
If the schedule action returns null or any other return value gracefully, the action execution status will be marked 'TRIGGERED' for async action and 'COMPLETED' for sync action, and the returned response is stored as such in the Schedule Action Execution Log.
A schedule can be in one of the following statuses:
Active: An active schedule is running at the specified frequency.
Inactive: An inactive schedule has reached its end datetime and no longer runs.
Disabled: A disabled schedule indicates that the user has disabled the schedule to not run at its specified frequency.
This section describes the various Scheduler Runtime options.
As the Scheduler is deployed and the application starts up, the Scheduler service performs the following actions:
Loads the schedules defined in the seed data SQL script in the installer. This means, schedule definitions are inserted in the corresponding Scheduler infrastructure table.
Loads the schedule action DSL for each corresponding schedule from the *_Action.sch files in the installer. Each schedule definition in the table is updated to include its corresponding schedule action.
The Scheduler service sets up the runtime timers for each schedule.
When the application is deployed for the first time, all schedules will be set up new. However, when the application is redeployed or the application server is restarted, any existing schedule timers will not be recreated.
All seed data schedules must be specified with status as Active. This ensures that the schedule timers are created at startup and the schedules start to run as per the frequency defined.
When a schedule action DLS contains any restricted keyword, the schedule will be Disabled at startup and will not run. The user must correct the schedule action definition from the Scheduler UI and enable the schedule to make it active.
Scheduler uses application server's implementation of Java EE compliant timer service to execute the schedules at runtime. When a schedule is created, Scheduler sets up a timer in the application server based on the schedule frequency configured. At each scheduled time, the application server invokes the callback method where the Scheduler will execute the schedule action.
Each schedule timer executes in separate thread, so schedule executions do not block each other. Each schedule execution itself is run synchronously in its own thread; that is, the execution is blocked until it completes. But the schedule action can be specified to be asynchronous (async action) or synchronous (sync action) based on the action DSL defined for the schedule.
It is appropriate to specify a schedule action as 'async' when all the service calls made within the schedule action are non-blocking asynchronous calls and the action defined runs in different thread from that of the Scheduler.
If any of the service call within the schedule action is a blocking synchronous call and the action is not defined to run in separate thread, then the action type must be 'sync'.
Specifying the schedule action type 'async' or 'sync' based on the action DSL definition determines the runtime execution behavior and statuses of the schedule execution. This is explained below.
When the schedule action execution starts for an async action, the action execution status is set to TRIGGERED and the action is executed. As the action type is specified Async, the action should be non blocking, either returning a response immediately or not returning a response and continuing execution, but runs in separate thread returning the control immediately.
The execution of the action and the eventual status thereof will not be known to Scheduler. Once the control is returned, the schedule action execution ends but the status remains TRIGGERED. In case of an exception when the action is triggered, the status is set to FAILED and the execution ends.
When the schedule action execution is started for a sync action, the action execution status is set to STARTED. As the action type is specified sync, the action is blocking and runs in the same thread as the schedule execution.
The schedule execution ends only when the action completes returning a response or throws an exception, thereby releasing the execution thread.
After the schedule action completes successfully returns, the status is set to COMPLETED. But if the action return value is FAILED or the action returns throwing an exception, the status is set to FAILED.
For sync actions, the action execution status in Scheduler can indicate the actual execution status (either completed or failed) of the process that was executed.
All schedule timers created by the Scheduler are persistent. This enables a failover feature that in case of unexpected server shutdown or downtime, the missed schedules will be run once the server is back up. That is, the schedules that should have been run during the downtime will be run as soon as the server is back up and the application is in running state.
|
Note: A missed schedule will be run only once, not as many times as was missed during the downtime. For example, if a schedule is scheduled to run every five minutes and the application server is down for fifteen minutes and restarted, the schedule will be run only one time and not three times. This is a feature supported by the Java EE container. |
Scheduler supports e-mail notification of scheduled runs at runtime. The available options of events for notifications on a scheduled run are:
Notify when the schedule action execution begins.
This occurs when the schedule action execution is Started for sync action and before triggering of action execution for async action.
Notify when the schedule action execution ends successfully.
This occurs when the schedule action execution status is Triggered for async actions and Completed for sync actions.
Notify when the schedule action execution fails.
This occurs when the status of schedule action execution is Failed, when one of the following occurs: An exception is caught in the Scheduler service itself, when an exception is thrown by the schedule action DSL, when the schedule action DSL returns the string FAILED.
The Scheduler infrastructure relies on the following schema to store the schedule definitions and schedule executions.
Scheduler service captures all schedule executions at runtime and persists the execution instances in the corresponding infrastructure table.
Table 5-1 Scheduler Infrastructure Schema
| Table Name | Description |
|---|---|
|
BDI_SCHEDULE_DEFINITION |
This table contains all the schedule definitions created, including schedule frequency, schedule notification information and schedule action DSL for each schedule. Seed data schedules are loaded in this table at deployment time during application startup. |
|
BDI_SCHEDULE_EXECUTION |
All schedule executions at runtime are persisted in this table. |
|
BDI_SYSTEM_OPTIONS |
This table contains system-level global parameters as key-value pairs used by the Scheduler at runtime, such as, Process Flow Admin Base URL, Process Flow Admin User Alias, which are configured at install time by the user. User can also add system parameters to be made available to the schedule actions. |
|
BDI_EMAIL_NOTIFICATION |
This table contains email notification details |
Best practices include:
Use POST DSL method to post to REST URL.
Use externalVariables for accessing variables from BDI_SYSTEM_OPTIONS table.
Use sch as extension for schedule action DSL file.
Try not to use time-based dependency management between schedules; instead, use process flow to manage dependency.
To schedule any existing jobs or programs, try to expose them as REST services and use the built-in DSL POST method to schedule action for executing the programs.
Minimize use of synchronous schedule actions since they block until completion during each schedule execution.
Scheduler Console (Admin UI) is a web user interface provided by Scheduler where users can monitor and manage schedules, including creating, updating, deleting, disabling, or enabling schedules, manually running schedules, viewing schedule executions and schedule logs.
The following describes various functions available in Scheduler Console in the current release.
|
Note: It is recommended to use the Chrome web browser to access Scheduler Console since the calendar widget for datetime fields is supported by Chrome browser and not by Firefox or IE. |
This is the home page that provides the overall summary of the scheduler runtime. It displays the following information.
This displays the total count of:
Active Schedules
Schedule Executions today
Schedule Executions that were successful today
Schedule Executions that failed today
|
Note: The use of ”Today” in the figure below indicates the duration from midnight to now. |
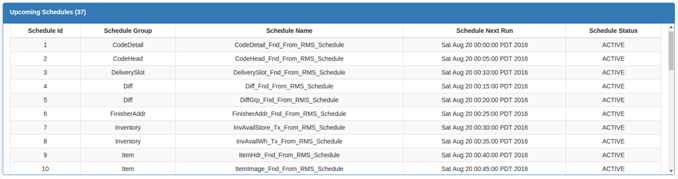
Upcoming Schedules
Lists the future schedules that are expected to run in the next 24 hours from now.�
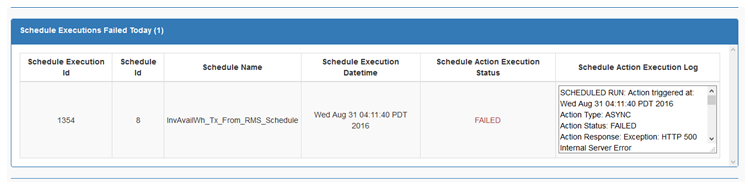
Schedule Executions Failed Today
This lists the schedule executions that have failed today (from midnight to now).
Schedule Executions Completed / Triggered Today
This lists the schedule executions that are completed or triggered today (from midnight to now). A status of Completed represents sync actions and status of Triggered represents async actions.
Schedule Executions In Progress Today
This lists the schedule executions that were started but have not completed and are in progress today (from midnight to now). This is applicable only for sync actions that are in Started status.
Schedules Past Due
This lists the schedules that failed to run at the scheduled time (that is, schedules whose next run time is before the current time are displayed here). Ideally, there should be no missed schedules unless there may be an internal server issue that the schedule timer failed to run.
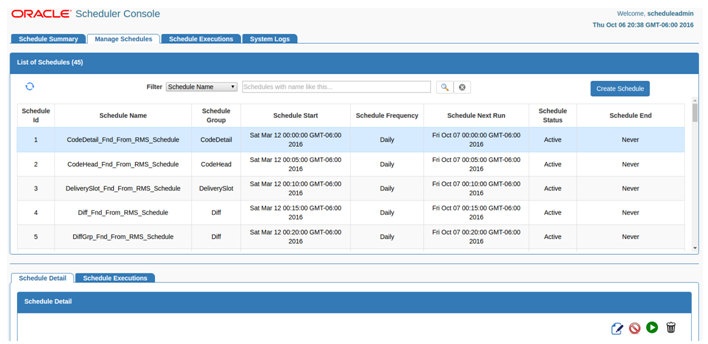
The Manage Schedules page displays a list of all the schedules and details of each schedule in the Schedule Detail view and their corresponding schedule executions in the Schedule Executions view for the schedule.
The schedules list provides options to filter schedules based on Schedule Name, Schedule Group, Schedule Status, and Schedule Frequency. There is also an option to filter upcoming schedules based on a date range.
The Create Schedule function will be available in this page for Admin users.
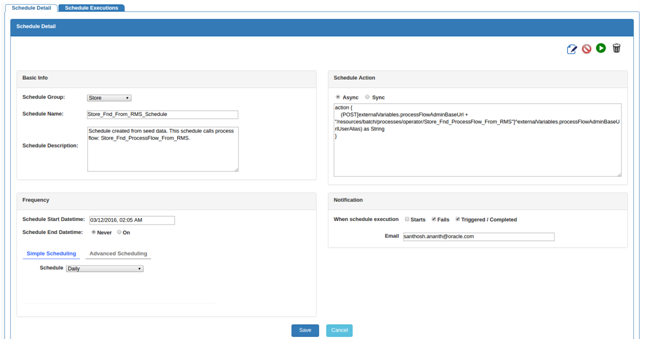
The Create Schedule option displays one page where the user can enter and save all required information to create a schedule. The page displays input fields under four sections as follows.
Basic Information
Schedule Action
Frequency
Notification
Schedule Name, Schedule Group, and Schedule Description are entered under Basic Info. Schedule Name and Schedule Group are required fields.
Schedule Name must be unique. The user can choose an existing Schedule Group or add a new group name for the schedule.
There is limitation to the number of characters that these fields can accept.
Specify a valid schedule action definition here that will get executed when the schedule runs.
If any restricted keyword is present in the action definition, the schedule cannot be saved, and when saving the schedule, an error highlighting the restricted keyword will be displayed.
Also choose here whether the schedule action is Async (which is the default selected option) or Sync.
|
Note: The schedule action is not validated or compiled for syntax when creating a schedule, so any syntax or programming errors in the action definition will result in an exception at runtime and the schedule execution will fail. |
It consists of Schedule Start Date time, End Date time, and Schedule Recurrence.
Schedule End Datetime is Never by default, meaning the schedule never ends and repeats indefinitely. If the schedule has an end datetime, the user can enter a specific datetime.
Start Datetime defaults to 5 minutes from current time and End Datetime defaults to 6 minutes from current time when chosen.
Scheduler provides two options to specify recurrence of schedule: Simple Scheduling and Advanced Scheduling. Use the options tabs to toggle between Simple and Advanced Scheduling options.
Start and End datetimes should be future dates. Schedule End datetime if specified should be after the scheduled start datetime. These validations will be done when saving the schedule.
Simple Scheduling
Simple Scheduling provides the following predefined schedules that the user can choose from a drop-down list.
Hourly
Daily (selected by default)
Weekly
Every Weekday [Mon-Friday]Monthly
On Weekends [Sat-Sunday]
Every Saturday
Every Sunday
First day of every month
Last day of every month
One time only
Specify a different frequency. User can use this option to specify a recurring interval in minutes, hours, days or weeks, for example, 30 minutes, 2 hours, 3 days, and so on.
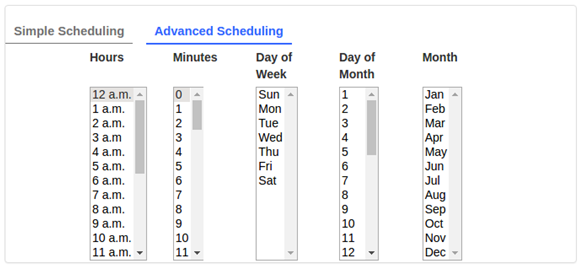
Advanced Scheduling
Advanced Scheduling enables the user to specify complex schedules similar to a cron expression. The user can choose multiple values for Hours, Minutes, Day of Week, Day of Month, and Month options using the multi-select lists.
The default schedule frequency here is daily midnight (Hours: 12 a.m., Minutes: 0 are the values selected by default).
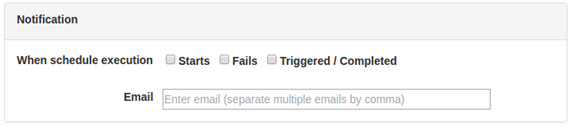
Use the schedule notification option to enable e-mail notification for the schedule when schedule execution starts or fails or completes.
Enter valid e-mail addresses for notification. When enabled, e-mail alerts will be sent based on the options selected.
When this option is chosen, e-mail will be sent when the schedule execution starts, that is, when the schedule runs at the scheduled interval, and just before the execution of schedule action.
An e-mail is sent when there is an exception in schedule execution or when the schedule action throws an exception, or returns a Failed response. This means the schedule action execution will be in Failed status.
An e-mail will be sent when the schedule action execution status is Triggered (for async actions) and Completed (for sync actions). This means the schedule execution is successful.
|
Note: For schedule notification to work, the mail session must have been configured in the WebLogic server. Refer to the JOS Installation Guide for details on the configuration of a mail session. |
A schedule can be updated by selecting the schedule from the Manage Schedules page and using the Edit option in Schedule Detail view.
The Edit page is same as that of the Create Schedule page with the schedule information populated. Update the values as required in the relevant sections as explained previously for creating schedule. Only an Admin user can edit a schedule.
|
Note: Updating the schedule frequency will validate the schedule start datetime and end datetime (if specified), similar to when creating a schedule. |
Updating any other details other than schedule frequency will not validate the existing schedule frequency, as the schedule will continue to run at the already defined frequency and only the other details of schedule definition will get updated as modified by the user.
When changing the schedule action definition, any restricted keywords will be validated.
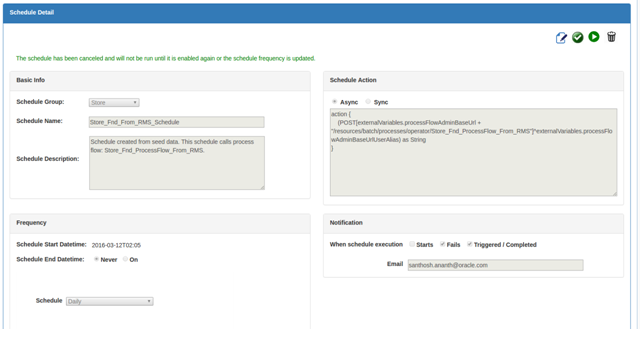
A schedule can be disabled by selecting the schedule from Mange Schedule page and using the Disable schedule option in the Schedule Detail view. Only Admin and Operator users can disable a schedule.
Disabling a schedule will change the schedule status to Disabled and the schedule will no longer run at the specified frequency. However, the schedule can be manually run using the Run Schedule Now option.
|
Note: An Inactive schedule cannot be disabled, since an inactive schedule has reached its end already and no longer runs. |
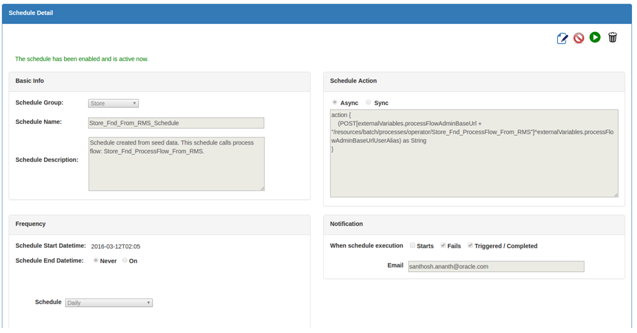
A disabled schedule can be enabled again using the Enable schedule option from the Schedule Detail view. Only Admin and Operator users can enable a schedule.
Enabling the schedule will change the status of the schedule to Active and the schedule will resume running at the specified frequency.
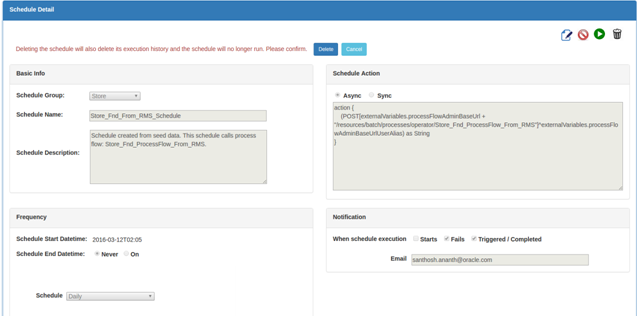
A schedule can be deleted using the Delete schedule option in the Schedule Detail view. Only an Admin user can delete a schedule.
|
Note: Deleting a schedule will delete the schedule definition and also its entire execution history. The schedule will no longer exist and will not run after deletion. There is no way to restore a deleted schedule except by creating the schedule again. |
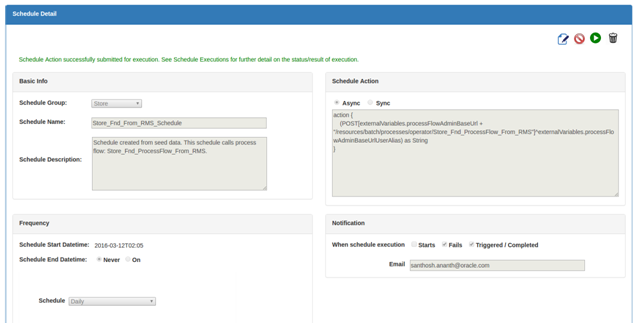
Any schedule can be manually run using the Run Schedule Now option from the Schedule Detail view. Inactive and disabled schedules can also be manually run.
This option is provided so that the user can run a schedule on demand when required. Only Admin and Operators can access this function.
When the schedule is run manually, the schedule action is submitted for execution in the backend and the result of execution can be seen from the Schedule Executions view.
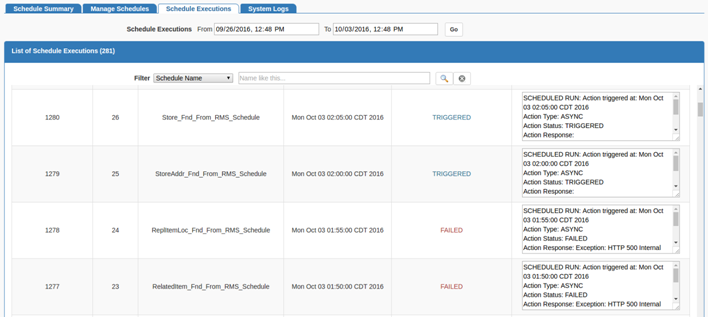
From the Schedule Executions page, the user can view all available historical schedule executions. The page will display schedule executions for the last one week by default. The user can use the search option to enter a different date range to obtain the corresponding schedule executions.
Within the list of schedule executions, the records can be filtered based on Schedule Name, Action Execution Status, and any string within the Action Execution Log. The list of scheduled executions are sorted by schedule execution datetime, the latest first.
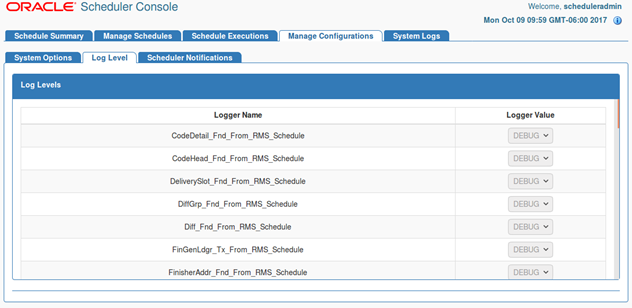
From the Manage Configurations page, user can manage log levels, notifications, and system options.
Log Level
The Log Level page displays log levels for all schedules. Users can change log level for one or more schedules.
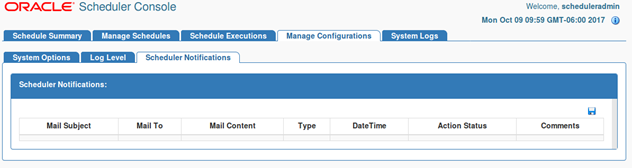
Notifications
Users can view/update notifications details from the Scheduler Notifications page.
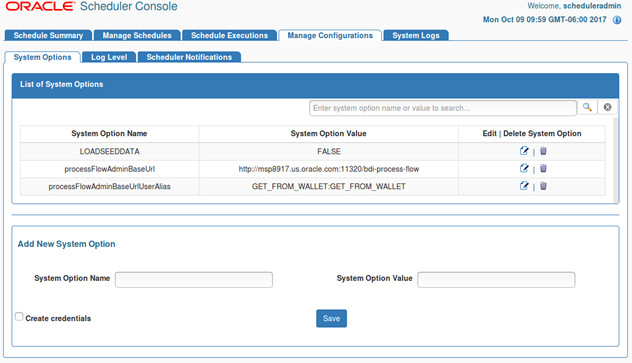
System Options
Users can add/update/delete system options from the System Options page. Credentials can also be created when a system option is created.
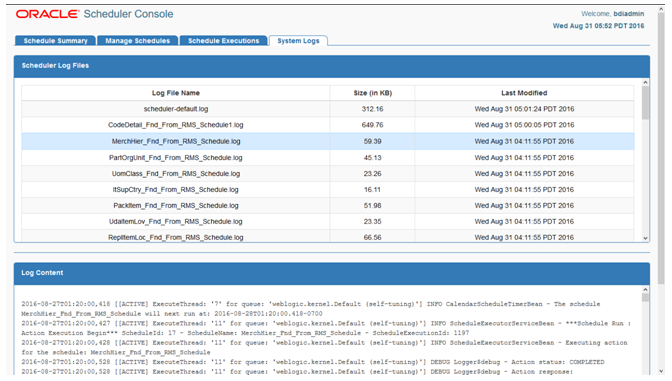
The System Logs page displays list of all schedule log files and log contents. Each schedule has its own log file, enabling easy access for the user to view the execution logs and other information from the log files for diagnosing and troubleshooting issues.
The list of log files are sorted by last modified time of file, with most recently modified file first.
This section describes the various scheduler security considerations.
The Scheduler application uses basic authentication to authenticate users and allow access to the requested resources based on authorization. Only valid users can access the Scheduler Console and the REST resources. The Scheduler accesses BDI process flows using basic authentication.
Users need to belong to one of these roles:
Admin (assigned to BdiSchedulerAdminGroup in WebLogic Server)
Operator (assigned to BdiSchedulerOperatorGroup in WebLogic Server)
Monitor (assigned to BdiSchedulerMonitorGroup in WebLogic Server)
Only authorized users with a specific role are allowed to access certain functionality in the Scheduler Console.
Users with the Admin role have access to all the functions in Scheduler. Users with the Operator role have limited authorizations to use only certain functions. Users with the Monitor role only have view/read-only access to Scheduler Console.
This section describes the various Scheduler operational considerations.
The Scheduler application is secured with role based security authorization. It is recommended to use separate users for Monitor, Operator, and Admin roles.
Schedules and executions can be effectively monitored using Scheduler Console. The console provides detailed action execution log and log files for each of the schedules that can be used to verify the runtime executions of schedules and related information.
Each schedule execution contains the Schedule Action Execution Log that provides descriptive information on the scheduled run or manual run of the schedule. The Schedule Action Execution Log provides information as follows.

For example, for a successful execution of schedule ItemHdr_Fnd_From_RMS_Schedule at the scheduled frequency, and action that triggers the process flow ItemHdr_Fnd_ProcessFlow_From_RMS, the Schedule Action Execution Log will be:

In case of an exception (for example, a connection error when invoking a process flow), the action execution log will be:

The previous action execution log examples indicate async actions. For sync actions, the action execution log also shows when the schedule action started and when it completed, which is particularly useful for a long running action for which the Scheduler waits for the response until completion. For example,

|
Note: The Action Response shows the value that the schedule action DSL finally returns after completion. |
Each schedule has its own log file. For example, a schedule named Store_Fnd_From_RMS_Schedule will have its log file named Store_Fnd_From_RMS_Schedule.log.
The log file contains detailed information on schedule executions which can be scheduled runs or manual runs, logs of actions such as disabling and enabling the schedule, action log on schedule updates such as change in schedule frequency, and, in case of any exceptions, the exception stack trace.
Users can use the following keywords to search for specific information in the schedule log file.
Table 5-3 Schedule Log File Keyword Descriptions
| Keyword | Description |
|---|---|
|
ScheduleId |
The primary key Id of schedule. |
|
ScheduleName |
The schedule name. |
|
ScheduleExecutionId |
The execution Id of schedule run instance. |
|
Action Execution Begin |
Indicates the start of the log when schedule action begins. |
|
Action Execution End |
Indicates the end of the log when schedule action ends. The log of the schedule action execution can be found between the two strings: ***Schedule Run: Action Execution Begin*** and ***Schedule Run: Action Execution End*** For manual run, it will be ***Manual Run: Action Execution Begin*** and ***Manual Run: Action Execution End*** |
|
Action execution exception |
The detailed exception message and stacktrace will be shown following this string, when an exception has occurred in schedule action execution. |
As the schedules run, schedule execution records are stored in the BDI_SCHEDULE_EXECUTION table.
This table will grow larger as the number of schedule executions increase. It is recommended to periodically purge historical schedule executions from the table that are older and no longer necessary, and only retain recent schedule executions of a particular period, say for the last one month to now. This will help keep the table size within certain limits and prevent database growth.
This section describes the various Scheduler customizations.
The SQL script containing the seed data schedule definitions is located in the jos-scheduler-home/setup-data/dml folder.
During the initial deployment of Scheduler application, seed data schedules are loaded into schedule definition table and the corresponding schedules are created.
If the Scheduler application must be redeployed and the seed data schedules must be reloaded during the redeployment (that is, to reset the schedules to the initial state as per seed data), set the LOADSEEDDATA column in BDI_SYSTEM_OPTIONS table to TRUE, and un-deploy and redeploy the application.
|
Note: The above redeployment procedure will reset the current schedule definitions (that is, existing schedules and any changes will be deleted) and the schedules will be recreated as per seed data definitions. Use this option with caution and only when absolutely necessary. |
By default, all BDI seed data schedules are scheduled to run daily, starting at midnight (each schedule running with a gap of 5 minutes). The user can edit the seed data and add new schedules to be loaded during deployment by updating the seed data SQL script and adding corresponding schedule action scripts in the bdi-scheduler-home install directory before starting the installation.
Seed data sql file: jos-scheduler-home/setup-data/dml/seed-data.sql
Schedule Action dsl files: jos-scheduler-home/setup-data/dsl
An insert statement for a schedule seed data definition will look like below (SQL for Oracle database):
INSERT INTO BDI_SCHEDULE_DEFINITION (schedule_id, schedule_name, schedule_group, schedule_description, schedule_status, schedule_start_datetime, schedule_type, schedule_frequency, schedule_notification, schedule_notification_email, schedule_action_type, schedule_action_definition) VALUES (7, 'InvAvailStore_Tx_From_RMS_Schedule', 'Inventory', 'Schedule created from seed data. This schedule calls process flow: InvAvailStore_Tx_ProcessFlow_From_RMS.', 'ACTIVE', TIMESTAMP '2016-03-12 00:30:00', 'SIMPLE', 'DAILY', 'ON_SUCCESS,ON_ERROR', 'user@example', 'ASYNC', 'InvAvailStore_Tx_From_RMS_Schedule_Action.sch')
|
Note: When adding or editing schedule definitions in seed data to be loaded at application startup, all of these fields (as shown in the previous SQL statement) are required fields to create a schedule at startup. |
schedule_id should be a unique number for each schedule.
schedule_name should be unique.
schedule_status needs to be ACTIVE for the schedule to be created and active.
schedule_type should be SIMPLE with any of the schedule_frequency values mentioned above. Advanced schedule (calendar schedules with complex cron expression) is not supported through seed data during deployment.
schedule_start_datetime:
Must be in the format yyyy-mm-dd hh:mm:ss
For example, 2016-01-01 00:00:00, 2016-01-01 18:30:00
schedule_frequency:
Valid values are: DAILY, HOURLY, WEEKLY, MONTHLY, WEEKDAY, WEEKEND, SATURDAY, SUNDAY, FIRSTDAYOFMONTH, LASTDAYOFMONTH, ONCE
schedule_notification:
Valid values are: ON_START, ON_SUCCESS, ON_ERROR (separate multiple values by comma)
schedule_email:
Valid e-mail id for notification (separate multiple e-mails by comma). E-mail is required if a schedule_notification is specified.
schedule_action_type:
Valid values are (based on the action specified): ASYNC or SYNC
schedule_action_definition in seed data refers to the name of the corresponding schedule action DSL file (this will get loaded at startup).
Each schedule should have corresponding schedule action DSL script defined. This will be the action that gets executed when the schedule runs.
To load the schedule action DSL during deployment, add the schedule action DLS file under bdi-scheduler-home/setup-data/dsl with file name convention: <Schedule Name>_Action.sch.
For example, for adding a new schedule named Schedule_1, add schedule action DSL script Schedule_1_Action.sch. During deployment, Scheduler will create Schedule_1 and update the schedule definition with the action script from the corresponding file Schedule_1_Action.sch.
The seed data schedules in Scheduler are the schedules that call the JOS process flows provided out-of-the-box. The Schedule Actions define the REST calls to the JOS process flows.
In an enterprise implementation, there will be requirements to schedule batch processes, any recurring jobs or activities that are not BDI process flows. There can also be existing batch processes or services that need to be scheduled.
The Scheduler can be used for such scheduling requirements by defining appropriate Schedule Action to invoke the services.
Scheduler can be used to schedule RESTful services and, as the Schedule Action is a DSL based on Groovy, valid Groovy or Java code can also be used within the action part that will be executed by the Scheduler based on the defined schedule.
The syntax for Schedule Action is as follows.

The following Schedule Action syntax specifies how a REST service can be called from Scheduler (assuming the REST resource does not require any authentication). The response from the REST service will be treated as a string.

This is a simple approach for scheduling existing and new services that can be exposed as REST services.
The Schedule Action syntax to call a REST service with authentication and with the base URL configured in System Options as follows.

The externalVariables is the name of the variable used internally by the Scheduler to access system options parameters. Any parameters (key-values) configured in System Options can be accessed using the notation externalVariables.<my-system-option-parameter>
Admin users can use the System Setting RESTful service to add or update system options parameters, and setting up credentials (stored in wallet) for any authentication to be used by the application. Refer to Appendix A for details on the System Setting REST resources.
In the above example, the user can add system option parameters named myRESTServiceBaseUrl with the REST resource base URL value (for example, http://<myserverhost>:<port>/myapp) and myRESTServiceBaseUrlUserAlias, which will be the alias name to be used for authentication and the value of this parameter should be GET_FROM_WALLET:GET_FROM_WALLET to indicate that the corresponding credentials for the alias need to be obtained from the wallet during runtime by the application.
Any failure in schedule execution can be analyzed in the Scheduler application by checking the Scheduler log files for the corresponding schedule.
If a schedule execution is FAILED due to an exception response from process flow, then the details of the corresponding process flow execution instance, the exception details, and any stack trace can be viewed in the corresponding process flow logs using Process Flow Admin console for further troubleshooting.
|
Note: The schedule execution where a JOS process flow is called is only a trigger for the process flow execution, so the actual execution of process flow and the status and logs thereof can only be viewed in the JOS Process Flow Admin console. |
Scheduler Console provides a calendar widget for datetime fields that is supported only by Chrome browser. The latest version of the Chrome browser is recommended for access to the Scheduler Console.
If any other browser is used that does not support the calendar widget for the datetime input, the datetime fields may appear as a text box. Users can enter the datetime input as text, but the value should be in the format of 'yyyy-MM-ddTHH:mm', for example, 2016-01-01T20:00. There is no loss of functionality due to this limitation however.