| Oracle® Retail Job Orchestration and Scheduler Oracle® Retail Job Orchestration and Scheduler Release 16.0.027 E94822-01 |
|

 Previous |
 Next |
| Oracle® Retail Job Orchestration and Scheduler Oracle® Retail Job Orchestration and Scheduler Release 16.0.027 E94822-01 |
|
Previous |
Next |
This chapter provides details about the following use cases.
The following steps outline the procedure for creating a batch job in Job Admin.
Download JosJobAdmin16.0.0ForAll16.x.xApps_eng_ga.zip and unzip the file.
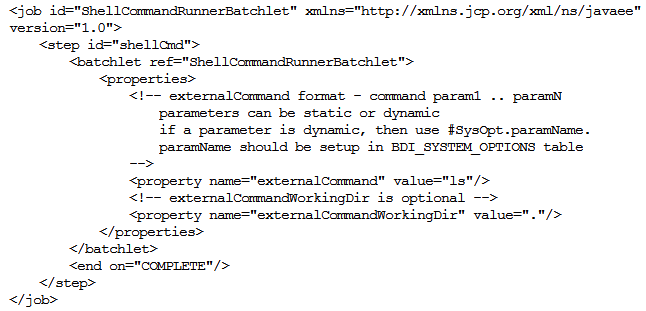
Create job XML files using Java batch specification. See the following Job XMLsample.
Copy job XML files to jos-job-home/setup-data/META-INF/batch-jobs folder.
Copy jar file that contains code related to jobs in jos-job-home/lib folder.
Run the deployer script in jos-job-home/bin folder.
Job parameters can be passed to a shell script from the job using the following syntax in the job.
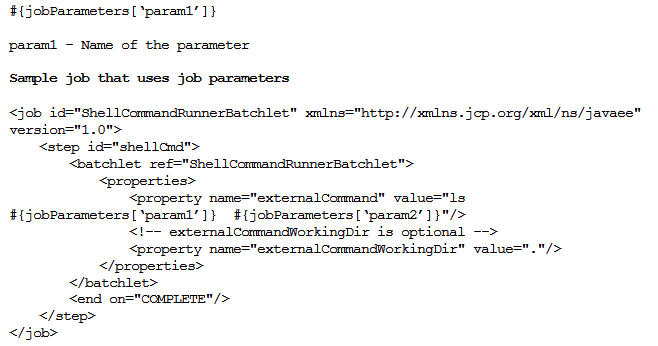
If the following parameters are entered in the Job Admin UI during the launching of the above job, the following command will be run by the job.
Job Parameters: param1=-a,param2=-l
Command executed: ls -a -l
System options can be passed to a shell script from the job using the following syntax in the job.
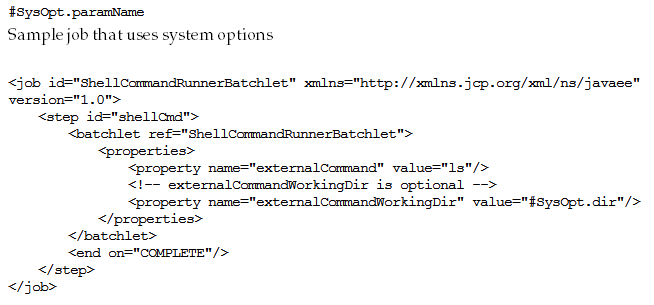
If the following system option is set in the Job Admin UI, the following command will be run by the job.
System Option: dir=/home/batch
Command executed in the working directory /home/batch.
Java system properties can be passed to a shell script from the job using the following syntax in the job.
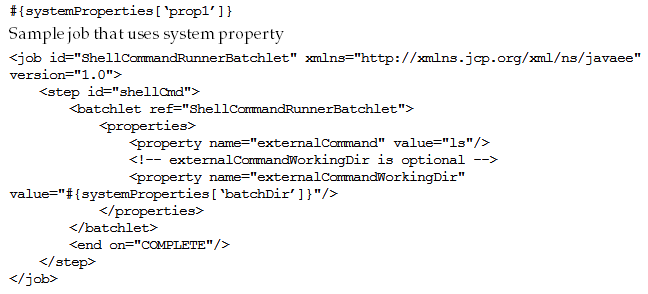
If the following system property is set in the JVM for Job Admin, the following command will be run by the job.
System Property: -DbatchDir=/home/batch
Command executed in the working directory /home/batch.
For running multiple jobs that must run in sequence (single flow), create a DSL to chain the jobs.
The following process flow runs two jobs, jobA and jobB in sequence.The activity AbcActivty starts jobA by calling a REST endpoint in Job Admin. The activity AbcStatusActivity calls a REST endpoint in Job Admin to check the status of the jobA. It waits until the job is complete or failed. This is a standard pattern for running a batch job. After jobA is complete, the process flow engine runs the jobB.
process {
name "AbcProcess"
var ([a:"b", c:"d", e: 5])

begin{
    action{
        println "$activityName Load variables"
        println "Access externalVariables=$externalVariables"
        return "okay"
    }
    on "okay" moveTo "AbcActivity"
}

activity{
    name "AbcActivity"
    action{
startOrRestartJob(externalVariables["jobAdminUrl"],"JobA", externalVariables["jobAdminUrlUserAlias"])
        "okay"
    }
    on "okay" moveTo "AbcStatusActivity"
on "error" moveTo "ErrorActivity"
}

activity{
    name "AbcStatusActivity"
 action{
waitForJobCompletedOrFailed("AbcActivity",externalVariables["jobAdminUrl"] + "/resources/batch/jobs/JobA/" + processVariables["jobExecutionId"], externalVariables["jobAdminUrlUserAlias"])
        "okay"
    }
    on "okay" moveTo "DefActivity"
}

activity{
   name "DefActivity"
    Action{
startOrRestartJob(externalVariables["jobAdminBaseUrl"],"JobB", externalVariables["jobAdminUrlUserAlias"])
"okay"
    }
    on "okay" moveTo "DefStatusActivity"
}

activity{
    name "DefStatusActivity"
    action{
waitForJobCompletedOrFailed("DefActivity",externalVariables["jobAdminUrl"] + "/resources/batch/jobs/JobB/" + processVariables["jobExecutionId"], externalVariables["jobAdminUrlUserAlias"])
"okay"
    }
    on "okay" moveTo "end"
}
 activity{
    name "ErrorActivity"
    action{
        println "$activityName This is error activity"
        return "okay"
    }
    on "okay" moveTo "end"
}

end{
    action{
        println "Got to end"
        return "COMPLETED"
    }
}
}
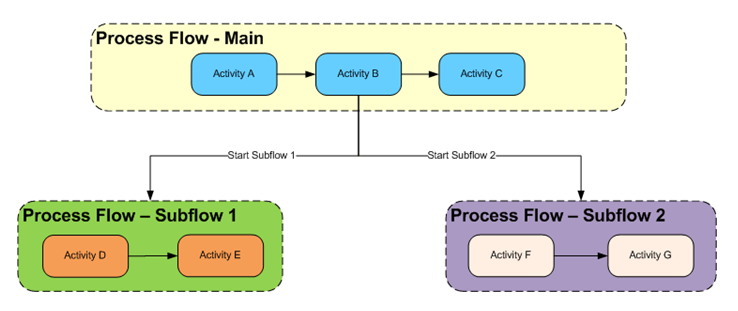
The main flow must fork other flows. Use the POST method to start a process flow from another process flow.
In this sample flow, the activity GhiProcessActivity posts a request to the process flow application to start a new process flow GhiProcess and the main flow continues with rest of the activities. The sub-flow runs independently of the main flow.
Main Flow
process {
name "DefProcess"

begin{
    action{
    }
    on "okay" moveTo "GhiProcessActivity"
}

activity{
    name "GhiProcessActivity"
    action {
(POST[externalVariables.processFlowAdminBaseUrl + "/resources/batch/processes/operator/ProcessGhi"] ]^externalVariables.processFlowAdminBaseUrlUserAlias)
           "okay"
    }
    on "okay" moveTo "DefActivity"
}

activity{
    name "DefActivity"
    action{
"okay"

    on "okay" moveTo "end"
}

end{
    action{
        return "COMPLETED"
    }
}
}
Sub Flow
process {
name "GhiProcess"

begin{
    action{
    }
    on "okay" moveTo "GhiActivity"
}

activity{
    name "GhiActivity"

    action{
//do something here
    }
    on "okay" moveTo "end"
}

end{
    action{
        return "COMPLETED"
    }
}
}
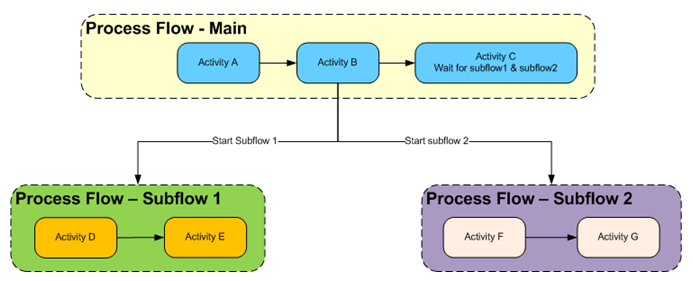
Process flow Abc starts process flow Def and Xyz. Process flow Abc must wait until Def and Xyz process flows are complete. The activity AbcActivity waits until DefProcess and XyzProcess are complete. Use waitForProcessInstancesToReachStatus method to wait for other flows to complete.
process {
name "AbcProcess"

begin{
    action{
"okay"
    }
    on "okay" moveTo "DefAndXyzActivity"
}

activity{
    name "DefAndXyzActivity"
    action {
def defExecution = ((POST[externalVariables.processFlowAdminBaseUrl + "/resources/batch/processes/operator/ProcessDef"] ]^externalVariables.processFlowAdminBaseUrlUserAlias) as ProcessExecutionIdsVo.ProcessExecutionIdVo)
processVariables[’processDefExecution'] = defExecution.executionId
def xyzExecution = ((POST[externalVariables.processFlowAdminBaseUrl + "/resources/batch/processes/operator/ProcessXyz"] ]^externalVariables.processFlowAdminBaseUrlUserAlias) as ProcessExecutionIdsVo.ProcessExecutionIdVo)
processVariables[’processXyzExecution'] = xyzExecution.executionId
           "okay"
    }
    on "okay" moveTo "AbcActivity"
}

activity{
    name "AbcActivity"
    Action{
waitForProcessInstancesToReachStatus([processVariables[’processDefExecution'],       processVariables[’processXyzExecution']], PROCESS_COMPLETED, LOGICAL_AND)
"okay"
    }
    on "okay" moveTo "end"
}

end{
    action{
        println "Got to end"
        return "COMPLETED"
    }
}
}
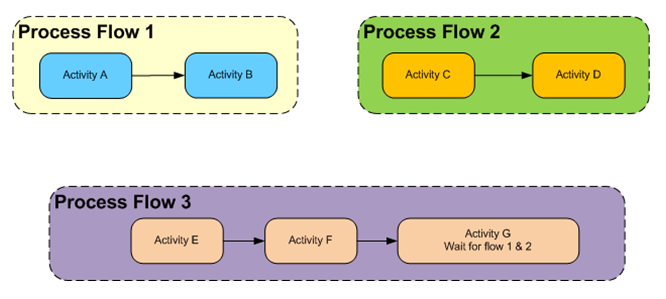
Process flow Def and Process flow Xyz run independently. Process flow Abc has to wait until process Def and Xyz are complete. Use waitForProcessNamesToReachStatus to wait for other processes to complete.
process {
name "AbcProcess"

begin{
    action{
    }
    on "okay" moveTo "AbcActivity"
}

activity{
    name "AbcActivity"
    action{
waitForProcessNamesToReachStatus([’DefProcess':2, ’XyzProcess':2], now().minusDays(1), PROCESS_COMPLETED, LOGICAL_AND, LAST_EXECUTION_STATUS)
"okay"
    }
    on "okay" moveTo "end"
}

end{
    action{
        return "COMPLETED"
    }
}
}
Process flow Abc must share data with process flow Def. Use persistGlobalUserData and findGlobalUserData APIs to share information.
process {
name "AbcProcess"
begin{
    action{
    }
    on "okay" moveTo "AbcActivity"
}
activity{
    name "AbcActivity"
    action{
// Persist date as String
persistGlobalUserData(”workDayStart”, now().minusDays(1).toString())
"okay"
    }
    on "okay" moveTo "end"
}
end{
    action{
        return "COMPLETED"
    }
}
}

process {
name "DefProcess"
begin{
    action{
    }
    on "okay" moveTo "DefActivity"
}
activity{
    name "DefActivity"
    action{
/fetch the date from db
def workDayStartString = findGlobalUserData("workDayStart")
LocalDateTime workDayStartDateObject = LocalDateTime.parse(workDayStartString)
log.debug "WorkDayStart Global data asString(${workDayStartString}) and asLocalDateTime(${workDayStartDateObject})    "
"okay"
    }
    on "okay" moveTo "end"
}
end{
    action{
        return "COMPLETED"
    }

}
Complete the following steps to create a schedule in Scheduler.
Download JosScheduler16.0.027ForAll16.x.xApps_eng_ga.zip and unzip the file.
Set up the schedule for the above created process through seed data or the UI. See the following seed data sample.
Create DSL file for action. DSL is Groovy based and Groovy or Java code can be used in Action block. See the following DSL sample.
Copy DSL file to jos-scheduler-home/setup-data/dsl folder.
Run the deployer script from jos-scheduler-home/bin folder.
Here are important fields in seed data that must be considered for the schedule being created.
schedule_type - SIMPLE. if advanced scheduling is required, it must be created using Scheduler UI.
schedule_start_datetime - Specify the date and time when to start the schedule, for example, '2016-11-22 10:20:00'
schedule _frequency - Valid values are: DAILY, HOURLY, WEEKLY, MONTHLY, WEEKDAY, WEEKEND, SATURDAY, SUNDAY, FIRSTDAYOFMONTH, LASTDAYOFMONTH, ONCE
schedule_action_type - ASYNC (asynchronous) or SYNC (synchronous)
schedule_action_definition - Name of the schedule action DSL file
INSERT INTO BDI_SCHEDULE_DEFINITION (schedule_id, schedule_name, schedule_group, schedule_description,
schedule_status, schedule_start_datetime, schedule_type, schedule_frequency, schedule_notification,
schedule_notification_email, schedule_action_type, schedule_action_definition) VALUES (1, 'Schedule1',
'Schedules', 'Schedule created from seed data. This schedule calls process flow: AbcProcess.',
'ACTIVE', TIMESTAMP '2016-11-22 00:00:00', 'SIMPLE', 'DAILY', 'ON_SUCCESS,ON_ERROR',
'admin@example.com', 'ASYNC', 'Abc.sch')