| Agile Product Lifecycle Management SDK Developer Guide - Developing PLM Extensions Release 9.3.6 E71153-01 ,Oracle and/or its affiliates. All rights reserved. |
|

 Previous |
 Next |
| Agile Product Lifecycle Management SDK Developer Guide - Developing PLM Extensions Release 9.3.6 E71153-01 ,Oracle and/or its affiliates. All rights reserved. |
|
Previous |
Next |
This chapter includes the following:
About Dashboard Management Extensions
Developing Custom Chart Dashboard Management Extensions
Developing Custom Table Dashboard Management Extensions
Similar to Process Extensions, Dashboard Management Extensions (DX) extend the functionality of the Agile PLM system. The Extensions support the following formats to access and display PLM data on the Agile PLM Dashboard:
ChartDataModel for charts
Collections for tables
When data is defined using these formats, Agile servers can interpret and process this data, and Agile Java Client users with administrator privileges can define Dashboard Tabs and display them in one of the following views or layouts:
Chart
Table
Custom (URL)
The SDK provides the API's that enable connecting the Agile PLM server to internal Agile databases to get the required content, format it as required by the DXs, and display the data in the Agile PLM Dashboard. Similarly, you can use other Java API's such as JDBC to connect to external databases for content.
Briefly, DXs provide the data, Dashboard Tabs and the formats to display the data (tables, charts, and URLs) are configured in Agile Java Client. Finally, Agile PLM users with proper privileges can view the Dashboard Tab and displays in Agile Web Client.
This chapter provides both background information and procedures to develop these methods.
You must set the Dashboard Tab View privilege in Admin>UserSettings>Privileges so that PLM users can view the Tabs and the related data in Web Client. In addition, Dashboard Tabs are controlled by privileges, and Agile PLM users must have the necessary roles and privileges to view the data on the Tab. Procedures to configure the views and assign privileges are fully documented in Agile PLM Administrator Guide.
The ICustomChart interface enables creating the necessary DXs that will display the required data in chart formats. This interface exposes the method which returns an instance of the public ChartDataModel getChart(IAgileSession session, Map params)
|
Note: Implementations of this interface must have no-arg constructors and they must be reentrant. |
The ChartDataModel class organizes the input data in a chart format. It is a concrete class that is exposed to the DXs and It contains one or more ChartDataSet(s) that you need to construct the chart.
A ChartDataSet is another concrete class that is exposed to the DXs. It contains the data required to plot a chart. For example, X-axis and Y-axis values and labels. The ChartDataModel is a placeholder for all the data sets.
|
Note: The ChartDataModel and ChartDataSet classes are exposed in com.agile.px package. |
As indicated above, chart DXs display the data in chart formats. The code in Example 4-1, "Defining a DX to display data in a chart format" uses ICustomChart and the exposed classes (ChartDataModel and ChartDataSet) to display the differences between morning and evening temperatures for every day of the week, using predefined input data in a chart format.
public ChartDataModel getChart(IAgileSession session,Map params) throws Exception{
import java.util.Map;
import com.agile.api.IAgileSession;
import com.agile.px.ICustomChart;
import com.agile.px.ChartDataModel;
import com.agile.px.ChartDataSet;

/**
 * A Sample Dashboard DX for Charts with predefined data. * This Example displays a comparison chart between * Morning and Evening Temperatures for each day of the * week with predefined data.
*/
public class TemperatureComparisionChart implements ICustomChart(

/**
 * Returns custom ChartDataModel. ChartDataModel * is a placeholder to hold all the * ChartDataSet(s) and any other relevant information related to the charts. * @param session current user session. * @param params * @return com.agile.px.ChartDataModel
*/
public ChartDataModel getChart(IAgileSession session,Map params) throws   Exception{

// Create a ChartDataModel
 ChartDataModel chartDataModel = new ChartDataModel("Temperatures");

// Create a ChartDataSet for Morning and Evening Temperatures ChartDataSet chartdataSet[] = new ChartDataSet[2];

// Create a ChartDataSet for Morning Temperatures chartdataSet[0] = new ChartDataSet("Morning Temperatures",7);

// Fill in the Morning Temperatures double[] morTempValues = {10, 8, 12, 19, 10, 14, 13}; chartdataSet[0].setValues(morTempValues); // or setYValues that can be used instead

// Set the Labels String[] labels = {"Monday", "Tuesday", "Wednesday", "Thursday", "Friday", "Saturday", "Sunday"};  chartdataSet[0].setLabels(labels);

// Create a ChartDataSet for Evening Temperatures chartdataSet[1] = new ChartDataSet("Evening Temperatures",7);

// Fill in the Evening Temperatures double[] eveTempValues = {16, 12, 20, 15, 18, 24, 26}; chartdataSet[1].setValues(eveTempValues); chartdataSet[1].setLabels(labels);

// Set the ChartDataSets in the Chart Model chartDataModel.setDataSets(chartdataSet);
return chartDataModel;
}
}
After developing the necessary classes for a new Chart, package and deploy them using the following procedure.
To package and deploy a Chart DX source:
Use your Java development environment or the Java Archive tool (or JAR tool), to create one or more JAR files for the custom action. Make sure the JAR file(s) includes a META-INF/services directory that contains the file com.agile.px.ICustomChart. This is a text file that lists the fully qualified Java class names, one class per line, for the custom action.
You can include multiple charts in one package. For example, com.agile.px.ICustomChart can resemble this:
dashboard.chart.TemperatureComparisionChartdashboard.chart.AgileObjectsCountChartdashboard.chart.ActualVsBudgetedLaborCostChart
|
Note: Paths within a JAR file are case-sensitive. Therefore, make sure the META-INF folder contained within the JAR file name are either all uppercase or all lowercase characters. Otherwise, the custom action will fail to deploy. |
Place the JAR file(s) in the agile_home/integration/sdk/extensions folder on the same computer where the Agile Application Server is installed.
|
Note: If you have several application servers in a clustered environment, you must deploy the Dashboard Extension files on each server in the cluster. |
In Agile Java Client, you can define Chart data sources in the Admin module. To configure the Agile PLM system settings, you must have an administrator account. This is briefly documented in the sequel below. For more information, refer to the Agile PLM Administrator Guide.
The data that you provide for a DX, regardless of the layout, is viewed in a Dashboard Management Tab. Because you cannot define a new Table in the Out of Box Tabs such as Executive or Financial, you must define a new Tab and then a Table within the Tab to configure a DX.
To add an optional Dashboard Management tab:
In Java Client, select Admin > Systems Settings > Dashboard Management and click the New Dashboard Tab icon in Dashboard Management.
In the Create Dashboard Tab dialog, complete the name (For example, call it Dashboard Extensions) and description fields, set the Visible field to Yes, and then click OK. Dashboard Extensions appears as an entry in the Dashboard Management.
Click the Order Tabs for Dashboard icon to reorder the tabs as required in Java Client.
Define a new tab, for example, Dashboard Extensions as shown above.
In the new tab (Dashboard Extensions), click the Tables icon. The Dashboard Management - Dashboard Extensions page appears.
In this page, click the New Dashboard Table icon to open the Create Dashboard Table dialog and define the new table.
Select Chart from the View List Type drop-down list. The following fields appear:
Table 4-1 Chart type table data fields
| Dashboard Table | Description/Purpose | Possible Settings |
|---|---|---|
|
Name |
Type the name of the table |
String |
|
API Name |
The Name typed above, converted to CamelCase naming convention by Agile PLM |
String |
|
Description |
Type the description of the table |
String (optional) |
|
View List Type |
Lists the types of table. Select Chart (when you select Chart, additional options are displayed). |
Chart, Table, Custom, Advance Search |
|
Dashboard Extension |
Lists all process extensions created for chart type list. Select the chart process extension you want. |
Empty cell |
|
Visible |
To enable viewing in Web Client |
Yes/No |
|
Chart Type |
Select the type of chart you want displayed |
Area, Bar, Line, Pie, Polar, Scatter, Stacked Area, Stacked Bar, Table |
|
X axis |
Type the X axis label |
(optional) |
|
Y axis |
Type the Y axis label |
(optional) |
|
Show Legend |
To display the chart legend on screen |
Yes/ No |
|
Legend Position |
Select the position where the Legend should be displayed |
Bottom, default, left, right, top |
|
3D Style |
To view the graph in 3D |
Yes/ No |
The ICustomTable interface is defined to create DXs to display the required data in tabular formats. This interface exposes the getTable(IAgileSession session, Map params) method which returns an instance of the Collection class.
public Collection getTable(IAgileSession session, Map params);
import java.util.*;
|
Note: Implementations of this interface must have a no-arg constructor and they must be reentrant. |
The Tabular Data in a DX is a ”collection” of Java HashMaps. Each Map key represents an attribute in the Table View and the Map represents a row in the table.
The property ”Attribute” of a column in View defines the mapping between the data model and the Table View. The value of this property corresponds to the key of a HashMap entry.
HashMap keys - For HashMap entries, an attribute is defined in the Table view. For example, a HashMap entry with ”name” as its key value, the property ”Attribute” of this attribute will have the value ”name.” The get('name') method will provide the display data for this attribute.
Link, Image, Money, Text, Date and Numeric Data - These data types are supported in Tabular DX formats and return objects with the following properties.
Text - Date, and Numeric Data types do not require any additional properties.
Link - A valid URL (as String) serves as the target and label for the display. The properties expected for a link data type are the same for the internal and external links. The DX users resolve the URL for internal links and add them to the URL property. The DX users can specify the target property as ”Right Pane” for internal links. By default, the links will be targeted to a new window.
Image - Images are expected to return an image URL (as String) and label to be displayed as a tool tip on the Image.
Money - Currency code (String) and Value (Number) are necessary for Money Data types.
|
Note: Keys that support the Link, Money and Image data properties are provided as constants in the class CustomTableConstants. A constant SERVER_URL is provided in this class. You can use it get the Server URL in the DX's from the params. |
The sample Dashboard DX in the following example creates a collection of rows with predefined data for display in the Dashboard. Each row is a Java Map object with key-value pairs that correspond to each column in the table. This value appears in each cell of the column in the table. The key is the mapping Attribute name in the View. When creating new Attributes (columns) in the View, it is necessary to supply this key in the Attribute field. Attribute Names and the corresponding Data type for this DX are as follows:
| Attribute | Corresponding Data Type |
| myString | Text |
| myExternalLink | Link |
| myDate | Date |
| myMoney | Money |
| myNumber | Numeric |
| myImage | Image |
Example 4-2 Defining a Dashboard extension to display data in tabular format
package dashboard.table;
import com.agile.api.IAgileSession;
import com.agile.px.ICustomTable;
import com.agile.px.CustomTableConstants;
/** This Sample Dashboard DX creates a collection
* of rows with predefined data
* in the format to be displayed in the Dashboard.
* Each row is a Java Map object which has
* key-value pairs corresponding to each column in the Table.
* The value is displayed in each Cell of the
* column in the table. The key is the
* mapping Attribute name in the View.
* While creating new Attributes (Columns) in the View,
* you must supply this key in the Attribute field.
* The corresponding Attribute Names and
* Data type for this DX are listed below.
*  <table border="1">
*  <tr><td><b>Attribute</b> </td><td><b>Data   Tye<b></td></tr>
*  <tr><td>myString         </td><td>Text      </td></tr>
*  <tr><td>myExternalLink   </td><td>Link      </td></tr>
*  <tr><td>myDate           </td><td>Date      </td></tr>
*  <tr><td>myMoney          </td><td>Money     </td></tr>
*  <tr><td>myNumber         </td><td>Numeric   </td></tr>
*  <tr><td>myImage          </td><td>Image     </td></tr>
*  </table>
*
*/

public class DashboardSampleTable  implements ICustomTable {
 /**
* Returns custom table data in form of collection of rows.
* Row is assumed to be a java Map object.
* @param session the user session
* @param params
* @return : java.util.Collection
 */
public Collection getTable (IAgileSession session,Map params) throws Exception{
String serverUrl =
   (String)params.get(CustomTableConstants.SERVER_URL);
String baseUrl =
  serverUrl.substring(0,serverUrl.lastIndexOf('/'));  ArrayList result = new ArrayList();
// 1st Row Entry
   HashMap row1 = new HashMap();

// For Text type
   row1.put("myString","Manoj Yeturu");
// For Numeric type
   row1.put("myNumber",new Double(10000));

// For Date Type
   row1.put("myDate",new Date());
// For Image Type. The url for image and label (for tooltip) properties are set
   HashMap hm1Image = new HashMap();   hm1Image.put(CustomTableConstants.URL,baseUrl+"/images/action_noshad.gif");
// Tool Tip
   hm1Image.put(CustomTableConstants.LABEL,"Action_Noshad");   row1.put("myImage",hm1Image);
// For Money Type. The Currency and value properties are set
   HashMap hm1Money = new HashMap();   hm1Money.put(CustomTableConstants.MONEY_CURRENCY_CODE,"USD");   hm1Money.put(CustomTableConstants.MONEY_VALUE,new Integer(3000));   row1.put("myMoney",hm1Money);
// For External Link, url, label (display string) and target
// (Rightpane,_new etc) are set
   HashMap externalLink1 = new HashMap();   externalLink1.put(CustomTableConstants.URL,"http://www.agile.com");   externalLink1.put(CustomTableConstants.LABEL,"Agile");   externalLink1.put(CustomTableConstants.TARGET,"_new");   row1.put("myExternalLink",externalLink1);   result.add(row1);
// 2nd Row Entry
   HashMap row2 = new HashMap()

// For Text type
   row2.put("myString","Venkat Tipparam");
// For Numeric type
   row2.put("myNumber",new Double(50000));

// For Date Type
   row2.put("myDate",(new Date()));
// For Image Type
   HashMap hm2Image = new HashMap();   hm2Image.put(CustomTableConstants.URL,baseUrl + "/images/addressdown.gif");
// Tool Tip
   hm2Image.put(CustomTableConstants.LABEL,"Addressdown");   row2.put("myImage",hm2Image);
// For Money Type
   HashMap hm2Money = new HashMap();   hm2Money.put(CustomTableConstants.MONEY_CURRENCY_CODE,"INR");   hm2Money.put(CustomTableConstants.MONEY_VALUE,new Integer(4000));   row2.put("myMoney",hm2Money);
// For External Link
   HashMap externalLink2 = new HashMap();   externalLink2.put(CustomTableConstants.URL,
      "http://www.agile.com/services/support.asp");   externalLink2.put(CustomTableConstants.LABEL,"Supprt");   externalLink2.put(CustomTableConstants.TARGET,"_new");   row2.put("myExternalLink",externalLink2);   result.add(row2);   return result;   }}
The Link data type is defined as follows in "Understanding Collections and CustomTableConstants."
A valid URL string that serves as the target and label for the display
And
DX users can specify the target property as ”Right Pane” for internal links which are targeted to a new window by default
When Web Client users retrieve an Agile Object in a Dashboard table by invoking Advanced Search, they automatically get the Number with a Link and Quick View as shown in Figure 4-1 below.
The SDK supports configuring the URL in the Link data type to display and open the selected object in the Right Pane for Agile Objects that are generated through user-defined Dashboard table DXs with ICustomeTable. To perform these configurations, you must first invoke the Advanced Search function to retrieve the Object.
The following code snippet returns the specified Agile Object and enables the Quick View pop-up for that Object.
Example 4-3 Invoking Advanced Search in a Custom Table DX Data Source
public class DashboardTableContainsQuickView implements ICustomTable{
   public Collection getTable(IAgileSession session, Map params){      try
      {
         IQuery query = null;         query = (IQuery)session.createObject
            (-5, ProgramConstants.CLASS_ACTIVITIES_CLASS);         query.setCaseSensitive(false);         query.setCriteria("[General Info.Name] contains 'Dashboard'");         Iterator iter = query.execute().iterator();         ArrayList result = new ArrayList();         while (iter.hasNext())         {
         IRow row = (IRow)iter.next();         HashMap rowMap = new HashMap();         IProgram program = (IProgram)row.getReferent();         program.getId()String number = program.getName();         rowMap.put("number", number);         String name = (String)program.getCell
            (ProgramConstants.ATT_GENERAL_INFO_NAME).getValue();         HashMap internalLinkMap = new HashMap();         internalLinkMap.put("label", name);
         internalLinkMap.put("target", "RightPane");         rowMap.put("name", internalLinkMap);         result.add(rowMap);         }         return result;      }
      catch (Exception e)      {         e.printStackTrace();      }return null;
   }
}
The following example enables Quick View for the Object returned by the search function. Code in the shaded area enables Quick View. To display Quick View, you must specify the correct Object Class ID(getClassId() and Object ID (getObjectId) attributes. In this example, ActivityHandler is hard coded, because this is the object type that the user wants to open. For other types of object, for example a Part object, you can use itemhandler. The output of this DX is displayed in Figure 4-2, "Sample output generated by the DX".
Example 4-4 Enabling Quick View in a Custom Table DX Data Source
public class DashboardTableContainsQuickView implements ICustomTable{   public Collection getTable(IAgileSession session, Map params)      {        try         {           IQuery query = null;           query = (IQuery)session.createObject
              (-5, ProgramConstants.CLASS_ACTIVITIES_CLASS);           query.setCaseSensitive(false);           query.setCriteria("[General Info.Name] contains 'Dashboard'");           Iterator iter = query.execute().iterator();           ArrayList result = new ArrayList();           while (iter.hasNext())           {              IRow row = (IRow)iter.next();              HashMap rowMap = new HashMap();              IProgram program = (IProgram)row.getReferent();              program.getId();              String number = program.getName();              rowMap.put("number", number);              String name = (String)program.getCell
                (ProgramConstants.ATT_GENERAL_INFO_NAME).getValue();              HashMap internalLinkMap = new HashMap();

            // Generate Quick View - Object ID and Class ID are necessary              int objClsId = ((Integer)row.getClassId()).intValue();              int objId = ((Integer)program.getObjectId()).intValue();              int objVersion = ((Integer)program.getObjectVersion()).intValue();              String urlStr =                "javascript:displayObject('ActivityHandler',                '" + objClsId + "', '" + objId + "', '0');                \"onmouseover=\"showQuickViewLink(event, this)\"                onmouseout=\"cancelQuickViewTimer(this);                \" infourl=\"showObjectInfo('" + objClsId + "',                '" + objId + "', '', '', '', 'true', '',                '"+ objVersion +"');\"\");";                internalLinkMap.put("url", urlStr);              internalLinkMap.put("label", name);              internalLinkMap.put("target", "RightPane");              rowMap.put("name", internalLinkMap);              result.add(rowMap);         }         return result;}
To display Quick View when moving the mouse over the Object ID, set the URL parameter as shown in the following code snippet. Make sure you are using correct values for classid and objectid parameters.
   internalLinkMap.put("url","javascript:displayDesignObject
      ('AttachmentHandler', '2000008297','21335435',
         '0', 'RightPane', '0', '', '4');"
   onmouseover="showQuickViewLink(event, this)" onmouseout=       "cancelQuickViewTimer(this);" infourl=
         "showObjectInfo('2000008297', '21335435', '1', '6173', 'R0', 'true',             'DASHBOARD_DXTABLE_2488764_GRID', '4');"");   internalLinkMap.put("label", name);   internalLinkMap.put("target", "RightPane");   rowMap.put("name", internalLinkMap);
|
Note: In this example, 2000008297 is the object's classId, 21335435 is the object's ID, and so on. These values were defined in the code snippet in "Enabling Quick View in a Custom Table DX Data Source." |
By default, when you use the Link option to open the selected object, the object is displayed in a new Window. The following syntax opens the referenced object in the right pane of the same window for an object retrieved using Advanced Search shown above.
|
Note: You must specify the correct Class ID and object ID attributes. In this case,18022 and 4555 respectively. Also, this link does not enable Quick View. It is a quick way to put a link in your code. The Quick View option creates a link that enables the Quick View popup. |
Example 4-6 Opening the selected object in the right pane
String name =
(String)program.getCell(ProgramConstants.ATT_GENERAL_INFO_NAME)get.Value();   HashMap internalLinkMap = newHashMap();   internalLinkMap.put("url","/web/PCMServlet?module=ActivityHandler&opcode=
      displayObject&classid=18022&objid=4555");   internalLinkMap.put("label",name);   internalLinkMap.put("target","RightPane");   rowMap.put("name",internalLinkMap);
After developing the required classes for a new Table, package and deploy them as shown below.
Use your Java development environment, or the Java Archive tool (or JAR tool), to create one or more JAR files for the custom action. Make sure the JAR file(s) includes a META-INF/services directory that contains a file named com.agile.px.ICustomTable. This is a text file that lists the fully qualified Java class names, one class per line, for the custom action.
You can include multiple charts in one package. For example, the com.agile.px.ICustomTable file could look like this:
dashboard.chart.ActualVsBudgetedLaborCostTabledashboard.chart.DashboardSampleTabledashboard.chart.QueryDashboardPrograms
|
Note: Paths within a JAR file are case-sensitive. Therefore, make sure the META-INF folder contained within the JAR file has a name with all uppercase or all lowercase characters. Otherwise, the custom action is not deployed. |
Place the JAR file(s) in the <agile_home>/integration/sdk/extensions folder on the same computer where the Agile Application Server is installed.
|
Note: If you have several application servers in a clustered environment, you must deploy the Dashboard Extension files on each server in the cluster. |
Similar to Chart type DXs, you can use an existing Dashboard Management tab, or create your own optional tab to add your Table DXs.
Define a new tab. For example, Dashboard Extensions as shown above.
In the new tab (Dashboard Extensions), click the Tables icon. The Dashboard Management - Dashboard Extensions page appears.
In this page, click the New Dashboard Table icon to open the Create Dashboard Table dialog and define the new table.
Select Table from the View List Type drop-down list. The Create Dashboard Table dialog displaying the necessary fields appears.
Complete these fields and then click OK. The new table is created.
| Dashboard Table | Description/Purpose | Possible Settings |
| Name | Type a name for the table | String |
| API Name | The Name field typed above, converted to CamelCase naming convention by AgilePLM | String |
| Description | Type a description of the table | String |
| View List Type | Lists the types of table. Select Table | Chart, Table, Custom, Advance Search |
| Dashboard Extension | Lists all the process extensions created for the type of Table in view | These are the attributes that were defined in the "Packaging and Deploying a Custom Chart DX Source." |
| Variable | To enable in Web client | Yes/No |
To Add Data to Tables:
Double-click the new table that you created in "To Add a Table to a Tab:."
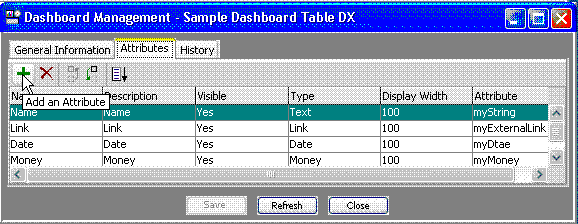
Click Attributes and then the Add an Attribute icon to create the new attribute.
|
Note: Agile currently supports Text, Numeric, Image, Date, Money, and Link type data as table attributes. They are listed and defined in Packaging and Deploying a Custom Table DX Source |
In the General Information tab, map the Attribute field to the attribute name in the DX.
|
Note: You are now defining the attributes (columns) that will appear in the table on the Dashboard Tab. The property ”Attribute” defines the mapping between the data model and the view. For example, if the attribute name in the DX is myStringy and the selected attribute type is Text, map the attribute field whose attribute name is myStringy. |
For more information, refer to the Agile PLM Administrator Guide.
A Dashboard PX of the type URL is configured to initiate from Dashboard Management. When defining Custom extensions, simply select Custom as the table type. See "To Add a URL to a Tab:" below. No other mapping is required for Dashboard PX's of type URL.
|
Note: URL Process Extensions are defined in the Process Extensions Library to initiate from Dashboard Management. |
To Add a URL to a Tab:
Define a new tab, for example, Dashboard Extensions as shown above.
In the new tab (Dashboard Extensions), click the Tables icon. The Dashboard Management - Dashboard Extensions page appears.
In this page, click the New Dashboard Table icon to open the Create Dashboard Table dialog and define the new table.
Select Custom from View List Type drop-down list. The Create Dashboard Table dialog displaying fields listed in the following appears.
Complete the Create Dashboard Table dialog fields and then click OK.
| Dashboard Table | Description | Possible Settings |
|---|---|---|
| Name | Type a name for the URL | String |
| Description | Type a description | String |
| View List Type | Lists types of table. Select Custom | Chart, Table, Custom, Advance Search |
| Dashboard Extension | Lists all process extensions created for Custom type list. | Employee Portal, Yahoo, Google, Process Extension_URLs |
| Visible | To enable in Web Client | Yes/No |