| Agile Product Lifecycle Management Getting Started Guide Release 9.3.6 E71144-01 |
|

 Previous |
 Next |
| Agile Product Lifecycle Management Getting Started Guide Release 9.3.6 E71144-01 |
|
Previous |
Next |
The Design File Change Order (DFCO) is a Change Order subclass with the Affected Files tab enabled by the Agile administrator. DFCOs use the Agile PLM workflow process to publish Design and File Folder objects, similar to the way ECOs are used to release item objects. Agile workflows provide a sign-off approval process. DFCOs are supported in Web Client only.
Design File Change Orders (DFCOs) are available in Agile PLM only if your Agile administrator has enabled and configured DFCOs and the roles and privileges you need to use DFCOs.
Features of DFCOs include:
Use the Agile workflow process to submit, update, approve, and publish designs files that you add to the DFCO Affected Files tab.
When you use the Affected Files table to publish design file folders, you do not use item object attachments to define the design file folder you wish to release.
Consolidate AdHoc, ECO, and ECR redline markups associated with the Design file folder on the DFCO Redline/Markup Files table on the Affected Files tab.
Add local files as markup files to the Redline/Markup Files table on the Affected Files tab.
Typically, DFCOs and the Design file publishing process is used in conjunction with Agile Engineering Collaboration (Agile EC), which is an MCAD Connector for Agile PLM that is operated from within your CAD system environment.
For more information, refer to Agile EC documentation at http://www.oracle.com/technetwork/documentation/agile-085940.html#ec
The Design File Change Order (DFCO) is a Change subclass, similar to an ECO. The ECO object has the Affected Items tab enabled. In comparison, the DFCO object has the Affected Files tab enabled.
|
Note: A Change Order subclass can be configured with either the Affected Items tab enabled (ECO), or with the Affected Files tab enabled (DFCO), but both tabs cannot be enabled for the same change order subclass. |
For detailed information about Change Order objects, see Product Collaboration User Guide, "Changes" chapter.
DFCOs allow you to use the Agile workflow process to submit, update, approve, and publish design files.
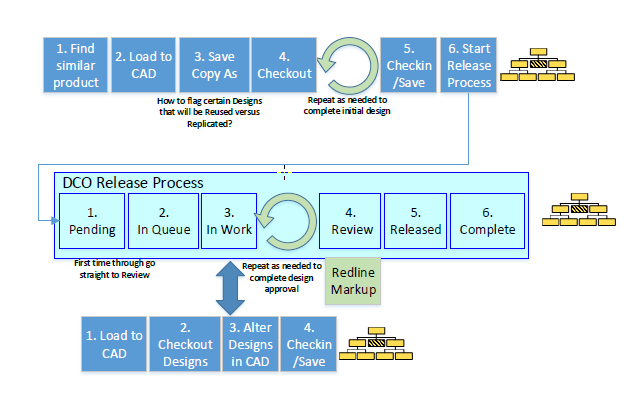
Dan Designer creates a new design in the CAD system and saves it to Agile PLM through EC.
Dan continues to work on the design in CAD. He performs several updates in through EC. Each time he updates the design and saves it, the Design folder version number in Agile PLM increments by 1.
Temporary Change Sequence numbers are assigned to each Design file folder on the Affected Files table. See also "Change Sequence."
Through EC, Dan creates a DFCO in Agile PLM for the design. The design is added to the Affected Files table of the DFCO.
When Dan Designer determines that his design is ready for approval, then Dan submits the DFCO to Mike Manager for review.
Mike Manger reviews the DFCO and Dan's design. Mike can add markups to the Redline/Markup Files tab by several methods:
View the affected file in the AutoVue viewer and then add redline markups in AutoVue, which are added to the markup table.
On the Redline/Markup Files tab, use Add button to browse for local files to add to the markup table.
On the Reline/Markup Files tab, use the Associate Redlines button to find redlines and add them to the markup table. Redlines to associate are file folder Ad Hoc redlines, ECO redlines, or ECR redlines.
Mike Manager returns the DFCO to Dan Designer.
Dan reviews the markups. Dan checks out the design in EC, and makes the changes in the design as specified in the markups. Dan checks in the design.
Dan submits the DFCO to Mike Manager. Mike compares the design and the redlines. When he is satisfied, Mike Manager moves the DFCO to the CCB workflow status, where the reviewers approve the DFCO.
The DFCO is released and Dan's design is published. The Title Block of the Design object is updated with the data from the DFCO:
Lifecycle Phase
The New Lifecycle Phase as defined on the Affected Files tab of the publishing DFCO.
Version
The file folder version published by the DFCO.
Change Sequence
The temporary Change Sequence numbers are locked and assigned to the file folder version number and to the publishing DFCO.
Change Publish Date
The date the DFCO is published.
Published Change Order
Then number of the DFCO that published the design.
In Agile PLM, you create DFCOs in the same ways that any change object is created:
Use the top pane Create New menu to choose the Changes base class and then choose the Change Orders class from the expanded lists. In the Create New dialog, choose DFCO in the Type drop-down list.
If you have a published DFCO object open, you can use the Actions > Save As command.
|
Note: Designs can be included on the Affected Files table of only one pending DFCO at a time. |
With a file folder object open, use the Actions menu and choose Create Change Order.
The Affected Files tab of a DFCO is similar to the Affected Items tab of an ECO.
On the Affected Files tab, you can add and remove files, add redline markups, edit the Affected File attributes, and add or modify Version Specific Properties.
See "Affected Files Tab Buttons and Actions."
The DFCO Affected Files tab lists the file folders to be published, and identifies the specific files.
The following table describes the columns on the Affected Files table.
If you have the appropriate privileges, then you can edit the editable cells in the table. Click Save to save your edits. See "Editing Table Cells in Web Client."
Table 13-1 Columns of the Affected Files table
| Attribute column | Description |
|---|---|
|
Is Checked Out (icon)
|
When icon is displayed, indicates that the file folder in this row is checked out. |
|
Incorporated (icon)
|
When icon is displayed, indicates that the file folder is incorporated. Files cannot be checked out or edited when the file folder is incorporated. |
|
Has Been Redlined (icon)
|
When icon is displayed, indicates that the file in this row has been redlined. |
|
Type (icon) |
The icon of the Design or File Folder object subclass. |
|
Type |
The Design or File Folder object subclass name. |
|
Folder Number |
The number of the Design or File Folder. |
|
Folder Description |
The folder description that appears on the Title Block tab of the folder. If you have the appropriate privileges, you can edit this attribute on the Affected Files table. |
|
Filename |
The name of the file. Each row lists one file. If there are multiple files in one affected file folder, then each file appears on a separate Affected Files table row. |
|
File Description |
The description of the file that appears on the Files table of the file folder object. If you have the appropriate privileges, you can edit this attribute on the Affected Files table. |
|
Folder Version |
The current version of the affected file folder. If the folder is checked out, then the pending version is displayed in brackets, for example [3]. |
|
Folder Owner |
The person who is responsible for editing the affected file to incorporate the associated redline comments and corrections. If you have the appropriate privileges, you can edit this attribute on the Affected Files table. |
|
New Change Sequence |
When a design file folder is added to the Affected Files table, a new Change Sequence number is assigned. Each Change Sequence number is associated with a specific design file folder version number. |
|
Old Folder Lifecycle Phase |
The current Lifecycle Phase of the affected file folder. |
|
Folder Lifecycle Phase |
The proposed Lifecycle Phase of the affected file folder when the DFCO is published. If you have the appropriate privileges, you can edit this attribute on the Affected Files table. |
|
Checkout User |
The name of the person who checked out the folder. If the folder is not checked out, then this attribute is empty. |
|
Last Modified |
The date and time the affected file folder was last modified and checked in. |
|
Chekout Date |
The date and time the affected file folder was checked out. |
|
Checkin Date |
The date the of the most recent file folder checkin. |
|
Create Date |
The date the affected file folder was created. |
|
Label |
A version-specific text field. |
|
Component Type |
The Component Type that appears on the Title Page tab of the affected file folder object. |
|
Change Date |
The Date the DFCO was published. |
|
Checkin User |
The name of the person who performed the most recent checkin. |
|
File Type |
The file type of the affected file. |
Change Sequence numbers define the order in which each DFCO is published for each Design or File Folder.
Each Change Sequence number is associated with one specific file folder version number. Before the DFCO is published, the affected files can be checked out and checked in multiple times, as many times as necessary. Each checkin increments the file folder version number. When a DFCO is published, the current file folder version is then associated with the DFCO and Change Sequence number.
The following table shows an example of how Change Sequence numbers, DFCOs, and file folder version numbers are associated with one another.
Table 13-2 Change Sequence Number example
| DFCO number | Design file folder version number | Change Sequence number | Notes |
|---|---|---|---|
|
DFCO-00254 |
4 |
001 |
Version 4 of the Design is checked in when the Design is published for the first time. Version 4 is associated with Change Sequence Number 001. |
|
DFCO-00481 |
12 |
002 |
The Design is checked out and checked in as many times as needed. When the DFCO is published, then version 12 is associated with Change Sequence Number 002. |
|
DFCO-00538 |
25 |
003 |
Version 25 is associated with Change Sequence Number 003. |
Change Sequence numbers are a series of three-digit numbers (001 through 099) that define the order in which DFCOs have been published for a specific Design or File Folder. Each Change Sequence number is associated with one specific DFCO and with the file folder version number in use when the DFCO is published.
File Folder Change Sequence numbers are similar to the concept of Items and Revision numbers. (See "About Item Revisions and File Folder Versions.")
When a Design file folder is added to the Affected Files tab of a DFCO, a Change Sequence number is assigned. If the Design has never been published before, then the Change Sequence number 001 is assigned. On the file folder object, the Change Sequence Number is displayed on the Changes tab.
If the file folder has been published before, then the next number in the sequence is assigned. For example, if the current Change Sequence Number is 013, and the file folder is added to the Affected Files table, then 014 is assigned.
The following table describes the actions available on the Affected Files tab.
Table 13-3 Affected Files tab buttons
| Button or Action | Description |
|---|---|
|
Add > To Change Order To Selected File Folder By Search |
Add files to the Affected Files table. Choose the add option:
|
|
Remove > From Change Order From File Folder |
Remove selected file. Choose the remove option:
|
|
Get |
Get a copy of the selected file. |
|
Open |
Open a copy of the selected file in its native application. See "Opening Attachment Files in their Native Applications." |
|
Veiw/Redline > View Compare by Search |
Opens the selected file in the AutoVue viewer. Choose the view option:
|
|
Checkout |
Checkout the selected file. |
|
Cancel Checkout |
|
|
Checkin |
|
|
More menu |
The More menu includes:
|
When adding files to the Affected Files table, you can choose from the following add methods:
Add File to Change Order – browse for a file to add to the DFCO. A new Design or File Folder is created when the file is added.
Click the Add button and choose To Change Order.
The File Upload Selector dialog appears.
Browse for one or more files to add. See "Web Client File Upload Selector."
Choose a folder Type, either Design or File Folder.
When you are finished, click Upload to begin uploading the files.
Add File to Selected File Folder – browse for a file to add to the selected file folder.
In the Affected Files table, select the row of the file folder to which a file will be added.
The file folder must be checked out.
Click the Add button and choose To Selected File Folder.
The File Upload Selector dialog appears.
Browse for one or more files to add. See "Web Client File Upload Selector."
When you are finished, click Upload to begin uploading the files.
Add File by Search – search for Design and File Folder objects, and then select a file to add. Or, search Design Structures to find a file to add.
Click the Add button and choose By Search.
The Add Files search dialog appears.
Choose a search type (Object Search or Design Structure), and then choose an object. Define your search criteria and click Search.
You can choose to display files that are on Active Changes and Published Change Orders. However, a file can be included on the Affected Files tab of only one DFCO at a time.
In the Search Results table, select one or more rows, and press Return.
The files are added to the Affected Files table.
|
Note: When you remove a file folder from the Affected Files table, then the associated Change Sequence Number is released. For example, if the Change Sequence Number of the selected file folder is [004], when the file folder is removed, then 003 becomes the current Change Sequence Number.If the file folder is later added to a different DFCO, then the Change Sequence Number [004] is associated with the new DFCO. |
To remove files from the Change Order:
Select one or more rows in the Affected Files table.
Click the Remove button and choose a From Change Order.
The selected file is removed from the DFCO, but it is not removed from the Design or File Folder object. Removing the file means that it is no longer part of the change process.
Only the selected file is removed from the Affected Files table. If a Design or File Folder has multiple files, you remove from the DFCO only the file you selected to remove.
To remove files from the Selected File Folder:
The file folders must be checked out. Check out the file folders if they are not already checked out.
Select an Affected Files table file row.
Click the Remove button and choose a From Selected File Folder.
The file is removed from the checked out version of the Design or File Folder.
If the selected file to remove is the last file in the file folder, then an error message is displayed.
When you select a row in the Affected Files table, then you are able to view, add, and remove redline markups.
The Redline/Markup Files tab appears at the bottom of the Affected Files tab when you have selected a single Affected Files table row.
The redline markups added or associated with the selected file are displayed in the Redline/Markup table, against all versions (for all files) of the selected file's Deisign or File Folder object.
If you have the appropriate privileges, you can edit the editable table cells. Click Save to save your edits. See "Editing Table Cells in Web Client."
Table 13-4 Columns of the Redline/Markup table
| Attribute column | Description |
|---|---|
|
Markup Name |
The name assigned to the markup (editable). |
|
Markup Number |
The number assigned to the markup. |
|
Markup Description |
Description of the markup (editable). |
|
Folder Version |
The folder version to which the markup is associated. |
|
Redline Process |
Process used to create the redline. The redline process is the change number of ECO, ECR or DFCO in which the redline was created. For File Folder or Design Ad Hoc redlines, the redline process is the File Folder number or the Design number. |
|
Redline User |
User who created the redline in the upper Affected Files table. |
|
Last Modified |
Most recent modify date. |
|
File Size |
File size |
|
File Name |
Name of the affected file. |
|
File Type |
File type |
|
Create Date |
Date the file was created. |
|
File Name |
Name of the file |
The following table describes the Redline/Markup tab buttons.
Table 13-5 Redline/Markup tab buttons
| Button or Action | Description |
|---|---|
|
Add |
Add markup files to the Redline/Markup table. Opens the File Upload Selector. Browse for files to upload to the Redline/Markup table. |
|
Associate Redlines |
Opens the Associate Redlines dialog. |
|
Remove |
Remove redlines from the table. |
|
Get |
Get a copy of the redline file. |
|
Open |
Open the redline file. |
|
View/Redlline |
Opens the selected file in the viewer. You can now add AutoVue redline markups to the file. The redline markups appear on the lower Redlline/Markup table on the Affected Files tab. |
|
More |
Includes the Full Display Mode menu option. |
If you have the appropriate privileges, then you can add local files as new markup files.
In order to add markups, the selected Affected File must be checked in.
Markups can be added regardless of the incorporation status of the selected Affected File.
The files can be of any file type that the Agile administrator has configured as a valid markup file type.
When you add a local file as a markup, then a new markup file folder is created.
The Redline Process is the current DFCO.
Clicking the markup file name in the Redline/Markup Files table opens the markup file in its native application.
To add Redline/Markups:
Select a row in the Affected Files table.
In the lower Redline/Markup Files tab, click the Add button.
The File Upload Selector dialog appears.
Browse to locate and select the file you want.
Click the Upload button.
The Associate Redlines action provides a method to consolidate all the redline markups for a specific file on the DFCO Affected Files tab Redline/Markup table.
For the selected Affected Files table row file folder, you can select markup files from any object with redline markup files (ECO Affected Item Attachment Redlines, ECR Attachment Redlines, DFCO Redline/Markups and File Folder/Design Files Ad hoc Redlines). The markup is against the selected Affected File's File Folder.4.63.2 The redline process is the change number for ECO, ECR and DFCO. For File Folder/Design redlines, the redline process is the file folder/design number.
Redline markups can be associated with a specific file by several methods:
Ad Hoc redline markups are created on the Files tab of a Design or File Folder object.
See "Ad Hoc Redlining or Marking Up of Attachment Files from the File Folder."
ECO redline markups of item attachment files are created on a change order for an item with an attachment, and approaching the attachment through the Redline Attachments tab of the ECO.
ECR redline markups are created for the ECR Affected Item attachments by adding those attachments to the ECR Attachments tab. Then, use the ECR Attachments tab Redline button to open the file in AutoVue and create redline markups.
DFCO Redline/Markup redlines are created on the Redline/Markup Files lower tab on the DFCO Affected Files tab.
To consolidate redlines, use the Associate Redlines button:
In the Affected Files table, select the file row you want.
The Redline/Markup table to the selected affected file is displayed in the lower tab.
In the lower Redline/Markup Files tab, click the Associate Redlines button.
The Associate Redlines dialog appears.
The Associate Redlines search returns all redlines against all versions (for all files) of the selected file's file folder.
Select the option Include Markups on Affected Files to include redlines from other DFCOs.
Select one or more rows in the Associate Redlines dialog table.
Click Associate.
The Affected Files Title Block tab is similar to the ECO Affected Items Title Block Redlines tab.
(For more information about the Affected Items Title Block Redlines tab, see Agile PLM Product Collaboration User Guide, Appendix B.)
The Agile administrator determines which attributes are version-specific. Attributes that can be defined as version-specific are some title block attributes and some Page two attributes.
If an attribute has been defined as version-specific, then it can only be modified on the DFCO Affected Files Title Block tab.
To modify a version-specific attribute:
Select a rows in the Affected Files table.
Click the lower Title Block tab to display it.
Attributes defined as version-specific are displayed on the Title Block tab.
On the Title Block tab, click Edit.
Edit the version-specific attributes.
Click Save.
DFCOs are routed for review and signoff in the same manner as any Change Order or routable object. See Chapter 9, "Routing Objects with Workflows."
Before a DFCO can be published (released), the release audit checks the following:
All affected files must be checked in.
The affected files are incorporated if the Publish Change Order with Unincorporated Files SmartRule is set to either Disallow or Warning.
Release audit checks for unreleased Design structure children.Release audit checks for unincorporated file folders according to the setting of the SmartRule Publish Change Order with Unincorporated Affected File Rows.
Release audit checks hat affected file Design structure recursive components are included on the Affected Files table of the same DFCO.
See also "Release Audit, Conditions Audited."
Once a DFCO is released, then.:
The released DFCO cannot be moved to a pre-release status in the workflow. That is, the DFCO cannot be unreleased.
The released DFCO cannot be canceled after it is released or implemented.
The released DFCO cannot be moved to a Hold-type status from the released-type status or from the implemented-type status.
If a DFCO is canceled, then:
The Change Sequence Number and DFCO number are not shown in the file folder Version dropdown list.
The Design or File Folder versions that were created through the DFCO remain visible on the Design or File Folder object, but the reline markup files remain on the canceled DFCO.
The Design or File Folder objects listed on the Affected Files tab of the canceled DFCO can be checked out and checked in from the Files tab of the Design or File Folder once the DFCO is canceled.
If there are affected files on the canceled DFCO, then the canceled DFCO cannot be moved to any another workflow status.