| Agile Product Lifecycle Management Getting Started Guide Release 9.3.6 E71144-01 |
|

 Previous |
 Next |
| Agile Product Lifecycle Management Getting Started Guide Release 9.3.6 E71144-01 |
|
Previous |
Next |
Workflows provide an automated process for routing, approving, and releasing changes and other routable objects.
Workflows automate the change control process by performing or completing tasks that you previously performed manually. For example:
When you create a routable object, you can select the appropriate workflow from the list of available workflows for that routable object.
When the routable object moves into a Review or Released status type, the lists of approvers and observers can be automatically selected.
When all the approvers have signed off for a Review or Released status type, and all the required fields have been completed, the routable object can be automatically promoted to the next status with the AutoPromote feature.
By defining a workflow with multiple Review or Released status types, you can sequentially route an object to different lists of approvers and observers.
When all required fields have been filled in on a routable object, it can be autopromoted to the next status.
When an approver does not respond within the specified reminder period set by the Agile administrator, a reminder email will be sent automatically.
If the approver does not respond within the specified escalation period set by the Agile administrator, the routable object will be sent to that user's designated escalation person. The designated escalation person can then approve or reject the routable object in place of the original approver.
You can transfer your authority to approve the routable object to another user for a specified time period. If you have the appropriate privileges, you can transfer signoff authority for other users.
At its most basic level, a workflow consists of:
A unique name
A list of matching criteria
A list of statuses
The status list defines the ordered list of statuses (or steps) that the routable object must go through during the change control process. The Agile administrator can define each workflow to have as many statuses as required. Each status is of a particular status type. Some status types may be used only once in a workflow, while others may be used multiple times.
The following section lists and defines the different status types.
Status Types and Definitions
Before a workflow is selected for a routable object:
Unassigned – Unassigned is a placeholder, that is, the default initial status name before a routable object has been matched with a workflow.
Basic Status Types (Active):
Pending – An originator is developing the routable object. A workflow must begin with a Pending status type. It is the first status in every workflow and is used only once in each workflow.
Submit – The Submit status type sends the routable object to the specified routing manager, who determines whether to promote the routable object to the next status.
Review – The Review status type routes the routable object to CCB members (approvers, acknowledgers, and observers). When all approvers and acknowledgers have signed off, and required fields have been completed, the routable object is automatically promoted to next status in the status list if AutoPromote is enabled. If Autopromote is not enabled, the routable object is manually moved to the next status by the routing manager.
Released – When a routable object enters the first Released type status, Agile PLM performs a series of checks; it also creates new revisions of the affected items (ECOs) with the new BOM, incorporates redlines into a new "rev," or updates the manufacturer part information (MCOs).
Like the Review status type, the Released status type may have approvers, acknowledgers, and observers and be routed for signoff and may be autopromoted.
Only the first Released status actually releases the routable object. Subsequent Released status types—given distinguishing status names—provide additional review/approval cycles for the released routable object.
Returning a released routable object to any of the first three status types (Unassigned, Pending, Submit) unreleases the routable object and removes approvals that were gathered. A Deviation can be unreleased if it does not have affected items.
Complete – If Complete status type is used, it must be the last active status in the workflow, and it may be used only once.
Special Status Types (Inactive)
Hold – The Hold status type provides a way to temporarily remove a routable object from the workflow and reinsert it later. It is added to the end of the status list as it is never part of the active sequence of statuses.
Hold unreleases a routable object.
Given appropriate privileges, you can manually move a routable object to Hold from any other status in the workflow (assuming it is listed as a valid next status under the Manual Valid Next Status property). It stays there until you manually move it back into the workflow. These moves require proper Change Status privileges.
Cancel – The Cancel status provides a way to remove a routable object from the workflow.
Cancel unreleases a routable object.
Cancel resets the workflow.
When a routable object is canceled, any redlines associated with the routable object are discarded.
Given appropriate privileges, you can manually move a routable object to Cancel from any other status in the workflow (assuming it is listed as a valid next status under the Manual Valid Next Status property).
When you open the Workflow tab of a routable object, the tab displays a graphical chart of the workflow and a workflow signoff history table.
To hide the workflow chart:
Web Client: the Expand icon and Collapse icon controls to the left of the Summary (Workflow Name) heading. Click these controls to show a hidden workflow summary or to hide the workflow summary.
Java Client: The Hide/View workflow chart button controls the display of the workflow chart on the Workflows tab. Toggle this button to Hide or View the workflow chart.
If the workflow is not visible and you click the button or control icon, the ECO's workflow appears, and the same is true for the workflow of any ECO you open at this point. If you click the Expand/Collapse icon or the Show/Hide Workflow button again, the workflows are hidden in all ECOs. The switch controls the View/Hide mode for all objects in that Agile class (for example, ECOs, PCOs, or Problem Reports). This is on a "per computer" basis, that is, it is not dependent on which user is logged on or other factors.
Your Agile administrator may define custom workflows that include multiple Hold and Cancel statuses.
The Next Status button on the Cover page also lets you move the routable object to any of the permissible order of statuses available in the workflow. The drop down menu on the Next Status button lists additional statuses: Hold and Cancel.
The Hold status appears from the status from which it is initiated.
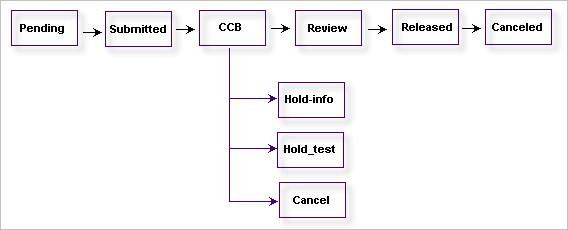
Example: The general routing of a business object (PSR) is as given below:
Unassigned, Pending, Submitted, Review, Released, Closed. Once you reach the Submitted status, additional workflow statuses Hold and Cancel are available on the Workflow chart.
You can initiate single Hold and Cancel status or multiple Hold statuses.
Example: While moving from one status to another you can initiate Hold status at any point:
(Hold_info) – gather more information
(Hold_test) – to test
You can click either of the above for a single Hold.
To gather more info and test then you need to initiate Multiple Holds. Naming the Hold indicates the purpose of the Hold status. You can have multiple hold statuses with unique names.
Significant points:
You can move to Hold or Cancel status from any of the existing statuses.
Example: If you are in the Implemented status you can move to Hold and then either come back to Implemented or move to Review status.
When you move back from Hold, existing Approvers and Observers of a workflow do not change.
A Hold or Cancel will display in the workflow diagram if it is a valid status change.
Active hyperlinks indicate valid status of the workflow.
The Hold status displays in the workflow for the duration of the current cycle. If the status changes to Pending or Submitted, the Hold status does not display on the workflow.
Hold Status for current and previous statuses will appear on the workflow for the duration of the current cycle.
Cancel signals the end of the workflow.
When you return from a Cancel status, the workflow is reset. Cancel does not appear on the workflow.
Agile PLM includes default workflows for each routable object type. Default workflows provide the same change control process as previous Agile releases.
|
Note: The Hold and Canceled statuses are optional, and are not part of the sequential status list. |
Table 9-1 Changes objects default workflows
| Default Workflow Name | 1st Status | 2nd Status | 3rd Status | 4th Status | Final | Optional |
|---|---|---|---|---|---|---|
|
Default Change Orders |
Pending |
Submitted |
CCB |
Released |
Implemented |
Hold Canceled |
|
Default Site Change Orders |
Pending |
Submitted |
CCB |
Released |
Implemented |
Hold Canceled |
|
Default Change Requests |
Pending |
Submitted |
CCB |
Released |
Closed |
Hold Canceled |
|
Default Deviations |
Pending |
Submitted |
CCB |
Released |
Expired |
Hold Canceled |
|
Default Stop Ship |
Pending |
Submitted |
CCB |
Released |
Resumed |
Hold Canceled |
|
Default Manufacturer Orders |
Pending |
Submitted |
CCB |
Released |
First Article Complete |
Hold Canceled |
Table 9-2 ATO (Automatic Transfer Order) default workflow
| Default Workflow Name | 1st Status | 2nd Status | Final |
|---|---|---|---|
|
Default ATOs |
Pending |
Released |
Complete |
The Default ATOs workflow is read-only.
|
Note: The Hold and Canceled statuses are optional, and are not part of the sequential status list. |
Table 9-4 Problem Report object and Non-Conformance Reports default workflows
| Default Workflow Name | 1st Status | 2nd Status | 3rd Status | 4th Status | Final | Optional |
|---|---|---|---|---|---|---|
|
Default Problem Reports |
Pending |
Submitted |
Review |
Released |
Closed |
Hold Canceled |
|
Default Non-Conformance Reports |
Pending |
Submitted |
CCB |
Released |
Closed |
Hold Canceled |
|
Note: The Canceled status is optional, and is not part of the sequential status list. |
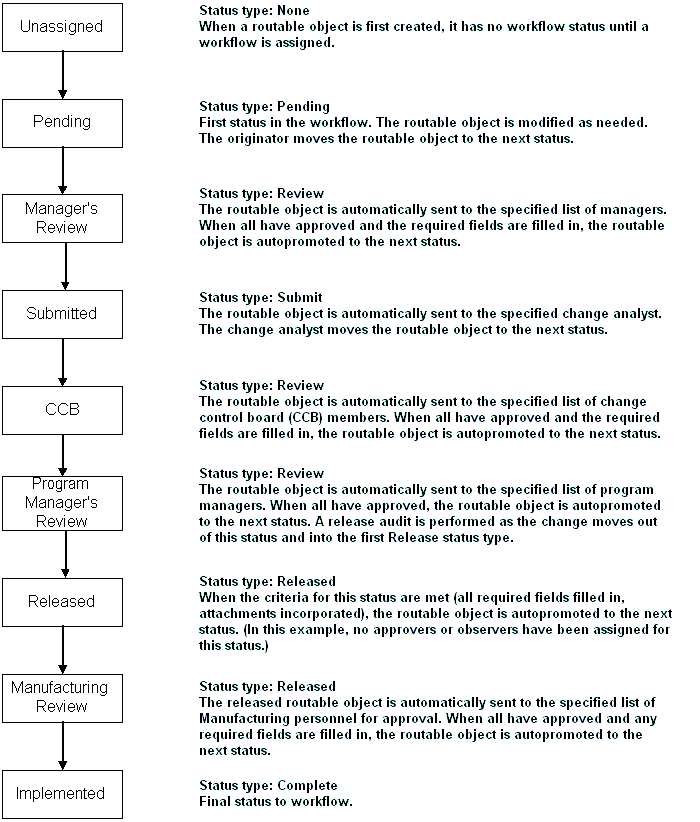
The following figure shows an example of a customized workflow. Notice that this workflow has three different Review status types and two different Released status types. A routable object using this workflow is:
Routed through an approval cycle (Review status type) before it is submitted to the change analyst.
Routed through two approval cycles (Review status type) before it is released, with a different group of approvers for each approval cycle.
Released when it moves into the first Released status type.
Moved into the second Released status type after the required fields have been filled in and, at this status, routed for approval a final time before moving into the Complete status type.
Customized Agile workflows allow great flexibility in defining change control processes to meet your company's needs.
When a routable object is first created, it has no workflow assigned to it; therefore, it has no workflow status. Until you select a workflow for the routable object, it remains unassigned, and the Unassigned status stamp is displayed in the upper right corner of the Cover Page tab.
You can edit an unassigned routable object the same way you edit a routable object in a Pending status type: fill in fields, add items to the Affected Items tab, add files to the Attachments tab, and so on.
When you have finished editing an Unassigned routable object, or a routable object in the Pending status type, and you are ready to start the routable object moving through the change control process, use the Next Status button.
While promoting workflows (of Changes, PSRs, QCRs and Declarations) to the Next Status, if no Change Analyst is assigned, a default Change Analyst is automatically populated to the field. The system assigns the default Change Analyst even if the user does not have the Modify privilege for the Change Analyst field.
Until you select a workflow for a routable object, the routable object remains unassigned, and the Unassigned status stamp is displayed in the upper right corner.
To select a workflow for an unassigned routable object in Web Client:
Open the routable object to which you want to assign a workflow.
When working with an unassigned routable object, you can use either of these methods to select a workflow:
On the Cover Page tab, click the Edit button.
Select a workflow from Workflow drop-down list.
Click Save.
The status of the routable object switches to the first status in the selected workflow which is always a Pending status type.
Or, click the Next Status button above the tabs.
If there is no workflow assigned, you are prompted to select one.
Complete any required fields, for example, select a Change Analyst.
If the workflow specifies a Default Change Analyst, then the Change Analyst field is automatically populated by the workflow, even if you do not have the Modify privilege for the Change Analyst field.
Click Continue. Agile PLM routes the object to the first non-pending status in the workflow, usually a Submitted status type.
Choose any users you want to notify.
Enter any comments you want to send.
Click Finish.
All the workflows that match the routable object are shown in the drop-down list. The drop-down list may vary depending on whether the Agile administrator has created any custom workflows.
|
Note: As long as the routable object is in the Pending status type, you can select a different workflow. You can also select the blank field in the Workflow drop-down list, which switches the routable object to the Unassigned status and cancels the previous workflow selection.To select a different workflow for a routable object that is not in either the Unassigned status or the Pending status type, you must switch the status to the Pending status type first. (See "Returning a Routable Object to the Originator."). |
To select a workflow for an unassigned routable object in Java Client:
Open the routable object that you want to assign a workflow to.
When working with an unassigned routable object, you can use either of these methods to select a workflow:
On the Cover Page tab, select a workflow from Workflow drop-down list.
Click Save in the object window.
The status of the routable object switches to the first status in the selected workflow, which is always a Pending status type.
Or, click the Next Status button above the tabs.
If there is no workflow assigned, you are prompted to select one in the Select Required Fields dialog drop-down list.
Complete any required fields, for example, select a Change Analyst.
Click OK. Agile PLM routes the object to the first non-pending status in the workflow, usually a Submitted status type.
Choose any users you want to notify.
Enter any comments you want to send.
Click Submit.
All the workflows that match the routable object are shown in the drop-down list. The drop-down list may vary depending on whether the Agile administrator has created any custom workflows.
|
Note: As long as the routable object is in the Pending status type, you can select a different workflow.To select a different workflow for a routable object that is not in either the Unassigned status or the Pending status type, you must switch the status to the Pending status type first. (See "Returning a Routable Object to the Originator."). |
This section includes the following topics:
Routable objects move through the change control process by moving through the statuses in the workflow status list. Routable objects make the transition from one status to another status in two ways:
The routable object is autopromoted from its current status to the next status in the workflow status list.
An Agile user switches the routable object from one status to another status manually.
For details about switching a routable object from the Unassigned status, see "Selecting a Workflow."
A routable object is manually switched from one status to another in one of the following ways:
The Next Status button switches the routable object from the current status to the next sequential status in the workflow status list. Click this button, and the appropriate change status dialog is displayed.
The Workflow tab lets you switch the routable object from the current status to any status allowed by the settings in the workflow (manual valid next status). The status need not be the next status in the workflow status list. For example, you might switch a routable object from a Submit status type to a Hold status type.
Whether you use the Next Status button or the Workflow tab, you must have the appropriate privileges to switch a routable object from one status to another status. See the Agile administrator if you have questions about your privileges.
You can use the Workflow tab or the Next Status button to switch the status of a routable object to any valid next status.
To switch a routable object to any valid next status in Web Client:
Open the routable object.
Audit the routable object to ensure that there are no errors that prevent switching to another status. If any errors are found, fix them. See "Auditing Routable Objects."
Click the Workflow tab.
|
Note: The valid next statuses that appear in the Workflow Summary are determined by workflow property settings and your privileges. To review the entire status list, choose Actions > View Workflows. Click Close to close the View Workflow dialog. |
Select one of the valid next statuses from the chart on the Workflow tab, or click the Next Status button to accept the default next status in the sequence.
When the Change Status dialog appears, add the appropriate approvers, observers, users to notify, and comments. See "Auditing Routable Objects."
Click Finish.
The routable object moves to the selected status, which is the orange status on the Workflow tab.
To switch a routable object to any valid next status in Java Client:
Open the routable object.
Audit the routable object to ensure that there are no errors that prevent switching to another status. If any errors are found, fix them. See "Auditing Routable Objects."
Click the Workflow tab.
|
Note: The valid next statuses (underlined statuses) that appear on the Workflow tab are determined by workflow property settings and your privileges. To review the entire status list, click the View Workflows button in the toolbar. Click Close to close the View Workflows dialog box. |
Click one of the valid next statuses from the chart on the Workflow tab, or click the default next status (underlined). Or click the Next Status button above the tabs to accept the default next status in the sequence.
When the Change Status dialog box appears, add the appropriate approvers, observers, users to notify, and comments. See "Adding and Removing Approvers, Acknowledgers, and Observers."
Click the dialog button that completes the status change, for example, Submit, Route, or Release.
The routable object moves to the selected status, which is the yellow status on the Workflow tab.
When you manually advance a workflow to the next status, the routing slip is filled in. This contains approvers, observers, "notify" users, and comments. In Web Client, the routing slip also includes acknowledgers. You may spend several minutes completing the slip. When you click Route or Finish, Agile performs an automatic workflow status audit.
Web Client
The change status dialog is displayed again, with an error message that lists the errors and the actions taken. The remainder of your user lists and comments are preserved.
Java Client
An error message dialog is displayed, listing the errors and actions taken. Click OK to acknowledge the error message. The change status dialog is displayed again. The remainder of your user lists and comments are preserved.
At this time, you can continue filling out the change status routing slip information and route the change status again.
Alternately, you can copy the routing slip data and paste it to a temporary location, such as a word processor file. This lets you save the work you have done so far.
You can audit a routable object at any status in the workflow. Before switching the routable object to a different status, always audit the object to detect any errors that may prevent switching to a different status.
With appropriate privileges, you can perform two types of audits: a status audit and a release audit.
|
Note: When a routable object moves from the current status (including the Pending status type, the first status in the workflow) to the next status in the workflow, the system automatically performs a release audit depending on the workflow Pass Release Audit property settings for the current status. |
In Web Client, the audit results dialog remains open until you close it, allowing you to refer to the audit results as you modify the routable object. You can use the Print button in the results dialog to print the audit results for your reference. Clicking each audit issue navigates you to the error. If you have the appropriate privileges, you can modify the highlighted field to correct the issue.
In Java Client, the audit results box remains open until you close it. This lets you refer to the audit results as you modify the routable object.
|
Note: Your Discovery and Read privileges determine which objects and which fields you can see in the audit results box. If you do not have the appropriate privileges, you may see the words "No Privilege" displayed. |
See also "Switching a Routable Object from One Status to Another Status."
The status audit is performed automatically when you use the Change Status function or the workflow attempts to autopromote to the next status. You can perform a status audit at any time by using the Audit Status button or menu selections. It performs the following checks:
Makes sure the Exit Required Fields for the current status are filled in.
If the current status is a Review status type or a Released status type, makes sure that all approvers have approved.
Checks the workflow settings of the Pass Release Audit property for the current status. If Pass Release Audit is set to either Yes or Warning, Agile PLM also performs a release audit.
Agile PLM performs a release audit automatically when the routable object is promoted to the first Released type status in the workflow. You can perform a release audit at any time by using the Audit Release button or menu selections.
The release audit performs the status audit for both the current status and the release status.
It performs the following additional checks:
For ECOs, checks if the proposed new revision number on the Affected Items tab already exists.
For ECOs, SCOs, PCOs and MCOs, checks if there are manufacturer redlines that will be lost after the routable object is released.
For ECOs and SCOs, checks if there are BOM redlines that will be lost after the routable object is released.
For ECOs, SCOs, PCOs and MCOs, checks if there are conflicts due to another ECO, SCO, or MCO being released first.
For ECOs, SCOs, and MCOs, if the BOM Multi-level Recursive SmartRule is set to Disallow, checks for recursive BOM structures, that is, when a subassembly includes one of its parent items from an upper level of the BOM tree structure on its own BOM. (A recursive BOM structure, if carried to its logical conclusion, would repeat indefinitely).
The BOM tree is evaluated from top to bottom. The Audit Release error message indicates, for each affected item with a recursive BOM, the first item found in the BOM tree whose first-level BOM table includes an item that appears at a higher level in the BOM tree, thus causing a recursive BOM structure. Although there may be multiple instances of recursive BOM structure in an affected item BOM tree, only the first found instance is displayed in the audit results.
For ECOs, SCOs, and PCOs, depending on SmartRule settings, checks for duplicate items, duplicate find numbers and duplicate reference designators caused by a change rebase. (When there are multiple pending changes for the same item, when one change is released, the remaining pending changes are rebased on the latest released change.)
For ECOs, SCOs, and MCOs, checks for duplication of the same manufacturer part on an item. (MultipleItemsPerManufPart is set to Warning or Disallow.)
(Duplication of the same manufacturer part on an item occurs when an item has multiple pending changes which associate the same manufacturer part to that item and one change is released. The remaining pending changes are rebased on the latest released change. The remaining pending changes now include manufacturer part redline modifications to add a manufacturer part that already exists on the released item's Manufacturers table.)
For ECOs, SCOs, and MCOs, checks for the use of the same manufacturer part on multiple items. (MultipleItemsPerManufPart is set to Warning or Disallow.)
(Duplication of the same manufacturer part on multiple items occurs when multiple changes add the same manufacturer part to two or more items' Manufacturers tables, either by redline addition or redline replacement. When one of the changes is released, the manufacturer part's Where Used table is rebased to refer to the newly released item. The remaining pending changes now include manufacturer part redline modifications that would allow a single manufacturer part to be used by multiple items.)
For ECOs, SCOs, and PCOs, if the Item Release First SmartRule is set to Disallow or Warning, then the routable object is checked to see if the child components have been released.
Checks if any of the attachments of the routable object remain checked out.
For every affected item, checks if any of the attachments remain checked out.
Checks the Effectivity Date Order and Effectivity Gap SmartRule settings.
Checks if items on the Affected Items tab have any other pending routable objects.
For ECOs, validates the affected item's Sites tab Make/Buy setting with the site's Site AML Allowed and AML Required on Buy settings. For more information, see Product Collaboration User Guide.
If you have the appropriate modify privileges, then you can modify the Make/Buy field in the Sites table of an item, even if the item has been released. However, the Make/Buy setting is not revision-specific. When you modify the Make/Buy setting on any item revision, it is also modified for all revisions. The following restrictions apply when modifying the Make/Buy setting:
When the item is included on the affected items table of a change order, the release audit validates the Site AML Allowed and AML Required on Buy settings of the site with the item Sites tab Make/Buy setting for that revision. Past revisions are not audited. (A release audit is performed automatically when the change order is released.)
Because the Make/Buy setting is not revision-specific and can be changed without using a change order, any validation violations caused by a modification to Make/Buy remain on the latest released revision of the item and may not be detected until the next time the item is added to a change order and the change order is release audited.
To audit the current status of a routable object in Web Client:
Open the routable object you want to audit.
You may audit a routable object from any tab.
Choose Actions > Audit Status.
The Audit Status Results dialog appears.
Click the Print button to print the audit results.
Click Close to close the Audit Status Results dialog.
Click an error message. Agile PLM navigates to the appropriate tab where the error exists and indicates the field, table row, or table cell where the error exists.
Depending on the error, Agile PLM may navigate to a field on the routable object, or to a field on an affected item.
If you have the appropriate privileges, you can modify the field to resolve the error.
The audit window remains open while you resolve the audit issues.
At any time, you can click the Audit button in the Audit Status Results dialog to perform the audit again.
To audit the current status of a routable object in Java Client:
Open the routable object you want to audit.
You may audit a routable object from any tab.
Click the Audit Status button above the tabs. Or right-click in the Agile Java Client window; in the menu that appears, choose Audit Status.
The Audit Results for Audit Status dialog box appears.
If there are errors, correct them and audit again.
To close the Audit Results dialog box, click OK.
To audit the routable object for release in Web Client:
Open the routable object you want to audit for release.
You may audit a change from any tab.
Choose Actions > Audit Release.
The Audit Status Results dialog appears.
Click the Print button to print the audit results.
Click Close to close the Audit Status Results dialog.
Click an error message. Agile PLM navigates to the appropriate tab where the error exists and indicates the field, table row, or table cell where the error exists.
Depending on the error, Agile PLM may navigate to a field on the routable object, or to a field on an affected item.
If you have the appropriate privileges, you can modify the field to resolve the error.
The audit window remains open while you resolve the audit issues.
At any time, you can click the Audit button in the Audit Status Results dialog to perform the audit again.
For ECOs, SCOs, and PCOs, if the Item Release First SmartRule is set to Warning or Disallow and there are unreleased children:
Click the error link to navigate to the Affected Items tab.
The unreleased children are automatically added to the affected items table.
For ECOs, SCOs, and MCOs, if the BOM Multi-Level Recursive Smart Rule is set to Warning or Disallow, and there is a recursive BOM:
Click the error link to navigate to the first item found in the BOM tree whose first-level BOM table includes an item that appears at a higher level in the BOM tree, thus causing a recursive BOM structure.
The BOM tree is evaluated from top to bottom. Although there may be multiple instances of recursive BOM structure in the affected item BOM tree, only the first instance is displayed in the Audit Status Results dialog.
Correct the recursive BOM error.
Click the Audit button in the Audit Status Results dialog to perform the audit again. The next recursive BOM error in the BOM tree is displayed in the audit results, if such an error exists.
Repeat steps b and c until all the recursive BOM errors have been corrected.
At any time, you can click the Audit button in the Audit Status Results dialog to perform the audit again.
To audit the routable object for release in Java Client:
Open the routable object you want to audit for release.
You may audit a change from any tab.
Click the Audit Release button above the tabs. Or right-click in the Agile Java Client window; in the menu that appears, choose Audit Release.
The Audit Results for Audit Release dialog box appears.
If there are errors, correct them and audit again.
To close the Audit Results dialog box, click OK.
When all the approvers have signed off for a Review or Released status type, and all the required fields have been completed, the routable object can be automatically promoted to the next status with the AutoPromote feature.
If autopromotion fails, the routing manager receives a notification. The routing manager should investigate why autopromotion failed and take the necessary action to move the routable object forward in the workflow.
Autopromotion may fail for one or more of the following reasons:
An attachment on the routable object, for example, a change order, remains checked out.
Either check-in the attachment or cancel the checkout, and then use Next Status to move the routable object to the next status in the workflow. See "Switching the Status of a Routable Object."
For one or more affected items of the routable object, an attachment remains checked out.
Either check in the attachment or cancel the checkout, and then use Next Status to move the routable object to the next status in the workflow. See "Switching the Status of a Routable Object."
If an affected item has two or more unreleased changes and each of those changes includes redlines to the item. The redlines are in conflict, for example, both ECOs include redlines to the quantity of the same BOM item.
Or an affected item has two or more unreleased changes with redlines and there are no redline conflicts while both changes are unreleased. However, if the current change is released, it will cause the other change to have redline conflicts with the most recently released revision of the item.
The change analyst can determine how to resolve the conflict:
Examine the pending changes and decide which redlines you want to keep. You can remove redlines or you may decide to remove the item from the Affected Items table of one of the changes. Advance the status manually.
Or, manually advance the status of one of the changes. A warning appears that tells you that releasing the change will cause another change to lose redlines. Ignore the warning and release the change; the redlines are removed from the remaining change.
This feature notifies whoever is specified in the status's If Autopromote Fails, Notify setting each time a change order fails to autopromote if new approvers were added since the last autopromote failure. Additionally, History is updated if Autopromote fails when a new approver is added but does not complete all workflow-required fields.
You promote a routable object by moving it through the sequential list of statuses in the workflow. If the workflow allows it, and if you have the appropriate privileges, you can also use the Workflow tab to demote a routable object by moving the routable object to a previous status in the workflow status list. From that previous status, the routable object then moves through the workflow again. For an example, see "Returning a Routable Object to the Originator."
If the routable object has entered the first Released status type, moving the routable object to a previous status in the workflow status list unreleases the routable object, and may have undesirable consequences. For more information, see "Releasing Routable Objects."
Agile administrative settings determine what happens when a routable object again moves through a status with approvers and observers (Review status type or Released status type) after status demotion. Depending on the settings, the following rules apply:
Demotion Approvers Removal SmartRule:
Remove: any ad hoc approvers and observers added during the first time through the Review status type or Released status type are removed for the second Review status type or Released status cycle.
Retain: ad hoc approvers and observers added during the first time through the Review status type or Released status type are kept on the approvers and observers lists for the second Review status type or Released status type cycle.
Demotion Signoff Removal SmartRule:
Remove: When a routable object enters the Review status type or Released status type the second time, all approvals and rejections from the first routing cycle are removed, and the approvers and observers must sign off again. (The approvals and rejections from the first routing cycle are still shown on the Workflow tab.)
Retain: When a routable object enters the Review status type or Released status type the second time, all the approvals and rejections from the first routing cycle are retained in the second routing status cycle and displayed in the signoff summary table. The approvers and observers who have already signed off do not need to sign off again.
Whenever you switch a routable object from one status to another, you must complete the Change Status dialog. The Change Status dialog for all status types includes a list of people to notify (the To: field in Web Client and the Notify field in Java Client) and a Comments field. For the Review status type and Released status type, additional fields for approvers, acknowledgers, and observers are included.
By default, you can switch a routable object to a Submit status type only if you are the originator, or if you have the appropriate privileges. Typically, the routing manager has the appropriate privileges to submit routable objects.
|
Note: If the routing manager field (for example, the Change Analyst field) on the Cover Page of the routable object is left blank, and if the workflow is defined to notify the default routing manager, then when you switch to a Submit status type, the routable object is submitted to every user on the routing manager drop-down list. |
You must include at least one change analyst in the Notify users list of the Change Status dialog.
Only the originator and users with the appropriate privileges can submit a routable object.
You cannot submit a routable object to a routing manager who does not have Discovery and Read privileges for that routable object. (See the Agile PLM Administrator Guide for details.)
By default, you can switch a routable object to a Submit status type only if you are the originator, or if you have the appropriate privileges. Typically, the change analyst or component engineer has the appropriate privileges to submit routable object.
To complete the Change Status page in Web Client:
Select a new status by using either the Next Status button or the Workflow tab. See "Switching a Routable Object from One Status to Another Status."
The Change Status dialog appears.
The Notify To: field may already contain a list of names, as specified in the workflow, or the To: field may be blank. In either case, you can add names to the To: field if you choose to do so.
To add names to the To: list, type the names of the users to be notified.
Or, click the icon to launch the address book palette.
You may select individual usernames or user groups. See "Adding and Removing Approvers, Acknowledgers, and Observers."
Add any comments in the Comments field.
Click Finish.
To complete the Change Status dialog box in Java Client:
Select a new status by using either the Next Status button or the Workflow tab. See "Switching the Status of a Routable Object."
The Change Status dialog box appears.
The Notify field may already contain a list of names, as specified in the workflow, or the Notify field may be blank. In either case, you can add names to the Notify field if you choose to do so.
To add names to the Notify list, type the names of the users to be notified (with semicolons separating the names).
Or click the Notify button to open the address book.
You may select individual usernames or user groups. See "Adding and Removing Approvers, Acknowledgers, and Observers."
|
Note: In Java Client, you can select approvers and observers, but you cannot select acknowledgers for the routable object. |
Add any comments in the Comments field.
Click the dialog button that completes the status change, for example, Submit, Route, or Release.
When you switch a routable object to a Review status type or a Released status type, you are routing it for signoff review to a list of approvers, acknowledgers, and observers. This list of approvers may also be called the CCB, or change control board.
When the Change Status dialog box (Java Client) or page (Web Client) appears, workflow property settings may have already assigned a list of users as approvers, acknowledgers, observers, and users to notify. If you choose, you may add to this list. If these fields are blank, complete them. When the routable object is routed, it is attached to an email message and sent to all the approvers, acknowledgers, observers, and users to notify. The email message contains an icon representing the change; double-clicking the icon opens the routable object. Approvers are required to either accept or reject the routable object. Acknowledgers are required to acknowledge the routable object. Observers may also accept or reject the routable object, but their response is not required. Users who are notified are not required to take any action.
To complete the Change Status to Review or Released page in Web Client:
Select the Review status type or the Released status type by using either the Next Status button or the Workflow tab. See "Switching the Status of a Routable Object."
The Change Status page appears.
Complete the Approvers, Acknowledgers, Observers, and To: fields. These fields may already contain names as defined by the workflow; with appropriate privileges, you may add names.
To add names to a Notify list, type the names of the users you want (with semicolons separating the names).
Or, click the icon to launch the address book palette.
You may select individual users, usernames, or user groups. See "Adding and Removing Approvers, Acknowledgers, and Observers."
Add any comments in the Comments field.
If appropriate, select the Send notifications as urgent check box. This adds "URGENT" to the subject of the email (if users are using Microsoft Outlook).
Click Finish.
The routable object is routed to all the approvers, acknowledgers, and observers, and their names are placed on the Workflow tab. All users in the Notify To: field receive email informing them of the new status of the routable object.
To complete the Change Status to Review or Released dialog box in Java Client:
Select the Review status type or the Released status type by using either the Next Status button or the Workflow tab. See "Switching the Status of a Routable Object."
The Change Status dialog box appears.
Complete the Approvers, Observers, and Notify fields. These fields may already contain names as defined by the workflow; with appropriate privileges, you may add names. Type the names, separated by semicolons.
Or click the Approvers, Observers, or Notify buttons to open the address book for each field.
From the Users or Groups tab, you may select individual usernames or user groups. See "Adding and Removing Approvers, Acknowledgers, and Observers."
|
Note: In Java Client, you can select approvers and observers, but you cannot select acknowledgers for the routable object. |
Add any comments in the Comments field.
If appropriate, select the Urgent check box. This adds "URGENT" to the subject of the email (if users are using Microsoft Outlook).
Click the dialog button that completes the status change, for example, Route or Release.
The routable object is routed to all the approvers, acknowledgers, and observers, and their names are placed on the Workflow tab. All users in the Notify field receive email informing them of the new status of the routable object.
If any of the users you select as approvers, acknowledgers, observers, or users to notify do not have the appropriate Discovery or Read privileges for the routable object, an error message appears when you attempt to route or release the routable object. The error message lists the users that do not have the appropriate privileges and informs you that their names have been automatically removed from the distribution list.
For more information about Discovery and Read privileges, see the Agile PLM Administrator Guide.
The following sections describe procedures you perform when routing changes:
Routing managers may want to monitor routable objects assigned to them to ensure that the list of approvers, acknowledgers, and observers is complete. Workflows may assign approvers, acknowledgers, and observers according to the attributes of the affected items of a routable object; you can add approvers, acknowledgers, and observers that were not automatically assigned by the workflow.
For example, at Acme Incorporated, each product line has several projects in development simultaneously. Acme uses a field to identify which project or projects each item (part or document) belongs to. The Libra Product Line workflow looks at the project assigned to the affected items on an ECO to determine which default approvers, acknowledgers, and observers to assign.
Mary Green creates ECO 333. She adds six Orion project objects to the Affected Items tab: three parts and three documents. Mary finishes preparing ECO 333 and switches it to the next status, where the routable object (ECO 333) is submitted to Bob Smith, the default change analyst.
To select approvers for the Orion project, the Libra Product Line workflow examines each item on the affected items table to determine if the field contains Orion. If all the items on the affected items table belong to the Orion project, then the list of Orion approvers, as defined in the workflow, is automatically added to the Workflow tab when ECO 333 is submitted to Bob.
However, in the case where some objects on the affected items table are documents, Acme requires that Orion team members in the Publications department (a user group) must also sign off the routable object. Since not all ECOs include documents to sign off, the Libra Product Line workflow does not automatically add to every ECO approvers from the Publications department.
Bob Smith, the change analyst, examines the ECO 333 and notices that some affected items are documents. Bob clicks Add Reviewers on the ECO 333 page and adds all the members of the Orion Publications group as approvers. Bob can add approvers, acknowledgers, or observers to any future Review or Released status type; the ECO does not need to be in the Review or Released status type to add approvers, acknowledgers, or observers.
See "Adding and Removing Approvers, Acknowledgers, and Observers" for detailed instructions for adding approvers, acknowledgers, and observers.
After a routable object has been routed for approval and enters a Review or Released status type, it may be necessary to either add or remove reviewers (approvers, acknowledgers, or observers). This requires both of the following:
The Ad Hoc Reviewers property in the workflow is set to Yes.
You have the appropriate privilege granted to you by the Agile administrator.
|
Note: You cannot add a user as a reviewer if that user does not have Discovery and Read privileges for that routable object.Ad hoc reviewers (approvers, acknowledgers, or observers) can be added to or removed from the routable object only when it is in a Submitted, Review, or Released type status. Ad hoc reviewers cannot be added to or removed from the routable object when it is in the Pending type status. |
You cannot add the same user to multiple reviewer lists (the Approvers, Acknowledgers, or Observers lists). If you attempt to add the same names to more than one list, Agile PLM warns you that the names are duplicated in more than one list. Before you can complete the add reviewers action, you must remove the duplicates so that each name appears in only one list.
In Web Client, you can also remove duplicate signoff users by using the Resolve Duplicates button in the Change Status dialog and in the Add Approvers, Acknowledgers and Observers dialog.
To add an approver, acknowledger, or observer in Web Client:
Select and open the routable object. Click the Workflow tab.
Click the Add Reviewers button.
The Add Approvers, Acknowledgers and Observers dialog appears.
Select the status you want the additional people to approve.
Complete the Approvers, Acknowledgers, and Observers fields. Type the names of the approvers, acknowledgers, or observers to add to the list (with semicolons separating the names).
Or click the icon to open the address book palette.
You may select individual usernames or user groups. For more information about using the address book palette, see "Selecting Users or User Groups to Modify a Field"
To add an entire user group as an approver:
In the address book palette, select User Groups in the drop-down list and execute a quick search to find the user groups you want.
Select a group by double-clicking it. The Group Sign-off Criteria dialog appears.
Select the appropriate check box and click Apply. The check box choices are:
Only one group member must approve
All group members must approve.
To select individual users or user groups according to their assigned job functions:
In the address book palette, select a specific job function in the drop-down list and execute a quick search to find a user or user group. Only users or user groups with that job function appear in the search results.
For example, if you select Lead Developer in the address book palette drop-down list, your search is limited to only users or user groups that include the Lead Developer job function in their Job Function(s) attribute.
Select the users or user groups that you want.
Add any comments.
When you have completed the Add Approvers, Acknowledgers and Observers dialog, click Add.
If one or more users or user groups are selected for duplicate signoff lists (Approver, Acknowleder, and Observer), then a an error message appears indicating the users and their duplicate signoff roles.
To resolver the duplicates, you can either: You can remove users or groups by clicking the click the small x button on each approver, acknowledger, or observer name you want to remove. Or, click the Resolve Duplicates button; see "Web Client, Resolve Duplicate Signoff Users."
Click the small x button on each approver, acknowledger, or observer name you want to remove.
Click the Resolve Duplicates button to resolve the duplicate names; see "Web Client, Resolve Duplicate Signoff Users."
When the duplicate names are resolved, then click Add.
|
Note: When you add a user group as an approver such that only one member of the group needs to signoff (UserGroupName - Any), escalation behavior is determined by the user group's profile settings for Allow Escalation Designation Approval (After Escalation or Always) and the user group's assigned escalation persons. However, when you add a user group as an approver such that all members of the group must signoff (UserGroupName - All), Agile PLM automatically adds each member of the group as an individual approver and, therefore, escalation behavior depends on the user profile settings and assigned escalation persons of each individual user.You must select a global user group to add a user group as an approver such that only one member of the group needs to signoff. If you select a personal user group and also choose the Only one group member must approve Group Sign-off Criteria, then a warning is displayed when you click Add in step 8. |
To remove an approver, acknowledger, or observer in Web Client:
Select and open the routable object.
Click the Remove Reviewers button.
The Remove Approvers, Acknowledgers and Observers dialog appears.
Select the status for which you want to remove approvers, acknowledgers, or observers.
In the Remaining Approvers, Remaining Acknowledgers, and Remaining Observers fields, click the small x button on each approver, acknowledger, or observer name you want to remove.
Enter any comments.
If desired, select the Send notification as urgent check box.
Click Save.
|
Note: You can remove an approver, acknowledger, or observer only if that reviewer has not yet approved, acknowledged, or rejected the routable object. |
In Agile Web Client, you add signoff users (approvers, acknowledgers, or observers) in the following dialogs:
Change Status to Review-type status or Released-type status. See "Completing the Status Change for a Review or Released Status."
Add Approvers, Acknowledger,s or Observers; see "Web Client, Adding and Removing Approvers, Acknowledgers, and Observers."
When you are done selecting the users or user groups in the dialog, you click Finish or Add.
If one or more users or user groups are selected for duplicate signoff lists (Approver, Acknowleder, and Observer), then a an error message appears indicating the users and their duplicate signoff roles. The Resolve Duplicates button becomes active.
To resolve duplicate signoff users manually:
You can click the small x button on each approver, acknowledger, or observer name you want to remove.
To quickly resolve all the duplicate signoff uses at one time:
Click the Resolve Duplicates button.
The Resolve Duplicate Users dialog appears, including the error message listing the users and their duplicate signoff roles.
Select the order in which the duplicate users are to be resolved. The signoff roles take precedence in the order listed and each duplicate user is assigned only one role.
For example, if you select Approver, Acknowledger, Observer, then:
If the user name is in all three lists, then the user name remains on the Approver list, and the user name is removed from the Acknowledger and Observer lists.
If the user name is on the Approver and Acknowledger lists, then the user name remains on the Approver list and the user name is removed from the Acknowledger list.
If the user name is on the Approver and Observer lists, then the user name remains on the Approver list and the user name is removed from the Observer list.
If the user name is on the Acknowledger and Observer lists, then the user name remains on the Acknowledger list and the user name is removed from the Observer list.
The resolution orders you can choose are:
Approver, Acknowledger, Observer (default)
Approver, Observer, Acknowledger
Acknowledger, Approver, Observer
Acknowledger, Observer, Approver
Observer, Approver, Acknowledger
Observer, Acknowledger, Approver
Click Save.
Focus returns to the Change Status dialog (then click Finish) or to the Add Approvers, Acknowledgers or Observers dialog (then click Add).
To add an approver or observer in Java Client:
Select and open the routable object.
On the Workflow tab, select the status you want the additional people to approve.
Click the Add Approver/Observer button.
The Add Approvers and Observers dialog box appears.
Complete the Approvers and Observers fields. Type the names of the approvers or observers to add to the list (with semicolons separating the names).
Or click the Approvers or Observers button to open the address book for each field.
From the Users or Groups tab, you may select individual usernames or user groups.
To add an entire user group as an approver, you can either add the group itself or the members of the group. This determines whether only one member or all members of the group must sign off.
Click the Group tab in the address book.
Select one or more group names.
(To select user names, expand a group by clicking the plus sign +.)
To add the group name to the recipient list, click the Add button. The group name is added to the recipients list. Only one user in the group needs to sign off.
|
Note: Personal user groups cannot be added as an approver or an observer. If you select a personal user group, then the Add button is disabled. Only a global user group can be added as an approver or an observer. |
To add the members of the group to the recipient list, click the Add all the users in the selected group button. The usernames of the members of the group are added to the recipient list. Each user in the group must sign off.
The Add all the users in the selected group button can be used both with global user groups and with personal user groups.
Add any comments.
Click OK.
To remove an approver or observer in Java Client:
Select and open the routable object.
On the Workflow tab, under the appropriate status, select the approvers or observers you want to remove from the list.
Click the Remove Approver/Observer button.
When prompted to confirm the removal action, click Yes.
|
Note: You can remove an approver only if that approver has not yet approved or rejected the routable object. |
When Agile PLM has been configured to use the Approval Matrix feature and the Approval Matrix Manager has created the necessary functional teams, then end users can use functional teams in the workflow process.
To use functional teams in the workflow process:
Create a routable object, for example, an ECO.
On the Cover Page tab, the two attributes that control the Approval Matrix feature are:
Workflow – Select the appropriate workflow for your routable object.
Functional Team(s) – Select one or more functional teams.
When the routable object enters a signoff status (review-type status or released-type status), Agile PLM matches the job functions in the workflow definition to the job functions in the functional teams, and populates the routable object Workflow tab with Approvers, Acknowledgers, Observers. That is:
A functional team matches one or more users with a job function. For example:
Mary Jones – Developer
John Smith – Product Manager
Bob White – QA Lead
The Agile administrator configures a workflow to associate a workflow action with a job function, for example:
Approver – Developer
Acknowledger – Product Manager
Observer – QA Lead
On the routable object Cover Page or General Info tab, one or more functional teams are selected in the Functional Team(s) attribute. When the routable object enters a signoff status, the job functions configured in the workflow are matched to the job functions in the functional teams. Agile PLM then populates the Workflow table with the appropriate users. From the examples above:
Approver – Developer – Mary Jones
Acknowledger – Product Manager – John Smith
Observer – QA Lead – Bob White
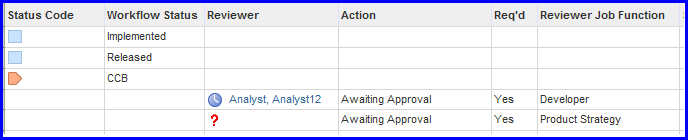
The Missing User icon is displayed in the Reviewer column of routable object workflow table when:
A job function has been defined as a reviewer for the routable object.
And
There is no identified user or user group to assign as a reviewer.
The occurs when, in the selected functional team, no user or user group is defined for that job function or the job function does not appear in the Job Functions table.
For example, the workflow requires that a user with the Product Strategy job function must approve the routable object. The functional team that was selected in the routable object Functional Team(s) attribute does not include the Product Strategy job function. When the routable object enters the CCB status, the missing user is indicated by the Missing User icon.
To resolve a missing user on the routable object workflow table:
|
Note: You must have the appropriate modify privileges to edit the workflow table Reviewer field. |
Double-click inside the table cell where the Missing User icon appears. A small search dialog appears.
|
Note: Only users and user groups that have the specified job function included in their Job Function(s) attribute appear in the search results. For example, when you resolve a missing user for a Product Strategy reviewer job function, then the search results are limited to Product Strategy users and user groups. |
Enter text to find a reviewer:
Begin typing a name and Agile PLM displays a name that matches in the search results field.
Click the name in the search results field to select it.
Press Enter to populate the Reviewer cell and to close the search dialog.
Or, click the icon to launch the address book palette.
Execute a search.
Double-click to select the search result row you want.
Press Escape to close the address book palette.
Press Enter to populate the Reviewer cell and to close the search dialog.
When you are done, click Save on the workflow table to save your edits.
When you approve a routable object, the approval and any comments are shown on the Workflow tab.
To approve a routable object in Web Client:
Open the routable object.
Click the Approve button to open the Approve dialog. The Approve and Reject buttons appear after the routable object is moved to a certain status, for example, a problem report moves from the Submitted to the Review status.
Depending on the Agile PLM system settings and workflow definitions, and the conditions under which you are signing off, the signoff area of the Approve dialog may include multiple users, job functions, or groups for whom you can approve.
In the Signoff area of the Approve dialog, ensure that the check boxes of users, job functions, or groups for whom you are approving are selected. Possible choices include:
Yourself
Groups – the approver groups of which you are a member.
Job Function – your job functions in the functional teams of which you are a member.
Transfers – transfer authorities for approver users or groups for which you are the Transfer To person.
Escalations – escalations for approver users or groups for which you are the Designated Escalation Person.
|
Note: When presented with multiple signoff possibilities (job functions, escalations, transfers, groups, or self) you must select at least one group, job function, or person for whom you are approving. |
In the Signoff area of the dialog, depending on Agile PLM system settings, you may be required to enter dual types of identification.
The first identification type is your approval password. Enter your approval password in the Password field.
The second identification type depends on Agile PLM system settings and may be either your userID (username) or your login password.
|
Note: The Password field appears in the Approve window depending on the Password Required property setting for the current workflow status. For more information about workflow properties, see Agile PLM Administrator Guide. |
Enter any comments in the Comments field.
Completing the Comments field may be either required or optional, depending on workflow settings.
In the Notify area of the approval dialog, select any of these check boxes to notify these people: Change Analyst, Originator, Reviewers. When notifying reviewers, you can select a workflow status other than the Current Status.
To select additional people to notify, launch the Address Book palette by clicking the Launch Palette icon.
Click Approve.
|
Note: For Design and File Folder objects, when you (Approvers/Observers/Reviewers) click the workflow approval link of a routing slip, the system takes you to the specific version to be approved. |
When all the approvers have approved and all the acknowledgers have acknowledged, then the routable object is ready to move to the next status in the status list.
If the AutoPromote property for the status is set to Yes, and the required fields are filled in, then the routable object is automatically promoted to the next status in the status list.
If the AutoPromote property for the status is set to No, then an email message notifies the change analyst, component engineer, or other routing manager that all the approvers have approved the routable object and all the acknowledgers have acknowledged the routable object.
To approve a routable object in Java Client:
Open the routable object.
Click the Approve button to open the Approve dialog box.
Enter any comments in the Comments field.
Completing the Comments field may be either required or optional, depending on workflow settings.
Select any of these check boxes to notify these people: Notify Change Analyst, Notify Originator, or Notify Reviewers. If you select Notify Reviewers, you can use the drop-down list to choose a different workflow status.
Depending on the Agile PLM system settings and workflow definitions, and the conditions under which you are signing off, the Approval dialog may include the following fields or lists that you must fill in:
Escalated From: A list of escalations for approver users or groups for which you are the Designated Escalation Person.
Click the down arrow next to the Escalated From field.
To select the users or groups for which you want to approve, in the dialog box that appears, select a user or group in the Choices list or the Selected list and click the right or left arrows to move the your selections from one list to the other. If you do not want to approve for any escalations, leave the Selected list blank.
Click OK.
Transferred From: A list of transfer authorities for approver users or groups for which you are the Transfer To person.
Click the down arrow next to the Transfer From field.
To select the users or groups for which you want to approve, in the dialog box that appears, select a user or group in the Choices list or the Selected list and click the right or left arrows to move the your selections from one list to the other. If you do not want to approve for any transfers, leave the Selected list blank.
Click OK.
Approval Group(s): A list of the approver groups of which you are a member.
Click the down arrow next to the Approving for Group(s) field.
To select the users or groups for which you want to approve, in the dialog box that appears, select a user or group in the Choices list or the Selected list and click the right or left arrows to move the your selections from one list to the other. If you do not want to approve for any groups, leave the Selected list blank.
Click OK.
Signoff for Self: When you are also an individual approver, a check box is displayed next to your name.
Check the check box to indicate that you are approving for yourself, in addition to any group, escalation, or transfer approvals. If you do not want to approve for yourself, deselect the check box.
Dual Identification: Depending on Agile PLM system settings, you may be required to enter dual types of identification.
The first identification type is your approval password. Enter your approval password in the Password field.
The second identification type depends on Agile PLM system settings and may be either your userID (username) or your login password.
|
Note: When presented with multiple signoff possibilities (escalations, transfers, groups, or self) you must select at least one group or person for whom you are approving.The Password field appears in the Approve window depending on the Password Required property setting for the current workflow status. For more information about workflow properties, see Agile PLM Administrator Guide. |
Click Approve.
|
Note: For File Folder objects, when you (Approvers/Observers/Reviewers) click the workflow approval link of a routing slip, the system takes you to the specific version to be approved. |
When you reject a routable object, the rejection and any comments appear on the Workflow tab, and the specified users receive an email message. Usually, this is the change analyst or component engineer. The email message states that you have rejected the routable object.
If a routable object is first rejected but is then later approved, the Workflow tab shows only the approval and not the rejection. However, the History tab shows both actions.
To reject a routable object in Web Client:
Open the routable object.
Click the Reject button to open the Reject dialog. The Approve and Reject buttons appear after the routable object is moved to a certain status, for example, a problem report moves from the Submitted to the Review status.
Depending on the Agile PLM system settings and workflow definitions, and the conditions under which you are signing off, the signoff area of the Reject dialog may include multiple users, job functions, or groups for whom you can reject.
In the Signoff area of the Reject dialog, ensure that the check boxes of users, job functions, or groups for whom you are rejecting are selected. Possible choices include:
Yourself
Groups – the approver groups of which you are a member.
Job Function – your job functions in the functional teams of which you are a member.
Transfers – transfer authorities for approver users or groups for which you are the Transfer To person.
Escalations – escalations for approver users or groups for which you are the Designated Escalation Person.
|
Note: When presented with multiple signoff possibilities (job functions, escalations, transfers, groups, or self) you must select at least one group, job function, or person for whom you are approving. |
In the Signoff area of the dialog, depending on Agile PLM system settings, you may be required to enter dual types of identification.
The first identification type is your approval password. Enter your approval password in the Password field.
The second identification type depends on Agile PLM system settings and may be either your userID (username) or your login password.
|
Note: The Password field appears in the Reject window depending on the Password Required property setting for the current workflow status. For more information about workflow properties, see Agile PLM Administrator Guide. |
Enter any comments in the Comments field.
Completing the Comments field may be either required or optional, depending on workflow settings.
In the Notify area of the approval dialog, select any of these check boxes to notify these people: Change Analyst, Originator, Reviewers. When notifying reviewers, you can select a workflow status other than the Current Status.
To select additional people to notify, click the Launch Palette icon button to launch the Address Book palette.
Click Reject.
To reject a routable object in Java Client:
Open the routable object.
Click the Reject button to open the Reject dialog box.
Enter any comments in the Comments field.
Completing the Comments field may be either required or optional, depending on workflow settings.
Depending on the Agile PLM system settings and workflow definitions, and the conditions under which you are signing off, the Reject dialog may include the following fields or lists that you must fill in:
Escalated From: A list of escalations for approver users or groups for which you are the Designated Escalation Person.
Click the down arrow next to the Escalated From field.
To select the users or groups for which you want to reject, in the dialog box that appears, select a user or group in the Choices list or the Selected list and click the right or left arrows to move the your selections from one list to the other. If you do not want to reject for any escalations, leave the Selected list blank.
Click OK.
Transferred From: A list of transfer authorities for approver users or groups for which you are the Transfer To person.
Click the down arrow next to the Transfer From field.
To select the users or groups for which you want to reject, in the dialog box that appears, select a user or group in the Choices list or the Selected list and click the right or left arrows to move the your selections from one list to the other. If you do not want to reject for any transfers, leave the Selected list blank.
Click OK.
Approval Group(s): A list of the approver groups of which you are a member.
Click the down arrow next to the Approving for Group(s) field.
To select the users or groups for which you want to reject, in the dialog box that appears, select a user or group in the Choices list or the Selected list and click the right or left arrows to move the your selections from one list to the other. If you do not want to reject for any groups, leave the Selected list blank.
Click OK.
Signoff for Self: When you are also an individual approver, a check box is displayed next to your name.
Select the check box to indicate that you are rejecting for yourself, in addition to any group, escalation, or transfer rejections. If you do not want to reject for yourself, deselect the check box.
Dual Identification: Depending on Agile PLM system settings, you may be required to enter dual types of identification.
The first identification type is your approval password. Enter your approval password in the Password field.
The second identification type depends on Agile PLM system settings and may be either your userID (username) or your login password.
|
Note: The Password field appears in the Reject window depending on the Password Required property setting for the current workflow status. For more information about workflow properties, see Agile PLM Administrator Guide.When presented with multiple signoff possibilities (escalations, transfers, groups, or self) you must select at least one group or person for whom you are rejecting. |
Click the Notify button to add any users to be notified.
Click Reject.
When at least one approver has rejected a routable object, the following actions occur, as specified in the workflow property settings:
The users specified in the workflow properties are notified that the routable object has been rejected.
If the AutoPromote property is set to Yes, then the routable object is not promoted to the next status in the status list.
Depending on the workflow property settings, the object may switch to a specified status when it has been rejected.
|
Note: You must use Web Client to acknowledge a routable object. The workflow acknowledge action is not available in Java Client. |
When you acknowledge a routable object, the acknowledgment and any comments are shown on the Workflow tab.
By acknowledging the routable object, the acknowledger verifies that he has reviewed the routable object or that he has performed an expected action when the object is routed.
|
Note: An acknowledgment is not an approval, however, similar to an approval, it is a required workflow action that must be completed in order for the routable object to be released. |
To acknowledge a routable object in Web Client:
Open the routable object.
Click the Acknowledge button to open the Acknowledge dialog. The Acknowledge button appears after the routable object is moved to a certain status, for example, a problem report moves from the Submitted to the Review status.
Depending on the Agile PLM system settings and workflow definitions, and the conditions under which you are acknowledging, the signoff area of the Acknowledge dialog may include multiple users, job functions, or groups for whom you can acknowledge.
In the Signoff area of the Acknowledge dialog, ensure that the check boxes of users, job functions, or groups for whom you are approving are selected. Possible choices include:
Yourself
Groups – the acknowledger groups of which you are a member.
Job Function – your job functions in the functional teams of which you are a member.
|
Note: When presented with multiple signoff possibilities (job functions, groups, or self) you must select at least one job function, group or person for whom you are acknowledging. |
In the Signoff area of the dialog, depending on Agile PLM system settings, you may be required to enter dual types of identification.
The first identification type is your approval password. Enter your approval password in the Password field.
The second identification type depends on Agile PLM system settings and may be either your userID (username) or your login password.
|
Note: The Password field appears in the Acknowledge window depending on the Password Required property setting for the current workflow status. For more information about workflow properties, see Agile PLM Administrator Guide. |
Enter any comments in the Comments field.
Completing the Comments field may be either required or optional, depending on workflow settings.
In the Notify area of the approval dialog, select any of these check boxes to notify these people: Change Analyst, Originator, Reviewers. When notifying reviewers, you can select a workflow status other than the Current Status.
To select additional people to notify, launch the Address Book palette by clicking the Launch Palette icon.
Click Acknowledge.
When all the approvers have approved and all the acknowledgers have acknowledged, then the routable object is ready to move to the next status in the status list.
If the AutoPromote property for the status is set to Yes, and the required fields are filled in, then the routable object is automatically promoted to the next status in the status list.
If the AutoPromote property for the status is set to No, then an email message notifies the change analyst, component engineer, or other routing manager that all the approvers have approved the routable object and all the acknowledgers have acknowledged the routable object.
The reminder period and the review escalation period are periods of time defined for each Review or Released status type in each workflow. For example, the reminder period for the CCB status in the Default Change Orders workflow is 48 hours, and the review escalation period is 96 hours. The reminder period and the review escalation period begin when the routable object enters a Review or Released status type. The reminder period is shorter than the escalation period so the approvers have time to respond before the escalation period elapses.
|
Note: If your user profile Receive Email Notifications preference is set to Yes, Agile PLM will also send an email notification to your user profile email address. See also "User Properties Defined" |
Each Review or Released status type has its own reminder period and review escalation period. If a workflow has several Review or Released status types, each one may have a different length of time for both its reminder period and review escalation period.
When the reminder period elapses, if an approver has not approved or rejected the routable object, or an acknowledger has not acknowledged the routable object, then a reminder notification is sent to the approver or acknowledger. The change analyst or component engineer receives a similar notification.
When the escalation period elapses, if an approver has not approved or rejected the routable object or an acknowledger has not acknowledged a routable object, then a notification is sent to the appropriate designated escalation person. A similar notification notifies the change analyst or component engineer that the routable object has been escalated to the specified designated escalation person. The designated escalation person may approve or reject the routable object in the place of the original approver or acknowledge the routable object in the place of the original acknowledger.
When reminder and escalation notifications are sent, the actions are recorded on the History tab.
Each user or user group may have multiple designated escalation persons. A designated escalation person can be an individual user or user group.
The Agile administrator determines whether your designated escalation persons are able to sign off a routable object for you at any time, or only after the escalation period has elapsed. See the Agile administrator if you have questions about your designated escalation persons.
For information about defining escalations, see "Working with Escalations in Web Client" or "Working with Escalations in Java Client."
|
Note: If your user profile Receive Email Notifications preference is set to Yes, Agile PLM will also send an email notification to your user profile email address. See also "User Properties Defined." |
If the review escalation period elapses, the reviewer's designated escalation persons are notified that the approver or the acknowledger has not responded. Now the designated escalation persons may approve or reject the routable object in the place of the original approver or acknowledge the routable object in the place of the original acknowledger. If the designated escalation person approves, rejects, or acknowledges the routable object, then the name is recorded on the Workflow tab and the History tab as the Signoff user.
|
Note: If the designated escalation person is a user group, only one member of the group needs to sign off the routable object. When the routable object has been signed off, the routable object no longer appears in the Inbox of the other members of the group. |
If you have the appropriate privileges, you can temporarily transfer your signoff authority for the routable object to one or more Agile users. For example, if you know you will be on vacation for a week, you can give other users the authority to sign off routable objects for you while you are gone. You can specify which routable objects to transfer to which user.
In addition, if you have the appropriate privileges, you can also transfer signoff authority for other users. For example, if Mary will be on vacation, you can give Bob the authority to sign off routable objects for Mary while she is gone.
Signoff authority is transferred for users who are assigned approvers or acknowledgers on a routable object. Signoff authority is not transferred for observers.
To transfer signoff authority for yourself or others in Web Client:
Click the My Settings button in the left navigation pane. Your user profile is displayed in the content pane.
Click the Transfer Authority button. The All Transfer Authority Details dialog appears.
Click the Add button. The Create Transfer Authority dialog appears.
Select yourself or another user to transfer authority from and then select the user who is receiving signoff authority.
Users who are receiving the authority must have the appropriate privileges to sign off the routable objects transferred to them. If you have questions about privileges, see the Agile administrator.
In the Criteria list, click to select the type of information to transfer.
The list of criteria is quite extensive. If you have questions about which criteria would best suit your needs, contact the Agile administrator, who manages all global criteria. Alternatively, consider defining a personal criteria that you can then use for transferring authority: choose Actions > Specify Personal Criteria in the Actions menu of your user profile. See "Defining Personal Criteria for Authority Transfers" for information about creating personal criteria.
Specify a start date and an end date.
In the Affected Changes list, specify whether you want all routable objects in your Inbox to be transferred, or only routable objects that arrive in your Inbox within the date range you specified.
Click Save to complete the transfer.
To transfer signoff authority for yourself or others in Java Client:
Choose Settings > Transfer Authority in the main menu bar. The Transfer Authority dialog box appears which lists the transfer authority definitions you have the ability to modify or delete.
Click the New button. The New Transfer Authority dialog box appears.
Select yourself or another user to transfer authority from and then select the user who is receiving signoff authority.
Users who are receiving the authority must have the appropriate privileges to sign off the routable objects transferred to them. If you have questions about privileges, see the Agile administrator.
In the Select Criteria list, click to select the type of information to transfer.
To view the filter conditions for the selected criteria, click the View button in the Criteria pane. The criteria is displayed, much like a search definition, in a read-only dialog box. You can verify whether the selected transfer criteria will find the routable objects you want to transfer. Click Cancel to close the dialog box.
The list of criteria is quite extensive. If you have questions about which criteria would best suit your needs, contact the Agile administrator, who manages all global criteria. Alternatively, consider defining a personal criteria that you can then use for transferring authority. See "Defining Personal Criteria for Authority Transfers" for information about creating personal criteria.
Specify a start date and an end date.
Under Affected Changes, specify whether you want all routable objects in your Inbox to be transferred, or only routable objects that arrive in your Inbox within the date range you specified.
Click OK to complete the transfer.
The new transfer authority definition appears in the Transfer Authority dialog box.
Click Close.
If the Transfer Authority Affected Changes property is set to All Changes During Time Period, the following conditions define the routable objects are transferred:
The routable object meets the criteria defined in the transfer authority.
The routable object enters a workflow status that has a list of approvers or acknowledgers (a Review-type status or a Released-type status) during the time period defined in the Transfer Authority.
The From user is an approver or acknowledger for that workflow status.
If the Transfer Authority Affected Changes property is set to All Changes, the following conditions define the routable objects are transferred:
The conditions listed above for All Changes During Time Period.
In addition, all criteria-defined routable objects that were awaiting signoff by the From user at the time the Transfer Authority was created (in a Review-type status or a Released-type status).
Routable objects that are created during the Transfer Authority time period that do not also enter a Review-type or Released-type status during the time period are not transferred to the To user.
The Start and End dates are time specific. If you enter today's date as the start date, and the time component of the date is in the past, Agile PLM creates the Transfer Authority with the current date and time.
With the appropriate privileges, you can modify or delete signoff authority transfers at any time. For each authority transfer, you can modify the person who receives signoff authority, the start and end dates, and whether to transfer routable objects already in the Transfer To user's Inbox.
You can also modify and reuse any expired authority transfer at a future date.
Your Transfer Authority privileges determine which authority transfers you can modify:
If you have privileges to create only your own authority transfers, you can modify only your own authority transfers.
If you have privileges to create authority transfers for other users, you can modify any authority transfers created by any user.
To modify signoff authority in Web Client:
Click the My Settings button in the left navigation pane. Your user profile is displayed in the content pane.
Click the Transfer Authority button. The All Transfer Authority Details dialog appears.
Select the row you want to modify and then click the Edit button.
Change the settings as needed.
|
Note: Users who are receiving the authority must have the appropriate privileges to sign off the routable objects transferred to them. If you have questions about privileges, see the Agile administrator. |
Click Save.
To modify signoff authority in Java Client:
Choose Settings > Transfer Authority in the main menu bar. The Transfer Authority dialog box appears which lists the transfer authority definitions you have the ability to modify or delete.
Click to select the transfer authority definition you want to change and then click the Modify button. The Modify Transfer Authority dialog box appears.
Change the settings as needed.
|
Note: Users who are receiving the authority must have the appropriate privileges to sign off the routable objects transferred to them. If you have questions about privileges, see the Agile administrator. |
Click OK to complete the transfer.
The modified transfer authority definition appears in the Transfer Authority dialog box.
Click Close.
To delete one or more transfers of signoff authority in Web Client:
Click the My Settings button in the left navigation pane. Your user profile is displayed in the content pane.
Click the Transfer Authority button. The All Transfer Authority Details dialog appears.
Select the rows you want to delete and then click the Remove button.
To delete one or more transfers of signoff authority in Java Client:
Choose Settings > Transfer Authority in the main menu bar. The Transfer Authority dialog box appears which lists the transfer authority definitions you have the ability to modify or delete.
Click to select the transfer authority definition you want to change and then click the Delete button.
When prompted, click Yes.
Click Close to close the Transfer Authority dialog box.
A criteria is similar to an advanced search. The attributes used to create criteria are similar to the fields used to create advanced searches. For escalations and authority transfers, criteria can also be thought of as "filters" or "qualifying descriptions" of the changes that will be escalated or transferred.
For example, you could create a personal criteria for all ECOs that affect a specified product line.
To create a personal criteria in Web Client:
Click the My Settings button in the left navigation pane. Your user profile is displayed in the content pane.
Click the Transfer Authority button. The All Transfer Authority Details dialog appears.
In your user profile Actions menu, choose Specify Personal Criteria.
Click the Add button. The Create Criteria dialog appears.
Enter a name for the criteria.
|
Note: The personal criteria that you create appears in the Transfer Authority criteria list preceded by your name, making it easier to locate. For example, if Bob Jones enters "All Leo Projects," the criteria appears in the transfer authority Criteria list as "Bob Jones.All Leo Projects." |
Enter a description for the criteria.
Using the sample name above, the description might be "All changes in the Leo product line."
You define criteria in the Create Criteria dialog the same way that you define search conditions in an Advanced Search. Fill in the fields. For more information about searching, see Chapter 8, "Finding Agile Data with Searches."
Click Save.
The new criteria appears in the Criteria drop-down list. You can now select this criteria when defining a transfer authority (Tools > My Settings > Transfer Authority).
To create a personal criteria in Java Client:
Choose Settings > Transfer Authority in the main menu bar. The Transfer Authority dialog box appears which lists the transfer authority definitions you have the ability to modify or delete.
Either click the New button or select a row and click the Modify button. The New or Modify Transfer Authority dialog box appears.
In the Criteria pane, click the New button to display the New Personal Criteria dialog box.
Enter a name for the criteria.
|
Note: The personal criteria that you create appear in the Transfer Authority criteria list preceded by your name, making them easier to locate. For example, if Bob Jones enters "All Leo Projects," the criteria appears in the Transfer Authority criteria list as "Bob Jones.All Leo Projects." |
Enter a description for the criteria.
Using the sample name above, the description might be "All changes in the Leo product line."
You define criteria in the New Personal Criteria dialog box the same way that you define search conditions in the Advanced Search wizard. Fill in the fields. For more information about searching, see Chapter 8, "Finding Agile Data with Searches."
Click OK.
The new criteria appears in the Criteria pane in the Transfer Authority dialog box. You can now select this criteria when defining or modifying a transfer authority.
You return a routable object to the originator by switching the status to the Pending status type. Before you can switch a routable object back to the Pending status type, you need the appropriate privileges. Usually, the change analyst and component engineer have these privileges. If you need them and do not have them, see the Agile administrator.
When a change analyst or component engineer switches a routable object from a workflow status (not from the Unassigned status) to the Pending status type (the first status in the workflow status list), the originator is notified. The originator is now able to edit the routable object, including editing items on the Affected Items tab and selecting a different workflow.
When the originator completes edits to the returned routable object and then switches it to the next status in the workflow status list, the routable object moves through the workflow status list and enters the Review status type or Released status type cycle a second time. For details about what happens when the routable object enters the Review status type or Released status type cycle again, see "Demoting a Routable Object."
To return a routable object to the originator in Web Client:
Open the routable object.
On the Workflow tab, click Pending (or a status of type Pending) in the chart on the Workflow tab.
When the Change Status dialog appears, complete the Notify To: field and add comments.
Click Finish.
The status of the routable object switches to the Pending status type.
|
Note: Approvals and rejections from previous routing cycles appear on the Workflow tab, but they are not active. Only approvals and rejections for the latest routing cycle on the Workflow tab are allowed. The History tab also shows the actions of the earlier routing cycles. |
You cannot return a routable object to an originator who does not have Discovery and Read privileges for that object. (See the Agile PLM Administrator Guide for details.)
To return a routable object to the originator in Java Client:
Open the routable object.
On the Workflow tab, click Pending (or a status of type Pending) in the chart on the Workflow tab.
See "Switching a Routable Object from One Status to Another Status."
When the Change Status dialog box appears, complete the Notify field and add comments.
Click OK.
The status of the routable object switches to the Pending status type.
|
Note: Approvals and rejections from previous routing cycles appear on the Workflow tab, but they are not active. Only approvals and rejections for the latest routing cycle on the Workflow tab are allowed. The History tab also shows the actions of the earlier routing cycles. |
You cannot return a routable object to an originator who does not have Discovery and Read privileges for that object. (See the Agile PLM Administrator Guide for details.)
You can use the Workflow tab to cancel a routable object by switching the status to the Cancel status type if both of the following are true:
The Cancel status type has been defined in the workflow as one of the valid next statuses.
You have the appropriate privileges. (See the Agile administrator if you have questions about your privileges.)
For example, you create an ECO to modify an assembly and route it through workflow, but later decided not to modify it. You can cancel the routable object itself. The reasons the ECO is canceled would be recorded in the comments of the canceled ECO. The canceled ECO can still remain in Agile database.
|
Note: If you cancel a released routable object, the revision is removed from the item revision list of the affected items. A routable object with affected items that has been canceled cannot be uncanceled (moved to a different status in the workflow). The canceled routable object appears on the Change History table of the item's Changes tab. If there are redline edits associated with the routable object, redlines are dropped (discarded) and you cannot access the redline table of a canceled routable object. This differs from a routable object on hold; see "Putting a Routable Object on Hold." |
Canceling a routable object is different than deleting it. A routable object can be canceled due to a fundamental flaw or rejection by several approvers, but it remains in the database. See also Appendix A, "Deleting Agile Objects."
When a routable object is canceled, it no longer has the current status, and the remaining statuses on the status list are skipped. All the remaining statuses on the status list show the name of the person who moved the routable object to Canceled under the Status Changed By column on the Workflow tab.
To cancel a routable object in Web Client:
Open the routable object.
On the Workflow tab, click Cancel in the Summary workflow chart.
When the Change Status dialog appears, complete the Notify To: field, and add comments.
Click Finish.
The status of the routable object switches to the Cancel status type.
To cancel a routable object in Java Client:
Open the routable object.
On the Workflow tab, click Cancel in the chart.
When the Change Status dialog box appears, complete the Notify field, and add comments.
Click OK.
The status of the routable object switches to the Cancel status type.
You uncancel a routable object by using the Workflow tab to switch the status. You can switch to any status if:
The status has been defined in the workflow as one of the valid next statuses.
You have the appropriate privileges. (See the Agile administrator if you have questions about your privileges.)
There are no items on the Affected Items tab of the routable object.
|
Note: If you cancel a released routable object, the revision is removed from the item revision list of the affected items. A routable object with affected items that has been canceled cannot be uncanceled (moved to a different status in the workflow). This differs from a routable object on hold; see also "Putting a Routable Object on Hold." |
To uncancel a routable object status change in Web Client:
Open the routable object.
On the Workflow tab, select a status in the Summary workflow chart.
When the Change Status dialog appears, complete the Notify To: field, add approvers, acknowledgers, and observers if appropriate, and add comments.
Click Finish.
The status of the routable object switches to the selected status.
To uncancel a routable object in Java Client:
Open the routable object.
On the Workflow tab, select a status in the chart.
When the Change Status dialog box appears, complete the Notify field, add approvers and observers if appropriate, and then add comments.
Click OK.
The status of the routable object switches to the selected status.
The process of switching a routable object to the Hold status type is similar to the process of canceling an object. See "Canceling a Routable Object" for detailed instructions.
When you put a routable object on hold, select the Hold status type instead of the Cancel status type.
For information about taking a routable object off hold, follow the directions described in "Uncanceling a Routable Object."
|
Note: A routable object with affected items that has been put on hold can be switched from a Hold status type to another status in the workflow. If you put a released routable object on hold, the revision remains on the item revision list of the affected items. This is a substantial difference between Cancel and Hold. |
The routable object on hold appears in the Pending Changes table on the item's Changes tab.
You can release routable objects by using the Next Status button on the Workflow tab. See "Switching a Routable Object from One Status to Another Status."
If the AutoPromote property of the preceding Review status type is set to Yes, then the routable object is automatically released when all required fields are filled in, and all approvers have approved the change, and all acknowledgers have acknowledged the change.
Before a routable object can be released, the system checks for the following:
The Category field and all other required fields are filled in. (The Agile administrator determines which fields are required in the workflow property settings.)
The routable object passes the release audit.
In addition, when a routable object releases an item, the system checks to see which sites the item is being released for, as indicated on the Affected Items tab of the routable object. The system then checks the following:
The value in the Make/Buy field on the items' Sites tabs, to determine if any of the sites are specified as Buy. A warning is displayed when an AML is required for a Buy item.
The Site-Specific AML field of the sites, to determine if any of the sites are required or allowed to have a site-specific AML.
You can use the Audit Release button (Java Client) or the Audit Release command on the Actions menu (Web Client) to verify that the routable object passes the release audit and that all required fields have been completed. For details, including the conditions a release audit checks, see "Auditing Routable Objects."
|
Note: If you do not have Discovery and Read privileges for an item on the Affected Items tab of the routable object, you cannot release that routable object. |
To release a routable object in Web Client:
Open the routable object.
If you want, audit the routable object (choose Actions > Audit Release).
On the Workflow tab, select the Released status type from the workflow status chart.
Complete the Notify field and enter any comments in the Comments field.
Complete the Approvers, Acknowledgers, and Observers fields if you want an additional signoff cycle after the routable object has been released. Otherwise, leave these fields blank.
Click OK.
If not all the required fields have been completed, you are prompted to complete them. Otherwise, the status of the routable object switches to Released.
To release a routable object in Java Client:
Open the routable object.
If you want, audit the routable object (click the Audit Release button, or right-click and choose Audit Release).
On the Workflow tab, select the Released status type from the workflow status chart.
Or click the Next Status button.
Complete the Notify field, and enter any comments in the Comments field.
Complete the Approvers and Observers fields if you want an additional signoff cycle after the routable object has been released. Otherwise, leave these fields blank.
Click Release.
For information about multiple Released status types, see "Multiple Released Status Types."
You can use the Workflow tab to unrelease a routable object by switching the routable object from a Released or Complete status type to a Pending, Submit, Review, Cancel, or Hold status type.
Routable objects can be interrelated in complex ways, for example, by their release order or by being listed on the Relationships tab one or more additional routable objects. Unreleasing any routable object can have unforeseen consequences.
|
Caution: Unreleasing a routable object is not a recommended practice. Use extreme caution when unreleasing routable objects if you are using Agile Content Service (ACS) or ChangeCAST. After you have released a routable object and it's been passed to your ERP system, unreleasing the routable object has no effect on the information in the ERP system. ACS and ChangeCAST do not pass the updated information about unreleasing a routable object to the ERP system, and any audit trails, records of tasks, or dependencies between objects are not restored. |
You can unrelease a routable object, if:
The workflow assigned to the routable object has been configured by the Agile administrator to allow you to switch a Released or Complete routable object to another status type. (The default workflows do not allow this procedure.)
You have the appropriate privileges.
No other changes have been made and released against the same items.
For example, when you are working with items and changes, if other changes have been created and released against the same items, you must first unrelease those later changes. Unrelease those changes in the reverse order in which they were created.
If you do not have Discovery and Read privileges for an item on the Affected Items tab of the routable object, you cannot unrelease that routable object.
To unrelease a routable object in Web Client:
Open the routable object.
On the Workflow tab, select a status from the chart. Do not select a Released or Complete status type.
Selecting the Pending status type lets you edit the unreleased routable object, including selecting a different workflow.
Complete the Notify field, and enter any comments in the Comments field. If appropriate, add approvers, acknowledgers, and observers.
Click OK.
To unrelease a routable object in Java Client:
Open the routable object.
On the Workflow tab, select a status from the chart. Do not select a Released or Complete status type.
|
Note: Selecting the Pending status type lets you edit the unreleased routable object, including selecting a different workflow. |
Complete the Notify field, and enter any comments in the Comments field. If appropriate, add approvers and observers.
Click OK.
A workflow can have multiple Released status types. When the routable object enters the first Released status type, all the release checks are performed (described in "Auditing Routable Objects"), and any BOM or manufacturer data redlines data goes into effect in the affected items. The routable object is now released.
For subsequent Released status types, no additional checks or release actions are performed; the routable object remains released. However, the released routable object may be routed for additional approval cycles. This allows for individual approval cycles after release but before the routable object moves to the Complete status type. The routable object remains released if it moves from a Released status type to either another Released status type or to a Complete status type.
|
Note: Moving a routable object from a Released status type to a Pending, Submit, Review, Hold, or Cancel status type unreleases the routable object. |
This use case explains how the system refers to multiple Released statuses. The "first Released status" does release the workflow. The other Released statuses provide for additional review signoffs; they can also have Entry Required fields.
Let there be a workflow with multiple Released statuses (call them R1, R2, and R3) and there are Entry Required fields set for each Release status. Also, a "non-first Released status" (in this case, R2 or R3) has been permitted to be a Valid Manual Next Status from one of the pre-Released statuses (that is, you can skip the first Released status, the one that actually releases the workflow). Then, when you select that workflow and it moves from Pending status to R3 status, the system checks the Entry Required fields of the first Released status, R1.
It works this way because the workflow should not be released without checking the first Released status's Entry Required fields, because that's where objects are changed in the database because of the released Change. For example, when an item's lifecycle is changed, its revision (rev) should be incremented, and even if you are attempting to leapfrog over R1, R1's requirements are important; if R1's Entry Required fields are ignored, you could end up with an improperly released item.
If you have the appropriate privilege and the routable object has a Comment button, you can add a comment to the routable object's History tab and send that comment to the users you select.
To add a History tab comment in Web Client:
Open the routable object and click its Comment button.
In the displayed dialog, enter your comments in the Comment field.
Use the check boxes to select default users to notify, such as the change analyst or the list of reviewers. Each type of routable object includes a selection of default users appropriate for that type of object.
Use the To: field to specify additional users to notify. Type user names or click the Launch Palette icon to launch the address book palette.
If desired, check the Send notification as urgent check box.
When you are finished, click Send.
To add a History tab comment in Java Client:
Open the routable object and click its Comment button.
In the displayed dialog, enter your comments in the Comment field.
Use the check boxes to select default users to notify, such as the change analyst or the list of reviewers. Each type of routable object includes a selection of default users appropriate for that type of object.
Use the Notify field to specify additional users to notify.
When you are finished, click Comment.
When sending comments (by using the Comment button) from a Review or Released type status in a change, you can specify whether the comments are to be sent to only the current review or released status reviewers (that is, for the workflow's current status) or if comments are to be sent to all reviewers in both current and previous Review and Released statuses. In the Comment dialog (Java Client) and the Comment wizard (Web Client), a drop-down box (after the "Notify Reviewers for" check box) contains Current Status and Current and Previous Statuses for selection.
The Agile administrator can create new subclasses of routable objects. If you have the appropriate privileges, and the routable object is still in the Pending status type, you can change the subclass of a routable object to another subclass in the same class. For example, if your administrator has created the ECN (engineering change notice) subclass, you can change the subclass of a routable object in the Change Orders class from ECO to ECN.
|
Note: When you change the subclass of a routable object, some of its data fields may change, and all previous information about the Page Three section is cleared. |
To change the subclass of a routable object in Web Client:
On the Cover Page tab of the change, click Edit, and select a new subclass from the Object Type drop-down list. For example, for Change Type, you can select ECO or ECN (engineering change notice).
If the Page Three section (on the Cover Page tab) is visible and has data, a warning message appears, alerting you that all Page Three data is cleared.
Select Continue to continue changing the subclass and to allow Page Three data to be cleared.
Select Cancel to cancel the change subclass process. No changes are made to the object.
Click Finish.
If the new subclass has an autonumbering scheme assigned by the Agile administrator, Agile Web Client asks you whether to select a new autonumber for the new subclass (unless your Agile system is configured to require autonumbering, in which case you see a different warning message).
Select Continue to continue the process of changing the number.
Select Cancel to cancel the change subclass process. No changes are made to the object.
Click Finish.
Agile PLM automatically numbers the change and displays the new number in the Number field, and the event is entered on the History tab of the routable object.
To change the subclass of a routable object in Java Client:
On the Cover Page tab of the routable object, select a new subclass from the Object Type drop-down list. For example, for Change Type, you can select ECO or ECN.
If the Page Three tab is visible, a warning message appears, alerting you that all Page Three data is cleared.
Click Yes to continue changing the subclass and to allow Page Three data to be cleared.
Click No to cancel the change subclass process. No changes are made to the object.
If the new subclass has an autonumbering scheme assigned by the Agile administrator, Agile asks you whether to continue using the same object number.
Click Yes to change the subclass but retain the existing number.
Click No to change the subclass and assign a new autonumber. If more than one autonumbering scheme applies, you are prompted to select the autonumbering scheme you want.
If the new subclass does not have an autonumbering scheme assigned by the Agile administrator, the process is completed with the subclass being changed but the number not being changed.
|
Note: When you click the AutoNumber button, the number changes automatically. The autonumbering scheme assigned to the subclass you selected is used, or you are prompted to select one (if multiple schemes have been designated). |
Agile PLM automatically numbers the routable object and displays the new number in the Number field, and the event is entered on the History tab of the routable object.
Releasing a routable object affects the appearance and behavior of the routable object's tabs, and also the BOM of any items affected by the routable object that were included on the affected items list of that routable object.
On the Cover Page tab of the routable object:
The status stamp reflects the new status.
The Status field reads Released.
On the Affected Items tab, the Add and Remove buttons are disabled.
|
Note: If the workflow has more than one Released status type, the appearance and behavior of the routable object are altered only when the routable object enters the first Released status type. For more information, see "Multiple Released Status Types" |
A routable object's workflow defines its final status. If the workflow has a status of type Complete, it is always the last status in the status list, before any Hold or Cancel status types.
|
Note: Depending on the assigned workflow, a routable object may not have a Complete status type. A Complete status type is not required in a workflow. |
To examine the status lists of the workflows in use at your company, in Java Client, click the View Workflows button in the toolbar. In Web Client, choose Actions > View Workflows.
If the Released status type is set to autopromote and it immediately precedes the Complete status type, then the routable object automatically switches to the Complete status type when all the required fields for the Released status type are filled in, any approvers have approved the routable object, and any acknowledgers have acknowledged the routable object.
You must have the appropriate privileges to switch a routable object to its Complete status type. See the Agile administrator if you have questions about your privileges.
After a routable object has been switched to its final status, you cannot delete it unless you unrelease it first. See Appendix A, "Deleting Agile Objects."
To switch a routable object to its final status in Web Client:
Open the routable object.
If you want, audit the routable object.
Select the Complete status type by using either the Next Status button or the Workflow tab.
The Change Status to Complete status type name page appears.
Complete the To: field.
Enter any comments in the Comments field.
Click Finish.
The routable object is switched to its final status.
To switch a routable object to its final status in Java Client:
Open the routable object.
If you want, audit the routable object.
Select the Complete status type by using either the Next Status button or the Workflow tab.
The Change Status dialog box appears.
Complete the Notify field.
Enter any comments in the Comments field.
Click OK.
The routable object is switched to its final status.
Redlining highlights, in red, changes made to an object. Only ECOs, MCOs, PCOs, and SCOs have redlining functions. Use these changes when you need to modify a released item. For information about the functions of these types of changes, see the Product Collaboration User Guide.
Depending on your company policy, when you redline manufacturing data, use an ECO when you want to advance the revision of an item, or use an MCO when you do not want to advance the revision of an item.
For information about redlining a BOM, AML, and attachments, see Chapter 4, "Concepts and Terms in Agile PLM Solutions."
You can redline BOM and AML data and attachments using an ECO.
Depending on Agile PLM system configuration, you may be able to perform change-controlled modifications to item Title Block attributes using an ECO in Web Client. See Product Collaboration User Guide.
ECO changes let you release new items and modify previously released items. When you create an ECO, a preliminary revision is created for any items modified by the change (the ones listed on the Affected Items tab). When the ECO is released, the preliminary revision is converted to a released revision for each modified item.
You can redline AML data using an MCO.
Depending on Agile PLM system configuration, you may be able to perform change-controlled modifications to item Title Block attributes using an MCO in Web Client. See Product Collaboration User Guide.
MCOs are similar in appearance and function to an ECO. However, MCOs do not change the revision of an item, unlike an ECO. Instead, the MCO number is displayed alongside the corresponding revision number in the Rev drop-down list. For example, if there is a pending MCO #M12345 against Rev B of an item, then, on the Rev drop-down list, that revision is listed as (B) M12345.
You can redline prices using a PCO. Using the redlining feature, you can publish the price to your customers. For example, if you have renegotiated the price of a particular item with your supplier and you want to publish the new price, you can redline the price and route it through a PCO.
For detailed information about using PCOs, see Product Cost Management User Guide.
You can redline site-specific BOM and AML data using an SCO.
SCOs are similar in appearance and function to ECOs. However, SCOs do not change the revision of an item, unlike ECOs. Instead, the SCO number is displayed next to the corresponding revision number in the Rev drop-down list. For example, if there is a pending SCO S12345 against revision B of an item, then, on the Rev drop-down list, that revision is listed as (B) S12345.
For details about deleting routable objects, see Appendix A, "Deleting Agile Objects."
You can print routable objects and other data. With the routable object open, click the Print button (Java Client), or choose Actions > Print (Web Client). You can print the current tab or all tabs.
Attachments are printed from their native applications or from the AutoVue for Agile viewer.