| Agile Product Lifecycle Management Getting Started Guide Release 9.3.6 E71144-01 |
|

 Previous |
 Next |
| Agile Product Lifecycle Management Getting Started Guide Release 9.3.6 E71144-01 |
|
Previous |
Next |
Agile Java Client is distributed using only a browser and Java Web Start. You can access the Product Collaboration solution and the Product Quality Management (PQM) solution with Java Client. Other Agile solutions are accessed with Web Client only.
While you might prefer to work in Java Client on a regular basis, some utilities on the Tools menu (Agile Import, Export, FileLoad) and Reports open only in Web Client. Some Product Collaboration features (Item Attribute Change Management features and viewing Designs attached to item objects) are available in Web Client only.
Agile PLM 9.3.4 has been installed on your company's system, and the Agile administrator has sent you a URL to connect to Java Client. You can also connect to the Java Client using application path on your Start Menu or a short cut icon on the desktop. If you do not have access to Java Client, see your administrator.
Complete details for installing the Java Client can be found in the manual Windows Client Installation Guide for Agile e6.1.3.0. To find Agile eSeries documentation, visit:
http://www.oracle.com/technetwork/documentation/agile-eseries-098047.html
To log in to Java Client:
Start the Web browser and type the following, per information from your administrator:
http://<webserver_hostname>:portnumber/JavaClient/start.html
You will receive a message about accessing the computer when you install and run Java Client. Click Launch. The Login window appears.
Enter your username. Your username is not case-sensitive.
Your username is assigned by your Agile administrator and can be an abbreviation of your full name. For example, the name Michael Jones may be abbreviated to MICHAELJ or MJONES.
Enter your password. Your password is case-sensitive.
Your password is initially assigned by your Agile administrator. If you have the appropriate privileges, you can change your password at any time. The administrator may require you to do so within a set number of sessions. (See "Changing Your Password.")
|
Note: If you are an LDAP user, your password cannot be reset in the Agile PLM database, neither by you nor by the Agile administrator. LDAP user passwords must be reset through LDAP. |
Click OK.
|
Note: If you do not have logon access to Java Client, an error message is displayed. If you have questions about your Java Client logon access, contact your Agile administrator |
The login process is complete. The Java Client window opens, as shown in the figure above.
The next time you start Java Client, you are prompted to create shortcuts on the desktop and in the Start menu. It is recommended that you choose Yes for either or both shortcut types.
You can also start Java Client using the Java Web Start icon on your desktop. Double-click the icon and you will see an option for Agile PLM.
|
Note: If you are having difficulty logging in to Java Client, one problem could be that your Java Web Start cache might be full. To clear the cache, open Java Web Start, choose File > Preferences, click the Advanced tab, and click Clear Folder. Then try launching Java Client. If you continue to have difficulty logging in, contact the Agile administrator. |
You can search for Agile data using the Simple Search field and Run Search button. To create a Quick Search, use the Search Option drop-down list to select a specific object type. Or, use the Advanced Search button. You can choose an activity from the menu bar, main toolbar, or tab toolbar. For detailed instructions about searching, see, Chapter 8, "Finding Agile Data with Searches."
To close Java Client, click the Exit button.
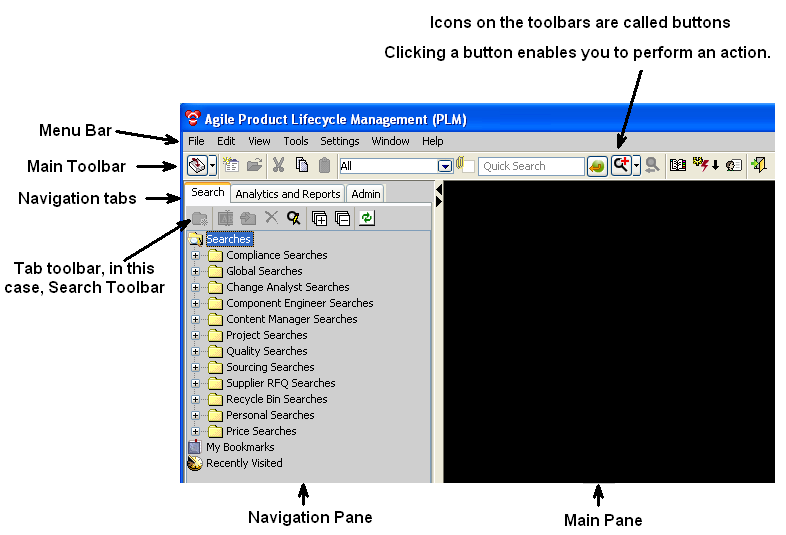
This section discusses some key user interface elements of Java Client.
You can use the following menus to perform various tasks based on your assigned roles and privileges:
File – Perform actions on Agile business objects, including New (Create), Open, Close, Save, Save As, Send, Scan Files, Batch Print, and Exit Java Client. Some Agile objects are items (parts and documents), changes (such as engineering change orders and price change orders), file folders (attachment objects), users, and suppliers. For more information about classes of Agile objects, see "Introducing Agile Objects."
The Scan utility (File > Scan Files) is available in Java Client only. See "Agile Scan Utility."
Edit – Cut, Copy, and Paste data. Delete and Undelete an object. Create a Quick Search or an Advanced Search and Organize Searches (delete). Add, organize, and delete Bookmarks.
View – View Notifications, Workflow Routings, and toggle the Windows Bar on or off: the Windows Bar shows all current open windows in Java Client.
Tools – Work with the Address Book; generate Reports and Analytics; access Agile Import, Export, and FileLoad (these are documented in the Agile PLM Import/Export Guide). Process Extensions appear on a drop-down menu, which depends on a developer at your company (or an Oracle Consulting - Agile Practice consultant) having created process extensions.
Settings – Transfer Authority for other users or user groups to sign off your workflows; create and modify Personal Groups, Personal Supplier Groups, and Personal Criteria; view Deleted Personal Groups; view and modify your Current User settings; Change Password.
Color Scheme and Options offer some standard Windows-based options.
Window – This is a standard menu that allows you switch to the Previous Window or the Next Window, and to arrange your open windows in Cascade or Tile schemes. The Window menu displays keyboard shortcuts for some commands.
Help – Manuals gives access to Agile PLM documentation and UPK (Oracle User Productivity Kit). UPK is available if it has been installed with your Agile system. About Agile displays information about the current release of Java Client.
From Java Client only, the Agile Scan utility runs a Windows utility that scans documents using a TWAIN interface. The user specifies valid file types. Scanned images are designated as one of those file types and they are added to the system as an attached file to a file folder object. For a description of Scan, see "Scan Utility."
There are toolbars in the main Java Client window, in object windows, and in some object tabs.
Depending on your assigned roles and privileges, you can use the toolbar buttons on the main toolbar to perform the tasks described in the following table. Toolbars in object windows contain buttons that pertain to the object.
These are the buttons that appear on Java Client's main toolbar.
Table 3-1 Java Client toolbar buttons
| Button | Name | Description | For more information, see... |
|---|---|---|---|
|
|
Inbox |
Displays Notifications or Workflow Routings. You can change this by clicking the View/Edit Current User main toolbar button. |
|
|
|
New Object |
Opens the New window, where you select which type of object you want to create, and assign a number to the object. |
|
|
|
Open Selected Objects |
Displays the tabbed window for the selected object(s). |
n/a |
|
|
Cut |
Removes selected information and places it on the Clipboard. |
n/a |
|
|
Copy |
Places a copy of the selected information on the Clipboard. |
n/a |
|
|
Paste |
Places a copy of the Clipboard contents into editable fields and tables. |
n/a |
|
Quick Search Controls |
These search controls consist of a selection list, a check box, and a text entry field. |
Quick Search class selection list. Select a base class of objects that will limit the Quick Search. Default selection is All.
Search Attachment Contents Check this box to search attachment file contents.
Search Criteria Entry field Enter the search text in this field. |
Base classes and other object types are presented in "Installed Agile Classes, Base Classes, and Subclasses." |
|
|
Run Search |
Searches for objects that match the criteria in the Simple Search text box. |
"Quick Searches and Wildcard Characters." |
|
|
Advanced Search |
Searches for objects with fields that match (multiple) conditions of the search that you set up. A Where Used search finds assemblies that contain parts that meet your search criteria; a Relationship search finds objects related to the objects that match your search criteria. |
|
|
|
Last Search Results |
Displays results of the most recent search you performed. |
n/a |
|
|
Address Book |
Opens the Address Book window, where you can view, create, and modify user groups. |
"Address Book in Java Client." |
|
|
Process Extensions |
Enables you to run/access custom actions that were defined by someone else. |
For information about process extensions, see Agile PLM Administrator Guide, "Process Extensions. |
|
|
View/Edit Current User |
Enables you to modify your Agile user profile. |
|
|
|
Exit |
Logs out of Java Client. |
n/a |
An optional windows bar appears below the main toolbar.
The windows bar contains a button for each open Java Client window. Each button includes the title of the window and an icon reflecting the window's contents. The button representing the current window is highlighted. To move to a different window, click its button in the windows bar.
To close a window using the windows bar:
Right-click the button representing the window you want to close, and choose Close.
You can also use Shift-click and Ctrl-click to select multiple windows, right-click (over one of the selected windows), and choose Close.
Finally, there is also a Close All option when you right-click in any window.
You can hide or show the windows bar, and you can move it to the top or bottom of the Java Client desktop.
To hide the windows bar:
Right-click the window bar and choose Hide Windows Bar, or choose View > Windows Bar.
To show the windows bar:
Choose View > Windows Bar.
To move the windows bar:
Right-click the windows bar and choose Move.
You may want to view the main window only (hide the navigation pane), and then show the navigation pane again when you need to use it.
To hide or show the navigation pane:
On the boundary between the navigation and content panes, click the small left arrow to hide the navigation pane and click the small right arrow to show the navigation pane.
To adjust the width of the navigation pane:
Hold the pointer on the boundary between the navigation and content panes. The pointer changes to a double-sided arrow.
Drag the arrow until the pane is the desired width: it is limited to a maximum of about one-fourth the total screen width.
Java Client displays many types of information in tables. For example, search results, BOMs, and AML information appear in tables.
You can change the sort order of some Agile tables, for example, the Affected Items table. To sort a table, click the column header of the column by which you want to sort. For example, to sort the Affected Items table by item description, click the Item Description column header. To change the width of the columns, select the line between column headers and drag.
There are some tables in Java Client on which you can perform certain actions. For example, on the Affected Items table, you can remove items. From the Search Results table, you can open an object and modify it or export it; you select the items on which you want to perform the action, and then click the action to perform it.
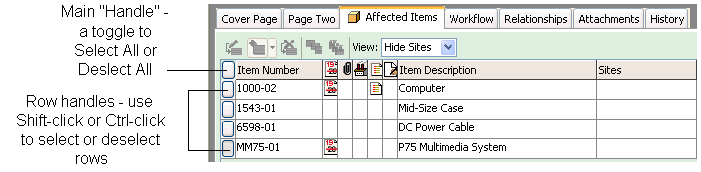
Tables on object tabs have a "handle" column at the left, as shown in the following figure. You can select rows by using any of the following methods:
You can select all the rows with the top handle, or you can use Windows commands (Shift-click and Ctrl-click) on the row handles to select the rows on which you want to perform the action.
You can select a row by clicking in the row or you can use Windows commands (Shift-click and Ctrl-click) in the rows you want.
You can drag-select (mouse-down or mouse-up as you drag across multiple rows).
When you have selected the rows you want, the available actions are buttons in the menu bar above the table.
For editable tables, select the rows you want and click the Edit button, and the Edit mode popup appears. In this mode, make any changes or updates and click OK. The table refreshes to reflect the changes.
In Edit mode, Java Client displays the object ID and object Description, which identifies the data in the row that has the focus.
To open and view objects in a table, use one of these methods:
To open one object, double-click the object's row in the table.
To open an object with a specific tab on top:
Select the object's row in the table.
Right-click.
In the displayed menu, choose Open and the tab you want.
To open multiple objects:
Select multiple rows in the table.
Press Enter on the keyboard or right-click the mouse and choose Open.
As information passes through the Agile system, users receive news of status changes, requests, and notifications. When you first start Java Client, it is a good idea to view your Inbox.
To view your Inbox in Java Client:
Click the arrow to the right of the Inbox icon on the main menu bar.
Click the Inbox section that you want to view, Workflow Routings or Notifications.
The Notifications section of the Inbox lists Agile PLM notifications. Notifications inform you of some action or process that has taken place, such as subscriptions, RFQs, and project invitations. You also receive a notification when a program-related request is sent to your My Assignments tab. The Accept function does not apply to notifications.
You can view or delete a notification. To view a notification, double-click it. To delete a notification, select it and click Delete.
When configuring Agile PLM, the Agile administrator can choose whether notifications are sent to an email address, to the Agile PLM Inbox, or to both.
The Workflow Routings section of the Inbox lists routable objects that require your review or action. For example, your Inbox may contain changes for which you are an approver. The preconfigured workflow routings are a combination of base classes, and actions that define the kind of review:
routable objects That Require My Approval
routable objects That I Am An Observer Of
routable objects That Were Returned To Me
routable objects Transferred to Me
routable objects Escalated to Me
Table 3-2 Routable objects listed in the Workflow Routings Inbox
| Base class... | ...includes routable objects from these classes... |
|---|---|
|
Change |
Change Orders, Change Requests, Site Change Orders, Price Change Orders, Deviations, and Stop Ships |
|
Quality Change Request (QCR) |
Corrective and Preventive Actions and Audits |
|
Problem Service Request (PSR) |
Non-Conformance Requests and Problem Reports |
|
Package |
Packages |
|
Project |
Activities and Gates |
|
Transfer Order |
Content Transfer Orders and Automated Transfer Orders |
|
Declarations |
Substance Declarations, Part Declarations, JGPSSI Declarations, Homogeneous Material Declarations, Supplier Declarations of Conformance, IPC 1752-1 Declarations, and IPC 1752-2 Declarations |
|
File Folders |
Designs and File folders |
To open a workflow routing in the table, double-click its number.
To export objects to a text or PDX file (if you have privileges), select the row and choose Tools > Export.
The Print button prints the entire Inbox table.
|
Note: The searches selected in your User Profile Searches field also determine which workflow routings appear in your Inbox. For example, if Change Analyst Searches is one of your assigned searches, you see Change class object workflow routings in the Workflow Routings window. In a similar manner, if Quality Searches is one of your assigned searches, you see QCR and PSR workflow routings. For more information, see "Changing Your User Settings" and "User Properties Defined." |
If there are objects that you need to return to frequently, you can use Bookmarks and the Recently Visited list for quick access.
Bookmarking lets you keep a list of objects that you return to frequently. You can click an object bookmark to quickly display that object.
To bookmark an object in Java Client:
Open the object.
Choose Edit > Add Bookmark, or click the Add Bookmark button in the object's toolbar.
The Add Bookmark dialog appears.
Enter a name for the bookmark in the Name field.
Select a folder in which to store it.
You can always save a bookmark in the My Bookmarks folder.
To create a new folder, click the New button. In the Create New Folder dialog, enter a folder name and click OK.
Click OK in the Add Bookmark dialog to save the bookmark.
The object's number is saved in the My Bookmarks list on the Searches tab in the navigation pane.
To open a bookmarked object in Java Client:
Double-click the object's number in the My Bookmarks list on the Searches tab in the navigation pane. The object opens.
You can arrange your bookmarks in folders using the Organize Bookmarks window (Edit > Organize Bookmarks).
To organize bookmarks in Java Client:
Choose Edit > Organize Bookmarks. The Organize Bookmarks window opens.
Use the features in the Organize Bookmarks window to create or remove folders and rename or remove bookmarks.
Table 3-3 Organize Bookmark windows buttons
| Button | Description |
|---|---|
|
Remove |
Removes the selected bookmark or folder. |
|
Rename |
Renames the selected bookmark or folder. |
|
New |
Adds a new bookmarks folder within the current folder. See "Bookmarking" for more information. |
|
Save |
Saves the changes you made in the Organize Bookmarks window. |
|
Cancel |
Discards the changes you made in the Organize Bookmarks window and closes the window. |
When you view an object during a work session, it is added to the Recently Visited list. The Recently Visited list includes the last 10 objects viewed (or 25, 50, or 100, depending on your administrator's setting of a Preference).
To open a recently visited object in Java Client:
Double-click the Recently Visited icon in the Search tab in the navigation pane.
Double-click the object's number in the list. The object opens.
This section includes information about creating or changing your User Profile, password, personal criteria, and escalations.
|
Note: The Agile administrator may have set values in Agile PLM that impact what you are able to modify. Most changes made by the administrator are automatically implemented systemwide; however, if the administrator makes changes in your role assignment, or to the roles and privilege masks, these take effect for a user only after the user has logged out and logged back in to Web Client or to Java Client. |
Your user profile contains a variety of information about you, including your contact information, your Windows date and time preferences, and several Java Client on-screen display preferences. The Agile administrator determines whether you can edit your user profile.
To edit or add information to your user profile:
Select Settings > Current User in Java Client window, or click the View/Edit Current User button. The User Profile window opens with all the tabs.
Click the tab on which you want to make changes.
To make changes to the General Info tab, edit any field that is available. Use the lists, browse buttons, and text boxes to enter the requested information.
You can also make changes to the Escalations and Attachments tabs. For information about escalations, see "Working with Escalations in Java Client." For information about working with the Attachments tab, see Chapter 10, "Working with Attachments."
|
Note: If you are working primarily in Java Client, check the System Preferences under the Preferences tab: Preferred Client should be set to Java Client and Receive Email Notifications should be set to Yes. This will ensure that you will receive email notifications in the same client you are working in. If there is a discrepancy and you are not able to change these properties, see the Agile administrator. |
A full list of the user preferences and their descriptions are found in "User Properties Defined."
These instructions describe how to change your login password, which you can do at any time. The Change Approval Password option is enabled only when your Use Login Password for Approval user property is set to No.
|
Note: If you are an LDAP user, your password cannot be reset in the Agile PLM database, neither by you nor by the Agile administrator. LDAP user passwords must be reset through LDAP. |
To change your login password:
Choose Settings > Change Password. The Change Password dialog box appears.
Type your old login password in the Old Password field.
Type your new login password in the New Password and Retype New Password fields. (Passwords are case-sensitive.)
To change your approval password (and the Change Password dialog displays the Change Approval Password fields), fill in the fields as described above.
Click OK.
If you have not followed the rules defined in your Agile system for selecting passwords, you are prompted to correct your password.
If your administrator has granted you the necessary privileges, you can set up escalations for yourself. Escalations allow changes to be forwarded automatically to a designated user, if you do not respond within a set amount of time. You can also create escalations for your personal user groups.
Your Agile administrator can add escalations to your user profile, and can edit existing escalations.
To manage escalations for yourself:
Choose Settings > Current User in Java Client window.
Or, click the View/Edit Current User button on the main toolbar.
Click the Escalations tab.
To set up a new escalation, click the Add button, and then select an escalation criteria and one or more users to be notified for that criteria. You can select a different person for each criteria, if you want.
To edit an escalation, select it on the Escalations tab and click the Edit button. Add users to, or remove them from, the Notify Users list.
To delete an escalation, select it and click the Delete button.
To manage escalations for a personal user group:
Choose Settings > Personal Groups.
Double-click the group.
When the user group window appears, click the Escalations tab.
To set up a new escalation, click the Add button, and then select an escalation criteria and one or more users to be notified for that criteria. You can select a different person for each criteria, if you want.
To edit an escalation, select it on the Escalations tab and click the Edit button. Add users to, or remove them from, the Notify Users list.
To delete an escalation, select it and click the Delete button.
A saved 'personal criteria' is a reusable database query very similar to an advanced search, in that the attributes used to create personal criteria are similar to the attributes used to create advanced searches. (For more information, see "Advanced Searches.") They may also be thought of as "filters" or "qualifying descriptions" of objects that you are interested in tracking.
You use personal criteria to define signoff authority transfers. If you have the appropriate privileges, you can temporarily transfer your signoff authority for routable objects to one or more Agile users. For more information about signoff authority transfers, see "Transferring Signoff Authority" and "Defining Personal Criteria for Authority Transfers."
Any criteria in Agile—personal or reusable—applies to one Agile class (and its children) or a particular subclass; therefore, you must create a separate criteria to apply to the objects of another class or another subclass.
To create a personal criteria:
Choose Settings > Personal Criteria. The Personal Criteria window appears.
Click the Create button. The Create Criteria dialog box appears.
Fill in the Name and Description fields, and select the object type that your personal criteria will apply to. This list includes all the Agile classes and user-defined subclasses.
The personal criteria name must be unique. If you specify a personal criteria name that is already used, a duplicate name error message is displayed.
Select the attribute you want from the Attribute drop-down list. The values that are available change according to the Agile class or subclass you selected in the previous step. Click OK in the small dialog box.
The Match If field specifies the search operator. The values that appear depend on what you selected from the Attribute list. Select from the listed operators, which will be a subset of the following:
In the Value field, select a value for the field you selected from the Attribute list. Click OK in the small dialog box.
To add additional conditions, select AND or OR in the And/Or field.
Repeat step 4 through step 7 until your personal criteria is complete.
When the criteria is complete, click OK.
|
Note: Changing the criteria in the Object Type field resets the entire personal criteria. A personal criteria applies to one class or subclass. You must create a separate global criteria to apply to another class or subclass. |
If you want your criteria to be case-sensitive, select the Case Sensitive check box. This can simplify how you define personal criteria:
If you enter text in the Value field, the criteria will look for text that is an exact match, depending on the restraints of the value of the Match If field.
If you define a numeric value, checking Case Sensitive allows the Agile system to utilize internal database settings to find objects more quickly.
Using case-sensitive searches improves performance of the system and is recommended when possible.
The Add( ) button places parentheses around the specified condition or conditions, which changes the order in which the search conditions are evaluated. The Add( ) button functions like a formula within parentheses in an algebraic equation, following the standard algebraic order of operations. The grouped criteria within parentheses are resolved before any others. If you do not use parentheses when defining your personal criteria search, the search is processed row by row without any precedence of And/Or values. The first line is combined with the second based on the first line's And/Or value. The result of the first two lines is then combined with the third line based on the second line's And/Or value, and so on.
Use this dialog box to edit the conditions in your personal criteria object. Defining or modifying a personal criteria object is similar to defining or modifying an advanced search. For detailed information about searches, see Chapter 8, "Finding Agile Data with Searches."
You can perform the following modifications to your personal criteria object:
In the search condition table, use Add, Insert to add more Search Condition rows as needed, or Delete to delete rows you do not want.
Click a cell in the Search Condition table to display the search criteria selection list.
Working from left to right in the search condition row, click the drop-down list buttons to select the target Attribute (for example, CoverPage.Originator), the Match If search operator (for example, Equal To), and the Value (for example, John Smith).
Depending on the selection in the Attribute list, the Value field may contain a list that is relevant to the selection, a calendar button, or a field where you can enter text or numbers.
Click the And/Or field to select And or Or from the list. Use And if both conditions must be met. Use Or if either or both conditions can be met.
Use the ( ) button to enclose selected rows in parentheses, which determines precedence in the way the search is performed.
If you do not use parentheses when defining your personal criteria search, the search is processed row by row without any precedence of And/Or values. The first line is combined with the second based on the first line's And/Or value. The result of the first two lines is then combined with the third line based on the second line's And/Or value, and so on.
Select Case Sensitive to perform a case-sensitive search where text capitalization matters.
The Address Book is a multi-list window that enables you to select users and user groups for various functions. The situations in which you use the address book can include:
When you send email notifications
When you select people or groups to sign off a workflow
When you share, or grant, one or more of your roles to another user or user group for specific objects
You can also create user groups in the Address Book.
You can access the Address Book by clicking the Address Book button on the main toolbar, or by choosing Tools > Address Book, or when you are performing actions that involve sending an object or a notification (for example, routing a change). You can select individual users or user groups. The Address Book lists all the individuals and user groups that use Java Client and Web Client.
The Agile administrator can use Discovery privileges to limit the users you see in the Address Book.
You can select recipients individually or in groups. When you select a group, all the members of the group receive the email message. You can sort users by Last Name or First Name by clicking one of the options.
To select users or user groups from the Address Book:
To display a list of names on the Users tab, click the Check Names button, which returns a list of all users.
Select a person on the Users tab, or select a user group on the User Groups tab.
To see more information about a user or user group, select it and click the View button.
To add names directly to the Recipients list, type a known value (for example, a last name) in the Find Name field, and then click the Check Names button or the keyboard shortcut Ctrl+K; the system finds the name and displays it in the Users tab list.
If more than one name matches the entered value, the names are displayed in the Users tab list.
Select one or more names and then click the Add button to move your selection into the Recipients list.
To select multiple names or user groups, use the Shift-click or Ctrl-click, and then the Add button.
To remove a name or multiple names, select using the same techniques and click the Remove button.
On the User Groups tab, if you select a user group and you want only the group name to appear in the Recipients list, use the Add button. If you do this when selecting approvers, only the group as a whole becomes an approver, and any single member of the group can approve.
If you select a user group, and you want to see every name in that group in the Recipients list, use the Add all the users in the selected group button (this button only appears on the User Groups tab). If you do this when selecting approvers for a routable object, each individual becomes an approver.
Continue selecting names and using the arrows until the Recipients list is correct.
Click Save As to create a new user group that includes every individual's name on the assembled list. This includes the individuals of any user group you included in the new group.
Click Save to save the list. Click Close to close the address book.
|
Note: When you add a user group to a group, and save it, when you open the modified user group, all the names of the members of the added user group are there. |
This section explains how to create both personal and global user groups, and how to modify and delete them. See also "Creating Supplier Groups."
Your User Profile User Group tab lists the Global Groups of which you are a member. Your membership in the personal groups of individual users is not displayed on the User Group tab. See also "Changing Your User Profile."
You can create personal user groups; with the appropriate privileges, you can create global user groups.
To create a personal user group in Java Client:
Choose Settings > Personal Groups. The Personal User Groups window appears.
Click the New button. The Create User Group dialog box opens.
Using the Subclass drop-down list, select a subclass of the User Groups class. User Groups will be the only subclass available if your administrator has not created another one in the User Groups class.
Fill in a name for the group in the Name field.
Click the button next to the Users field to open the address book. Then move users (from the Users list) or other user groups (from the Groups list) to the Recipient list.
Click OK. The new user group object appears, with applicable fields populated.
On the General Info tab, select or accept values from the drop-down lists. Enter a description and the maximum number of named users, if appropriate.
When you are finished, click Save.
Continue to select, enter, or accept values for properties under the Users and Escalations tabs.
To create a user group from the address book:
Open the address book by clicking the Address Book button on the main toolbar, or by choosing Tools > Address Book.
Select and move users (from the Users list) or other user groups (from the User Groups list) to the Recipients list.
Click Save As Group. The Save Group dialog box appears.
Under the Group Name heading, enter a name in the New Group field. Or you can select a group from the Existing Group field; the new version of the existing group will overwrite the original one.
Under the Save In heading, select Personal Groups or Global Groups.
The Subclass field contains only User Group. It will list other subclasses if the administrator has created new subclasses of the User Groups class.
Click OK. The new user group is saved in the Global or Personal Groups folder.
To complete additional information about your user group, or to edit an existing personal user group:
If the address book is still open, click Refresh. Otherwise, choose Settings > Personal Groups, or open the address book and then display the Groups tab.
Navigate to the group you created by expanding the appropriate group folder.
Select the group and click View. The group opens in a tabbed window.
On the General Info tab, specify general information about the user group.
You can click the Users tab to delete users. On the Users tab, select the name, and click the Delete button.
To add or modify escalations for the user group, click the Escalations tab. For information about escalations, see "Working with Escalations in Java Client."
Add or remove any attachment references for the user group on the Attachments tab.
For information about attachments, see Chapter 10, "Working with Attachments."
Click Close to close the user group window.
|
Note: With User Group "synch" function enabled, you cannot remove or add users on a user group's Users tab that have been synchronized (that is, where users have been added to a user group through LDAP). This feature only applies to iPlanet server. Contact your Agile administrator if you have questions about your ability to delete users from the Users tab of a group object. |
To delete a personal user group:
Choose Settings > Personal Groups.
Select the group and click the Delete button. The selected group is deleted.
To delete a personal user group from the address book:
Open the address book and display the Groups tab.
Select the group you want to delete. Click View.
Click the Delete button. The selected group is deleted.
You can create personal supplier groups; you cannot create a global supplier group in Java Client. Suppliers are other companies who are using Agile PLM to work with your company.
|
Note: The Agile administrator creates global supplier groups, as noted below. For more information about creating global supplier groups see the Agile PLM Administrator Guide. |
To create a personal supplier group:
Choose Settings > Personal Supplier Groups. The Personal Supplier Groups window appears.
Click the New button. The Create New Supplier Group dialog opens.
Fill in the Name and Description fields, and select Yes or No in the Enabled field.
The Type field is grayed, with the value of Personal entered. (Supplier groups that are created from the Admin > User Settings > Supplier Groups node are "global." You can create global supplier groups only if you have sufficient privileges. For more information about global supplier groups, see the Agile PLM Administrator Guide.)
For the Suppliers field, click the down-arrow. The Select Objects dialog appears.
In the Select Objects dialog, you can execute a quick search, define an advanced search, use a saved search, or select from your Bookmarks and Recently Visited list (Shortcuts).
Move suppliers from the Search Results table to the Selected Objects list.
Click OK and you are returned to the Create New Supplier Group dialog. Click OK again and the new supplier group object appears, with the applicable fields populated.