| Agile Product Lifecycle Management Getting Started Guide Release 9.3.6 E71144-01 |
|

 Previous |
 Next |
| Agile Product Lifecycle Management Getting Started Guide Release 9.3.6 E71144-01 |
|
Previous |
Next |
When you want to find specific Agile objects, content found in documents or attachments, or other kinds of information contained in the database, you perform a search.
The main Searches folder has subfolders of saved searches:
In the Web Client left navigation pane, if the FOLDERS drawer is not already displayed, click FOLDERS to display the search folders, bookmarks, and recently visited list. In the Searches section, click the Expand All icon to display all the searches. Or, for a specific folder, click the Expand icon to display the searches in that folder.
In Java Client, to display the search window, click the Search tab in the left navigation pane. Select the top Search folder and click the Expand All icon to display all the searches. Or, for a specific folder, click the + icon to display the searches in that folder.
For more information about the predefined searches in Agile PLM, see "Saved Searches."
For more information about organizing, editing, and deleting your personal searches, see "Editing and Managing Searches and Search Folders."
Several types of searches are available from the toolbar of both Web Client and Java Client.
Several types of searches are available in Agile PLM Web Client.
Quick Search-Searches for objects whose name, number, or description matches the criteria in the top pane toolbar Search text box. See"Quick Searches and Wildcard Characters."
A Quick Search can search across all objects or can be filtered for a specific object base class. By default, the Search object class drop-down list is set to All, and Agile PLM performs a Quick Search to search all objects in the database. Narrow your Quick Search by selecting a base class in the drop-down list that limits the search to any object with that base class as its "ancestor."
You can also extend the Quick Search to attachment files. To enable attachment text searching, at the bottom of the base class drop-down list, click the last selection (Include Attachments Text). A check mark on this list selection indicates that attachment searching is enabled. (See "Quick Searches.")
|
Note: When the object class drop-down list is set to All, then attachment text searching is disabled. |
Custom Search – In the quick search results display or from the top pane search menu, click Custom Search to display the Search Criteria dialog. You can narrow your search by filtering the search results and defining additional search criteria. Agile PLM displays the last custom search you used:
Basic Search – A preconfigured parametric search the Agile administrator has configured. Your Agile administrator configures Agile PLM to present the most commonly used search attributes for that class or type.
From the drop-down list, you can select a base class that limits the search to any object with that base class as its "ancestor" similar to a Quick Search.
Click the + to expand and display the parametric search the Agile administrator has configured. Your Agile administrator configures Agile PLM to present the most commonly used search attributes for that class or type. Select the search operator and search value for one or more of the displayed attributes. See "Preconfigured Parametric Searches."
Advanced Searches – For greater precision, you can perform an advanced search, which lets you use more specific search conditions and multiple conditions which have not been preconfigured in the parametric search. See "Advanced Searches."
Attachment content search – You can use a quick, parametric, or advanced search to find specified content in attachment files. See "Full Text Search for Content in Attachment Files."
Where-used Searches – An option in Advanced Search, it searches specific levels of the BOM and revisions, such as "All Levels Latest Released Revision Only." See "Where-Used Searches for Items" and "Where-used Searches for File Folders."
Relationship searches – An option in Advanced Search, it finds objects that are related to the object that meets the search conditions. See "Relationship Searches."
|
Note: To be able to change the search preference, add users.Preference.Include Inactive List Values to the Modify My User and Read My User privilege. Contact your Agile administrator. |
The Preferences tab of the My Settings page allows to define a search preference (Include Inactive List Values) for Basic or Advanced searches. By default, this option is set to Yes, thus the search result for these searches contains active and inactive list values. To hide inactive list values, this option has to be set to No.
This setting applies to:
Lists on the Search Criteria page
Lists on the Filter tab of the Table Personalization mask
To modify your search preference:
In Web Client, select My Settings to display the My Settings page.
Click the Preferences tab.
Click Edit.
In the Display Preferences section, open the Include Inactive List Values drop-down list.
Select No.
Click Save.
Several types of searches are available from the toolbar of both Java Client and Web Client.
Simple Search – Searches for objects whose name, number, or description matches the criteria in the main toolbar Search text box. See "Quick Searches and Wildcard Characters." In a Simple Search, the object class drop-down list is set to All and a wildcard character is used in the main toolbar Search text box.
When the object class drop-down list is set to All, the Search Attachments Context check box is inactive and not available.
Quick Search – Searches for objects whose name, number, or description matches the criteria in the main toolbar Search text box. See "Quick Searches and Wildcard Characters".
By default, the Search object class drop-down list is set to All, and Agile performs a Simple Search to search all objects in the database. Narrow your Quick Search by selecting a base class in the drop-down list that limits the search to any object with that base class as its "ancestor."
You can also extend the Quick Search to attachment files. See "Quick Searches"
Preconfigured Parametric Search – From the Search... button drop-down list, select a base class that limits the search to any object with that base class as its "ancestor" similar to a Quick Search. Click the + to expand and display the parametric search your Agile administrator has configured. Your Agile administrator configures Agile PLM to present the most commonly used search attributes for that class or type. Select the search operator and search value for one or more of the displayed attributes. See "Preconfigured Parametric Searches"
Last Search Results – Return to the results of the last search that you ran.
Attachment content search – You can use a quick, parametric, or advanced search to find specified content in attachment files. See "Full Text Search for Content in Attachment Files"
Advanced Searches – For greater precision, you can perform an advanced search, which allow you to use more specific search conditions and multiple conditions which have not been preconfigured in the parametric search. See "Advanced Searches".
Where-used Searches – An option in Advanced Search, it searches specific levels of the BOM and revisions, such as "All Levels Latest Released Revision Only." See "Where-Used Searches for Items" and "Where-used Searches for File Folders."
Relationship searches – An option in Advanced Search, it finds objects that are related to the object that meets the search conditions. See "Relationship Searches."
A user's assigned roles determine which Agile objects he can search for and which object attributes he can use for search criteria.
For Parametric Search and Advanced Search, the base classes, classes and subclasses that appear Search for: drop-down lists are determined by the user's Discovery privilege masks.
Discovery privilege masks can be based on criteria for a specific subclass, class, or base class. If the user has a Discovery privilege mask based on a criteria for a specific class, then the user sees and can select any of the subclasses of that class in the Search for: drop-down list. Similarly, if a user has a Discovery privilege mask based on a base class, then all classes and subclasses in the specified base class appear in the Search for: drop-down list. However, if a user's Discovery privilege masks are limited only to specified subclasses, then the user sees the associated base class and class, but only those specified subclasses appear in the Search for: drop-down lists. The user may select the base class, class or subclass; however, if his discovery privileges are limited to specific subclasses, only objects of the specified subclasses appear in the search results.
The business object fields a user can view and select as search criteria in Parametric Searches and Advanced Searches is determined by the user's field-level Read privileges.
In Advanced Searches, the searchable attributes appear in the Field drop-down list of each search condition. In Parametric Searches, the Agile administrator configures which attributes are displayed for selection in the parametric search display. In addition, the user must have the appropriate field-level read privilege masks. If the user does not have read privilege for a specific field, that field does not appear in the Parametric Search display, and that field does not appear in the search condition Field drop-down list in Advanced Search.
In Web Client, when you run a search, the results appear in the right content pane.
In Java Client, when you run a search, the results appear in a search results window. The window title bar displays the name of the search. The search result icon appears in the left corner of the window title bar.
The maximum number of search results that can be displayed is based on the Maximum Query Results Displayed property in Agile Administrator under Admin > Server Settings > Preferences. If the system found more than the setting Maximum Query Results Displayed allows, a message informs you that the returned results were more than allowed. Refine your search criteria as needed.
The maximum number of search results that can be displayed for an external search is based on the Maximum Database Records to Process for Searches property in Agile Administrator under Admin > Server Settings > Preferences. If the system found more results than defined in the setting Maximum Database Records to Process for Searches, a message informs you that you either do not have sufficient user privileges, or that you need to refine your search criteria.
For Quick Search, the search results are sorted when the number of search results displayed is less than or equal to 5,000.
|
Note: If you do not have Discovery or Read privilege for an object, it does not appear in search results. Depending on Agile Administrator SmartRule settings, you may see a warning that rows are missing due to insufficient privileges. For more information, see your Agile administrator. |
When you search for items (part or document objects), the items displayed are the latest released revision or the most recent pending revision (which was created when the item was added to the Affected Items tab of an ECO or an MCO). See also "Searching on Rev-Specific Values."
|
Important: The Specify Output Column privilege is removed from Agile PLM; therefore, all users can potentially specify output attributes in advanced searches. However, if you find that you cannot do so, you have probably been assigned the Enforce Field Level Read privilege by your administrator. |
To open and view objects in the results table in Web Client:
Click the Number link of the object.
To open and view objects in the results table in Java Client, use one of these methods:
To open one object, double-click the object's row in the search results table.
To open an object with a specific tab on top:
Select the object's row in the search results table.
Right-click.
In the displayed menu, select Open > tab.
To open multiple objects:
Select multiple rows in the search results table.
Either press Enter on the keyboard or click the Open button in the main toolbar.
To print a list of objects found by the search:
In Web Client, click the Print button on the Search Results page.
In Java Client, click the Print button in the search results toolbar.
To view the results of the last search you performed:
In Web Client, if you have opened an item on the Search Results table, you can click the Search Results link at the top of the content pane.
In Java Client, click the Last Search Results button.
When LargeText fields are included in the Search Results table format (see "C. Define a Custom Output Display, Web Client."), then the contents of LargeText fields are represented by a Has Content icon.
To view the contents of a LargeText field from the Search Results table:
Click the Has Content icon in the table cell.
The LargeText palette opens.
To close the palette, press Escape.
If the LargeText field has no content, then the corresponding cell in the Search Results table is empty.
In both Web Client and Java Client, you can export some or all results of a search (Advanced Search or saved search) to a CSV (comma separated value) file for use in another application, for instance, Microsoft Excel or Microsoft Word. You can also export the search results in Microsoft Excel '.
To export search results in Web Client:
Run a search.
In the search results table, click the More drop-down button and choose a format (.csv or Microsoft Excel):
Export (csv)
The content of LargeText attributes are not exported.
Export (xls)
Then content of LargeText attributes are not exported.
Export Objects
When exported by choosing the XML format, then the content of LargeText attributes are included.
When you choose either Export (csv) or Export (xls), the File Download dialog opens.
Click Open to view the exported file in the chosen format, or Save to save the file to your local drive.
|
Note: For information about Export Objects, see Agile PLM Import/Export User Guide. |
To export search results in Java Client:
Run a search.
In the search results table, click the Export drop-down button and choose a file format: .CSV or Microsoft Excel.
In the File Download dialog that opens, click Open to view the exported file in the chosen format, or Save to save the file to your local drive.
Saved searches are advanced searches that have been saved for future use. They include the predefined searches shipped with Agile, global searches that your Agile administrator created, or personal searches you created yourself.
Global searches are seen by all Agile users with appropriate Discovery and Read privileges. Personal searches are seen only by the user who created the search. Although personal searches are created on a local computer, they are stored on the server. Because your personal searches are stored on the server, you can log in to any computer that runs your usual client and see the personal searches you have created, even if those searches were created on a different computer. Only you can see them, under your own login.
Agile PLM comes with a set of predefined searches. You can use them as they are, or you can use them as a template to modify and save as your own custom searches.
Which searches you see depends on your company's licenses and your user profile settings, roles, and privileges. If you have the Global Search privilege, you can edit or delete the predefined system searches. If you do not have the Global Search privilege, you can still view the system searches.
|
Note: Some predefined system searches cannot be edited, viewed or saved because they are defined internally and are not based on an advanced search. For example, the Recycle Bin searches for soft-deleted objects are not editable. |
The search Save As feature lets you create a shortcut (link) to a non-editable system search, but does not allow you to make a copy of that search in your personal searches folder. For more information, see "Using Save As to Save a Search."
You also need to have the Searches property in your user profile include the kind of searches you want to see. The Agile administrator may have already set that up when your profile was created as an object in the Agile database; if not, follow this sequence:
To add the capability to see a folder of searches:
Display your user profile:
In Web Client, choose My Settings in the navigation pane toolbar. Your user profile is displayed.
In Java Client, click the View/Edit Current User button in the main toolbar.
This step is only necessary in the Web Client! Click Edit to begin modifying your user profile.
On the General Info tab, scroll down to the Profile section.
Modify the Searches field to select the Searches you want access to. You may select multiple searches.
When you have finished modifying your user profile, click Save.
If you have questions about your ability to discover, read, or edit searches, see the Agile administrator.
The Global Searches folder has a subfolder named Workflow Searches with additional predefined searches.
The following table lists all Searches you can have access to.
Table 8-1 Predefined system search folders
| Name of folder | Purpose of searches |
|---|---|
|
Compliance Searches |
Searches that find product governance and compliance data. |
|
Global Searches > Workflow Search |
Searches that use workflow attributes to find routable objects. See "Searching for Routable Objects with Workflow Attributes." |
|
Change Analyst Searches |
Searches that find changes, items, and redlined attachment files. |
|
Component Engineer Searches |
Searches that find manufacturers and manufacturer parts. |
|
Workflow Routings |
Searches that find workflows, as described in "Workflow Routings." Also see "Searching for Routable Objects with Workflow Attributes." |
|
Content Manager Searches |
Searches that find content transfer orders and packages. |
|
Price Searches |
Searches that find prices. |
|
Project Searches |
Searches that find projects. |
|
Quality Searches |
Searches that find product service requests and quality change requests. |
|
Sourcing Searches |
Searches that find requests for quote and sourcing projects. |
|
Supplier RFQ Searches |
Searches that find supplier RFQ requests. |
|
Recycle Bin Searches |
Searches that find deleted objects in every base class in Agile PLM. |
|
Personal Searches |
Searches that you have created. |
In Web Client, when you run a saved search, the found objects are listed in the right pane, below the name of the search.
In Java Client, when you run a saved search, the found objects are listed in the search results window with the name of the search in the window title bar.
In Web Client, to use searches predefined in Agile PLM, created by your Agile administrator, or saved by you:
In the FOLDERS drawer in the navigation pane, navigate to the search you want to edit.
Click the Expand icon next to a search folder to display the list of saved searches in that folder.
Or, click the Expand All icon in the Searches navigation pane to display all search subfolders and their contents.
Click the search name link to execute the search. Results appear in the right content pane.
At the top of the search results table, click the Expand icon to view the search control pane.
Click the Collapse icon at the bottom of the search control pane to collapse and hide the search control pane.
Click the Navigator button in any table, including search results tables, to populate the NAVIGATOR drawer.
In Java Client, to use searches predefined in Agile PLM, created by your Agile administrator, or saved by you:
If the folders of saved searches are not displayed in the Searches folder on the Search tab of the left navigation pane, double-click the Searches folder.
Or, highlight the Searches folder and click the Expand All icon in the Searches toolbar to display all search subfolders and their contents.
Double-click the name of the folder that you want to open.
Double-click the name of a search in that folder to run it. Results appear in a search results window.
You can create and save searches that prompt you to fill in the values for which you want to search. Each time you run the saved search, you can specify different search values.
When you run a saved "Prompt at Runtime" search, a dialog appears that lets you fill in search values.
Fill in the fields provided and then click Run.
To create and save a "Prompt at Runtime" search, see "Creating an Advanced Search in Web Client" or "Creating an Advanced Search in Java Client"
Use the main toolbar quick search features in both clients to run quick searches. Quick searches let you quickly locate objects in the Agile PLM database. The quick search returns a list of all Agile objects whose name, number (ID), or description contains the search criteria that you specified.
In a default quick search (main toolbar class drop-down list set to All, also referred to as a simple search) Agile searches all classes to find any object in the database that matches the criteria. When you choose a base class in the drop-down list, Agile limits the search to any object with that base class as its "ancestor." You can also extend the search to attachment files; see "Full Text Search for Content in Attachment Files."
Quick searches behave like Contains searches for text strings. The search criteria is treated as a single string and Agile PLM searches for names or descriptions that contain the search criteria string. In the case of ID numbers, Agile PLM searches for an exact match, however, you may use wildcard characters to specify part of an ID number as a search criteria.
The columns included in the search results table depend on the type of objects for which you searched.
"Using Wildcard Characters" gives some examples of values for quick searches and the returned results that can be expected.
For detailed information about using quick searches, see:
The Web Client Quick Search interface appears in the top pane main toolbar in Web Client. See also "Top Pane Main Toolbar."
The following table describes the actions associated with the Quick Search buttons and fields in Web Client.
Table 8-2 Quick Search controls, Web Client
| Button or field | Description |
|---|---|
|
|
Base Class drop-down list Use to select a specific base class. Agile limits the search to any object with that base class as its "ancestor." All (default when is displayed) – searches all object classes in the database. See "Perform a Quick Search in Web Client" for more information. |
|
Search Criteria field |
The search criteria text is not case-sensitive. You can enter as search criteria:
See "Quick Searches and Wildcard Characters" for more information. |
|
|
Execute a Quick Search button Runs the search you specify and displays the results in the Search Results window. See "Search Results" for more information. |
|
|
Custom Search (Ctrl + Shift + Q) Opens a Search Criteria definition pane to create either a basic (parametric) search or an advanced search. The last Search Criteria you used (basic or advanced) is displayed. See "Preconfigured Parametric Searches" and "Advanced Searches." Runs a Quick Search. See "Quick Searches and Wildcard Characters" and "Quick Searches." |
Additional Web Client Quick Search features appear in the Base Class drop-down list.
Table 8-3 Quick Search drop-down list features, Web Client
| Drop-down list icon | Description |
|---|---|
|
Class icon in search criteria field |
When you select a base class for Quick Search, then the icon for that base class appears in the search criteria field. |
|
|
Active menu entry indicator In addition to the base class icon in the search criteria field, the active menu entry icon appears in the drop-down list to indicate which class has been selected. |
|
|
Include Attachment Text list entry check mark icon Click to toggle this menu entry selection. To include the content of attachment files in your search, the Include Attachment Text entry must be checked. Scroll to the bottom of the list and click this menu entry to enable this option; the check mark appears on the list. To disable this option, click the menu entry again; the check mark is removed. For more information see "Full Text Search for Content in Attachment Files." |
To perform a Quick Search in Web Client:
Use the object type drop-down list to select the type of object you want to search for. Select a base class to limit the search to any object with that base class as its "ancestor."
When you select All, Agile searches across all classes.
To include the content of attachment files in your search, scroll to the bottom of the drop-down list and click the Include Attachment Text entry to enable it; the menu selection checkmark icon appears when this option is selected. Click the entry again to deselect it; the icon is removed. See "Full Text Search for Content in Attachment Files" for more information.
Enter the search characters in the search criteria field.
Click the Execute Quick Search button. The search returns all objects in the specified base class where the ID number matches or a word in the description contains the search characters.
To open a returned object, click its link in the search results table.
In Agile PLM Web Client, when you specify a search criteria for a Quick Search or for the Name/Number/Desc search criteria attribute, Web Client executes the search using an internally appended asterisk (*) wildcard at the end of your search criteria. (See also "Quick Searches and Wildcard Characters.")
For example, if you execute a quick search (that is, a Name/Number/Desc search) for 1000, the search results will include items with the following numbers and descriptions.
Table 8-4 Name/Number/Desc search results for 1000
| Number | Description |
|---|---|
|
1000-01 |
Computer, Model 1.0 |
|
1000-021 |
Computer, Model 2.1 |
|
403-1009-02 |
DIODE, REC 1A 1000V |
All Web Client quick searches are Name/Number/Desc searches. In addition to executing a quick search from the Web Client top pane menu, the Add by Search palettes and the search palettes that allow you search for an object field value are also quick searches.
The Basic custom search includes a Name/Number/Desc search criteria field. When you define an Advanced Search, Name/Number/Desc can be selected in the Attribute column of the search criteria.
The Java Client Quick Search interface appears in the main Java Client window toolbar. See also "Java Client Toolbars."
The following table describes the actions associated with the Quick Search buttons and fields in Java Client.
Table 8-5 Quick Search controls, Java Client
| Button or field | Description |
|---|---|
|
Base Class drop-down list |
Use the drop-down list button to select a specific base class. Agile limits the search to any object with that base class as its "ancestor." All (default) – searches all object classes in the database. For more information see "Perform a Quick Search in Java Client." |
|
Search Attachment Text check box |
When you select a base class in the Base Class drop-down list, then this check box is enabled. To include the content of attachment files in your search, click the check box to select this option. For more information, see "Full Text Search for Content in Attachment Files." |
|
Search Criteria field |
The search criteria text is not case-sensitive. You can enter as search criteria:
See "Quick Searches and Wildcard Characters"for more information. |
|
Run Search button |
Click to run the Simple Search or Quick Search that you have specified. The search results are displayed in the Search Results window. See also: |
|
Advanced Search button |
Opens the Advanced Search dialog to create an advanced search. |
|
Search drop-down list |
Click the drop-down arrow to display a list of base classes to select for a preconfigured parametric search. |
|
Last Search Results button |
Display the results of the last search that you performed. |
To perform a quick search in Java Client:
Enter the search characters in the Search Text field in the main toolbar.
Use the Object Type drop-down list to select the type of object you want to search for. Select a base class to limit the search to any object with that base class as its "ancestor."
When you select All, Agile performs a Simple Search and searches across all classes. The Search Attachment Text check box is disabled for Simple Searches.
When you select an object type, the Search Attachment Text check box is enabled. To include the content of attachment files in your search, select the check box. See "Full Text Search for Content in Attachment Files" for more information.
Click the Run Search button. The search returns all objects in the specified base class where the ID number matches or a word in the description contains the search characters.
To open an object in the search results table, double-click its row.
You can use wildcard characters when you perform a quick search in Web Client ("Web Client Quick Search") or Java Client ("Java Client Quick Search").
Agile accepts two wildcards: the asterisk (*) and the question mark (?), and they can be used in any of the searches.
The question mark ?
Finds matches with any other single character.
The asterisk *
Finds matches with more than one character.
|
Note: For systems on SQL Server, there are some limitations on searches that depend on the available resources of the database server. On SQL Server, the newly created or renamed object cannot be searched on immediately. There is a delay of 10-15 seconds.Also, on SQL Server, the wildcard search "value*" is supported. The following searches are not supported:
|
Web Client internally appends an asterisk (*) to the Quick Search criteria you enter to make quick searching more efficient. Here are some examples, using each of the wildcards and no wildcards in Web Client:
Table 8-6 Wildcard search examples, Web Client
| Search criteria | will be returned | will not be returned |
|---|---|---|
|
Hello World |
Java output hello world |
Hello Dolly |
|
at |
Item is at Phoenix site |
bat, atlas |
|
?at |
bat, cat (and so on) |
splat |
|
*at |
bat, cat, splat, big hat batter, catfood, hatpin |
— |
|
1001-0?2 |
1001-002, 1001-012, 1001-0A2 Also: 1001-0029 |
— |
|
1001-0*2 |
1001-012, 1001-0A2, 1001-0A12, 1001-03742 (and so on) Also: 1001-0129 |
— |
|
Semi |
ABC Semi Haulers Also: ABC Semiconductor |
— |
|
Semi* |
ABC Semi Haulers, ABC Semiconductor Also: ABC Nonsemi Haulers |
— |
Here are some examples, using each of the wildcards and no wildcards, in Java Client:
Table 8-7 Wildcard search example, Java Client
| Search criteria | will be returned | will not be returned |
|---|---|---|
|
Hello World |
Java output hello world |
Hello Dolly |
|
at |
Item is at Phoenix site |
bat, atlas |
|
?at |
bat, cat (and so on) |
splat |
|
*at |
bat, cat, splat, big hat |
batter, catfood, hatpin |
|
1001-0?2 |
1001-002, 1001-012, 1001-0A2 |
1001-0029 |
|
1001-0*2 |
1001-012, 1001-0A2, 1001-0A12, 1001-03742 (and so on) |
1001-0129 |
|
Semi |
ABC Semi Haulers |
ABC Semiconductor |
|
Semi* |
ABC Semi Haulers, ABC Semiconductor |
ABC Nonsemi Haulers |
|
Note: The only advanced search operator that allows wildcard characters is the Like operator. The Like operator is located in the Match If list. (See "Advanced Searches.") |
To search for objects that contain "*", type the backslash character (\) in front of the * wildcard (so, "\*") to indicate that you mean the * character, not the * wildcard. For example, to search for "10*18", type 10\*18 .
|
Note: You cannot search for the "?" character, that is, you cannot enter the string "\?". Nor can you search for the backslash character by entering the string "\\". |
The following characters are considered to be part of the word or number in which they are found:
Table 8-8 Special characters considered to be part of a word or number
| Character | Description |
|---|---|
|
_ |
underscore |
|
- |
hyphen |
|
~ |
tilde |
|
* |
asterisk |
|
' |
apostrophe |
|
@ |
at sign |
|
# |
number sign |
|
% |
percent |
|
" |
quotation mark |
|
^ |
caret |
|
& |
ampersand |
|
. |
period (fullstop) |
|
( |
open parenthesis |
|
) |
close parenthesis |
|
+ |
plus sign |
|
= |
equal sign |
|
: |
colon |
|
; |
semicolon |
For instance, if an item's number is 10#40, the search treats it as a single word; "10" and "40" would not be found. So, if you use the * wildcard character, 1* would find 10#40 but 4* would not.
|
Important: Do not use wildcards to create searches that match too many rows in the database, for example, a search for "P*". When you run a search with a wildcard, the criteria must be matched against all words in the index (formed by combining autonumbers, descriptions, and text in attachments), which can run into several million rows on a large database. It is a good idea to further refine such a search so performance of the database is not compromised.If your wildcard search matches too many rows in the database, you may see an error message telling you that your wildcard query resulted in too many results, refine your criteria and try again. In this case, enter a more specific search string and try again. The more clues you can provide, the more specific your search will be. For example, "Resistor*" is more specific than "R*" and "MOSFET Transistor" is more specific than "Transistor". Wildcard searches that specify only one or two characters, including the space character and punctuation characters, may return this error. Whether a specific wildcard search matches too many rows in the database also depends on the size and complexity of your database. If you enter "*" without any criteria, Agile PLM does not attempt to match all the words in the index. |
|
Note: For multi-byte language Agile installations (Japanese, Chinese, and Korean), simple searches and quick searches, that use wildcard characters to search for text strings that include the following special characters, produce inconsistent results or do not return the correct search results.tilde ~ grave accent ` exclamation point ! at sign @ number sign # dollar sign $ per cent sign % caret ^ ampersand & asterisk * open parenthesis ( close parenthesis ) hyphen - underscore _ equal sign = plus sign + backslash \ vertical bar | open bracket [ open brace { close brace } close bracket ] semicolon ; colon : apostrophe ' quotation mark " comma , less than sign < period . greater than sign > slash / question mark ? Instead, use an advanced search to use wildcard characters to search for text strings that include these special characters. Specify Like as the search operator. The Like search operator lets you use wildcard characters in advanced searches. When you have defined the advanced search, you can save it for later use. See "Advanced Searches." |
You can search attachment files to find a particular word or phrase. You can use Quick Search or Advanced Search to find attachment file content.
|
Note: FTS in the content of attached files with multi-language characters and wildcard characters may not be fully successful in Simple Search, Quick Search, and Parametric Search.Full Text Search (FTS) for multi-language characters and wildcard characters may not be fully successful for a Simple Search, Quick Search, and Parametric Search. We recommend that you use the Advanced Search for multi-language characters and wildcard characters. For more information see "Advanced Searches." |
When you search for attachment file content, the search results list each object that contains files matching the search criteria. Only the latest versions of attachments are listed.
|
Note: If an object contains multiple files, even if only one of the files contains the search text, the entire object is returned. The file that contains the text is not indicated, and you may need to look through all attachment files to find the appropriate one.For non-English text in documents, Full Text Search is not supported for Stem search or Concept search. Moreover, attachment files that can be returned by a full text search must be created and saved in Microsoft Word (.DOC) or Excel (.XLS). Non-English-text attachment files created in .RTF or .TXT formats are not returned (although .TXT files may work if the encoding type is Unicode UTF-8). |
To include attachment file content in a quick search:
Web Client – In the quick search drop-down list, click the Include Attachment Text entry at the bottom of the list to enable it. The icon appears when the entry is enabled. Click again to disable.
Java Client – Select the Search Attachment Text check box.
For detailed information about running quick searches, see "Web Client Quick Search" and "Java Client Quick Search."
The following words are called "stop" words and are ignored by the system in searching against attachment files. So, a search for "the mouse" will return all matches for "mouse", which includes attachment content with the sequence "the mouse" because the stop word "the" is ignored. (To contrast, a simple search of objects—not attachments—for "mouse" would not return "the mouse".
|
Note: On SQL Server, the query string cannot contain any stop words. For example, you would not be able to input "the mouse" as a query string. |
"Stop" Words List
a, about, after, all, also, an, and, any, are, as, at
be, because, been, but, by
can, co, Corp, corp, could
for, from
had, has, have, he, her, his
if, in, inc, into, is, it, its
last
more, most, Mr, mr, Mrs, mrs, Ms, ms, Mz, mz
no, not
of, on, one, only, or, other, out, over
s, says, she, so, some, such
than, that, the, their, there, they, this, to
up
was, we, were, when, which, who, will, with, would
You can search for attachment files in which the file content matches the text criteria you specify. The following list shows an example of an advanced search in Web Client that will find attachment files that contain the words "PCB" and "Layout." (For general instructions about creating advanced searches, see "Advanced Searches.")
Table 8-9 Example: Attachment content search
| Search definition field: | Criteria selected or entered: |
|---|---|
|
Base Class drop-down list |
Items |
|
Search Type drop-down list |
Object Search |
|
Search Attribute drop-down list |
Attachments tab, File Document Text |
|
Search Operator drop-down list |
Contains all Words |
|
Search Value field |
PCM Layout |
To search for attachment file content, use the attribute Attachments.File Document Text.
The following tables describe the attachment content search options available when Attachments.File Document Text is the selected search attribute.
Table 8-10 File Document Text search operators
| Search Attribute Setting | Finds | Example |
|---|---|---|
|
Contains All Words |
Attachment files that contain all the words that you specify, in any order |
Search text: PCB layout Search results may include:
|
|
Contains Any Word or Words |
Attachment files that contain at least one of the words that you specify |
Search text: PCB layout Search results may include:
|
|
Contains Phrase |
Attachment files that contain all the words that you specify, in the order specified |
Search text: PCB layout Search results include only:
|
|
Does Not Contain (or Contains None Of) |
Attachments that do not contain the specified text |
Search text: PCB layout Search results never include:
|
|
About (for concept searching) |
Searches for words that are about the same concept as the specified word. |
Search text: sports Search results may include "basketball" |
This table describes two specialized search settings, stem searching and concept searching.
|
Note: SQL Server systems do not support concept searching. |
Table 8-11 Concept Search and Stem Search
| Feature | Description | Examples |
|---|---|---|
|
Concept searching |
Searches for words that are about the same concept as the specified word. |
Search text: sports Search results may contain: basketball, baseball |
|
Stem searching |
Searches for the root of the specified word and find all attachments that contain the root. |
Search text: index Search results may contain: indexing, indices Search text: run Search results may contain: running, ran |
In an advanced search, you can choose from a complete list of the available search attributes. By contrast, in a preconfigured parametric search, a list of the most useful or commonly used search attributes is automatically displayed for you in the search window. For each parametric search attribute, you can select a Match If operator and a value for which to search. You define search values for only the attributes you want to use in your search. You can leave the remaining parametric search attributes blank.
Your Agile administrator defines the parametric search for all Agile PLM users in Agile Administrator. Each object class or type can have a different set of preconfigured search attributes. Contact your Agile administrator if you have questions about preconfigured search attributes in your Agile system.
After you have defined your parametric search, you can save it in your Personal Searches folder for reuse. For more information about saving a parametric search, see "Saving a Search."
The search features in the parametric search pane or window are similar to the quick search.
|
Important: To display the preconfigured search attributes in the parametric search window, you must select an object type in the second drop-down list. This displays the preconfigured parametric search attributes. Then, select Match If operators and search values for the parametric search attributes you want to use, and click Search or Run.Each search condition you define is added to the search (creating an AND search), including the quick search condition at the top of the page. |
The following figure illustrates the Web Client parametric search window.
The following search control fields, buttons, and menus appear in the Web Client parametric search pane:
Table 8-12 Parametric search pane controls, Web Client
| Button, field, or menu | Description |
|---|---|
|
Base Class drop-down list |
In this list, select a specific base class. Agile limits the search to any object with that base class as its "ancestor." |
|
Object Type drop-down list |
In this list, select a specific object class or a specific object subclass (object type) to further limit the search. The available choices in this list are defined by the Base Class list selection. Note: Selecting an object type in this list automatically displays any preconfigured search attributes. |
|
Search attributes |
The search attributes that are displayed in the parametric search are preconfigured by the Agile administrator. |
|
Search Operator drop-down lists |
The available search operators depend on the attribute type, for example, list, date, or text. |
|
Search Criteria fields |
The search criteria text is not case-sensitive. You can enter as search criteria:
The available criteria entry methods depend on the attribute type, for example, list, date, or text. |
|
Include Attachment Text check box |
When you select an Object Type, then this check box is enabled. To include the content of attachment file in your search, click to select the check box. |
|
Advanced button |
Displays the Advanced Search criteria definition pane. The parametric search criteria you defined in the parametric search are pre-defined in the Advanced Search pane. See "Saving a Parametric Search as an Advanced Search." |
|
Format button |
The Search Personalization palette lets you select which attribute columns appear in the search results table and the order in which you want them to appear. See "C. Define a Custom Output Display, Web Client." |
|
Save button |
Use to save the displayed search. See "Saving a Search." |
|
Search button |
Runs the search you specify and displays the results in the Search Results table. See "Search Results" for more information. |
|
Clear button |
Clears the displayed search criteria in the Search window. |
To define and run a preconfigured parametric search:
In the main menu, click the Custom Search button. The custom search pane appears. If the advanced search pane is displayed, click the Basic button to display the parametric search pane.
|
Note: Agile PLM displays the last type of search you used, either Advanced or Basic (parametric). |
In the first drop-down list, select the base class you want to use.
To display the preconfigured search attributes, select an object type in the second drop-down list.
The preconfigured search attributes for the selected object type are displayed in the search criteria pane.
For each attribute you want to include in your search, select a search operator.
For each search attribute you want to include in your search, enter a search value.
If you leave a search value blank, that attribute search criteria will not be used in your search.
Click Search.
The results are displayed in the search table below the parametric search definition.
The parametric search is an AND search. Each search condition is included in the search with an AND operator.
The following figure illustrates the Java Client parametric search window.
The following search control fields, buttons, and menus appear in the Java Client parametric search pane:
Table 8-13 Parametric search window controls, Java Client
| Button, field, or menu | Description |
|---|---|
|
Base Class drop-down list |
Use the drop-down list to select a specific base class. Agile limits the search to any object with that base class as its "ancestor." Selecting All in this list disables the Object Type list. Agile searches all object classes in the database. |
|
Object Type drop-down list |
Use the drop-down list to select a specific object class or a specific object subclass (object type) to further limit the search. The available choices in this list are defined by the Base Class list selection. Note: Selecting an object type in this list, automatically displays any preconfigured search attributes. |
|
Search Attachment Text check box |
When you select an Object Type, this check box is enabled. To include the content of attachment files in your search, click to select the check box. |
|
Search Criteria field |
The search criteria text is not case-sensitive. You can enter the following as search criteria:
|
|
Run Search button |
Runs the search you specify and displays the results in the Search Results window. |
|
Search attributes |
The search attributes that are displayed in the parametric search are preconfigured by the Agile administrator. |
|
Attribute Match if drop-down lists |
The available search operators depend on the attribute type, for example, list, date, or text. |
|
Attribute search value criteria fields |
The available criteria entry methods depend on the attribute type, for example, list, date, or text. |
|
Run button |
Runs the search with the displayed criteria. |
|
Save button |
Save the displayed search as an Advanced Search. The Save in Folder dialog appears. See "Saving a Search." |
|
Reset button |
Clears the displayed search criteria in the Search window. |
|
More... |
The More drop-down list displays additional actions. |
|
More... Customize Output Display |
The Customize Output Display dialog lets you select which attribute columns appear in the search results table and the order in which you want to appear. See "C. Define a Custom Output Display, Java Client." |
|
More... Convert to Advanced Search |
Displays the Advanced Search dialog. The parametric search criteria you defined in the parametric search are pre-defined in the Advanced Search dialog. See "Saving a Parametric Search as an Advanced Search." |
To define and run a preconfigured parametric search:
In the main menu Search button drop-down list, select the object class you want for your search.
The parametric search window opens with no preconfigured search attributes displayed.
You can use the collapsed parametric search display to run a quick search. (See "Quick Search Overview.")
To display the preconfigured search attributes, select an object type in the second drop-down list.
The preconfigured search attributes for the selected object type are displayed in the search window.
Use the - or + to the left of the Search For field to collapse or expand the list of preconfigured search attributes.
For each attribute you want to include in your search, select a Match If operator.
For each search attribute you want to include in your search, enter a search value.
If you leave a search value blank, that attribute search criteria will not be used in your search.
Click Run.
The results are displayed in the search window below the parametric search definition.
The parametric search is an AND search. Each search condition is included in the search with an AND operator.
You can save both parametric searches and advanced searches using a similar save process or save as processes. A saved parametric search returns search results in the parametric search window, and a saved advanced search returns the search results in the advanced search results table.
When you run a saved parametric search, the search results are displayed in the parametric search window. You can expand the list of preconfigured attributes to modify or refine your search. If you want, you can save the search with the modifications you made.
When you run a saved advanced search, the search results are displayed in the advanced search results window. To modify the advanced search, use the Edit button in the search results table.
To save a parametric or advanced search in Web Client:
Define the search conditions; click the Save menu button and choose Save.
The Save Search As dialog box appears.
Enter a name for the search in the Search Name field.
Then select a folder in which to store it.
If you do not have sufficient privileges to save a search in the selected folder, you can select another. You can always save a search in the Personal Searches folder.
To create a new folder, click the New Folder button. In the Create a Folder dialog, enter a folder name and click Save.
Click Save in the Save Search As dialog box to save the search.
To save a parametric or advanced search in Java Client:
Define the search conditions and click Save.
The Save in Folder dialog box appears.
Enter a name for the search in the Search Name field.
Select a folder in which to store it.
If you do not have sufficient privileges to save a search in the selected folder, you can select another. You can always save a search in the Personal Searches folder.
To create a new folder, click the New button. In the Create New Folder dialog, enter a folder name and click OK.
Click OK in the Save in Folder dialog box to save the search.
Click Save in the Save Search As dialog box to save the search.
When the parametric search window is open, you can convert the parametric search to a new advanced search. The advanced search is created with all the parametric search conditions predefined in the advanced search. This lets you define additional search criteria not available in a parametric search and save the advanced search for reuse.
To save a parametric search as an advanced search in Web Client:
With a parametric search window open, click the Advanced button.
You can either define a parametric search and convert it, or you can run a previously saved parametric search and convert it.
The Advanced Search pane appears. Define the advanced search.
For more information about defining advanced searches, see "Creating an Advanced Search in Web Client."
When you are finished, in the Advanced Search pane, click the Save menu button and choose Save.
The Save Search As dialog box appears.
Enter a name for the search in the Search Name field.
Then select a folder in which to store it.
If you do not have sufficient privileges to save a search in the selected folder, you can select another. You can always save a search in the Personal Searches folder.
To create a new folder, click the New Folder button. In the Create a Folder dialog, enter a folder name and click Save.
Click Save in the Save Search As dialog box to save the search.
To save a parametric search as an advanced search in Java Client:
With a parametric search window open, in the More button drop-down list, choose Convert to Advanced Search...
You can either define a parametric search and convert it, or you can run a previously saved parametric search and convert it.
The Advanced Search dialog appears. Define the advanced search.
For more information about defining advanced searches, see "Creating an Advanced Search in Java Client."
When you are finished, in the Advanced Search dialog, click Save.
The Save in Folder dialog box appears.
Enter a name for the search in the Search Name field.
Select a folder in which to store it.
If you do not have sufficient privileges to save a search in the selected folder, you can select another. You can always save a search in the Personal Searches folder.
To create a new folder, click the New button. In the Create New Folder dialog, enter a folder name and click OK.
Click OK in the Save in Folder dialog box to save the search.
You can use Save As to:
Create a new copy of a previously saved search.
Create a shortcut (link) to a predefined system search in a system folder, for example, the Global Searches folder, in your personal searches folder.
If the Agile administrator updates or modifies a global search, when you run the search from the shortcut in your personal searches folder, Agile runs the most recent updated search.
Create a shortcut (link) to a non-editable system search.
|
Note: When you use Save As and select a non-editable system search, creating a shortcut is the default action. |
Create a shortcut to a saved search in a different personal searches folder.
To use Save As to save a search in Web Client:
In the left navigation pane, navigate to the search you want to edit. Click the search to execute it.
In the search results pane, click the Expand icon at the top of the pane to show the search controls.
Modify the search definition in the search control pane.
Click the Save menu button and choose Save As.
The Save Search As dialog appears. To create a shortcut or link to the search, select the check box for Create shortcut (a reference to the exiting search). To create a copy of the search, ensure that the check box is deselected.
|
Note: If you have selected a non-editable predefined system search, the Save menu button is unavailable. Instead, use the Save as Shortcut button. The Create shortcut (a reference to the exiting search) check box is preselected for you and cannot be deselected. You are not allowed to create a copy of a non-editable system search using Save As. For more information, see "Predefined System Searches." |
Select the folder you want for the saved search or shortcut.
To create a new folder, click the New Folder button. In the Create a Folder dialog, enter a folder name and click Save.
Click Save in the Save Search As dialog box to save the search.
To use Save As to save a search in Java Client:
Select the search you want to copy or link to, and then initiate the save as process:
In the Search folder, select the search you want, right-click and choose Save As.
In the Search folder, select the search you want, right-click and choose Edit. In the More button drop-down list, choose Save As.
Run the search, and then choose edit from the search results table:
In a parametric search window, use the More button drop-down list, choose Save As.
In an advanced search results table, click the Edit button. In the advanced search dialog, use the More button drop-down list and choose Save As.
The Move to Folder dialog appears. The Create ShortCut check box is selected by default. To create a copy of the search, deselect the check box.
|
Note: If you have selected a non-editable predefined system search, then the Create ShortCut check box is preselected for you and cannot be deselected. You are not allowed to create a copy of a non-editable system search using Save As. For more information, see "Predefined System Searches." |
Select the folder you want for the saved search or shortcut.
To create a new folder, click the New button. In the Create New Folder dialog, enter a folder name and click OK.
Click OK in the Move to Folder dialog box to save the search.
This section provides the details on using the advanced search capability.
For information specific to searching for attachment file content, see "Full Text Search for Content in Attachment Files."
For information about where-used searches, see "Where-Used Searches for Items."Where-used searches find assemblies that contain items that match the search criteria.
For information about relationship searches, see "Relationship Searches." Relationship searches find objects that are related to objects that match the search criteria.
These are the topics in this section about advanced searches:
Advanced searches look for all the objects with fields that match the conditions of the search. The object fields and attributes that you can use for advanced searches depend on whether you are searching for an object base class, class, or subclass. (For information about classes, see "Introducing Agile Objects.")
|
Important: Your company may need to examine the benefits of indexing specific columns in your database. If the enterprise has an extremely large database, and users discover that advanced searches are taking a long time (longer than 2 or 3 minutes), it is likely that the searching operation is going through every single column in the database. By indexing specific database columns, or setting a "search order" of database columns, the searching capability can run faster for all users. See your Agile administrator if you suspect this is a problem. |
For example, Agile can search for the fields on the Title Block tab of items, the Cover Page tab of changes, and the General Info tab of manufacturing objects, and also the fields on the Manufacturers tab of items. In both Web Client and Java Client, if your company uses custom Page Two or Page Three fields (which appear on the Title Block or Cover Page tab in Web Client), they may be referred to by a different name on your system. Agile can also search those fields.
|
Note: When searching for Discussions, Agile lets you do a relationship search if a Discussion exists for the object. |
You can only search for Discussions if you have the respective privileges assigned to you. Contact your administrator.
When searching for changes, Agile can search for workflow attributes and statuses on changes.
Once you create and save a search, you can:
Run it by clicking it (Web Client), or double-clicking it (Java Client), in the navigation pane.
Edit it as described in "Editing and Managing Searches and Search Folders."
For detailed instructions for creating an advanced search in Web Client and in Java Client, see "Creating an Advanced Search in Web Client," and "Creating an Advanced Search in Java Client."
The general procedure to creating an advanced search is as follows:
Open the Advanced Search definition window from the button in the menu.
Define the Search Criteria: the type of object, the kind of search (for example, an object search, a where-used search, or a relationship search), field names, conditions, and values you want to search for.
Define search results options: specify the output fields you want displayed in the search results table, and the order in which you want to display them.
Save the search (name and folder), run the search, and print the search results.
Also see the sections immediately following the "create search" tasks: "Using And/Or Values in Advanced Searches" and "Using Parentheses in Search Definitions."
The following topics discuss important ideas about advanced searches:
Creating a successful advanced search can be challenging. Consider using a saved search that has some elements of the search you want to create.
In Web Client, you can execute the search you want to begin with and then use the Save As command to save a duplicate copy. Develop your new search by modifying the copy of the old search.
In Java Client, when you start to create an advanced search, there is an option to Use a Saved Search; you browse to the search and it "prepopulates" the search dialog box or wizard. Or you may prefer, with a search selected in Java Client, to click the View/Edit button, save the opened search with another name (and directory as needed), and develop your new search by modifying the old search.
There is potential for ambiguity between the search criteria and the search results output display settings. The search criteria that you define (including the object type coupled with the object attributes) determine which objects the search finds. The output display attributes determine how the found objects are listed in the search results table. The output display attributes do not alter the results of the search; they determine only the manner in which those results are displayed.
When you search for objects by defining criteria that uses data found on related tables, and select similar criteria to display in the output, you may find unexpected results. It is recommended that, whenever possible, you set up your search against the parent object and not its associated data.
More specifically, if you search an object using an attribute of a related object (data that is pulled from other objects, such as BOM, Affected Items, Related PSRs, Changes, and so forth) as a search criteria, and for your output you choose to display attributes of the related object in your output, all the related objects will be listed, not just those that meet the search criteria. You will see the searched-for objects listed multiple times in the search results, once for each related object.
For example, if you choose "PSR" for object type and search against Affected Items (which is associated data) for some criteria such as "quantity > 5," and you display the affected item number and quantity, you may expect that only affected items with quantity > 5 will appear on the search results table; however, all the affected items of the found PSRs will be listed, resulting in the PSR itself being listed multiple times.
A space character by itself is not a valid search value. Agile PLM will return an error if one or more space characters are the only characters specified in the search condition Value field.
However, you can specify a search value that includes a space character with other characters. For example, you can search for "blue box" to find the text string "blue<space>box".
|
Note: To search for text strings that begin with a space, you can use the Like search operator in the Match If field and include a wildcard character in the Value field. |
When you use a wildcard in the search Value field, you must use the Like operator. The only advanced search operator that allows wildcard characters is the Like operator.
For more information about wildcard characters, see "Using Wildcard Characters."
You may encounter a situation where a field on Page Three of a business object is available for search in Web Client, but is not available in Java Client. This can happen when the administrator hides a field (changes Visible property to No), but has not yet logged out on his system, so the change has not gone into effect for Java Client users, while the change is immediately in effect for Web Client users.
To create an advanced search in Web Client:
Display the Advanced Search Search Criteria pane.
Click the Custom Search button in the main toolbar to open the Search Criteria pane. Click the Advanced button if the Advanced Search criteria pane is not already displayed.
There are three drop-down lists at the top of the Search Criteria pane. In the first two lists, select the following:
Base Class – This list specifies a broad object definition for the search, for example, Items or Changes.
Class or Subclass – This list selection narrows your search. If you selected Items in the first list, select a class (Parts or Documents), or select a specific subclass (Resistors or Diodes). If you leave this list blank, Agile PLM searches all object subclasses included in the specified base class.
In the Search Type drop-down list, make sure Object Search is selected.
|
Note: When you make a selection in the Class or Subclass list (the list is not left blank), additional search types become available in the Search Type list. If you select a search type other than Object Search, a fourth drop-down list may be displayed. The fourth list lets you select the Related Content for the search. For more information, see "Where-Used Searches for Items," "Where-used Searches for File Folders," and "Relationship Searches." |
By default, the search condition table contains one row. (In Web Client, you can add as many rows as you need by making a selection in the Join drop-down list (select And or Or from the list) or by clicking the plus sign button at the end of the row. See step 2e below.)
Define a set of search criteria, or conditions:
In the Attribute column, use the drop-down list to select a target search attribute from the list. For example, under the Title Block heading in the list, choose Number, which represents the Number field on the Title Block tab of a part or document.
The Attribute list varies depending on the object selected in the search definition lists above the search criteria table. For example, if you search for assembly drawings (a part) the Attribute list includes the Lifecycle Phase attribute on the Title Block tab. If you search for ECOs (a change) the Attribute list includes the Status attribute on the Cover Page tab.
|
Note: If you are using Microsoft IE browser, long names in the Attribute drop-down list may be truncated. To view the full attribute name, hold the cursor over a list entry in the Attribute drop-down list and the full attribute name is displayed in a tooltip. |
Click the second drop-down list to select a search operator from the list. For more information, see "Selecting Search Operators."
The Prompt field is enabled if appropriate, and the check box is deselected by default. If you leave the check box deselected, the Value field is enabled (see next step). If you select the check box, you are not going to fill in the Value field now, and, when you run the saved search, you will be prompted to enter a value.
Click the Value field, and enter or select the value or values you want to search for; press Enter when you are finished.
The value entry selection method depends on the kind of attribute you selected (for example, text, list, or date). In the Search Criteria value selection, Web Client uses the same attribute entry and modification methods used elsewhere in Web Client.
In general, begin to type the value you want to search for and a list of matching entries is displayed in the palette. Double-click an entry to select it. Click the Search to Add button in the palette to open a Quick Search dialog. For date values, you can click the Calendar button.
The Value field specifies the content or setting of the field selected from the field list. Depending on the selection in the field list, the value field may allow you select from a list that is relevant to the selection, a calendar button, or a field where you can enter text or numbers. For example, if Attribute is set to Title Block, Lifecycle Phase, then the Attribute field lists the different lifecycle phases when you click the Search to Add button. If Attribute is set to Title Block, Description, then you can enter text or numbers in the Value field.
If you select Like as a search operator, or if you are searching for attachment file content, you can use wildcard characters when entering a value. For information about using wildcards to search for objects, see "Using Wildcard Characters." For information about searching for attachment file content, see "Full Text Search for Content in Attachment Files."
To add an operator setting of "And" or "Or," click the Join field and select And or Or from the list.
Use And if both conditions must be met.
Use Or if either or both conditions can be met.
A second line for your search is added as soon as you select And or Or.
If you have selected And or Or but want to remove the operator, click the Join field and select the empty space, which will depopulate the field of either operator.
The added line does not disappear. You can still set values for that row, and re-select And or Or. You can also delete the row using the minus sign button to the right.
If you do not use parentheses when defining your search, the search is processed giving precedence to And values, that is, it processes all rows that end with And before processing rows that end with Or. In other words, the first line is combined with the second and process order is based on the first line's And/Or value.
For more information, see "Using And/Or Values in Advanced Searches."
To add parentheses, click the appropriate options to locate both an open and close parenthesis. Then click the Grouping menu button and choose Add ( ). The proper parenthesis appears to the left of the first row and right of the second row.
To remove parentheses, click the appropriate options for the two rows grouped by parentheses, and click the Grouping menu button and choose Remove ( ).
For more information about using parentheses, see "Using Parentheses in Search Definitions."
To add another row of search conditions, click the And/Or field and select And or Or. A new row is added at the bottom of the table. You can add as many rows as you like before populating them with criteria.
To insert a search condition row, click the Add button. The new row is inserted below the row where you clicked the button. To delete a search condition row, click the button for that row.
To perform a case-sensitive search where text capitalization matters, select the Match Case check box.
To perform a search where text capitalization does not matter, click to deselect Match Case.
Selecting the Match Case check box can help your search run more quickly. If you enter text in the Value field, the search looks for text that is an exact match (uppercase and lowercase letters). If you select a value from a list (such as for Product Line), checking Match Case allows the system to use internal database settings to find objects more quickly.
When you have finished adding search conditions, you can use the buttons at the bottom of the dialog to:
Search – execute the search.
Save – save the search.
If you choose Save, skip to "D. Save and Run the Search, Web Client" to save the search. Saving the search now, before you define the search results format (see "C. Define a Custom Output Display, Web Client"), gives you the opportunity to name the Search Criteria you have defined, and to use that search with different output displays later.
When you have finished adding search conditions, click the Format button. The Search Personalization palette appears for you to specify which fields to include in the search results. The Sort tab is displayed.
To sort the search results, on the Sort tab, in the Attribute column, use the drop-down list to select the field name by which you want to sort first and use the Sort Order drop-down list to choose Ascending or Descending. Select attributes and sort order for up to three attributes. The results are sorted by the first attribute, then by the second attribute, and then by the third attribute.
|
Note: List and MultiList fields, such as Product Lines, cannot be sorted alphabetically. |
To format the search results table, click the Search Personalization Format tab.
On the Format tab, in the Hidden Fields table, select field names you want and then use the right and left arrows to move field names to and from the Hidden Fields and Displayed Fields lists. Double-clicking a field name also moves it from one list to the other list.
The Displayed Fields list specifies the field names that will appear in the search results table. Use the up and down arrows to change the order of field names in the list, which reflects the order of the columns in the search results.
Lock horizontal scrolling - Use the Lock Selected Column button to lock horizontal scrolling. Select and highlight an attribute in the Displayed Fields list. The slightly thicker vertical line appears to the right of the locked column in the search results table.
Click the Lock Selected Column button. A lock icon appears in the Displayed Fields list next to the selected attribute. The locked column and all columns to the left of the locked columns will not scroll horizontally. For example, when you lock the number column, the object number is always visible when you scroll horizontally left or right.
To lock a different column, select the attribute you want in the Displayed Fields list and click the Lock Selected Column button. The lock is moved from one attribute to the other. Only one column can be locked at a time.
To remove the lock, select the locked column in the Displayed Fields list and click the Unlock Selected Column button. The column lock is removed and no columns remain locked.
Click Apply at any time to immediately apply your format settings to the Search Results table.
When you have finished specifying output fields and sort order, click Close in the Search Personalization palette.
You may choose to click the Save menu button and choose Save to save the search, or click Search to execute the search.
If you chose Save, the Save Search As dialog box appears.
Enter a name for the search.
Then select a folder in which to store it. If you do not have sufficient privileges to save a search in the selected folder, you can select another. You can always save a search in the Personal Searches folder.
Click Save in the dialog box to save the search.
When you are ready to run the search, click Search in the Search Criteria pane.
The Search Results table shows all the objects that match the search criteria.
To print the list of search results, click the More button menu, and then choose Print.
To edit the search after running it in Web Client:
Open the Search Criteria pane at the top of the Search Results table and edit the search.
If the Search Criteria pane is not already displayed, click the Expand icon at the top of the pane to show the search controls.
Click Collapse icon to hide the search controls.
To create an advanced search in Java Client:
Click the Advanced Search button in the toolbar.
The Advanced Search dialog appears, ready for you to define the search criteria. The name Advanced Search appears in the title bar at the upper left of the dialog box.
To create a completely new search, select the Create New check box.
You can also start with a saved search: select the Use a Saved Search check box, click the button next to the Select a Search field, and select the search you want to start with.
In the Object Type drop-down list, select the type of object to find. You can specify a base class, class, or subclass object.
In the Search Type drop-down list, make sure Object Search is selected.
|
Note: If you select a search type other than Object Search, you must also select an object type in the With Related Content drop-down list. For more information, see "Where-Used Searches for Items," "Where-used Searches for File Folders," and "Relationship Searches." |
By default, the search condition table contains one row. (You can add as many rows as you need by clicking Add in the search builder window.)
Click the row to enable the search criteria selection lists.
Define a set of search criteria, or conditions:
Click the first drop-down list to select a target Field from the list. For example, Title Block.Number represents the Number field on the Title Block tab of a part or document.
The Field list varies depending on the object selected in the Object Type field. For example, if you search for assembly drawings (a part) the Field list includes Title Block.Lifecycle Phase. If you search for ECOs (a change) the Field list includes Cover Page.Status.
Click the second drop-down list to select a Match If search operator from the list. For more information, see "Selecting Search Operators."
The Prompt? field is enabled if appropriate, and the check box is deselected by default. If you leave the check box deselected, the Value field is enabled (see next step). If you select the check box, you are not going to fill in the Value field, and, when you run the saved search, you will be prompted to enter a value.
In the Value field, select a value from the drop-down list and click OK. The value you selected populates the field.
The Value field specifies the content or setting of the field selected from the field list. Depending on the selection in the field list, the value field may contain a list that is relevant to the selection, a calendar button, or a field where you can enter text or numbers. For example, if Field is set to Title Block.Lifecycle Phase, then the Value field lists the different lifecycle phases. If Field is set to Title Block.Description, then you can type text or numbers in the Value field.
If you select Like as a Match If search operator, or if you are searching for attachment file content, you can use wildcard characters when entering a value. For information about using wildcards to search for objects, see s For information about searching for attachment file content, see "Full Text Search for Content in Attachment Files."
To add an operator setting of "AND" or "OR," click the And/... field and select AND or OR from the list.
Use AND if both conditions must be met.
Use OR if either or both conditions can be met.
If you have selected AND or OR but want to remove the operator, click the And/... field and select the empty space, which will depopulate the field of either operator.
If you do not use parentheses when defining your search, the search is processed giving precedence to AND values, that is, it processes all rows that end with AND before processing rows that end with OR. In other words, the first line is combined with the second and process order is based on the first line's AND/OR value.
For more information, see "Using And/Or Values in Advanced Searches." To add parentheses, select two adjacent rows using Shift-click. When you select two adjacent rows, then the ( ) button is enabled. Click it and the proper parenthesis appears to the left of the first row and right of the second row.
To remove parentheses, select two rows grouped by parentheses, and click the enabled Remove ( ) button.
For more information about using parentheses, see "Using Parentheses in Search Definitions."
To add another row of search conditions, click Add. A new row is added at the bottom of the table. The AND/OR field at the end of the previous row is set to [blank] by default.
To insert a search condition row, select a row and click the Insert button. The new row is inserted above the selected row. To delete a search condition row, select one or more rows and click Delete. The selected rows are deleted.
To perform a case-sensitive search where text capitalization matters, select the Match Case check box.
To perform a search where text capitalization does not matter, click to deselect Match Case.
Selecting the Match Case check box can help your search run more quickly. If you enter text in the Value field, the search looks for text that is an exact match (uppercase and lowercase letters). If you select a value from a list (such as for Product Line), checking Match Case allows the system to use internal database settings to find objects more quickly.
When you have finished adding search conditions, you can Save the search, or click Run to run the search without saving it.
If you click Save, skip to "D. Save and Run the Search, Java Client" and follow step a through step d to save the search. Saving the search now, before you define the Custom Output Display (see "C. Define a Custom Output Display, Java Client"), gives you the opportunity to name the Search Criteria you have defined, and to use that search with different output displays later.
If you click Run without saving the search, the results are displayed in the search results window. To further edit the search or to save the search, click the View/Edit button.
When you have finished adding search conditions, select Custom Output Display... in the More.. button drop-down list. The Custom Output Display dialog appears for you to specify which fields to include in the search results. The Available Fields and Selected Fields tables are displayed.
In the Custom Output Display dialog, in the Available Fields table, select the field names you want and use the right and left arrows to move field names to and from the Available Fields and Selected Fields lists. Double-clicking a field name also moves it from one list to the other list.
The Selected Fields list specifies the field names that will appear in the search results table. Select one or more rows and use the up and down arrows to change the order of field names in the list, which reflects the order of the columns in the search results.
To sort the search results, in the Selected Fields list, click in the Sort column for the field name by which you want to sort, and select a number from the drop-down list (for example, 1 means sort by this field name first). You can sort by multiple field names; select a number in the Sort column for the each of the field names you want to use to sort. Click in the Direction column and select Ascending or Descending order.
|
Note: List and MultiList fields, such as Product Lines, cannot be sorted alphabetically. |
When you have finished specifying output display fields and sort order, click OK in the dialog box.
You may choose to click Save to save the search, or click Run to run the search without saving it first.
If you click Save, the Save in Folder dialog box appears.
Enter a name for the search.
Then select a folder in which to store it. If you do not have sufficient privileges to save a search in the selected folder, you can select another. You can always save a search in the Personal Searches folder.
Click OK in the dialog box to save the search.
When you are ready to run the search, click Run in the search dialog box.
The Search Results window shows all the objects that match the search criteria.
To print the list of search results, click the Print button.
To edit the search after running it, do one of the following:
If the search results window is open, click the View/Edit button.
If you saved the search and closed it, in the Searches tab of the navigation pane, select the search and run it. Then click the View/Edit Search button in the search results window, and edit the search.
Search operators are specified in the Match If field. Available operators vary depending on the Field list selection. For example, if the Field setting is Title Block.Description, the Match If field includes the Contains operator along with several others; if the Field is set to Title Block.Lifecycle Phase, the only operators are In, Not In, Is Null, and Is Not Null.
Table 8-14 Search Operators
| Operator | Description |
|---|---|
|
Contains |
Finds any value that includes the contents of the Value field. For example, if you are searching for objects that contain the value "cap" in their description, the search would find objects described as capacitor, High Capacity Drive, CAP plug, and so on. |
|
Equal To |
Finds only an exact match with the contents of the Value field. |
|
Like |
Allows wildcard searches that match any single character. |
|
Not Like |
Allows wildcard searches that exclude any single character. |
|
Starts With |
Finds values that begin with the characters in the Value field. |
|
Does Not Contain |
Finds any value that does not include the contents of the Value field. |
|
Not Equal To |
Finds any value other than an exact match with the contents of the Value field. |
|
Does Not Start With |
Finds values that do not begin with the characters in the Value field. |
|
Is Null |
Finds objects where the field selected from the Field list contains no value. |
|
Is Not Null |
Finds objects where the field selected from the Field list contains any value. |
|
Greater Than |
Finds dates later than, or duration (in hours) longer than, the contents of the Value field. Finds numbers larger than the contents of the Value field. Finds currency amounts larger than the contents of the Value field. |
|
Greater Than Or Equal To |
Finds dates that match or are later than, or duration (in hours) that matches or is longer than, the contents of the Value field. Finds numbers that match or are larger than the contents of the Value field. Finds currency amounts that match or are larger than the contents of the Value field. |
|
Less Than |
Finds dates earlier than, or duration (in hours) less than, the contents of the Value field. Finds numbers less than the contents of the Value field. Finds currency amounts less than the contents of the Value field. |
|
Less Than Or Equal To |
Finds dates that match or are earlier than, or duration (in hours) that matches or is less than, the contents of the Value field. Finds numbers that match or are less than the contents of the Value field. Finds currency amounts that match or are less than the contents of the Value field. |
|
Between |
Finds dates that match or are between the beginning date and ending date specified in the Value field. Finds numbers that match or are between the high number and low number specified in the Value field. Finds currency amounts that match or are between the high amount and low amount specified in the Value field. |
|
Not Between |
Finds dates that do not match or are not between the beginning date and ending date specified in the Value field. Finds numbers that do not match or are not between the high number and low number specified in the Value field. Finds currency amounts that do not match or are not between the high amount and low amount specified in the Value field. |
|
In |
Finds a list attribute that matches one of the list values specified in the Value field. |
|
Not In |
Finds a list attribute that does not match any of the list values specified in the Value field. |
|
Contains Any |
Finds a MultiList attribute that matches any (at least one) of the MultiList values specified in the Value field. |
|
Contains All |
Finds a MultiList attribute that contains all of the MultiList values specified in the Value field. Note: To find an exact match, use the Equal To operator. To find a MultiList attribute that is not empty, use the Is Not Null operator. |
|
Contains None |
Finds a MultiList attribute that contains none of the MultiList values specified in the Value field. Note: To find an empty MultiList attribute, use the Is Null operator. |
The following table lists the search operators used for each attribute type and explains how to recognize different attribute types by the manner in which you enter data into the field.
The Agile PLM administrator can set default values (such as the current date, or current user) to automatically appear in a field when new objects are created. For more information, see Agile PLM Administrator Guide.
Table 8-15 Attribute types
| Type | What to Enter in the Field |
|---|---|
|
Date |
Enter date and time, enter the variable $TODAY to use today's date, or select date and time from a pop-up calendar. |
|
List |
Select one item from a list. Select one item from a cascading list. |
|
MultiList |
Select one or more items from a multiple-selection list. The list can be a cascading list. Note: There is now no limit to the number of list entries in a multi-list field; in previous service packs, multi-lists could only save and populate 31 list entries. |
|
Text |
Enter a single line of text; the allowable length varies, but generally it is up to 50 characters. |
|
MultiText |
Enter a block of text (up to 4,000 characters) that wraps across multiple lines. |
|
Numeric |
Enter a numeric value. |
|
Money |
Enter a monetary amount. |
|
LargeText |
If the attribute is configured to allow journal entries, you can add a new time-stamped journal entry. Use the HTML editor features to format the entry. If the attribute does not allow journal entries, you can enter new text or edit existing text. Use the HTML editor features to format the text. Default maximum length is 60,000 characters, including HTML format characters. The Agile administrator can increase the maximum length if needed. See Agile PLM Administrator Guide. |
The following table lists the search operators that apply to each attribute type.
Table 8-16 Search operators that apply to each attribute type
| Attribute types | Search operators that apply |
|---|---|
|
List |
In Not In Is Null Is Not Null |
|
MultiList |
Equal To Not Equal To Contains Any Contains All Contains None Is Null Is Not Null |
|
Date Number Money |
Between Equal To Less Than Less Than or Equal To Greater Than Greater Than or Equal To Not Equal To Not Between Is Null Is Not Null |
|
Text MultiText |
Equal To Like Contains Starts With Not Equal To Not Like Does Not Contain Does Not Start With Is Null Is Not Null |
|
LargeText |
Contains Phrase Contains All Words Contains Any Word Contains None Of |
When the time stamp for the date is 12:00:00 AM, Agile PLM assumes the entire day (12:00:00 AM to 11:59:59 PM) for the search.
If you enter a specific time, Agile PLM uses the exact time in the search. For example, between 08/20/2007 8:00:00 AM PST and 08/21/2007 5:00:00 PM PST.
In Advanced Searches, you may also use the search wildcard $TODAY by typing the wildcard into the search value field (as opposed to clicking the calendar button to display the calendar tool).
$TODAY evaluates true for today's date, all times from 12:00:00 AM to 11:59:59 PM. Date and time are determined by your Time Zone as defined in your user profile.
Use $TODAY-<integer> or $TODAY+<integer> to include the number of days before or after today. The integers refer to whole days, not hours. For example, use the $TODAY wildcard to search for:
Items with a Release Date >= $TODAY-7, that is, all items released in the last week.
Changes with a Date Originated Between $TODAY-10 and $TODAY, that is, all changes created in the last 10 days.
An orphaned item is an item that is not used in any BOM tree, therefore, the orphaned item does not have any parents. In the hierarchy of a BOM tree structure, there are parent items and children items. When an item no longer has any parents, it is referred to as an orphan. On the Where Used tab of an orphaned item, the Where Used table is empty.
In an object search for item objects, in the search criteria attribute list, you can select the Where Used table Item Number text attribute as shown below. For this specific item search attribute, the search operators are limited to Is Null and Is Not Null.
Table 8-17 Orphaned item object search criteria
| Item object search criteria attribute | Description | Available Operators |
|---|---|---|
|
Where Used Item Number |
Specifies the latest released revision of the item object. |
Is Null Is Not Null |
|
Where Used Item Number All Revisions |
Specifies all the revisions of the item object. |
Is Null Is Not Null |
This orphaned item search attribute can be combined with other search attributes to define a narrow search for specific orphaned items. For example, the following search finds all parts without parents for the latest released revision where the product line is Gemini, and the specified date is later than May 1, 2013.
Item Number Is Null And
Product Lines(s) Equal To Gemini And
Page Two Date 01 Greater Than May 1, 2013
When you have two or more conditions defined in a search, the relationship between them is defined as either AND or OR.
AND narrows the search by requiring that both conditions are met. Each item in the results must match both conditions.
OR broadens the search by including any object that meets either condition. Each item in the results table needs to match only one of the conditions, but may match both.
When you define a search with "Equal to" and AND, both parts of the definition must be true. For example, the following search results in zero objects found.
  Title Block.Product Line(s)   Equal To   Taurus    AND
  Title Block.Product Line(s)   Equal To   Scorpio
This is because if the first part of the definition is true (that is, the object belongs only to the product line Taurus), then the second part of the definition cannot also be true (that is, the object cannot belong only to the product line Scorpio).
In the example above, if you wanted to search for objects that belong to more than one product line, you could use Contains Any with And. The following search would find all the objects that belong to both the Taurus and Scorpio product lines because both sides of the definition could be true:
  Title Block.Product Line(s)   Contains Any   Taurus    AND
  Title Block.Product Line(s)   Contains Any   Scorpio
Alternately, the Contains Any operator lets you specify the search as follows:
Title Block.Product Line(s) Contains Any Taurus, Scorpio
Knowing when you want to use AND versus OR in constructing your search criteria can help you get the most accurate results from your search and save you valuable time. For example, the following figure shows a search that looks for parts that have both a part category equal to Electrical and a lifecycle phase equal to Inactive.
  Title Block.Part Category     In   Electrical    AND
  Title Block.Part Category     In   Inactive
If you replace And with Or, the search locates all parts with either a part category of Electrical or a lifecycle phase of Inactive. Depending on your database, this latter search might locate a very large number of parts.
If you do not use parentheses when defining your search, the search is processed giving precedence to AND values, that is, it processes all rows that end with AND before processing rows that end with OR.
In this case, shown in the following figure, Agile looks for objects with both a lifecycle phase equal to Production and a product line equal to Scorpio. Then, Agile searches the rest of the database for objects with a Description field that contains "computer." Found objects must have a lifecycle phase equal to Production and a product line equal to Scorpio or the word "computer" in their Description field because the rows are processed in order.
  Title Block.Lifecycle Phase   Equal To   Production    AND
  Title Block.Product Line(s)   Equal To   Scorpio       OR
  Title Block.Description       Contains   computer
Parentheses let you group search conditions to determine how the search is performed.
To place parentheses around search conditions in Web Client:
In the row where you want to place an open parenthesis, select the option in the open parenthesis column.
In the row where you want to place a close parenthesis, select the option in the close parenthesis column.
Click the Add ( ) button. The parentheses are placed in the first and last rows selected.
To place parentheses around search conditions in Java Client:
Select the rows that you want to enclose in parentheses.
Click a row to select it. The row is highlighted.
Use Shift-click or Ctrl-click to select one or more additional rows.
Click the parentheses ( ) button. The parentheses are placed in the first and last rows selected.
To remove parentheses from search conditions in Web Client:
Deselect the open and close parentheses options in the rows from which you want to remove parentheses.
Click the Remove ( ) button. The parentheses are removed.
To remove parentheses from search conditions in Java Client:
Select the rows with the open parenthesis and close parenthesis.
Use Shift-click or Ctrl-click to select one or more additional rows.
Click a row to select it. The row is highlighted.
Click the Remove ( ) button. The parentheses are removed.
For example, in the search conditions shown in the following table, the second and third conditions are enclosed in parentheses. Agile first looks for objects with a lifecycle phase equal to Production, then searches that group for objects with either the specified product line or description. All found objects must have a lifecycle phase equal to Production, but they can have either a product line equal to Scorpio or a Description field that contains "computer."
  Title Block.Lifecycle Phase   Equal To   Production    AND
( Title Block.Product Line(s)   Equal To   Scorpio       OR
  Title Block.Description       Contains   computer   )
If the parentheses are placed around different conditions, a different search occurs. For example, in the search conditions shown in the following table, the parentheses are around the first and second conditions. Found objects will either have lifecycle phase equal to Production and product line equal to Scorpio, or the Description will contain "computer" without regard to lifecycle phase or product line.
( Title Block.Lifecycle Phase   Equal To   Production    AND
  Title Block.Product Line(s)   Equal To   Scorpio     ) OR
  Title Block.Description       Contains   computer
Where-used searches are specialized searches that find assemblies that include items that meet the search criteria.
In an object search, the search conditions define the objects you want to find; the objects that meet those search conditions appear in the search results table. In a where-used search, the search conditions specify items that appear on the BOM(s) of the object(s) that you want to find. Therefore, a where-used search finds any assembly that uses the specified items. The assemblies that use the defined items appear in the search results table.
For example, the intent of an object search is
Create a list of items whose Description field contains Computer.
The intent of a where-used search with the same search condition is
Create a list of assemblies where the BOM contains items whose Description field contains Computer.
These are the subsections of "Where-Used Searches for Items":
When you set up a Where Used search, you may well be seeking information about specific revisions of a part or other object. A revision, or "rev", explicitly means that the part has been modified by a change order. (These ideas are covered in Product Collaboration User Guide.)
You may use or create criteria that includes revision-specific attributes, such as Rev, Lifecycle Phase, Rev. Release Date, Rev. Incorporate Date, and also fields on the Manufacturers tab of the object.
In general, Agile reviews only the latest revision of each item object. The "latest rev" is the most recent revision of the object. If the object has been released (through a change order), this can be called a "released rev." Because an object might be released, unreleased, and released again (there can be multiple releases), you may want information about the "latest released rev" – presumably the part or assembly that is closest to being finished.
The latest revision can be any of the following, but only one case at a time (see Note below):
The latest released revision of the item: the item has been released, it has a revision number, and there are no change orders or MCOs pending against the item. A released revision occurs when the change (Change Order or Manufacturer Order) that created the revision is in its workflow at Released or Implemented status types. This is indicated by the revision letter showing in parentheses.
The latest pending revision of the item: the item is on the Affected Items tab of one or more unreleased change orders or MCOs. A Pending revision occurs when the change that created the revision is in its workflow at one of these status types: Unassigned, Pending, Submit, Review, or Hold. This is indicated by the revision letter showing in parentheses.
An Introductory rev with no pending changes: this Introductory item has no revision number or pending revision number. It has never been released and it is not on the Affected Items tab of a change order or an MCO.
|
Note: These revision types are listed in hierarchical order: if there is an instance of case 1, that is the latest rev. If there is no released rev but there is an instance of case 2, the system sees that as the latest rev. If there is no released or pending rev but there is an instance of case 3, Agile takes the Introductory rev as the latest rev. Note also that the Introductory rev is considered to be a released revision, so items at Intro rev are expected to be included in Where Used search results. |
There are four types of "where-used" searches, which are defined and described in the following sections. "Level" refers to the BOM.
This where-used search type returns a list of the latest released revision of assemblies that contain the named object (that is, assemblies where that object is used). The following rules apply:
Pending revisions are not included. For items/assemblies with pending change order, the Where Used search result will return the item/assembly labeled Introductory (Intro) revision.
Introductory revisions are included, and they are treated as if they were released revisions.
The object described by the search conditions is contained, directly or indirectly (defined below), on the BOMs of the returned assemblies. This search returns assemblies that contain the described object at any BOM level.
Refer to the figure below. In Assembly 999, Part 222 is contained directly on the BOM of Assembly 999. Also, Assembly 999 includes Subassemblies 777 and 888.
Part 333 is on Subassembly 777; therefore, Part 333 is indirectly contained on the BOM of Assembly 999.
A Where-Used-All Levels-Latest Released Revision Only search for Part 333 returns both Assembly 999 (where it is indirectly contained) and Subassembly 777 (where it is directly contained).
This where-used search type returns a list of top-level assemblies, latest released revision only. The following rules apply:
Pending revisions are not included. For items/assemblies with pending change order, the Where Used search result will return the item/assembly labeled Introductory (Intro) revision.
Introductory revisions are included, and they are treated as if they were released revisions.
The object described by the search conditions is contained, directly or indirectly, on the BOMs of the returned assemblies.
For example, in the figure below, a Where-Used-Top Level-Latest Released Revision Only search for Part 333 returns only Assembly 999, the top-level assembly.
This where-used search type returns a list of latest released revision assemblies that directly contain the named object. The following rules apply:
Pending revisions are not included. For items/assemblies with pending change order, the Where Used search result will return the item/assembly labeled Introductory (Intro) revision.
Introductory revisions are included, and they are treated as if they were released revisions.
The object described by the search conditions is contained directly on the BOMs of the returned assemblies.
Refer to the figure below. Assembly 999 has been released five times, named by Revs A, B, C, D, and E; there is a pending rev, named by Rev (F).
A Where-Used-One Level-Latest Released Revision Only search for Part 111 returns Assembly 999 Rev E only, since Part 111 is directly contained on the BOM of the latest released revision - Rev E - of Assembly 999; previously released revisions of Assembly 999 also contain Part 111, but they are not included in the search results because they are not the latest released revision.
Rev (F) also contains Part 111, but it is not included in the search results because it is a pending revision.
This where-used search type returns a list of all the released revision assemblies that directly contain the named object. The following rules apply:
Pending revisions are not included. For items/assemblies with pending change order, the Where Used search result will return the item/assembly labeled Introductory (Intro) revision.
Introductory revisions are included, and they are treated as if they were released revisions.
The object described in the search conditions is contained directly on the BOM of the released revision of the assembly, even if it is not the latest released revision.
For example, in the figure below, a Where-Used-One Level-All Released Revisions search for Part 222 returns Assembly 999 Rev A and Rev C. Assembly 999 Rev B and Rev D are both released revisions, but they do not directly contain Part 222. Revision (F) does directly contain Part 222, but it is not included in the search results because it is a pending revision.
Where-used set operators allow you to further define relationships between grouped search conditions.
This operator is the equivalent of Or. For example, this lets you find assemblies that contain only part 111, assemblies that contain only part 222 and assemblies that contain both parts 111 and 222. The search results are the union of these two sets of assemblies.
This operator is the equivalent of And. For example, this lets you find assemblies that contain both part 222 and part 333, but not assemblies with only part 222 or part 333. The search results are the intersection of these two sets of assemblies.
This operator is the equivalent of Not. For example, this operator lets you find assemblies that contain part 333, but not part 444. The search results are the assemblies that contain part 333, except for the assemblies that contain both part 333 and 444, nor the assemblies that contain only part 444.
The following table illustrates how the set operators can be used. This search locates all assemblies that contain (part 111, part 222, or both) and part 333, but not part 444.
  Title Block.Number    Equal To   111   Union
  Title Block.Number    Equal To   222   Intersection
  Title Block.Number    Equal To   333   Minus
  Title Block.Number    Equal To   444
This where-used search first finds assemblies that contain either part 111 or part 222 (or both). Next, in the resulting list of assemblies, the search then finds assemblies that also contain part 333. In that resulting list of assemblies, the search now subtracts any assemblies that contain part 444.
To create a where-used search in Web Client:
Display the Advanced Search, Search Criteria pane.
Click Custom Search to open the Search Criteria pane. Click the Advanced button if the Advanced search criteria pane is not already displayed.
In the Search For list, select the type of object on which to base the where-used search.
The object must be an item or a part or document.
Optionally, you can further narrow your search by selecting a subclass in the second Search For list.
In the Search Type list, select the type of where-used search to perform.
Select Match Case to perform a case-sensitive search where capitalization matters.
Selecting the Match Case check box can help your search run more quickly. If you enter text in the Value field, the search looks for text that is an exact match (uppercase and lowercase letters). If you selected a value from a list (such as for Product Line), checking Match Case allows Agile PLM to use internal database settings to find objects more quickly.
Define a set of search criteria, or conditions:
Select a target attribute from the Attribute example, Title Block.Number represents the Number field on the Title Block tab of a part or document.
Select a search operator from the Operator list. For more information, see "Selecting Search Operators.".
If you select the Prompt check box, the value field is disabled and you do not enter a value for which to search. Instead, when you run the saved search, you are prompted to enter a value.
Enter a value in the Value field.
Value specifies the content or setting of the field selected from the Attribute list. Depending on the selection in the Attribute list, the Value field may contain a list that is relevant to the selection, a calendar button, or a field where you can enter text or numbers. For example, if Attribute is set to Title Block.Size, then Value lists different sizes. If Attribute is set to Title Block.Description, then you can type text or numbers in the Value field.
If you select Like as a Match If search operator, you can use wildcard characters when entering a value. For information about using wildcards to search for objects, see "Using Wildcard Characters."
To add another row of search conditions, use the Join field:
Set the Join field to And, Or, or none (empty field) to show whether the search conditions for either or both rows must be met. Use And if both conditions must be met. Use Or if either or both conditions can be met. If you do not use parentheses when defining your search, the search is processed giving precedence to And values, that is, it processes all rows that end with And before processing rows that end with Or. In other words, the first line is combined with the second and process order is based on the first line's Join value.
For more information, see "Using And/Or Values in Advanced Searches."
When you have finished adding search conditions, you can continue with any of the following actions:
Run the search. Click the Search button. The Search Results appear in a table below the Search Criteria pane.
Define search results formatting. Click the Format button to display the Search Personalization palette. See "C. Define a Custom Output Display, Web Client."
Save the search. In the Save button drop-down list, choose either Save or Save As. See "D. Save and Run the Search, Web Client."
To print the list of search results, click the More menu button and choose Print.
The process for creating a where-used search is similar to the process for creating an object search.
To create a where-used search in Java Client:
Click the Advanced Search button in the toolbar.
The Advanced Search dialog box appears with the Search tab displayed.
In the Object Type list, select the type of object on which to base the where-used search.
The object must be an item, a part, or a document.
In the Search Type list, select the type of where-used search to perform.
By default, the search condition table contains one row. (You can add as many rows as you need by clicking Add in the Advanced Search dialog box.)
Click the row to display the search criteria selection lists.
Click each drop-down list button, from left to right, to define the target Field, the Match If search operator, and the value.
Define a set of search criteria, or conditions:
Click the first drop-down list to select a target Field from the list. For example, Title Block.Number represents the Number field on the Title Block tab of a part or document.
The Field list varies depending on the object selected in the Object Type field.
Click the second drop-down list to select a Match If search operator from the list. For more information, see "Selecting Search Operators."
If you select the Prompt ? check box, the value field is disabled and you do not enter a value for which to search. Instead, when you run the saved search, you are prompted to enter a value.
In the last field, enter a value.
The last search condition field, the Value field, specifies the content or setting of the field selected from the Field list. Depending on the selection in the Field list, the Value field may contain a list that is relevant to the selection, a calendar button, or a field where you can enter text or numbers. For example, if the first field is set to Title Block.Size, then Value lists different sizes. If the first field is set to Title Block.Description, then you can type text or numbers in the field.
If you select Like as a Match If search operator, you can use wildcard characters when entering a value. For information about using wildcards to search for objects, see "Using Wildcard Characters."
To add another row of search conditions, click Add.
A new row is added at the bottom of the table. The And/Or field at the end of the row is set to [blank] by default.
To modify the And/Or or Union/Intersection/Minus setting, click the And/Or field to select AND or OR from the list. Use AND if both conditions must be met. Use OR if either or both conditions can be met. For more information, see "Using And/Or Values in Advanced Searches."
To insert a search condition row, select a row and click Insert.
The new row is inserted above the selected row.
To delete a search condition row, select one or more rows and click Delete.
The selected rows are deleted.
If you do not use parentheses when defining your search, the search is processed giving precedence to AND values, that is, it processes all rows that end with AND before processing rows that end with OR. In other words, the first line is combined with the second and process order is based on the first line's AND/OR value.
For more information, see "Using And/Or Values in Advanced Searches."
Choose Custom Output Display... in the More.. button drop-down list to specify which fields to include in the search results and save the search, or click Run to run the search without saving it.
If you click Run, the search results window shows all the objects that match the search criteria.
If you choose Custom Output Display... in the More.. button drop-down list, the Display Fields, Results Range and Case Sensitive settings are displayed.
|
Note: In these setup steps, Case Sensitive is selected by default. |
Under Display Fields, select fields and use the right and left arrows to move fields to and from the Available Fields and Selected Fields lists. Double-clicking a field name also moves it from one list to the other list.
The Selected Fields list specifies the fields that will appear in the search results table. Use the up and down arrows to change the order of fields in the list, which reflects the order of the columns in the search results.
To sort the search results, in the Selected Fields list, click in the Sort column for the field by which you want to sort, and select a number from the drop-down list (for example, 1 means sort by this field first). You can sort by multiple fields; select a number in the Sort column for the each of the fields you want to use to sort. Click in the Direction column and select Ascending or Descending order.
To perform a case-sensitive search where text capitalization matters, make sure Case Sensitive is selected.
To perform a search where text capitalization does not matter, click to deselect Case Sensitive.
Selecting the Case Sensitive check box can help your search run more quickly. If you enter text in the Value field, the search looks for text that is an exact match (uppercase and lowercase letters). If you selected a value from a list (such as for Product Line), checking Case Sensitive allows Agile to use internal database settings to find objects more quickly.
When you have finished specifying output fields and sort order, click Run to run the search, or click Save to save it.
If you click Save, the Save in Folder dialog box appears.
Enter a name for the search. Then select a folder in which to store it. If you do not have sufficient privileges to save a search in the selected folder, you can select another. You can always save a search in the Personal Searches folder.
Click OK in the Save in Folder dialog box to save the search.
When you are ready to run the search, click Run in the search dialog box.
The search results window shows all the objects that match the search criteria. If there is more than one page, click the right arrow at the top of the window to display the next page.
To print the list of search results, click the Print button.
To edit the search after running it, do one of the following:
If you saved the search, on the Searches tab of the navigation pane, select the search, and click the View/Edit button.
If the Search Results window is open, click the View/Edit button in the Search Results window.
Where-used searches for file folders are specialized searches similar to "Relationship Searches" that find file folders that appear on the Attachments tabs of the objects defined in the search criteria.
In a file folder object search, the search conditions specify object attributes of the file folders you want to find; the file folder objects that match those search conditions are returned in the search results.
For example, the following search returns file folders that Mary Smith has checked out:
Table 8-18 Example: Object Search for File Folders
| Search setting | Specified as: |
|---|---|
|
Search for Object: |
File Folder |
|
Search Type: |
Object Search |
|
Search Condition: |
Title Block.Checkout User Equal to Mary Smith |
In a file folder where-used search, you select the object where the file folder is used, for example, Changes. This lets you specify search conditions that include change object attributes, in addition to search criteria that specify file folder attributes.
For example, the following search returns file folders that Mary Smith has checked out that appear on the Attachments tab of changes assigned to the Virgo product line.
Table 8-19 Example: Where-Used search for File Folders
| Search setting | Specified as: |
|---|---|
|
Search for Object: |
File Folder |
|
Search Type: |
Where Used Search |
|
With Related Content: |
Changes |
|
Search Condition: |
Title Block.Checkout User Equal to Mary Smith And Where Used.Changes.Cover Page.Product Line(s) Equal to Virgo |
For detailed information about defining searches, see "Advanced Searches."
|
Note: For file folder object searches, the latest checked-in file folder version that meets the search criteria is included in the search results table. For file folder searches that include search conditions based on version-specific properties, the search results table will include only checked-in versions of the file folder where the search condition is true.When a file folder is checked out, the pending version is enclosed in brackets in the Version list, for example [3]. Pending version [3] becomes a valid version only when the file folder is checked in. |
File folder objects (File Folder class objects and Design class objects) have multiple versions. When you create a file folder object search that include search conditions based on version-specific properties, the search results table will include a row for each version of a file folder object where the search condition is true. Therefore, the file folder search results table may list the same file folder object multiple times.
The following table lists the version-specific properties that automatically cause the search results to list a file folder object multiple times, regardless of whether the version-specific field appears in the search results table, as defined in the advanced search output display.
|
Note: These attributes are visible on the Title Block tab only if the Agile administrator has enabled them. They are typically enabled for Design objects. |
Table 8-20 File Folder object version-specific fields
| Version-specific file folder Title Block field | Description |
|---|---|
|
Label |
A design object version-specific text field which indicates a label identifier for the version. Users with the appropriate privileges can modify this field on any checked in or checked out version. |
|
Revision |
Version-specific text field which indicates the targeted Revision for the Design Version. |
|
Revision Date |
Version-specific date field which indicates a revision date for the Design Version. |
|
Version |
The version number. |
The search results table can also display an object multiple times depending on the Output Display as defined in an advanced search. For more information about the Output Display, see "C. Define a Custom Output Display, Web Client" and "C. Define a Custom Output Display, Java Client."
See also Chapter 12, "Working with Design Objects."
When you create a file folder search based on the file folder Lifecycle Phase attribute, the search results will include the latest checked-in file folder version where the search condition is true.
To display all checked-in versions where the Lifecycle Phase search condition is true:
Modify the output format to include the Title Page Version attribute.
For more information about the Output Display, see "C. Define a Custom Output Display, Web Client" and "C. Define a Custom Output Display, Java Client."
The search results will include all checked-in versions that meet the search criteria.
|
Note: For file folder object searches, the latest checked-in file folder version that meets the search criteria is included in the search results table. For file folder searches that include search conditions based on version-specific properties, the search results table will include only checked-in versions of the file folder where the search condition is true.When a file folder is checked out, the pending version is enclosed in brackets in the Version list, for example [3]. Pending version [3] becomes a valid version only when the file folder is checked in. |
Relationship searches are available for any class that has a Relationships tab, that is, all object classes except Action Items and Reports.
In a relationship search you select the related object type, for example, Changes. This lets you specify search conditions that include change object attributes, in addition to search criteria that specify the attributes of the searched-for object.
If the Relationships tab is visible for the searched-for object, you will be able to select this search type in the search definition dialog.
For example, the following search returns Non-Conformance Report (NCR) objects where the Severity field on the Cover Page tab of the NCR equals "Minor" and the NCR Relationships tab, Affected By table includes change order objects whose Cover Page tab, Change Analyst field lists Larry Jones as the change analyst.
Table 8-21 Example: Relationship search
| Search setting | Specified as: |
|---|---|
|
Search for Object: |
Non-Conformance Reports |
|
Search Type: |
Relationships |
|
With Related Content: |
Changes |
|
Search Condition: |
Cover Page. Severity Equal to Minor And Relationships.Change Orders.Cover Page.Change Analyst Equal to Larry Jones |
You set up an advanced search to find objects in relationship with each other that fit the criteria you specify in the search. See "Advanced Searches."
Relationship searches allow you to include attributes from the objects on the Relationships tab in your search criteria and to search by Relationship tab attributes including, but not limited to:
Rule – Null or Not Null – Determine if there is a rule
Criteria Met – Yes or No – Determine if the criteria defined in the rule has been met
Relationship Type – Affects, Affected By, Reference
You can select from the following relationship searches:
Table 8-22 Available relationship searches by object type
| For object classes: | Available relationship searches |
|---|---|
|
All object classes except Reports and Action Items. |
Relationships Search |
|
Programs (Agile PPM) |
Content Search |
|
File Folders |
Relationships Search Where Used Search |
|
Transfer Orders |
Relationships Search Selected Content Search |
Relationships Search lets you include attributes from the objects on the Relationships tab in your search criteria, including search criteria about rules and the relationship type>
(Affected By, Affects, or Reference).
Selected Content Search lets you include attributes from the objects on the Selected Content tab in your search criteria.
Content Search lets you include Relationships Search attributes and additional Agile PPM content attributes in your search criteria.
For detailed information about defining searches, see "Advanced Searches."
You can search on Users and User Groups. In Quick Search, you can select Users or User Groups as the base class guiding the system per the search-text. You can define a preconfigured parametric search for users and user groups. In Advanced Search, when you select Users or User Groups as the object to search for, the drop-down list in the Attribute (Web Client) or Field (Java Client) drop-down list is populated with object-specific attributes. As always, your roles and privileges govern what types of objects you can search for and also which objects you can open.
For more information about constructing advanced searches, see "Advanced Searches."
"Workflow Routings" introduced and described the workflow-based sample searches. This section elaborates on this area.
Agile comes with a large array of predefined search samples based on workflow attributes. These are designed to complete the majority of tasks for change analysts, observers, and approvers, but they can be used by any users if they are assigned the appropriate privileges.
|
Note: Your ability to use workflow attributes to create searches may be limited depending on the Agile Server licenses at your site, and which roles and privileges you have been granted. For more information, see your Agile administrator. |
These predefined workflow searches are also modifiable for use as templates. Building a search with workflow attributes is the same as building standard searches. However, you need to follow some special rules to build a successful search. For more information about building a search, begin with "Advanced Searches." For information about using workflow attributes in searches, see "Creating Grouped Conditions for Workflow Searches."
It is highly recommended that you save the predefined searches with a new name before you modify them. This way you will always have a template to work from if you need to start over.
You can search for changes by various attributes relating to the workflow in use for those changes. You can combine some workflow attributes with other workflow attributes in brackets to create a grouped condition, which further refines the way the workflow attributes work together.
In general, you can use the workflow attributes with other non-workflow attributes; however, not all the workflow attributes work together in a search with other workflow attributes, or with non-workflow attributes. If you have selected search attributes that cannot be used together, an error message is displayed. For information about creating grouped conditions, see "Creating Grouped Conditions for Workflow Searches."
The following tables display each workflow attribute, its operators, and the expected results of using it in a search. Use these tables to verify that the attributes you want to search will deliver the information you require. A table is included for each of the following workflow attributes:
Cover Page.Status
Workflow.Workflow Status
Workflow.Next Status
Workflow.Approver
Workflow.Observer
Workflow.Notify Users
Workflow.Signoff User
Workflow.Status Changed By
Workflow.Duration
Workflow.Approver Action or Workflow.Observer Action
|
Note: $CurrentStatus limits searches on workflow activities to the change's current workflow status. $User limits searches on users or user actions to the current user, that is, the user running the search. |
Cover Page.Status
Table 8-23 Cover Page.Status workflow attribute search results
| Match If operator | Value | The change found has these attributes |
|---|---|---|
|
In |
Any workflow status; any status type; Unassigned |
The specified status matches the current status on the Cover Page. |
|
Not In |
Any workflow status; any status type; Unassigned |
The specified status does not match the current status on the Cover Page. |
|
Is Null |
(None) |
The Cover Page.Status field is empty. |
|
Is Not Null |
(None) |
The Cover Page.Status field is not empty. |
Workflow.Workflow Status
Table 8-24 Workflow.Workflow Status workflow attribute search results
| Match If operator | Value | The change found has these attributes |
|---|---|---|
|
Equal To |
Any workflow status; any status type $CurrentStatus |
The specified status matches the current status of the change. |
|
Not Equal To |
Any workflow status; any status type $CurrentStatus |
The specified status does not match the current status of the change. |
Workflow.Next Status
Table 8-25 Workflow.Next Status workflow attribute search results
| Match If operator | Value | The change found has these attributes |
|---|---|---|
|
Equal To |
Any workflow status; any status type |
The specified status matches the next status of the change. |
|
Not Equal To |
Any workflow status; any status type |
The specified status does not match the next status of the change. |
Workflow.Approver
Table 8-26 Workflow.Approver workflow attribute search results
| Match If operator | Value | The change found has these attributes |
|---|---|---|
|
Contains |
One or more users or user groups from the address book; $User |
The specified user or user group is included in the list of approvers. |
|
Does Not Contain |
One or more users or user groups from the address book; $User |
Specified user or user group is not included in the list of approvers. |
|
Is Null |
(None) |
The approver list is empty. |
|
Is Not Null |
(None) |
The approver list is not empty; there is at least one user, department, or group on the list. |
Workflow.Observer
Table 8-27 Workflow.Observer workflow attribute search results
| Match If operator | Value | The change found has these attributes |
|---|---|---|
|
Contains |
One or more users or user groups from the address book; $User |
The specified user or user group is included in the list of observers. |
|
Does Not Contain |
One or more users or user groups from the address book; $User |
The specified user or user group is not included in the list of observers. |
|
Is Null |
(None) |
The observer list is empty. |
|
Is Not Null |
(None) |
The observer list is not empty; there is at least one user, department, or group on the list. |
Workflow.Notify Users
Table 8-28 Workflow.Notify Users workflow attribute search results
| Match If operator | Value | The change found has these attributes |
|---|---|---|
|
Contains |
One or more users or user groups from the address book; $User |
The specified user or user group is included in the list of persons to notify. |
|
Does Not Contain |
One or more users or user groups from the address book; $User |
The specified user or user group is not included in the list of persons to notify. |
|
Is Null |
(None) |
The Notify list is empty. |
|
Is Not Null |
(None) |
The Notify list is not empty; there is at least one user, department, or group on the list. |
Workflow.Signoff User
Table 8-29 Workflow.Notify User workflow attribute search results
| Match If operator | Value | The change found has these attributes |
|---|---|---|
|
Contains |
One or more usernames from the address book; $User |
The specified user performed the signoff action. |
|
Does Not Contain |
One or more usernames from the address book; $User |
The specified user did not perform any signoff action. |
|
Is Null |
(None) |
No users have performed any signoff actions. |
|
Is Not Null |
(None) |
At least one user has performed a signoff action. |
Workflow.Status Changed By
Table 8-30 Workflow.Status Changed By workflow attribute search results
| Match If operator | Value | The change found has these attributes |
|---|---|---|
|
In |
One username from the address book; $User |
The specified user caused the change to be moved out of this status. |
|
Not In |
One username from the address book; $User |
The specified user did not cause the change to be moved out of this status. |
|
Is Null |
(None) |
The change was autopromoted. |
|
Is Not Null |
(None) |
The change was manually promoted. |
Workflow.Duration
Workflow.Duration must be used with Cover Page.Status.
Workflow.Duration cannot be used with Cancel or Hold status types.
Table 8-31 Workflow.Duration workflow attribute search results
| Match If operator | Value | The change found has these attributes |
|---|---|---|
|
Number of hours. Any positive number; decimal point allowed. |
All numeric comparison operators: >, <, >=, <=, =, <> |
The change was moved to the specified status within the number of hours specified. Cannot be used with Cancel or Hold status types. |
Workflow.Approver Action or Workflow.Observer Action
When either Workflow.Approver Action or Workflow.Observer Action is used in a grouped condition with Workflow.Approver or Workflow.Observer, then the Workflow.Approve Action or Workflow.Observer Action attribute represents the action of the particular user specified by Worklfow.Approver or Workflow.Observer.
When Workflow.Approver Action or Workflow.Observer Action are not used in a grouped condition, then these attributes represent the actions taken by all the approvers and observers.
Table 8-32 Workflow.Approver Action and Workflow.Observer Action workflow attributes search results
| Match If operator | Value | The change found has these attributes |
|---|---|---|
|
Contains |
Awaiting Approval |
One or more approvers/observers have not signed off. |
|
Contains |
Approved |
One or more approvers/observers have approved. |
|
Contains |
Rejected |
One or more approvers/observers have rejected. |
|
Contains |
Returned |
One or more approvers'/observers' signoff request has been returned. |
|
Does Not Contain |
Awaiting Approval |
All approvers/observers have signed off. |
|
Does Not Contain |
Approved |
No approvers/observers have approved. |
|
Does Not Contain |
Rejected |
No approvers/observers have rejected. |
|
Does Not Contain |
Returned |
No approvers'/observers' signoff request has been returned. |
|
Equal To |
Awaiting Approval |
All selected approvers/observers have not signed off. |
|
Equal To |
Approved |
All selected approvers/observers have approved. |
|
Equal To |
Rejected |
All selected approvers/observers have rejected. |
|
Equal To |
Returned |
All selected approvers'/observers' signoff requests have been returned. |
|
Not Equal To |
Awaiting Approval |
Some selected approvers/observers have signed off. |
|
Not Equal To |
Approved |
Not all selected approvers/observers have approved. |
|
Not Equal To |
Rejected |
Not all selected approvers/observers have rejected. |
|
Not Equal To |
Returned |
Not all selected approvers'/observers' signoff requests have been returned. |
One of the powerful functions that you can use for a workflow search is grouped conditions. This option lets you build powerful search conditions based on certain pairs of workflow attributes. Grouped conditions are enclosed in brackets [ ].
For example, consider the following grouped condition:
[ Workflow.Workflow Status  Equal To  Status Type.Implemented    OR
  Workflow.Workflow Status  Equal To  Status Type.Released     ] AND
  Workflow.Status Changed   In        Sharon
This grouped condition finds all changes where the status type is either Implemented or Released and Sharon is the person who changed the status.
Use a grouped condition to refine a search based on workflow attributes. These three rules must be followed to create a grouped condition:
Two workflow attributes are used within a set of brackets.
The operator is set to And.
There are no non-workflow attributes used within the brackets.
To group two or more workflow attributes in Web Client:
In the row where you want to place an open bracket, select the option in the open parenthesis column.
In the row where you want to place a close bracket, select the option in the close parenthesis column.
Click the Grouping button and choose Add [ ] from the menu.
Brackets [ ] are placed around the group of workflow attributes.
To group two or more workflow attributes in Java Client:
Select the rows that you want to group in brackets.
Click a row to select it. The row is highlighted.
Use shift-click or Ctrl-click to select the last row of the group.
Click the [Group] button.
The brackets are placed around the rows selected.
To ungroup two or more workflow attributes in Web Client:
In the row where you want to remove an open bracket, select the option in the open parenthesis column.
In the row where you want to remove a close bracket, select the option in the close parenthesis column.
Click the Grouping button and choose Remove [ ] from the menu.
To ungroup two or more workflow attributes in Java Client:
Select the rows enclosed in brackets.
Click a row to select it. The row is highlighted.
Use Shift-click or Ctrl-click to select the second row.
Click the Remove ( ) button.
The brackets are removed.
The following fields qualify for grouped condition searches:
Cover Page.Status
Workflow.Duration
Workflow.Workflow Status
Workflow.Next Status
Workflow.Signoff User
Workflow.Approver when it is set to a valid user's name, and Workflow.Approver Action is set to Equal To or Not Equal To a specific action, and there are no non-workflow attributes within the brackets.
Workflow.Observer when it is set to a valid user's name and Workflow.Observer Action is set to Equal To or Not Equal To a specific action, and there are no non-workflow attributes within the brackets.
When used in a grouped condition, the workflow attribute that pertains to observers or approvers is set to Contains and the operator for the second workflow attribute is set to either Equal To or Not Equal To, the grouped condition is evaluated in respect to only that specific approver or observer.
If one of the workflow attributes in a grouped condition pertains to a status, and specifies a specific status, then the remaining workflow attributes in the grouped condition are evaluated in respect to only that specific status. For example:
Search 1:
Find all changes where Cathy is an approver and she has approved that change. The approval action applies specifically to Cathy. The use of brackets makes this a grouped condition:
[ Workflow.Approver          Contains  Cathy Agile   AND
  Workflow.Approver Action   Equal To  Approved    ]
Search 2:
Find all changes where Cathy is an approver and all approvers have approved that change. The approval action applies generally to all the approvers.
|
Note: This specific search does not work and it should be taken as a sample for this discussion. |
There are no brackets; this is not a grouped condition:
  Workflow.Approver          Contains  Cathy Agile   AND
  Workflow.Approver Action   Equal To  Approved
In Web Client, grouping is available whenever the open parenthesis and close parenthesis options have been selected to enclose multiple search conditions. Click the Grouping button and choose Add [ ] from the menu to enclose the selected search conditions in brackets [ ]. If the selected search conditions constitute a valid grouped condition, Web Client adds brackets. If the selected search conditions do not constitute a valid grouped condition, the Grouping button Add [ ] menu selection is disabled (grayed).
In Java Client, grouping is available whenever multiple search conditions are selected. If the Group button is disabled (grayed) the selected search conditions do not constitute a valid grouped condition. Click the Group button to enclose the selected search conditions in brackets [ ]. If the selected search conditions enclosed in brackets do not constitute a valid grouped condition, you see an error message when you run or save the search.
Workflow attributes grouped within a set of brackets can be used with other search conditions within a single search.
When non-workflow attributes appear in parentheses along with workflow attributes, parentheses are considered precedences rather than a grouped condition. For example:
( Workflow.Signoff User        Contains   Ann Agile        AND
  Cover Page.Change Category   Equal To   Quick Phase-In ) OR
  Cover Page.Product Line(s)   Contains   Scorpio
In Web Client, when you attempt to save searches with illegal grouped conditions, Web Client disables the Add [ ] Grouping option.
In Java Client, when you attempt to define searches with illegal grouped conditions, Java Client disables the Group button.
In some cases, when you attempt to save a search, you may see an error message. If you do, edit your search to correct the error and then save the search again.
Additional restrictions apply to the use of workflow attributes:
Nested brackets are not supported. You may not include a grouped condition inside the brackets of another grouped condition. (You can, however, use a bracketed grouped condition inside a set of parentheses with other non-workflow search conditions.)
Each workflow attribute can be used only once within a grouped condition within a set of brackets. For instance, you may not use Workflow.Signoff User twice in the same set of brackets.
Workflow.Approver, Workflow.Observer, Workflow.Notify Users and Workflow.Signoff User may not be used in the same grouped condition.
Workflow.Approver Action and Workflow.Observer Action may not be used in the same grouped condition.
Workflow.Duration can be used only in a grouped condition within a set of brackets that contains only Workflow.Workflow Status with an operator of Equal To.
Workflow.Workflow Status can be used only along with another workflow attribute within a grouped condition.
Workflow.Status Changed By can be used only with Workflow.Workflow Status within a grouped condition.
Non-workflow attributes cannot be used in a grouped condition, although they may be used with workflow attributes when enclosed in parentheses.
The Match If logical operator Or cannot be used in a grouped condition.
If Workflow.Approver Action or Workflow.Observer Action is used in a grouped condition with Workflow.Signoff User, then the Match If operator for Workflow.Approver Action or Workflow.Observer Action must be Equal To or Not Equal To, and the Match If operator for Workflow.Signoff User must be Contains.
When you search for a specific user for Workflow.Approver, Workflow.Observer, or Workflow.Notify Users, if that user is the member of a group or department, the search also returns changes where the group or department is an approver, observer, or user to notify. For example, if Mary is a member of the Libra Project group, searching for changes where Mary is an approver also returns changes that list the Libra Project group as an approver.
If you have sufficient privileges, you can rename, delete, and rearrange both searches and the folders, even some default system searches.
The following table lists and describes the buttons in the Searches section of the FOLDERS drawer in the navigation pane.
Table 8-33 Searches toolbar buttons, Web Client
| Button | Description |
|---|---|
|
|
Expands all the search folders in the navigation pane to display all available searches. |
|
|
Collapses all the search folders in the navigation pane. |
|
|
Opens the Organize Searches window. |
In addition, the name of each search in the Searches section of the FOLDERS drawer in the navigation pane is preceded by two icon buttons.
Table 8-34 Search list icon buttons, Web Client
| Button | Description |
|---|---|
|
|
Runs the search and displays the search results in the content pane. You can also run the search by clicking the name of the search in the Searches section of the FOLDERS drawer in the navigation pane. |
|
|
Opens the search control panel in the content pane without running the search. You can now edit the search criteria. See "Editing a Search in Web Client." |
When you select a search in Java Client, most of the buttons on the Search toolbar in the left pane are enabled; additional functions are enabled on the right-click menu.
The following table lists and describes the buttons used in the Search toolbar in Java Client.
Table 8-35 Search toolbar buttons, Java Client
| Button | Name | Description |
|---|---|---|
|
|
New |
Adds a new search folder within the current folder (you can select another folder in the Save In Folder dialog). Available in both Search toolbar and right-click menu. |
|
|
Edit Search Right-click menu only |
Opens the selected search in edit mode. Available in Right-click menu only. |
|
|
Save As Right-click menu only |
Saves the selected search, with standard Save As dialog box that prompts for a file name and directory. Available in right-click menu only. |
|
|
Rename |
Lets you rename the selected search (all searches) or the selected user-defined subfolder. Available in both Search toolbar and Right-click menu. |
|
|
Move To Folder |
Moves the selected search or subfolder to the folder you specify. Available in both Search toolbar and right-click menu. |
|
|
Delete |
Removes the selected user-created search or user-created subfolder. Available in both Search toolbar and Right-click menu. |
|
|
Organize Search Right-click menu only when the top Search folder is selected. |
Opens the Organize Search dialog which lets you
Available in right-click menu only. |
|
|
Expand All Available only when the top Search folder is selected. |
When the Searches folder is highlighted, expands all the subfolders. Available in both Search toolbar and Right-click menu |
|
|
Collapse All Available only when the top Search folder is selected. |
When the Searches folder is highlighted, collapses all the subfolders. Available in both Search toolbar and right-click menu |
|
|
Refresh Left Panel Tree |
Refreshes the navigation pane of Java Client's user interface |
Searches can be organized in the Organize Searches window.
To open the Organize Searches window in Web Client:
In the FOLDERS drawer in the navigation pane, click the Organize Searches icon.
The Organize Searches window opens.
To open the Organize Search window in Java Client:
Select the Searches folder at the top of the Search tab in the left navigation pane.
Right-click and choose Organize Search in the menu.
The Organize Search window opens.
Use the features in the Web Client Organize Searches window to create or remove folders, rename or remove searches, and sort and move folders and searches.
Table 8-36 Web Client Organize Searches window actions and buttons
| Web Client Button | Description |
|---|---|
|
Create Folder |
Adds a new search folder within the selected folder. |
|
Remove |
Removes the selected searches and search folders. |
|
Order |
Alphabetically reorder the searches in the selected folder. Menu choice are A to Z and Z to A. |
|
Expand All |
Expands all folders, sub-folders and searches. |
|
Collapse All |
Collapses all folders, sub-folders and searches. |
|
(double-click to edit name) |
Opens a text box to rename the selected search or search folder. |
|
(drag and drop) |
Lets you reorder searches and search folders. As you drag the search or folder, the displayed icon indicates the drop action:
|
|
Save |
Save the modifications you made in the Organize Searches window. |
|
Cancel |
Discards the modifications you made in the Organize Searches window and closes the window. |
|
Close |
Closes the Organize Searches window. |
Use the features in the Java Client Organize Searches window to create or remove folders, rename or remove searches, and sort and move folders and searches.
Table 8-37 Java Client Organize Searches window, actions and buttons
| Java Client Button | Description |
|---|---|
|
Remove |
Removes the selected searches and search folders. |
|
Rename |
Renames the selected search or search folder. |
|
Add New Folder |
Adds a new search folder within the current folder. |
|
(drag and drop) |
Lets you reorder searches and search folders. |
|
Save |
Saves the modifications you made in the Organize Searches window. |
|
Cancel |
Discards the modifications you made in the Organize Searches window and closes the window. |
When you edit a search, you are changing the combination of conditions Agile PLM looks for. You might want to edit a search to either broaden or narrow the scope of the search or change the output fields.
Whether a search is editable depends on your privileges.
When editing a search you can:
Alter the values of search criteria
Add conditions to the search condition table
Insert conditions into the interior of the search condition table
Delete conditions from the search conditions table
Substitute an And for an Or and vice versa
Add or remove output columns in search results
Modify the sort order of search results
To edit a search in Web Client:
In the FOLDERS drawer in the navigation pane, navigate to the search you want to edit.
Click the Edit search criteria icon button to the left of the name of the search you want to edit.
The search control pane is displayed in the content pane. The search is not executed, therefore the Search Results table is empty.
To edit the output columns or the sort order, from the Format button to display and modify the Sort and Format settings palette. Modify the setting and click Apply. Click Close to close the palette.
To edit search conditions, follow the steps in "Advanced Searches" or "Where-Used Searches for Items" to edit the search.
For a Basic search, modify the Match If search operators and value fields. Click Advanced to convert the search to an Advanced search.
For an Advanced search, to add a search condition, click the Add icon at the end of the row. To remove a search condition, click Remove icon at the end of the row.
When you are finished, use the Save button menu and choose Save. The search is saved and Agile PLM runs the search and displays the search results below the search control pane.
Or, use the Save button menu and choose Save As. You are prompted to enter a search name and specify a folder in which to save it. The search is saved and Agile PLM runs the search and displays the search results in the content pane. At the top of the search results table, click the Expand icon to view the search control pane. Click the Collapse icon to collapse and hide the search control pane.
To edit a search in Java Client:
In the Search folder, navigate to the search you want to edit.
Select the search, right-click and choose Edit Search in the menu.
To edit search conditions, click the row you want to edit. To edit the search, follow the steps in "Creating an Advanced Search in Java Client," or "Where-Used Searches for Items."
To delete a condition, select the row you want to delete, and click Delete.
When you are finished, click Save.
|
Note: If the search results window is open, click the View/Edit button in the search results window, and edit the search. |
You can rename a saved search to better indicate the type of objects the search is designed to locate.
To rename a search in Web Client:
In the FOLDERS drawer in the navigation pane, click the Organize Searches icon.
In the Organize Searches window navigate to the search you want to rename.
|
Note: Your assigned roles and privileges control which searches and folders you can rename. You can always rename searches and folders in your Personal Searches folder. |
Double-click the search name to edit it.
In the text field, enter a new name and press the Return key.
When you are finished, click Save.
To rename a search in Java Client Search tab:
In the Search tab, select the search you want to rename.
Right-click and select Rename in the menu.
In the dialog, enter a name for the folder and click OK.
To rename a search in Java Client Organize Searches window:
Select the Searches folder, right-click and choose Organize Search in the menu.
In the Organize Search window navigate to the search you want to rename and select it.
|
Note: Your assigned roles and privileges control which searches and folders you can rename. You can always rename searches and folders in your Personal Searches folder. |
Click the Rename button.
Edit the name of the search in the Enter Name field.
Click OK.
When you are finished, click Save.
In Web Client, you can delete a search from the Organize Searches page.
In Java Client, you can delete a search on the Searches tab if you have the appropriate privileges for that search.
To remove a search in Web Client:
In the FOLDERS drawer in the navigation pane, click the Organize Searches icon.
In the Organize Searches window navigate to the search you want to remove and select it.
|
Note: Your assigned roles and privileges control which searches you can remove. You can always remove searches and folders in your Personal Searches folder. |
Click the Remove button.
To remove a search in Java Client Search tab:
In the Search tab, select the search you want to delete.
Right-click and select Delete in the menu.
When the confirmation prompt appears, click Yes.
The search is deleted.
To remove a search in Java Client Organize Search window:
Select the Searches folder, right-click and choose Organize Search in the menu.
In the Organize Search window navigate to the search you want to remove and select it.
|
Note: Your assigned roles and privileges control which searches and folders you can remove. You can always remove searches and folders in your Personal Searches folder. |
Click the Remove button.
When you are finished, click Save.
You can organize your bookmarks in folders to make them easier to locate and manage. You can use the existing folders or create new ones.
To create a search folder in Web Client:
In the FOLDERS drawer in the navigation pane, click the Organize Searches icon.
In the Organize Searches window navigate to the folder in which you want to create a new folder.
|
Note: Your assigned roles and privileges control the folders in which you can create new subfolders. You can always add folders in your Personal Searches folder. |
Click the Create Folder button.
In the text field, enter a new name and press the Return key.
When you are finished, click Save.
To close the Organize Searches window, click Close.
To create a search folder in Java Client Search tab:
In the Search tab, select the folder in which you want to create a new folder.
Right-click and choose New Folder in the menu.
In the Folder Name field, enter a name for the folder and click OK.
To create a search folder in Java Client in the Organize Search window:
Select the Searches folder, right-click and choose Organize Search in the menu.
In the Organize Search window navigate to the folder in which you want to create a new folder.
|
Note: Your assigned roles and privileges control the folders in which you can create new subfolders. You can always add folders in your Personal Searches folder. |
In the Folder Name field, enter a new name.
Click OK.
When you are finished, click Save.
You can remove or delete a folder, even if it is not empty.
To remove a search or folder in Web Client:
In the FOLDERS drawer in the navigation pane, click the Organize Searches icon.
In the Organize Searches window navigate to the folder you want to remove and select it.
|
Note: Your assigned roles and privileges control which folders you can remove. You can always remove searches and folders in your Personal Searches folder. |
Click the Remove button.
When you are finished, click Save.
To close the Organize Searches window, click Close.
To remove a folder in Java Client Search tab:
In the Search tab, select the folder you want to delete.
Right-click and choose Delete in the menu.
When the confirmation prompt appears, click Yes.
The folder and its contents are deleted.
To remove a folder in Java Client Organize Search window:
Select the Searches folder, right-click and choose Organize Search in the menu.
In the Organize Search window, navigate to the folder you want to remove and select it.
|
Note: Your assigned roles and privileges control which folders you can remove. You can always remove searches and folders in your Personal Searches folder. |
Click the Remove button.
When you are finished, click Save.
To rename a search in Web Client:
In the FOLDERS drawer in the navigation pane, click the Organize Searches icon.
In the Organize Searches window navigate to the search you want to rename.
|
Note: Your assigned roles and privileges control which folders you can rename. You can always rename searches and folders in your Personal Searches folder. |
Double-click the search name.
In the text field, enter a new name and press the Return key.
When you are finished, click Save.
To close the Organize Searches window, click Close
To rename a folder in Java Client Search tab:
In the Search tab, select the folder you want to rename.
Right-click and select Rename in the menu.
In the Enter Name field, enter a name for the folder.
Click OK.
To rename a search in Java Client Organize Searches window:
Select the Searches folder, right-click and choose Organize Search in the menu.
In the Organize Search window navigate to the search you want to rename and select it.
|
Note: Your assigned roles and privileges control which searches and folders you can rename. You can always rename searches and folders in your Personal Searches folder. |
Click the Rename button.
In the Enter Name field, enter a name for the folder.
Click OK.
When you are finished, click Save.
To move a search or a search folder into another folder in Web Client:
In the FOLDERS drawer in the navigation pane, click the Organize Searches icon.
In the Organize Searches window, navigate to the search or folder that you want to move. To expand a folder, click its Expand icon.
Click the folder or search to select it.
Drag the folder or search to its new location and drop it onto a folder or a search.
As shown in "The Web Client Organize Searches Window," the green arrow icons indicate the drop location for the dropped search or folder:
Above the indicated folder.
Into the indicated folder.
Below the indicated folder
When you are finished, click Save.
To close the Organize Searches window, click Close.
To use the Search window buttons to move a search or a search folder into another folder in Java Client:
Select the Searches folder, right-click and choose Organize Search in the menu.
In the Organize Search window, navigate to the folder or search you want to move.
Click the folder or search to select it.
Drag the folder or search to its new location and drop it onto:
Highlighted folder – the dropped folder or search is moved into the highlighted folder.
Gray line between two names in the list of searches and folders – the dropped folder or search is moved to that location in the list.
When you are finished, click Save.
You can generate quick access URLs that provide direct pointers to either Agile objects or to Agile attachment files.
These quick access URLs can be pasted into other applications or files such as spreadsheet files, word processing files, a company Intranet web page or WIKI page, or into an email.
For information about quick access to searches using search quick access Smart URLs, see:
For information about quick access to Agile objects using quick access URLs, see:
For information about quick access to attachment files using attachment quick access URLs, see:
The Agile Smart Object URL feature is designed to enable effective collaboration through email, spreadsheets, documents, WIKIs, and so forth. Users or automated tools can generate smart readable URLs that point to a specific object or attachment file in Agile PLM. See "Formats for User-Generated Smart Object URLs" and "Smart URL Quick Access to Files."
In addition, you can use the Smart Object URL feature to directly open a search dialog in Agile PLM Web Client. You can define a Smart URL for searches that can:
Run a Quick search and display the quick search results in Agile PLM. See "Quick Search Smart Object URL Examples."
Open a Basic (or Parametric) search dialog that specifies the object type for the search. When the basic search dialog is displayed, then you can begin defining the search conditions. See "Basic Search Smart Object URL Examples."
Open an Advanced search dialog that specifies the object type for the search. When the advanced search dialog is displayed, then you can begin defining the search conditions. See "Advanced Search Smart Object URL Examples."
Run a Saved search and display the search results. You can specify either a global saved search or a personal saved search. See "Saved Search Smart Object URL Examples."
Automated tools can also use this format to generate object URLs.
Smart Object Search URLs open search dialogs in Agile PLM Web Client.
Smart object search URLs use the following formats
http://server:port/VirtualPath/object/search/<SearchType>/[<BaseClass>]/[<ObjectType>]/[<search-condition>]http://server:port/VirtualPath/object/search/<SearchType>/[<BaseClass>]/[<ObjectType>]/http:/server:port/VirtualPath/object/search/<SearchType>/<SearchFolder>/<SavedSearch>where the URL has the following representation:
Table 8-38 Smart Object Search URL parameters
| Parameter | Description |
|---|---|
|
server port VirtualPat |
Server, port, and VirtualPath identify the Agile PLM instance |
|
object |
The text "object" indicates to Agile PLM that the URL is an object URL. |
|
search |
The text "search" indicates to Agile PLM that the Smart URL opens a search. |
|
SearchType |
Specifies the trype of search to open. Choices are: quick, basic, advanced, or saved. |
|
BaseClass |
The base class you wish to specify for the Smart URL search. |
|
ObjectType |
The class or subclass you wish to specify for the Smart URL search. If you specify an ObjectType, then you must also specify a BaseClass. |
|
search condition |
For Smart URL Quick search only: Enter the text string to use in the quick search. |
|
SearchFolder |
For Smart URL Saved Search only: Enter the name of the folder that contains the saved search to be opened. |
|
SearchName |
For Smart URL Saved search only: Enter the name of the saved search to be opened. |
http://server:port/VirtualPath/object/search/quick/<BaseClass>/<ObjectType>/search_condition_textOpens a browser window, displaying the quick search results. To display search results, you must specify the base class, the object type, and a search condition text string. If you omit parameters the search condition, object type or base class in the URL, Agile PLM displays Web Client with the quick search field selected and highlighted. You can immediately begin to type the search condition text.
Examples:
http://server:port/VirtualPath/object/search/quick/Items/Parts/greenSearches for part objects with the search condition green, and displays the search results in the Web Client search results page.
http://server:port/VirtualPath/object/search/quick/Items/Parts/Displays Web Client content pane with quick search field selected and highlighted. Enter the search condition text. The search is limited to the object type specified in the URL, in this example, Parts.
http://server:port/VirtualPath/object/search/quick/Items/Parts/greenDisplays Web Client content pane with quick search field selected and highlighted. Enter the search condition text. The search is limited to the base class specified in the URL, in this example, Items.
http://server:port/VirtualPath/object/search/quick/Displays Web Client window with quick search field selected and highlighted. Enter the search condition text. A quick search of All object types is performed.
http://server:port/VirtualPath/object/search/basic/<BaseClass>/<ObjectType>/Displays the Basic search window. The specified base class and object type are preselected in the search pane. Begin to define any parametric search attributes.
|
Note: The Agile administrator determines which attributes appear in the list of parametric criteria in the basic search window. For more information, see Agile PLM Administrator Guide. |
Examples:
http://server:port/VirtualPath/object/search/basic/<BaseClass>/<ObjectType>/Displays the Basic search window. The specified base class and object are preselected in the search pane. Define the desired parametric search attributes.
http: //server:port/VirtualPath/object/search/basic/<BaseClass>/Displays the Basic search window. The specified base class is preselected in the search pane. If needed, select an object type. Define the desired parametric search attributes.
http: //server:port/VirtualPath/object/search/basic/Displays the Basic search window. The default base class is selected in the search pane. If needed, select a base class and object type. Define the desired parametric search attributes.
http://server:port/VirtualPath/object/search/advanced/<BaseClass>/<ObjectType>/Displays the Basic search window. The specified base class and object type are preselected in the search pane. Begin to define any parametric search attributes.
Examples:
http: //server:port/VirtualPath/object/search/advanced/<BaseClass>/<ObjectType>/Displays the Advanced search window. The specified base class and object are preselected in the search pane. Define the desired search criteria.
http: //server:port/VirtualPath/object/search/advanced/<BaseClass>/Displays the Advanced search window. The specified base class is preselected in the search pane. If needed, select an object type. Define the desired search criteria.
http: //server:port/VirtualPath/object/search/advanced/Displays the Advanced search window. The default base class is selected in the search pane. If needed, select a base class and object type. Define the desired search criteria.
http://server:port/VirtualPath/object/search/saved/<SearchFolder>/<SavedSearch>Displays the specified saved search and the search results in the search window. You can specify either a global saved search, or a personal saved search.
You must specify both the search folder name and the saved search name. These two parameters (folder name and search name) comprise the unique identifier for the saved search.
|
Note: In the case where one or more saved searches in the Agile PLM database have the same unique identifier (the same folder name and the same saved search name), then Agile PLM uses the saved search that was created first. Folder and search names are case-sensitive. |
For example, Bob has organized his personal saved searches in several subfolders in his Personal Searches folder. Bob collaborates with Sally by sending her a Smart Object URL for one of his personal searches:
http://server:port/VirtualPath/object/search/saved/Taurus Project/Taurus Mechanical Parts/When Sally clicks the Smart URL, the search results of Bob's saved search is displayed in Sally's Agile PLM window.
Examples:
http: //server:port/VirtualPath/object/search/saved//Workflow Searches/Changes that I am as Approver of/Displays the search results window of the specified global search.
http: //server:port/VirtualPath/object/search/saved/Sally Personal Searches/Sally Saved Search/Displays the search results window of the specified personal search.


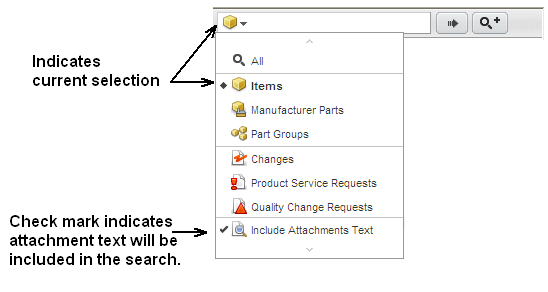


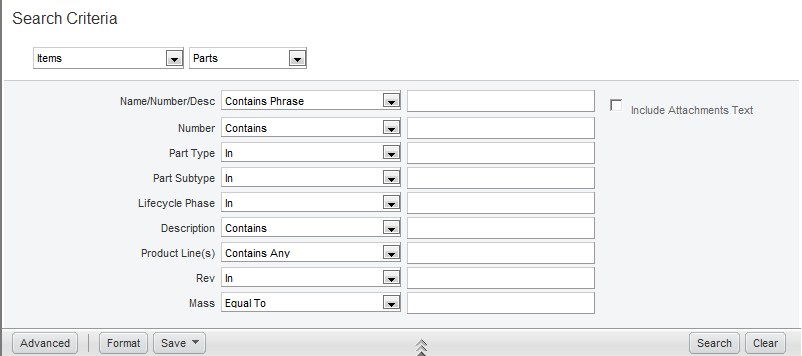
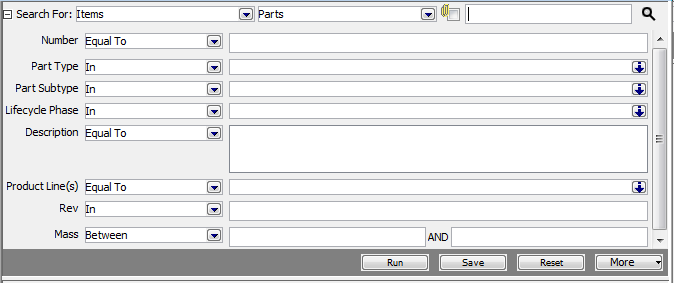
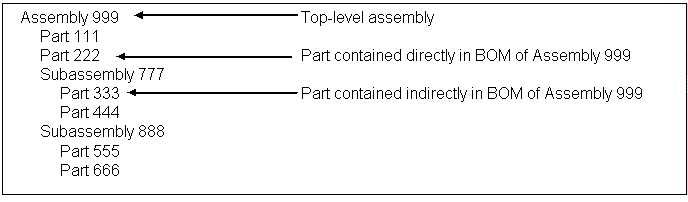
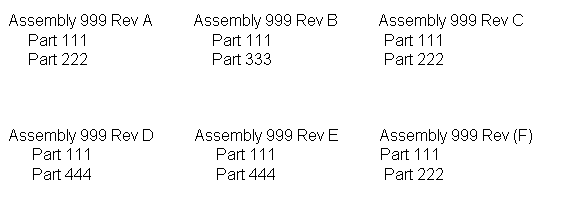
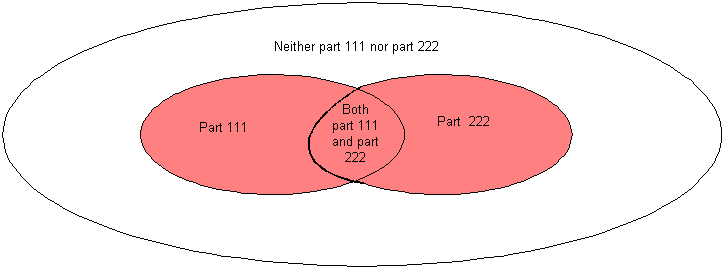
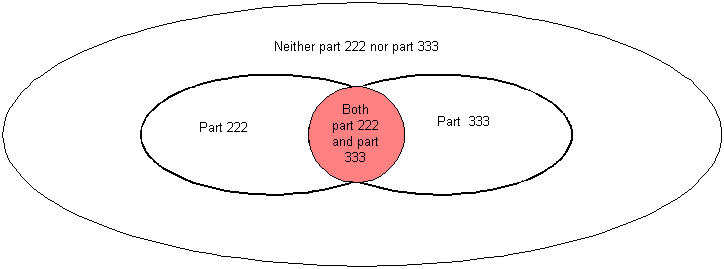
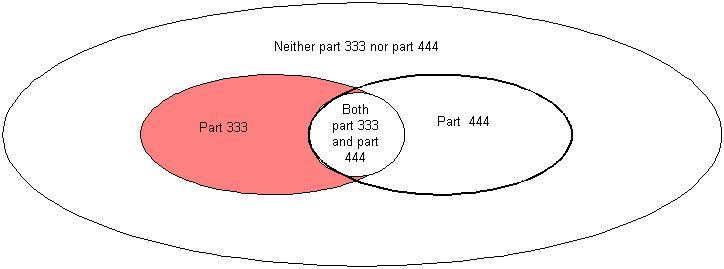
 Expand All
 Collapse All
 Organize Searches
 Search


 Drop above the indicated folder.
 Drop into the indicated folder.
 Drop below the indicated folder