5 Servicing FRUs
The following topics describe how to service field-replaceable units (FRUs) for the Oracle Database Appliance. You must power down the system and disconnect the AC power cords from the server before servicing any of these components.
Only Oracle authorized service personnel should service FRU components.
Servicing Oracle Database Appliance X6-2 Series FRUs
This section describes how to service server node FRUs for Oracle Database Appliance X6-2 series. If you have Oracle Database Appliance X3-2, Oracle Database Appliance X4-2, or Oracle Database Appliance X5-2, go to Preparing Oracle Database Appliance X3-2/X4-2/X5-2 for Service. If you have Oracle Database Appliance Version 1, go to Servicing Oracle Database Appliance Version 1 FRUs.
Only Oracle authorized service personnel should service FRU components.
Note:
Most of the links in the following table take you to instructions outside of the Oracle Database Appliance library to the Oracle Server X6-2 and Oracle Server X6-2L (including Storage Server X6-2 Extreme Flash version) documentation libraries. Use your browser's Back button to return to the Oracle Database Appliance library.| Oracle Database Appliance X6-2S/X6-2M | Oracle Database Appliance X6-2L | Oracle Database Appliance X6-2-HA |
|---|---|---|
|
Servicing the Oracle PCIe NVMe Switch Card (FRU)
Note - For this product, the NVMe Switch Card is located in Slot 2. |
Servicing the Oracle PCIe NVMe Switch Card (FRU)
Note - For this product, the NVMe Switch Cards are located in Slots 2, 5 and 6. |
This product does not have a PCIe NVMe Switch Card. |
|
Installing the Rear Storage Drive Backplane (FRU)
Note - For this product, there is a single SAS cable that connects directly from the PCIe HBA in slot 3 to the rear storage drive backplane. It does not route through the chassis mid-wall. |
||
|
This product does not include a slot for a DVD drive. |
||
|
Replace the Internal SAS HBA Cables
Note - For this product, there is a single SAS cable that connects directly from the PCIe HBA in slot 3 to the rear storage drive backplane. It does not route through the chassis mid-wall. |
||
|
Servicing the NVMe Cables (FRU)
Note - The NVMe Switch Card is located in PCIe slot 2 for this product. |
Servicing the NVMe Cables (FRU)
Note - The NVMe Switch Cards are located in PCIe slots 2, 5 and 6 for this product. |
This product does not have NVMe devices. |
|
For this product, cabling for Front Indicator Modules and the disk backplanes are included as part of the FRU servicing procedure for those components listed earlier in this table. |
||
Servicing the Internal SAS Host Bus Adapter (HBA) (FRU)
This section describes servicing the internal Oracle Storage 12 Gb/s SAS PCIe RAID HBA in an Oracle Database Appliance X6-2L system.
Replace the Internal SAS HBA Card
Caution:
Ensure that all power is removed from the server before removing or installing PCIe cards. You must disconnect all power cables from the system before performing these procedures.- Prepare the server for service.
Refer to Preparing Oracle Database Appliance X6-2 Series for Service for additional details.
- Power off the server and disconnect the power cords from the power supplies.
- Extend the server to the maintenance position.
- Attach an antistatic wrist strap.
- Remove the server top cover.
- Remove the super capacitor from the chassis.
- Grasp both ends of the cable connector, press in on the release latch, and then unplug the connector [1].
The HBA super capacitor is secured to the air baffle by a recloseable fastener, which allows it to be easily removed and replaced.
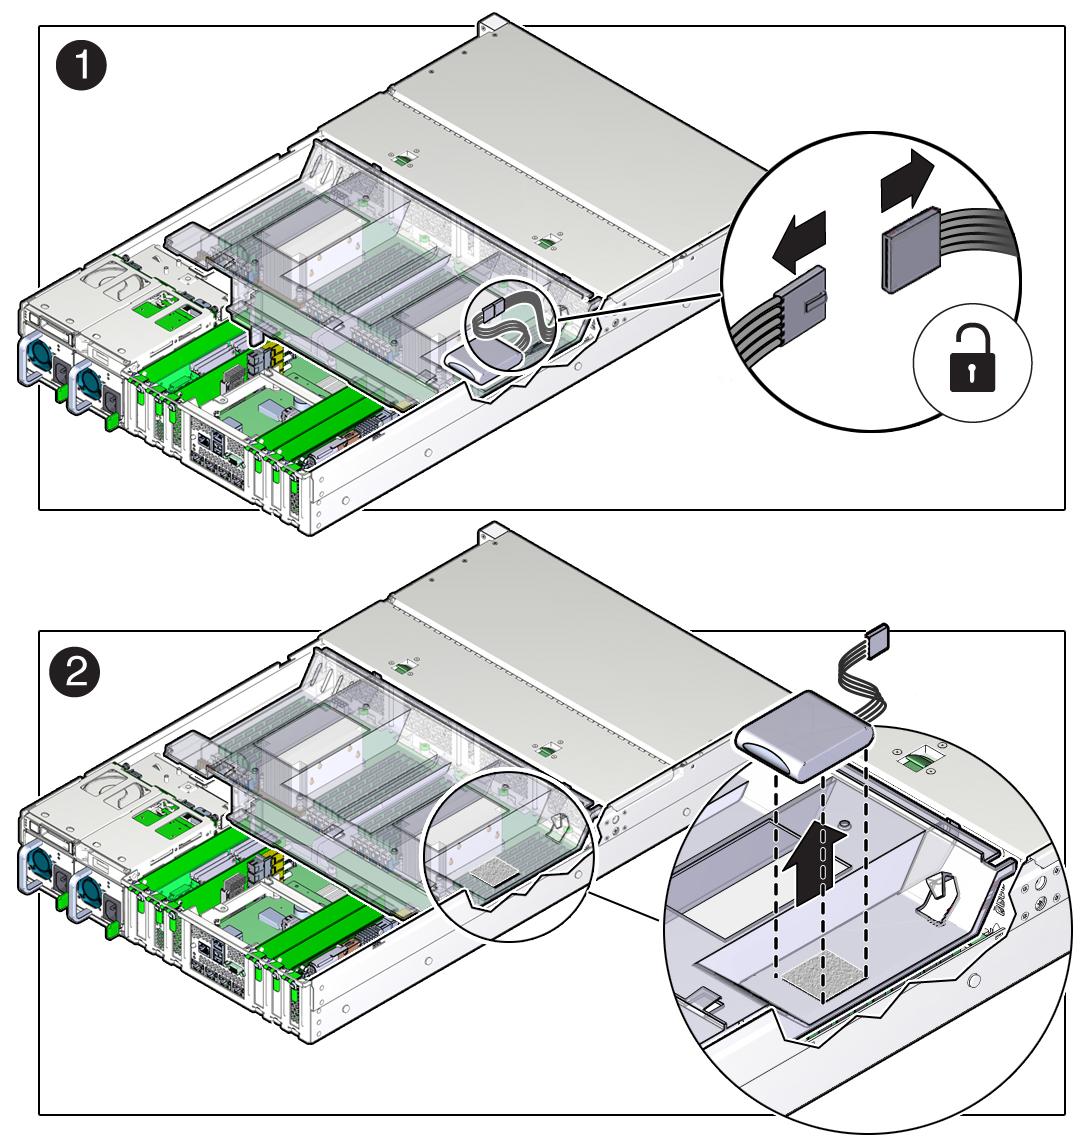
- To separate the HBA super capacitor from the air baffle, place your finger under the rear of the super capacitor and lift up [2].
- Grasp both ends of the cable connector, press in on the release latch, and then unplug the connector [1].
- Swivel the air baffle into the upright position to allow access to the super capacitor cable and the SAS HBA card.
- Rotate the PCIe card locking mechanism, and then lift up on the PCIe HBA card to disengage it from the motherboard connectors [1].
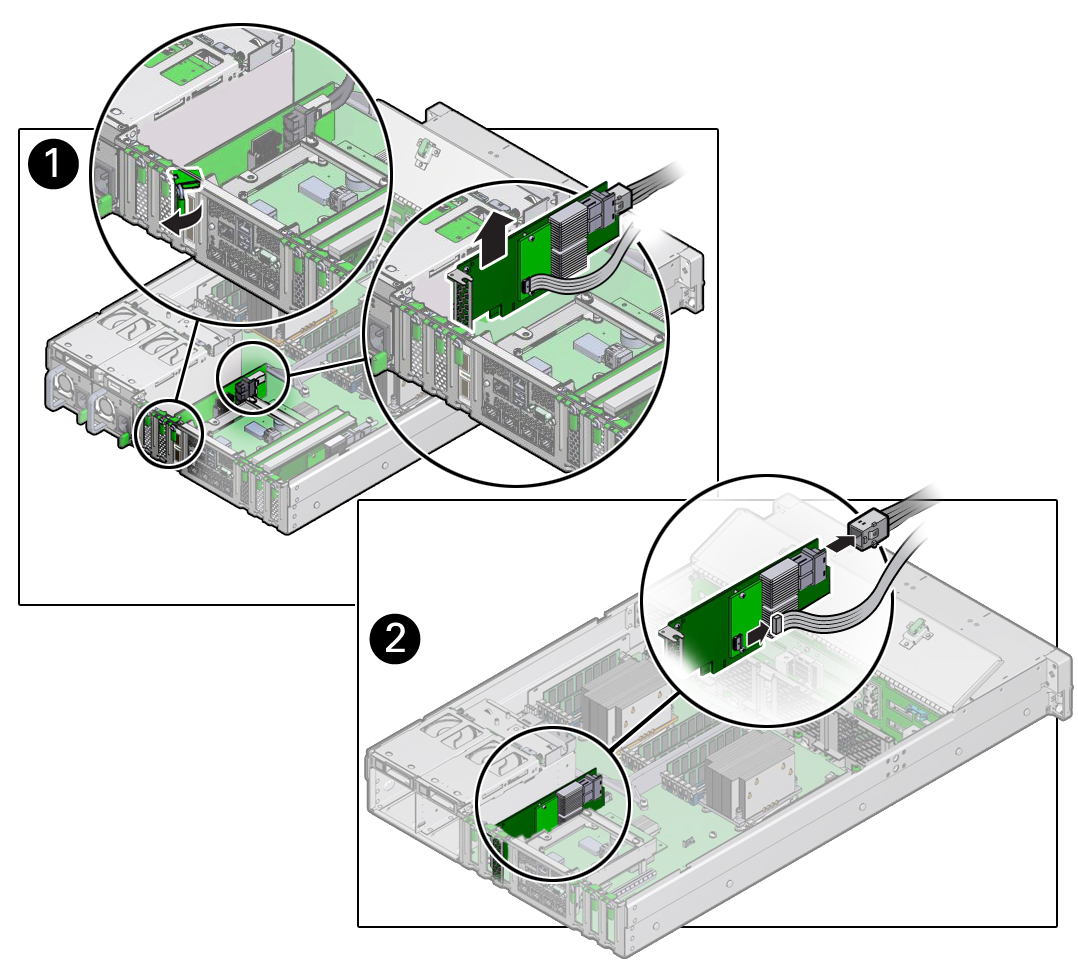
- Disconnect the super capacitor cable and the SAS cables from the SAS HBA card [1].
- Remove the SAS HBA card from the chassis [2].
- Remove super capacitor cable from the chassis.
The super capacitor cable is routed along the left side of the chassis (when facing the front of the system).
- Unpack the replacement Oracle Storage 12 Gb/s SAS PCIe RAID HBA card and super capacitor, and place them on an antistatic mat.
- If it isn't already, swivel the air baffle into the upright position and install the super capacitor cable along the left side of the chassis and into its access hole in the air baffle.
Install the super capacitor cable along the left side of the chassis (when facing the front of the system). Thread the cable connector through the hole on the bottom of the air baffle to where the super capacitor will be installed. Check to ensure it does not interfere with the air baffle when it closes.
- Connect the super capacitor cable to the SAS HBA card, and then reconnect the SAS cables that you unplugged during the removal procedure [1].
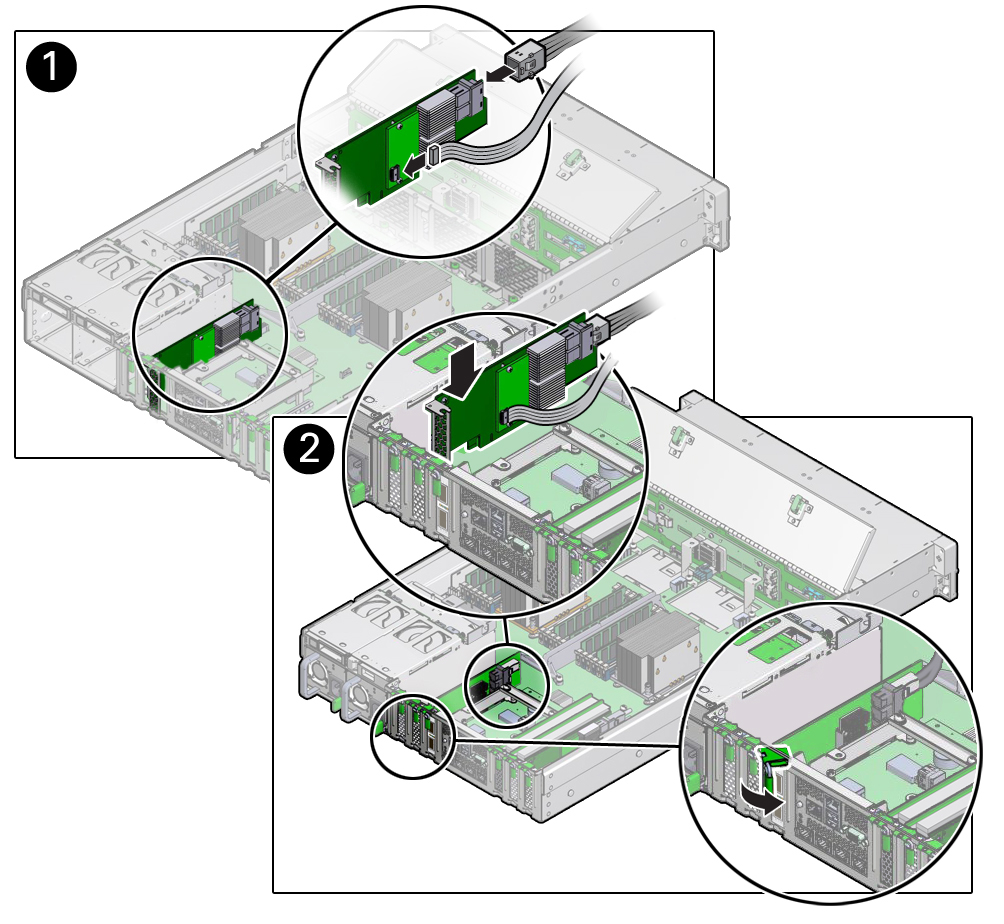
- Insert the SAS HBA card into PCIe slot 3 [2], and rotate the PCIe locking mechanism to secure the PCIe HBA card in place [1].
Note:
PCIe slot 3 is the reserved slot for the Oracle Storage 12 Gb/s SAS PCIe RAID HBA card. - Install the super capacitor in the chassis.
- Lower the air baffle to the installed position.
- Align the recloseable fastener on the super capacitor with the recloseable fastener on the air baffle and press down [1].
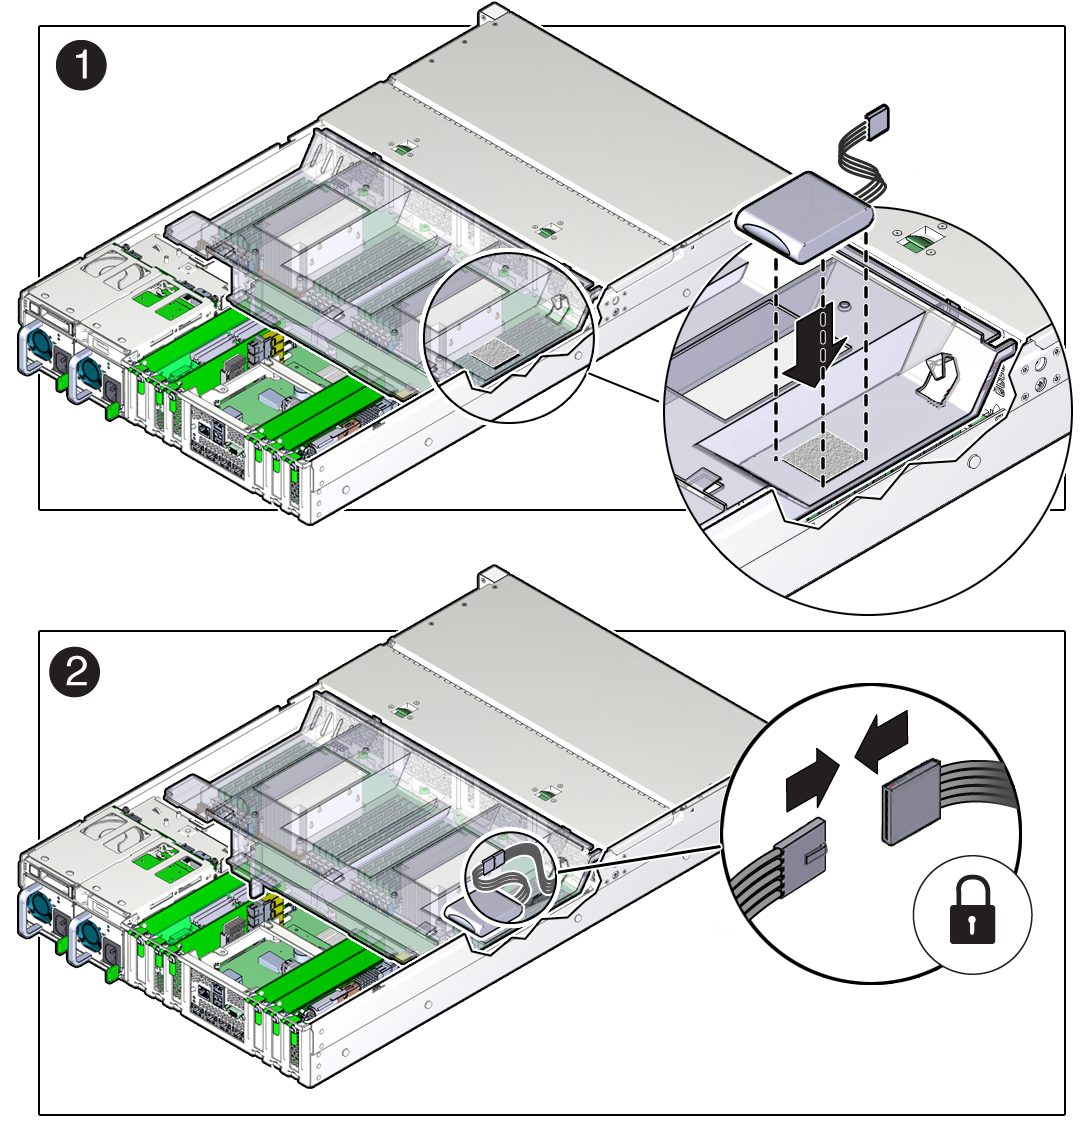
- Connect the super capacitor cable to the super capacitor [2].
- Return the server to operation.
- Install the server top cover.
- Return the server to the normal rack position.
- Reconnect the power cords to the power supplies and power on the server.
- Use Oracle ILOM to clear any server PCIe card faults.
You can use the Oracle ILOM web interface or the command-line interface (CLI) to manually clear faults. For information on how to use the Oracle ILOM web interface or the CLI to clear server faults, refer to the Oracle Integrated Lights Out Manager (ILOM) 3.2 Documentation Library at http://www.oracle.com/goto/ilom/docs.
Replace the Internal SAS HBA Cables
These instructions describe replacing SAS cables for the factory installed Oracle Storage 12 Gb/s SAS PCIe RAID HBA in an Oracle Database Appliance X6-2L system.
Caution:
The system supplies power to the cables even when the server is powered off. To avoid personal injury or damage to the server, you must disconnect power cords before servicing the cables.- Prepare the server for service.
Refer to Preparing Oracle Database Appliance X6-2 Series for Service for additional details.
- Power off the server and disconnect the power cords from the power supplies.
- Extend the server to the maintenance position.
- Attach an antistatic wrist strap.
- Remove the server top cover.
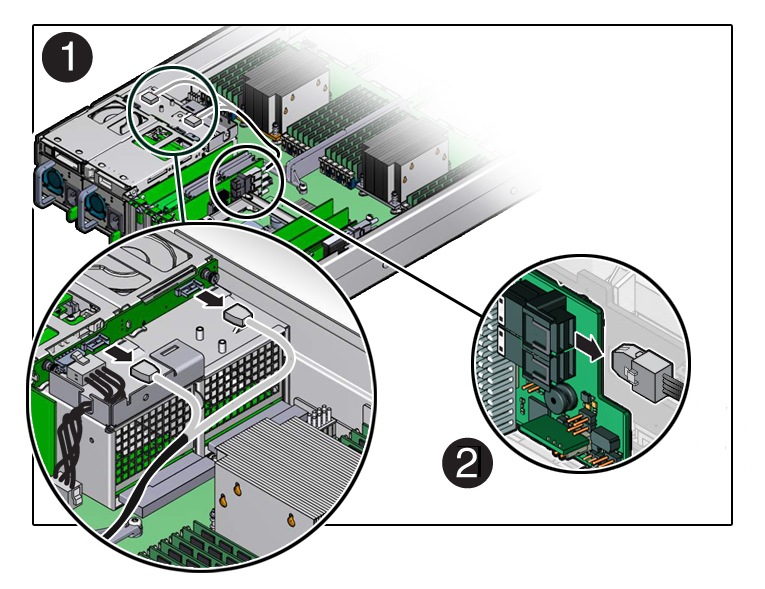
- Swivel the air baffle into the upright position to allow access to the SAS storage drive cables.
- Disconnect the SAS cable from the rear disk drive backplane [1] and from the card [2].
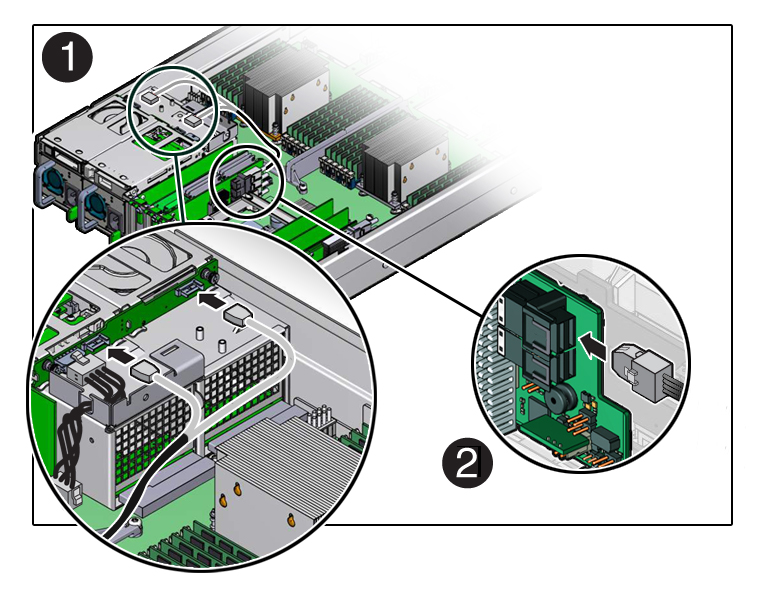
- Install the replacement SAS cable to the rear disk drive backplane [1] and the SAS card [2].
- Lower the air baffle to the installed position.
- Return the server to operation.
- Install the server top cover.
- Return the server to the normal rack position.
- Reconnect the power cords to the power supplies and power on the server.
Servicing Oracle Database Appliance X3-2/X4-2/X5-2 FRUs
This section describes how to service server node FRUs for Oracle Database Appliance X3-2, Oracle Database Appliance X4-2, or Oracle Database Appliance X5-2. If you have Oracle Database Appliance X6-2 series, go to Servicing Oracle Database Appliance X6-2 Series FRUs. If you have Oracle Database Appliance Version 1, go to Servicing Oracle Database Appliance Version 1 FRUs.
Only Oracle authorized service personnel should service FRU components.
Note:
Most of the links in the following table take you to instructions outside of the Oracle Database Appliance library to the Sun Server X3-2, Sun Server X4-2, and Oracle Server X5-2 documentation libraries. Use your browser's Back button to return to the Oracle Database Appliance library.| Oracle Database Appliance X3-2 | Oracle Database Appliance X4-2 | Oracle Database Appliance X5-2 |
|---|---|---|
|
An optional DVD drive for this system is considered a CRU. See Servicing Oracle Database Appliance X3-2/X4-2/X5-2 CRUs.
|
An optional DVD drive for this system is considered a CRU. See Servicing Oracle Database Appliance X3-2/X4-2/X5-2 CRUs.
|
|
Managing System Faults on Oracle Database Appliance X3-2/X4-2/X5-2 and X6-2 Series
This section describes how to manage system faults when servicing Oracle Database Appliance X3-2, Oracle Database Appliance X4-2, Oracle Database Appliance X5-2 or Oracle Database Appliance X6-2 series. If you have Oracle Database Appliance Version 1, go to Servicing Oracle Database Appliance Version 1 FRUs.
Component Fault Management
Typically, when a faulty component is replaced and the server is returned to service, the fault state of the component in Oracle ILOM is automatically cleared and the component Service Required indicator will turn off. This is the default behavior for all components that have an embedded FRU serial number in the component firmware.
For replaced components that do not have an embedded FRU serial number, or do not automatically clear their fault state after the component has been repaired and the server is returned to service, you can use Oracle ILOM command line interface to manually clear the fault state. Use the following syntax:
set /path_to_target clear_fault_action=true
Where path_to_target is the path to the component (such as a DIMM) that had the fault.
In addition, the Fault Management shell can also be used. Use of the Fault Management shell is reserved for Oracle Service. For more information on component fault management:
-
For systems with Oracle ILOM 3.1, see Using fmadm to Administer Active Hardware Faults in the Oracle Integrated Lights Out Manager Documentation Library.
-
For systems with Oracle ILOM 3.2, see Using fmadm to Administer Active Hardware Faults in the Oracle Integrated Lights Out Manager Documentation Library.
Servicing Oracle Database Appliance Version 1 FRUs
This section describes how to service server node FRUs for Oracle Database Appliance Version 1. If you have Oracle Database Appliance X6-2 series, go to Servicing Oracle Database Appliance X6-2 Series FRUs. If you have Oracle Database Appliance X3-2, Oracle Database Appliance X4-2, or Oracle Database Appliance X5-2, go to Servicing Oracle Database Appliance X3-2/X4-2/X5-2 FRUs.
Note:
Only Oracle authorized service personnel should service FRU components.