|
Siebel Installation Guide for Microsoft Windows > Overview of Installing Siebel Business Applications >
Roadmap for Installing Siebel Business Applications in a Migration Installation Case (Existing Installation)
Use this roadmap to guide you in performing the installation tasks for deploying the current release of Siebel CRM, where there is an existing installation of a prior version. This is the migration installation case. Migration installation is analogous to patch installation. The current release is Siebel CRM version 17.0 (Siebel Innovation Pack 2017). You use this roadmap when you have an existing Siebel Business Applications installation of a prior release of Siebel CRM version 8.1.1.x, version 8.2.2.x, version 15.x, or version 16.x. You must perform the migration installation tasks for your existing installed Siebel CRM software. TIP: For the upgrade case, where you are upgrading to the current release from a Siebel CRM release prior to version 8.1.1 or version 8.2.2, see Roadmap for Installing and Configuring Siebel Business Applications in an Upgrade Case (Existing Database) instead. In an upgrade case, you perform a full database upgrade instead of running Incremental Repository Merge. In general, this book uses the term migration to refer to a migration installation and uses the term upgrade to refer to a full database upgrade.
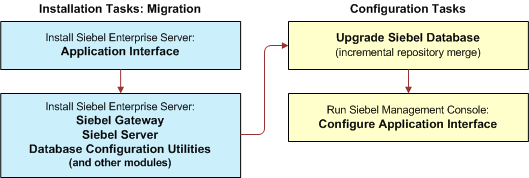
Figure 3 presents a simplified view of the installation and configuration tasks for Siebel CRM server modules for a migration deployment. NOTE: This illustration does not mention installing the Siebel Enterprise Cache or the Siebel Constraint Engine, or configuring security, the Siebel Enterprise Cache, the Siebel Constraint Engine, or the Siebel Migration application. However, those tasks, where applicable, are implicitly part of this roadmap. The Siebel Constraint Engine is available as a developer preview.
Figure 3. Installing and Configuring Servers for a Migration Deployment
|
NOTE: It is recommended that, for each applicable Siebel module, you install the latest Siebel Patchset release after you install the current release. For more information, see About Siebel CRM Releases.
This roadmap only summarizes the migration installation process and does not include details about required tasks. For example, you must do the following tasks after performing the migration installation tasks. See also Additional Tasks for Migration Installations.
- Upgrade the database client. You might need to upgrade the database client software to a supported version for Siebel Innovation Pack 2017, as noted in the Certifications tab on My Oracle Support. Also update the database client installation path in the defined environment variables. See About Configuring Siebel Business Applications.
- Run Incremental Repository Merge. Customers must run Incremental Repository Merge. Before doing this, you must have installed at least one Siebel Server with Database Configuration Utilities and installed Siebel Tools. For more information about Incremental Repository Merge, see Siebel Database Upgrade Guide.
- Reset passwords in Siebel Gateway and on the Siebel Server. Customers must reset any passwords on the Siebel Gateway that were previously encrypted using encryption other than AES. In the current release, such passwords are encrypted using AES. For more information about reencrypting these passwords, see Siebel Security Guide. See also Additional Tasks for Migration Installations.
The installation process for Siebel Business Applications in a migration installation case requires multiple tasks that you perform in the following general sequence:
- Before performing installation tasks, review all documented requirements and perform any necessary premigration tasks.
See Before You Install Siebel Business Applications and Additional Tasks for Migration Installations.
- Create the network images for all applicable releases of Siebel CRM:
- Remove the existing configuration on the Web server computer where you previously installed Siebel Web Server Extension (SWSE).
CAUTION: You must perform this task before you perform the migration installation of Siebel Application Interface for the existing installation of SWSE.
See Additional Tasks for Migration Installations and About Configuring Siebel Business Applications.
- For the Siebel Application Interface, install the current release as a migration installation for each existing installation of Siebel Web Server Extension (SWSE). Then install the latest Siebel Patchset release.
As part of installation, also specify authentication information and port numbers that will be used by your Siebel CRM deployment. The port numbers must be unique on each installation computer or operating system instance.
See Installing Siebel Business Applications Server Modules.
- For the remaining Siebel Enterprise Server modules, install the current release as a migration installation for each existing installation. Then install the latest Siebel Patchset release. Also perform any necessary postmigration tasks.
As part of installation, also specify authentication information and port numbers that will be used by your Siebel CRM deployment. The port numbers must be unique on each installation computer or operating system instance.
NOTE: When you migrate the Siebel Gateway, you also must provide information to allow your existing configurations to migrate. This includes the port number of the existing Siebel Gateway Name Server as well as some Siebel Application Interface settings that you specified in Step 4. (If you installed multiple instances of Siebel Application Interface, then specify the settings that apply to the instance of Siebel Application Interface from which you will run Siebel Management Console.)
See Installing Siebel Business Applications Server Modules. See also Additional Tasks for Migration Installations.
- Verify the installation of Siebel Business Applications modules.
See Verifying and Troubleshooting Your Installation.
- For Siebel Tools, install the current release as a migration installation for each existing installation. Then install the latest Siebel Patchset release. Also perform any necessary postmigration tasks.
NOTE: When you install the current release, Oracle Database XE is installed for use with the local database. You can optionally install the local database with Siebel Tools.
See Installing Siebel Web Clients and Siebel Tools. See also Additional Tasks for Migration Installations.
- For Siebel Mobile Web Clients (or Developer Web Clients), install the current release as a migration installation for each existing installation. Then install the latest Siebel Patchset release. Also perform any necessary postmigration tasks.
NOTE: When you install the current release, Oracle Database XE is installed for use with the local database or sample database, for Siebel Mobile Web Client. You can optionally install the sample database with this client.
See Installing Siebel Web Clients and Siebel Tools. See also Additional Tasks for Migration Installations.
- Verify the installation of Siebel Tools and Siebel Mobile Web Clients.
See Verifying and Troubleshooting Your Installation.
- Run Incremental Repository Merge on the Siebel database.
See Siebel Database Upgrade Guide.
- Run the Siebel Management Console and configure your Siebel deployment:
- Configure the Siebel Application Interface.
- Perform any other configuration tasks that you require for your deployment.
Configuring Siebel Business Applications Server Modules.
- Perform additional postinstallation tasks for the Siebel Server.
See Additional Postinstallation and Configuration Tasks.
- (Optional) Install additional Siebel modules. For example:
- Desktop Integration Siebel Agent (DISA)
- Install Siebel Search software
- Siebel Test Execution
- Siebel Approval Manager
- (Optional) Install and configure additional instances of Siebel Server or Siebel Application Interface if they are required for your deployment, then verify each installation.
- Perform any remaining postinstallation tasks. For example, install or upgrade any required third-party products.
See the Certifications tab on My Oracle Support.
See Additional Postinstallation and Configuration Tasks.
Related Topics
Roadmap for Installing and Configuring Siebel Business Applications for a New Deployment
Roadmap for Installing and Configuring Siebel Business Applications in an Upgrade Case (Existing Database)
|