Using this option, you can initiate an Import Letter of Credit (LC) in the application. A letter of credit is a bank document that guarantees that the seller receives payment in full provided the delivery conditions have been satisfied. In the event that the buyer is unable to make payment on the purchase, the bank covers the outstanding amount.
Pre-Requisites
User must be having a valid corporate login credentials to get into the system. This will be under a maker – approver system, or as per user’s access. User must be having a sanctioned limit/credit available for his perusal.
Workflow
![]() How to reach here:
How to reach here:
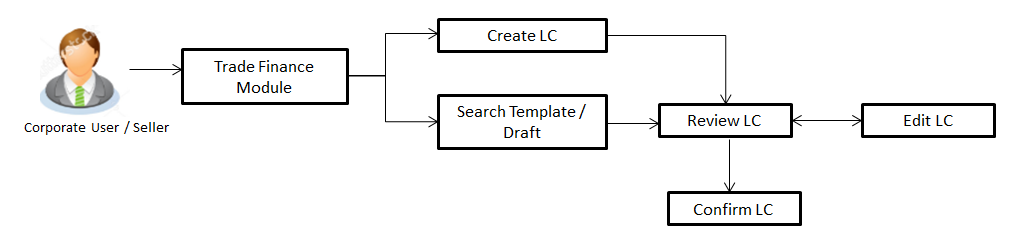
Trade Finance > Letter of Credit > Initiate LC
User has three options to initiate LC
These are explained in detail underneath.
User can save LC application as a Template so that same can be used for creation of similar kind of LCs, if required in future. User can search the saved LC template using Template Name.
Note: LC Application saved as Template can be re used any number of times for LC Initiation.
To search the LC template:
|
Field Name |
Description |
|---|---|
|
Search Result |
|
|
Template Name |
The name using which template is stored and can be used to initiate a LC application. |
|
Beneficiary |
The beneficiary name against whom LC is to be created. |
|
Product |
The corresponding LC product type and as supported by Host. |
|
Created by |
The name of the maker who created the template. |
|
Last Updated |
The latest updated date of the template. |
|
Access Type |
The type of access granted to template whether it is public or private. |
User can save LC application as a Draft so that it can be used if required in future. User can search the saved LC draft using Draft Name.
Note: LC Application saved as Draft can be used only one time for LC Application initiation.
To search the LC draft:
|
Field Name |
Description |
|---|---|
|
Search Result |
|
|
Draft Name |
The name of the LC application saved as draft. |
|
Saved On |
The date on which the draft is saved. |
Using this option, you can initiate an Import Letter of Credit (LC) in the application. To initiate an LC in the application, you must enter details such as your Customer ID, Product, shipment period, and applicable charges etc. You can also give specific instructions to bank.
To initiate the LC:
|
Field Name |
Description |
|---|---|
|
Party Id |
The both primary and secondary party IDs in the application. |
|
Branch |
The bank branch where you want to create the LC contract. |
|
Applicant Details |
|
|
Applicant Name |
Displays the LC applicant name based on the selected party ID. |
|
Address |
Displays the LC applicant address. |
|
Country |
Displays the country of the LC applicant. |
|
Date of Application |
The current date as the date of LC application. |
|
Beneficiary Details |
|
|
Beneficiary Name |
The name of the LC beneficiary. |
|
Address |
The address of the LC beneficiary. |
|
Country |
The country of the LC beneficiary. |
|
Product Details |
|
|
Product |
The Import LC product under which you want to create the Import Letter of Credit. |
|
Revolving |
Indicates whether the LC is revolving or not. The options are:
|
|
Revolving Type |
The Indicates revolving type. The options are:
|
|
Repeat Frequency |
The time duration of revolving frequency The options are:
This field is enabled if the Time option is selected in Revolving Type list. |
|
Cumulative |
Displays whether the frequency is cumulative for the LC. If it is cumulative then unused amount of previous LC would be added and available for the new LCs. The options are:
|
|
Auto Reinstatement |
This states that reinstatement will happen automatically, if not chosen it has to be done manually if required. The options are:
|
|
Transferable |
Indicates whether the LC is transferable or not. The options are:
|
|
Date of Expiry |
The the expiry date of the LC. The expiry date must be later than the application date. |
|
Place of Expiry |
The place where LC would expire. |
|
LC Amount Details |
|
|
LC Amount |
The currency under which the LC can be issued. Indicates the amount for the Letter of Credit. |
|
Tolerance |
The level of tolerance on the LC amount to created and would be honored in case of any minor fluctuations in amount. |
|
Total Exposure |
Displays the total LC amount including the positive tolerance, with the currency. |
|
Date of Expiry |
The the expiry date of the LC. The expiry date must be later than the application date. |
|
Place of Expiry |
The place where LC would expire. |
|
Credit Available By |
Indicates the manner in which credit is available when the bank is authorized to pay, accept, negotiate or incur a deferred payment undertaking for the credit. The options are:
|
|
Credit Available With |
Indicates the details of Bank where credit would become available. It is captured by Bank’s Swift code. |
|
Drafts |
The drafts are associated with the LC application. Displays the draft amount for the LC. |
|
Drafts section This section appears if you click Add to add drafts to the LC application. Note: Click |
|
|
Tenor (In Days) |
The tenor of drafts to be drawn under the documentary credit. |
|
Credit Days From |
The date from which the draft tenor is to be counted. Indicates the date type from which the draft tenor is to be counted. The options are:
|
|
Draft Amount |
The various drafts amount for the LC application. |
|
Drawee Bank |
The drawee bank of the LC. |
|
Template Access Type |
Indicates the type of access for the template. The options are:
Applicable only in case of “Save as Template”. |
This tab captures the Shipment details of the LC application process.
|
Field Name |
Description |
|---|---|
|
Partial Shipment |
Indicates whether partial shipments are allowed under the LC. The options are:
|
|
Shipment Period |
The period of shipment during which the goods are to be loaded on board/dispatched/taken in charge. |
|
Transshipment |
Indicates whether transshipments are allowed under the LC. The options are:
|
|
Latest Date for Shipment |
The latest date for shipment loading goods on board/dispatch/taking in charge. The Latest Date for Shipment should not be later than the LC Expiry Date. It is mandatory to enter either in the Latest Shipment Date or Shipment Period field. |
|
Shipment From |
The place of receipt from where shipment will be done. |
|
Shipment To |
The place of delivery of goods. |
|
Port of Loading |
The place of dispatch or taking in charge of the goods or loading on board. |
|
Port of Discharge |
The port of discharge. |
|
Goods |
The type of good being shipped has to be chosen. |
|
Description of Goods |
The description of goods. |
Note: Shipment period field is not dependent on partial shipment allowed flag , user need to enter either latest shipment date or shipment period but not both.
This tab includes the Inco terms (International Commercial Terms) and required document details along with the clauses list related to the documents. The lists on this tab are populated when you select the appropriate product from the Product list on the Initiate LC tab.
|
Field Name |
Description |
|---|---|
|
Upload Documents |
Upload Documents functionality will be available in next release. |
|
Uploaded Documents |
Upload Documents functionality will be available in next release. |
|
Documents List Documents list have the list of documents with checkboxes to choose along with the number of original or copies submitted and clauses they cater too. |
|
|
Selected |
Displays the documents that you have selected from the list. The selected documents are to be a part of the initiated LC. |
|
Document Name |
Name of the document to be uploaded for the LC. |
|
Original |
The required number of original documents required for the selected document. It is provided as m/n, where m out of available n documents would be submitted to bank. |
|
Copies |
The required number of copies required for the selected document. |
|
Incoterm |
Indicates the INCO terms for the LC application. |
|
Clause |
|
|
View Clause |
The clauses maintained in the bank application for each of the document. A document can have multiple clauses. |
|
Selected |
The clauses that you have selected from the Clause List. The selected clauses related documents are to be attached to the selected document. You must select at least one clause. |
|
Clause |
The name of the clause. |
|
Clause Description |
The description and number of the selected clause. |
|
Documents to be presented within/beyond _____ days after the date of shipment but within validity of this credit |
The number of days after the date of shipment when the documents will be presented to bank. Note: On adding these days to the date of application, it should be within validity period. |
This tab includes the miscellaneous information such as Advising Bank Swift ID, Charges Borne By , and Remarks.
|
Field Name |
Description |
|---|---|
|
Advising Bank Swift ID |
The SWIFT ID of the Advising Bank. Click |
|
Charges Borne By |
Allow user to choose who is to bear the charges of Remittances and other charges applicable. The options are:
|
|
Charges Borne By Beneficiary |
User can input details about account etc, and is applicable only if charges borne by is Beneficiary. This would be active only if Charges borne by selected are Beneficiary. |
|
Charges Account |
The user account from which charges are to be deducted. This would be active only if Charges borne by selected are Applicant. |
|
Instructions to the Bank (not forming part of LC) |
Any additional instructions that you want to give to the bank. |
|
Terms and conditions |
This displays the terms and conditions applicable by Bank along with details of charges applicable. |
User can save LC application as a Template so that same can be used for creation of similar LCs, if required in future. The application allows the template access as public or private if saved as template.
User can search the saved LC template by template name in search tab. The LC applications earlier saved as template can also be saved as draft while initiating a LC.
To save LC application as template:
|
Field Name |
Description |
|---|---|
|
Template Type |
Indicates the type of access for the template. The options are:
|
|
Template Name |
Name of the template. |
User can save LC application as a Draft so that it can be used if required in future. It can be re used only one time for LC Application initiation. User can search the saved LC draft using the draft name in search box. The saved drafts can be accessed from the Draft tab. The LC applications, which were saved as draft canalso be saved as template after adding all other necessary fields.
To save LC application as draft:
|
Field Name |
Description |
|---|---|
|
Draft Name |
Name of the draft. |
FAQs
![]() Can I create a Letter of Credit without providing Advising Bank Details?
Can I create a Letter of Credit without providing Advising Bank Details?
![]() What if I do not want to have any tolerance?
What if I do not want to have any tolerance?
![]() When should I create a draft and when should I create a Template?
When should I create a draft and when should I create a Template?