6 Configuring DIVArchive Actors
This chapter describes DIVArchive Actor configuration and operations, and includes the following information:
Configuration Overview
The DIVArchive Actor runs on both Windows and Linux platforms. Windows Actors no longer start automatically with Windows. The DIVArchive Actor runs as a standalone server application. The DIVArchive Manager connects to each Actor as a client application.
The Actor is installed in the %DIVA_HOME%\Program\Actor\bin\ folder in Windows, and in the /home/diva/DIVA/Program/actor/bin/ directory in Linux. The Actor's configuration files are located separately in the %DIVA_HOME%\Program\conf\Actor\ folder in Windows, and in the /home/diva/DIVA/Program/conf/actor/ directory in Linux. At the system level, the location and capabilities of each DIVArchive Actor are defined in the Configuration Utility.
The Actor configuration parameters are located the Configuration Utility, except for the Service Name and Port. These settings are located under Actor Advanced and Partial Restore Settings tabs of the Actor frame of the System tab. Some settings are only available In Engineering Mode.
You must notify the actors of any changes to the configuration by clicking on Notification, Notify Actors while connected to the Manager. The actors must be running and connected to the Manager to receive the notifications.
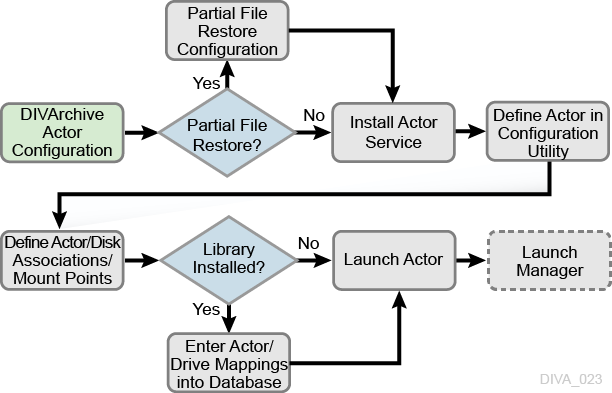
The following figure is the workflow for installing a DIVArchive Actor:
Configuring the Local Actor (actor.conf)
The Actor configuration file contains the Service Name and Port parameters. Remove the .ini extension from the actor.conf.ini file and edit the file with a plain text editor (for example, Notepad or Notepad++) to insert the Service Name and Port number as described in the following table.
Table 6-1 actor.conf Configuration Parameters
| Parameter | Parameter Type | Description | Default |
|---|---|---|---|
|
|
TCP Port Number |
The TCP Port Number for the Actor to listen on for incoming requests. If running more than one Actor on the host, the TCP Port Number must be unique for each Actor. |
|
|
|
Name |
The |
Configuring Oracle DIVArchive Partial File Restore
The Partial File Restore parameters are located on the Partial Restore Settings tab in the Configuration Utility Actor frame. These options provide additional parameters to the Actor for specific partial file restore formats.
To edit the parameters, double-click the Actor Name in the Partial Restore Settings tab to open the Edit Partial Restore Settings dialog box. The Partial File Restore options are defined on the Partial Restore Settings tab of the dialog box.
DIVArchive 7.5 and later MPEG2 Transport Stream supports HD MPEG video essences with AES3 audio tracks.
The following table describes the Partial File Restore parameters available on the Edit Partial Restore Settings Entry dialog box:
Table 6-2 Oracle Partial File Restore Parameters
| Parameter | Value or Type | Description | Default |
|---|---|---|---|
|
Name |
String |
This is the name of the Actor associated with these Partial File Restore options. This value is automatically filled in from the Actor settings. If you modify the name here, or in the Actor settings screen, it will be modified in both places. |
|
|
QT Ignore Start Timecode |
N (disabled) Y (enabled) |
If this setting is enabled, Partial File Restore will ignore the SOM value of the original clip and process TCIN and TCOUT as if it starts from 00:00:00:00. |
N |
|
QT Omneon First Frame Handling |
IGNORE RESET UPDATE |
This setting identifies how the Actor will handle the first frame of a QuickTime clip:
|
RESET |
|
AVI Ignore Start Timecode |
N (disabled) Y (enabled) |
If this setting is enabled, Partial File Restore will ignore the SOM value of the original clip and process TCIN and TCOUT as if it starts from 00:00:00:00. |
N |
|
EVS MXF Ignore Start Timecode |
N (disabled) Y (enabled) |
If this setting is enabled, Partial File Restore will ignore the SOM value of the original clip and process TCIN and TCOUT as if it starts from 00:00:00:00. |
N |
|
GXF Timecode Reference |
Integer |
This setting specifies how the time code
|
|
|
GXF Progressive Timecode Translation |
N (disabled) Y (enabled) |
Partial File Restore is expecting TCIN and TCOUT to be in conformance with the frame rate of the archived clip by default. For example, if the frame rate of the clip is 29.97fps NTSC (or 25fps for PAL), the frame count of TCIN and TCOUT can be comprised between 0 and 29 (25 if it is PAL). HD formats have progressive frame rates (23.976, 24, 29.97, 30, 59.94, 60). For automations, the actual frame rate of the clip can be unknown. When this parameter is set to Y (enabled), DIVArchive considers that TCIN and TCOUT are PAL or NTSC timecodes and translates these timecodes according to the actual frame rate of the archived clip. |
N |
|
LXF Ignore Start Timecode |
N (disabled) Y (enabled) |
If this setting is enabled, Partial File Restore will ignore the SOM value of the original clip and process TCIN and TCOUT as if it starts from 00:00:00:00. |
N |
|
MXF Partial Restore Dictionary File |
Path and File Name |
This parameter must point to the name and location of the MXF dictionary file. The dictionary is normally distributed with the DIVArchive Actor installation in the Set this parameter to Where |
|
|
MXF Timecode From Source Package |
N (disabled) Y (enabled) |
If you set this parameter Y (enabled), the time code track used to locate the in and out points will be the one from the source package. Otherwise, timecode will be sourced from the Material Package. |
N |
|
MXF Timecode Value To Switch Package |
-1 (no switch) 0 (switch) |
If the SOM value found in the MXF package specified by the parameter MXF Timecode From Source Package is equal to this value, the Actor will automatically look for the SOM in the other MXF Package. The default value of -1 avoids switching from one package to the other. |
-1 |
|
MXF Enforce Closed Header |
N (disabled) Y (enabled) |
If this parameter is set to Y (enabled) the extraction will fail if the metadata in the header is not closed. If set to N (disabled), the Actor will attempt to find closed metadata in the footer partition. |
Y |
|
MXF Run In Processor |
File Name |
If this parameter is defined it must contain the name of the |
|
|
MXF Ignore Start Timecode |
N (disabled) Y (enabled) |
If this parameter is set to Y (enabled), MXF Partial File Restore will ignore all start time code values of the original clip and TCIN and TCOUT (SOM and EOM) is processed as if the original clip starts at 00:00:00:00. This option overrides the MXF TIMECODE FROM SOURCE PACKAGE parameter. |
N |
|
MXF Use Omneon Dark Meta |
N (disabled) Y (enabled) |
Certain Omneon MXF clips have their start time code located in a Dark Metadata Set. By default the MXF Partial File Restore does not pay attention to this field. Set this parameter to Y if you want the MXF Partial File Restore to manage this field. |
N |
|
MXF Use BMX Library (instead of MOG SDK) |
N (disabled) Y (enabled) |
The MOG SDK library has been replaced by BMX under Linux. Under Windows, the use of either MOG SDK or BMX can be selected from the Config Utility under Advanced Actor Settings, by setting the Use BMX Library parameter to Y. Under Linux, BMX will always be used. |
N |
|
MXF Serialize Depth First |
N (disabled) Y (enabled) |
If this parameter is set to Y (enabled) the MXF Partial File Restore serializes the Metadata Sets of the partially restored clip using a depth-first approach. This option is recommended when the destination is a QUANTEL ISA gateway. If it is set to N (disabled), the MXF Partial File Restore serializes the Metadata Sets with no ordering. |
N |
|
MXF Generate Random Index Pack |
N (disabled) Y (enabled) |
Random Index Pack (RIP) is an optional small structure located after an MXF file that contains file offset information for each partition in the file (when present). You can set this parameter to N (disabled), for incompatible servers (for example, SONY XDCAM). |
Y |
|
MXF Number of Frames Per Body Partition |
Integer between 50 and 250. |
This parameter defines the number of frames per partition in the output file. Only values between 50 and 250 are valid. If a value greater than 250 is entered, the MXF Partial File Restore will use 250. If the entered value is less than 50, it will use 50. This parameter is rounded automatically by the Actor to align body partitions on GOP boundaries. |
250 |
|
MXF Update TC Track Origin |
N (disabled) Y (enabled) |
When the video essence is MPEG2 LGOP, Partial File Restore will use the origin field of each track to be frame accurate. The origin specifies GOP precharge frames. Your video server may use a different implementation or interpretation of this field. If this parameter is set to Y (enabled), the Origin field is modified in all tracks. If this parameter is set to N (disabled), the Origin field is modified in all tracks except the timecode track. |
N |
|
MXF Use BMX Library Value or Type |
N (disabled) Y (enabled) |
By default, on Windows actors, the MXF partial restore is using the MXF SDK from MOG solutions. The use of BMX can be selected as an alternative is this parameter is set to Y. |
N |
|
MXF Tolerance on TCOUT |
Integer between 0 and 250. |
This parameter can be set to indicate a tolerance on the TCOUT supplied to a Partial File Restore request. This tolerance value is 0 by default, but it you can set it to a specific number of frames. If the supplied TCOUT is beyond the end of the clip, but not too far out (within the tolerance), DIVArchive will perform the Partial File Restore until the end of the clip instead of reporting and invalid TCOUT. |
0 |
|
MXF Duration From Footer |
N (disabled) Y (enabled) |
When the duration of the input clip is -1 in the header partition, the MXF Partial File Restore loads the footer partition in to obtain the correct value. Some older clips may not have a correct RIP after the file, and the footer partition may not be accessible. If you set this value to N (disabled), the MXF Partial File Restore does not load the footer partition and performs a blind Partial File Restore, if TCIN and TCOUT are valid. |
Y |
|
MXF Maximum Queue Size |
Integer between 0 and 200. |
The maximum size (in MB) that the extractor can queue before producing an error (to avoid running out of memory). |
200 |
|
Seachange Ignore Start Timecode |
N (disabled) Y (enabled) |
If you set this parameter to Y (enabled), SeaChange Partial File Restore ignores the start time code value of the original clip and processes TCIN and TCOUT as if it starts from 00:00:00:00. The configuration of the MXF parser is also required for MXF. However, because this is a SeaChange clip, it ignores the MXF Ignore Start Timecode in this workflow. |
N |
|
MPEG2 Transport Stream Ignore Start Timecode |
N (disabled) Y (enabled) |
If you set this parameter to Y (enabled), the MPEG2 transport stream Partial File Restore ignores the start time code value of the original clip, and processes TCIN and TCOUT as if it starts from 00:00:00:00. |
N |
|
MPEG2 Program Stream Ignore Start Timecode |
N (disabled) Y (enabled) |
If you se this parameter to Y (enabled), MPEG2 transport stream Partial File Restore ignores the start timecode value of the original clip and processes TCIN and TCOUT as if it starts from 00:00:00:00. |
N |
Defining and Declaring Actors
Each DIVArchive Actor must be declared in the DIVArchive Database. You declare the Actors in the Actors frame in the Configuration Utility's System tab. The Actors frame has three tabs:
- Actor Settings
-
This tab includes general Actor definition settings such as Actor name, IP address, port, production system, and so on.
- Actor Advanced Settings
-
This tab includes advanced settings such as read and write block sizes, tape unit timeout, Quantel, QuickTime and FTP settings.
- Partial Restore Settings
-
This tab includes Partial File Restore settings previously in the Partial File Restore configuration file.
Actor and Partial File Restore settings are configured and edited on the Actor Settings Entry screen. Click + on the top right of the Actor Settings frame to create and configure an Actor, or double-click the actor you want to edit to access the settings screen.
The following list describes the maximum operations parameters on the Actor Settings Entry screen:
- Name
-
This is the name of the Actor associated with the Partial File Restore options. This value is automatically filled in from the Actor settings. If you modify the name here, or in the Actor Settings Screen, it will be modified in both places.
- IP Address
-
This is the IP address of the Actor.
- Port
-
This is the port number the Actor listens on for commands.
- Prod. System
-
This parameter identifies the production system where the Actor is in use.
- Site
-
This parameter identifies the physical location of the production system.
- Max Drive Operations
-
This is the maximum number of simultaneous requests to and from drives that this Actor can perform. You can use this parameter to distribute requests and bandwidth among all Actors.
- Max Server Operations
-
This is the maximum number of simultaneous requests to and from servers from the Sources and Destinations configuration that this Actor can perform. You can use this parameter to distribute requests and bandwidth among all Actors.
- Max Disk Operations
-
This is the maximum number of simultaneous transfers to and from disks (both read and write) that this Actor can perform. You can use this parameter to distribute requests and bandwidth among all Actors.
- Verify Tape
-
This parameter defines whether tapes are verified.
- Direct Restore
-
This parameter defines whether this Actor can be used for direct restores to a Source or Destination.
- Cache Restore
-
The Actor is permitted to perform cache restores to a Source or Destination. You must disable this option if this Actor has no local cache storage for the temporary storage of the DIVArchive object during a transfer.
- Copy To Group
-
This parameter defines whether this Actor can be used for Copy To Group requests. You can use this option to isolate specific Actors involved in critical operations from mass Copy To Group requests, such as those from the DIVArchive SPM option.
- Associative Copy
-
This parameter defines whether this Actor can be used for Associative Copy requests.
- Repack
-
This parameter defines whether this Actor can be used for tape repack requests. You must set this to N if the Actor has no local cache for temporary storage during the repack operation. Because tape repacking is a lengthy operation, you can also use this setting to dedicate an Actor solely to repack requests by disabling the other options (except Delete) and disabling repack on the other Actors.
- Delete
-
This parameter defines whether this Actor can be used for requests that involve deleting DIVArchive objects from a disk. You can use this option to isolate an Actor from mass deletion requests (for example, requests issued from the SPM option).
- Direct Archive
-
This parameter defines whether this Actor can be used for direct Archive requests.
- Cache Archive
-
This parameter defines whether this Actor can be used for cache Archive requests. You must disable this option if this Actor has no local cache storage for the temporary storage of the DIVArchive object during a transfer.
- First Utilization Date
-
This is the date the Actor was first put into use.
Advanced Actor Settings
Advanced Actor parameters are displayed on the Actor Advanced Setting Tab in the Actors Panel of the Configuration Utility. Entries are configured and edited on the Actor Settings Entry screen's Actor Advanced Settings Tab. To configure or edit advanced actor parameters, double-click the actor you want to edit to access the settings screen.
The following list describes the parameters on the Actor Advanced Settings Entry screen:
- Name
-
This is the name of the Actor associated with the Partial File Restore options. This value is automatically filled in from the Actor settings. If you modify the name here, or in the Actor Settings Screen, it will be modified in both places.
- Tape Test Unit Ready Timeout (s)
-
The time in seconds to wait for a drive to become ready after a tape is mounted. If the drive is not ready within this period, the drive is considered to be not responding.
- Profile Read Block Size (B)
-
The FTP block size used for transfers on profile video servers when reading. The default value (1500) is the best block size to use with GVG profile servers. This value may be different when using other servers. Possible values are between 1500 and 262,144 bytes.
- Profile Write Block Size (B)
-
The FTP block size used for transfers on profile video servers when writing. The default value (32,768) is the best block size to use with GVG profile servers. This value may be different when using other servers. Possible values are between 1500 and 262,144 bytes.
- Quantel Rename Clips
-
Automatically rename clips when restoring them to Quantel.
-
Setting this to N disables this feature. This is the default setting.
-
Setting this to Y renames files using the first part of the object name (before the comma) truncated. This is Omnibus renaming.
-
- QT Self-contained Threshold (MB)
-
When preforming a QuickTime Partial File Restore, the Actor must determine if a clip is self-contained, or not based on the size of the input file. This parameter is a limit in MB. When this limit is exceeded, the Actor considers the clip to be self-contained. The unique objective of this parameter is to prevent the Actor from loading a large self-contained clip into memory. Values range from 10 MB through 100 MB.
- Disk FTP Passive Mode
-
FTP data connections are, by default, created in Active mode. The DivaFTP client connects from a random unprivileged port (greater than port 1023). Then it immediately starts listening to the port and sends a
PORTcommand to the FTP server.When you set this parameter to Y, data connections are created in Passive mode rather than Active mode. In Passive mode the DivaFTP client sends a
PASVcommand to the FTP server and the server creates socket, not the client. - Disk FTP Block Size (KB)
-
This parameter defines how much data the Actor attempts to send and receive using a single system call during FTP transfers.
For example, if the Actor internal buffer size is set to 2 MB, and this parameter is set to 32768 bytes, 64 system calls are required to write a single buffer to a data socket.
- Disk FTP Socket Window Size (B)
-
This parameter adjusts the normal buffer size allocated for output and input buffers. This parameter is internally used to set the send and receive buffers for FTP-managed disk types.
Defining Actor to Disk Connections
After you have configured the Actor definitions, you must define the logical connections (mount points) of the physical disks previously identified during the initial DIVArchive configuration.
If the same resource on a physical disk is to be shared between multiple Actors, and file sharing software has been installed, Oracle recommends that the drive letter or volume of the disk connection configured in each Actor host is identical (for simplicity). Actors retrieve these mount point definitions when the DIVArchive Manager first connects to each of them. Any modifications performed here require the relevant Actor to be restarted.
To edit the parameters, double-click the Actor Name in the Actor-Disk Connections frame to open the Add new row in Actor-Disk Connections dialog box. Click the + button on the top of the frame to add an Actor-Disk connection.
Note:
Multiple selections are available in Add mode, but not in Edit mode. Nearline storage is used for disk instances created during a Restore or N-Restore request with a Nearline QOS when no other disk instances are available.The following list describes the options on the Add new row in Actor-Disk Connections dialog box:
- Disk
-
Select a physical disk in the drop-down menu for this Actor association. Only entries previously defined in the Disks frame will be displayed. Multiple disks may be selected using the check box next to each disk name.
- Actor
-
Select the Actor for this disk association. Only Actors declared in the Actors frame of the System tab will be listed. The selected disk must be directly accessible by this Actor.
- Interface
-
Select the access method the Actor will use to connect to the disk.
- Mount Point
-
The Mount Point is used with the Interface selection.
- Max. Throughput, MB/s
-
This allows bandwidth throttling of the transfers performed by the Actor. Typically used to load balance transfers with other Actors or non-DIVArchive applications.
When DIVArchive has multiple disks to choose from for object storage, this parameter is the first criteria for disk allocation (that is, the disk with the highest throughput will be used first). The second criterion is the percentage of used capacity of each disk considered.
- Access
-
This defines this Actor's read/write access to the associated logical disk. This allows further granularity in load balancing with other Actors.
- Used for
-
This defines how the associated disk is to be used by this Actor as follows:
- Cache Only
-
DIVArchive will only use this disk for caching operations.
- Storage Only
-
DIVArchive will only use this disk for object storage.
- Cache and Storage
-
DIVArchive will use this disk for both cache and object storage.
- Storage and Nearline
-
DIVArchive will use this disk for both object and Nearline storage.
- Cache and Storage and Nearline
-
DIVArchive will use the disk for cache, object, and Nearline storage.
Actor to Disk Interfaces and Mount Points
The disk interface method and the corresponding mount point in an Actor-Disk connection are determined by how the drive is logically connected and presented to the Actor host computer's operating system. The following sections describe different interface methods and mount point configurations.
Local Interface
This option specifies that unbuffered I/O will be used with the disk to maximize transfer performance. Disks that use this option can reside within the Actor host itself (for example, disks to be used for cache purposes), disks connected to the host through either SCSI or Fiber Channel HBAs (for example, in a SAN), or those specified with a Universal Naming Convention (UNC) mount point. Some network drives may actually suffer with this type of interface. In these instances use the Remote option instead.
Note:
Windows-based Actors do not support network drives mapped to a Windows drive letter (this is a Microsoft security restriction). Networked disks in Windows must use the Remote option instead.The Mount Point is the drive letter or volume of the drive as it appears to the host operating system, plus any additional directory path.
Remote Interface
This interface specifies that buffered I/O will be used with the disk, and allows access to disks hosted by another computer using CIFS protocol. This option must be used for networked disks with the Windows Actor Service.
The mount point for a CIFS connection is a UNC path. For example, cifs://192.168.56.26\shared or cifs://user:password@//192.168.56.26\shared.
Appropriate permissions for any CIFS-based disk must be enabled for the Actor to access the network drive. Otherwise, the disk will be set Offline.
Note:
Linux-based Actors do not support UNC paths for CIFS sources and destinations. However, you can define a local path to a mounted SMB share. UNC paths are supported for SMB Source/Destinations and Managed Disks if the UNC path is directly mounted on the Windows Actor.Oracle Cloud Interfaces
This interface is used for Oracle Storage Cloud, Oracle Archive Cloud, and Oracle Cloud Infrastructure Storage accounts. See Configuring Oracle Archive Cloud for DIVArchive and Configuring Oracle Cloud Infrastructure for configuration information.
BML Interface
This interface enables the Actor to use a SeaChange BML (non-Infiniband Media Libraries) as disk storage. For regular disks, DIVArchive stores objects under multiple subdirectories. The BML however uses a flat file system (that is, no directory structure). DIVArchive automatically incorporates a directory structure into the file name when it is archived to the BML, and removes this addition from the file name as it is restored.
The mount point for the BML option is bml://IP_Address. For example, bml://10.201.10.124.
FTP Interface
This interface enables DIVArchive to use FTP servers as disk storage using the FTP protocol. Oracle only supports Linux-based FTP servers when operating in a Linux environment, not Windows-based FileZilla and IIS FTP servers. This is because Windows FTP servers cannot handle the large numbers of files.
The mount point must be in the format ftp://login:password@host/rootdir.
MetaSAN Interface
You must select this interface when MetaSAN manages the disk volume. By default, DIVArchive Actors preallocate storage on disks to prevent disk fragmentation. MetaSAN implements its own anti-fragmentation mechanisms. Selecting this option will disable preallocation when dealing with this volume.
Simulation Interface
You use this interface when setting up a DIVArchive Simulator. See the DIVArchive Simulator Operations Guide for details. This book is only available to OPN partners.
The mount point must be a real path name to a directory on a local disk. When used to store objects, only the file size is recorded to the disk (that is, no content is actually saved). You cannot use a simulated disk as cache for a repack request.
Configuring Actor to Drive Connections
The Data Transfer component of the drives must be configured for use with the Actors separate from the Tape Drive Control configuration for the Robot Manager. You must logically configure of each drive in the Actor-Drive configuration in the database.
The Actors-Drives frame is located on the Drives tab. The frame displays the current Actor-Drive associations including the Actor Name, Drive Number, and Library location. If a drive is connected to multiple Actors through a SAN, the Actor-Drive mapping must be repeated for each Actor accessing this drive.
You can combine the Drive Operations settings and the Actor Capability settings to dedicate a drive to a particular set of Actors for specific operations. For example, tape repacking.
To edit the parameters, double-click the Actor Name in the Actors-Drives frame to open the Add new row in Actors-Drives Connections dialog box. Click the + button on the top of the frame to add an Actors-Drives connection.
Two options are available on the Add new row in Actors-Drives Connections dialog box as follows:
- Actor
-
You select the Actor the drive is connected to from the list. Only Actors already defined in the Actors frame of the System tab are listed.
- Drives
-
You select the logical drive in the relevant library for this mapping. Only drives defined in the Drives frame of the Drives tab are listed. You select one or more drives using the check boxes. Multiple selections are only available when adding an association, not while editing an existing one.
When you select a different Actor, the drives available for configuration are displayed. If all drives have already been configured for the selected Actor, the Drives list is not available and indicates there are no drives available for the selected Actor.
Logging Actor Activity
DIVArchive Actors log all activities during normal operations. The log files are named actor.log, or actor_SERVICE_NAME.log. The files are stored in the %DIVA_HOME%\Program\log\actor folder.
Each DIVArchive Actor also provides additional logging functions for some specific server protocols (for example, the Quantel QCP interface, FTP servers, and Partial File Restore). DIVArchive enables logs by default, and they are unique for each server type. They provide detailed logging information from that protocol to the standard Actor log file.
These files are useful in diagnosing transfer errors with either drives or servers, and particularly for debugging the configuration when a Source or Destination has been added. Oracle Support may request these logs when providing assistance.
Installing and Uninstalling Actor Services in Windows
You use the actorservice.exe executable in the Actor bin directory to install (or uninstall) the DIVArchive Actor as a service from a Windows command-line prompt.
By default, the Actor Service uses the actor.conf file located in %DIVA_HOME%\Program\conf\actor folder to define the Service Name. If you are installing multiple Actors on a single host, you must create additional Actor configuration files and specify them to the service to create unique instances for each Actor (see Actor Service Management Functions for more information).
See Appendix A for Oracle DIVArchive options and licensing information.
Use the following commands to install or uninstall the Actor Service from the Windows command line:
actorservice -i-
Installs the Actor Service using the SERVICE_NAME parameter defined in
actor.conf. If this parameter is undefined, then the service is installed asDIVArchive Actor - Host_Name. actorservice-u-
Removes the Actor Service using the SERVICE_NAME parameter defined in
actor.conf. If this parameter is undefined, then the service to be removed isDIVArchive Actor - Host_Name.
Installing and Uninstalling Actor Services in Linux
The divaservice executable in the Actor bin directory installs (or uninstalls) the DIVArchive Actor as a service from a Linux terminal.
Use the following command sequence to install Actor services:
cd/home/diva/DIVA/Program

./divaservice install actor /home/diva/DIVA/Program/conf/actor/actor.conf
Use the following command sequence to uninstall Actor services:
cd/home/diva/DIVA/Program

./divaservice uninstall actor /home/diva/DIVA/Program/conf/actor/actor.conf
See Installing the DIVArchive Services for more information on using the divaservice command.
Actor Service Management Functions
When installing or uninstalling additional Actor Services on the same host, you must specify the path to each Actor's configuration file for each instance. You add the -conf (or -f) command switches when installing the service as follows:
actorservice {-i|-u} {-conf|-f} {Path and file name}
The command syntax is the same for Windows and Linux. However the path and file name will be different. The following examples install the Actor services for two different Actors on the same host computer. You use the -u command switch (instead of -i to install) to uninstall these same Actor services.
Check the services applet after installation to verify that each Actor Service was installed correctly.
For example, use the following command in Windows to install the Actor defined by the SERVICE_NAME in the actor1.conf configuration file:
actorservice -i -conf C:\DIVA\Program\conf\actor\actor1.conf
Use the following command in Windows to install the Actor defined by the SERVICE_NAME in the actor2.conf configuration file:
actorservice -i -conf C:\DIVA\Program\conf\actor\actor2.conf
Use the following command in Linux to install the Actor defined by the SERVICE_NAME in the actor1.conf configuration file:
actorservice -i -conf ../../conf/actor/actor1.conf
Use the following command in Linux to install the Actor defined by the SERVICE_NAME in the actor2.conf configuration file:
actorservice -i -conf ../../conf/actor/actor2.conf
The following additional command options are also available for the Actor Service:
actorservice debug-
Starts the Actor Service in console mode. This is used for troubleshooting.
actorservice version-
Displays the DIVArchive Actor Service software release information. You can also use the
-vswitch instead ofversion. actorservice help-
Displays all command line options.
Launching the Actors
Windows DIVArchive Actors no longer start automatically with Windows. You can manage the Actor Services through the Windows Services applet, from a Windows command line, or from Linux terminal.
In Windows, you can locate the Actor Service in the Windows Services applet, right-click the name, and then select the desired management function (Start, Stop, Restart, and so on) from the context menu.
Note:
The quotation marks in the following commands must be used when specifying a Windows service with spaces in the name.You can restart an Actor from a Windows command line or Linux terminal using the following command sequence:
net stop "DIVArchive Actor"
net start "DIVArchive Actor"
If a SERVICE_NAME is specified in the actor.conf file (for multiple Actors on a single computer), then you can restart an Actor from a Windows command line or Linux terminal using the following command sequence:
net stop "DIVArchive Actor -SERVICE_NAME"
net start "DIVArchive Actor -SERVICE_NAME"
Tip:
Create a Windows batch file containing these commands and place it on the desktop for easy access.