4 Deploying Oracle Software on Oracle Database Appliance

Complete these tasks to deploy the Oracle Database Appliance software.

About Deploying Oracle Database Appliance Software Using OAKCLI

Review this information to understand the steps required for different deployments, where log files are placed, and how to change deployment types.

Tasks in this chapter are marked to indicate if they apply to Bare Metal deployments, Virtualized Platform deployments, or both. Perform only the tasks designated for a deployment on your platform.

Note:

If you are planning to convert from Oracle Database Appliance Virtualized Platform to a bare metal deployment, first check with My Oracle Support to confirm that you have a compatible image installed.

Recovering from Failed Deployments, Or Changing Deployments

You can use the cleanup script cleanupDeploy.sh described in this chapter to reset your system or to repeat a failed deployment.

About OAKCLI Deploy Command Log Files

The oakcli deploy command creates log files in the following filepath:

/opt/oracle/oak/onecmd/tmp/

Log files are prefaced with the string STEP. For example:

/opt/oracle/oak/onecmd/tmp/STEP-6-20160226103534.log

Deploying Bare Metal Platforms on Oracle Database Appliance

Complete this procedure to deploy Oracle software directly on the appliance, also known as a Bare Metal configuration of Oracle Database Appliance.

The procedure to deploy software in a bare-metal configuration consists of the following steps:

  1. Install the end-user bundle for Bare Metal platform deployments

  2. Prepare the appliance to run Oracle Appliance Manager Configurator

  3. Deploy your configuration using Oracle Appliance Manager.

The End-User GI/RDBMS Clone files contain specific Grid Infrastructure (GI) and RDBMS software components, for deployment on an Oracle Database Appliance in the "shipped from factory" state, or an Oracle Database Appliance that has been re-imaged using the OS ISO  Image.

You must install the end-user bundle on Oracle Database Appliance before you deploy any other software. To install the end-user bundle, download the appropriate patch file to an external client. Copy the patch from your client to Oracle Database Appliance, and install the patch.

Note:

Oracle Database Appliance is ready when the green Power OK LED lights on the front of the system remain steadily on. If any of the green LED lights on the server are still blinking, then wait for them to complete their initialization steps.
  1. Run the following command on the appliance to determine if your Oracle Appliance Manager software version is current: /opt/oracle/oak/bin/oakcli show version -detail
    If your version is earlier than 12.2.1.1.0, then download the patches and update your base image.
  2. Download the Oracle Database Appliance 12.2.1.1.0 End-User Bundle (GI/RDBMS Clone) to a location on Node 0.
    1. Sign in to MyOracle Support, then locate patch 12978712 for the Oracle Database Appliance End-User Bundle.
    2. Select the patch version for release 12.2.1.1.0.
    3. Click Download to download the zip file.
      p12978712_122110_Linux-x86-64_1of2.zip
      p12978712_122110_Linux-x86-64_2of2.zip
      

    You can copy the file either by using a USB storage device or by using Secure Copy command (scp).

    • To use a USB drive to transfer the file, you must format it first as FAT32, ext3, or ext4. NTFS file formats are not supported.

    • To use secure copy, you must first set up a static IP address (for example. oda_host) and configure Oracle Database Appliance with that address by using the oakcli configure firstnet command.

    For example, if you use the scp command, then enter a command similar to the following, where the temporary host address is oda_host, and you are copying the bundle to /tmp on Node 0:

    scp p12978712_122110_Linux-x86-64_1of2.zip root@odahost:/tmp

    scp p12978712_122110_Linux-x86-64_2of2.zip root @odahost:/tmp

  3. Use the command syntax oakcli unpack -package /directory_path/package_name to unpack the Oracle Database Appliance software, where directory_path is the path where the end-user bundle patch file is located, and package_name is the name of the package.

    For example, if the end-user bundle patch files are in /tmp, and the patch names are p12978712_122110_Linux-x86-64_1of2.zip and p12978712_122110_Linux-x86-64_2of2.zip, then enter the following commands:

    # oakcli unpack -package /tmp/p12978712_122110_Linux-x86-64_1of2.zip
    # oakcli unpack -package /tmp/p12978712_122110_Linux-x86-64_2of2.zip
    

    The command oakcli unpack unpacks the bundle patch, and places the extracted files in the directory locations required for deployment.

  4. Startup VNC server on Node 0. Then use VNC to log in to Node 0 and port 5901 of Oracle Database Appliance as the root user using the default password.
  5. Enter the following command to launch the Oracle Appliance Manager Configurator: # /opt/oracle/oak/bin/oakcli deploy
    The Oracle Appliance Manager Welcome screen appears.

    Note:

    If the Welcome window in Oracle Appliance Manager Configurator fails to open, then set the user DISPLAY variable to display to your terminal window.

  6. Click Next.
  7. On the Configuration Type page, select the options for configuration type: Typical, Custom, or SAP Application. If you have an existing configuration file that you want to load and edit, then click Browse and locate the file on your client.

    Note:

    Do not use a configuration file created for an earlier version of Oracle Appliance Manager Configurator. If you do not have a current configuration file, then complete a real-time configuration and deployment.

    Oracle recommends in most cases that you select the typical configuration. If you intend to deploy SAP applications, then select SAP Application. Choose the Custom option if you want to configure additional or alternate network interfaces, or if you want to override the default values for one or more of the following:

    • Database block size, language, territory, backup file location, or disk redundancy level for the DATA and RECO disk groups

    • Oracle Integrated Lights Out Manager (Oracle ILOM) server

    • Oracle Auto Service Request (Oracle ASR) configuration

    • Oracle Cloud File System mount point and file system size

    • Network Time Protocol service server

    To see the default values for your version of Oracle Database Appliance software before choosing the Typical or Custom option, run the Configurator using the Custom option.

    Note:

    The SAP Application option is only valid with the Bare Metal option.

    Make your selection, then click Next.

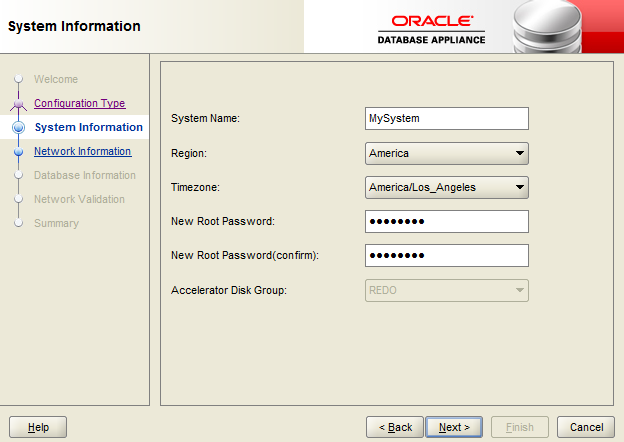
  8. On the System Information page, provide the system name, and select the correct value from the lists for your region and time zone.

    In the New Root Password and New Root Password (confirm) fields, enter a new password for the root user. This password is encrypted in the configuration file. It is temporarily decrypted to reset the password during deployment.

  9. Click Next.
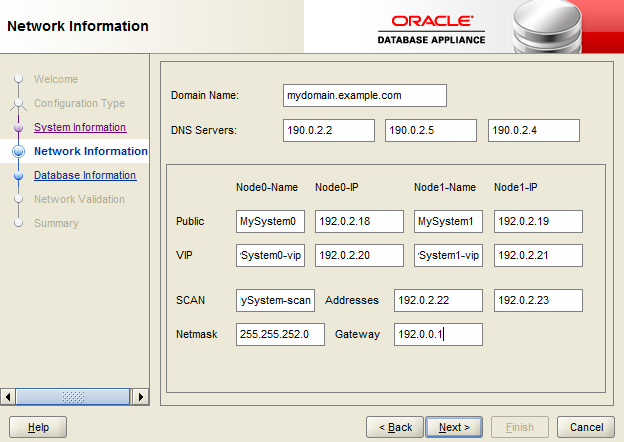
  10. On the Network Information page, provide your domain name, DNS server addresses, public and VIP addresses for your two nodes, SCAN name and addresses, and netmask and Gateway addresses.

    As you enter data on this page, some fields are automatically filled with values derived from earlier entries. For example, if the address that you provide for the Node 0 public IP address is 192.0.2.18, then the default node addresses generate as follows:

    • Node 0 public IP address: 192.0.2.18

    • Node 1 public IP address: 192.0.2.19

    • Node 0 virtual IP (VIP) address: 192.0.2.20

    • Node 1 virtual IP (VIP) address: 192.0.2.21

    • SCAN addresses (two addresses resolving to the SCAN VIP name): 192.0.2.22, 192.0.2.23

  11. Click Next.
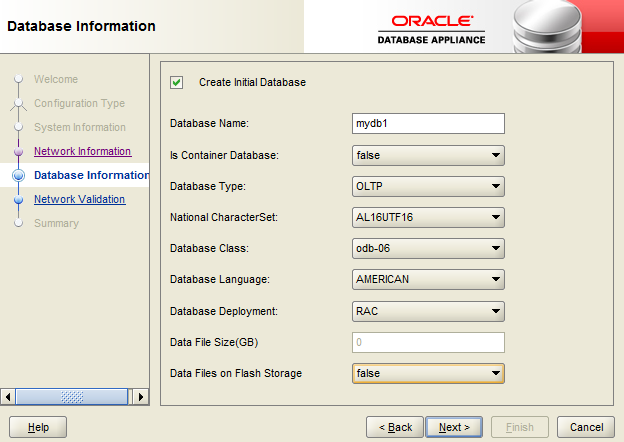
  12. On the Database Information page, select if you want to create an initial database. If you check the box to create a database, then you can also provide your database details. These details include the database name, which you must enter, and the following options, selected from the available list values:
    • Is Container Database The default is false. If you leave the default value, then the Configurator builds a non-container database

    • Database Type The default type is OLTP. You can also select DSS, or select In-Memory.

    • Database Class Select the database class that you want to deploy. Not all options are available for all models of Oracle Database Appliance; the default class is odb-06

    • Database Language The default language is AMERICAN

    • Database Deployment Select one of the following, where RAC is the default:

      • Oracle RAC

      • Oracle RAC One Node

      • Oracle Database Enterprise Edition (no Oracle RAC)

    • Data File Size (GB) If you indicate that you want to build a container database, then provide a database data file size in the final field on this page. (This field does not accept input unless the Is Container Database selection is True.) If you do not want to create an initial database, then do not select the check box for Create Initial Database.

    • Data Files on Flash Storage Select false. For Oracle Database Appliance X6-2-HA, the database is always stored in flash storage.

    Click Next.

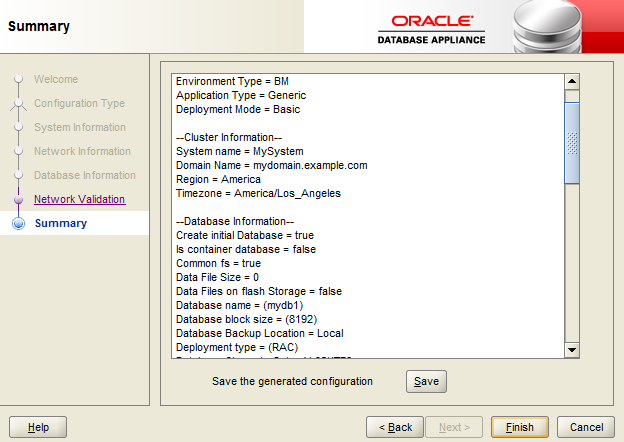
  13. On the Summary page, review the configuration options that you have selected. Click Save to save the configuration file, or click Back to modify your selections.

    You can print the contents of the configuration file and use the printout to review your configuration entries for deployment planning purposes. You can also load the configuration file later when you run the Configurator again.

    If you are running the Configurator on Oracle Database Appliance, and you have completed the preliminary steps to configure your initial network and install the End-User Bundle or deploy ODA_BASE, then you can click Install to deploy the configuration.

    If you are not ready to complete the deployment, then first click Save, and then click Finish. Note the name and location of the configuration file. You can copy this configuration file to your Oracle Database Appliance for deployment. If you need to make corrections before deployment, then rerun the standalone Oracle Appliance Manager Configurator, load your configuration file, make the changes, and save the file again.

Deploying Virtualized Platform Software

Complete these tasks to deploy a Virtualized Platform configuration on Oracle Database Appliance X6-2-HA. You must complete the deployment tasks in the order that they are listed.

Topics:

About Deploying an Oracle Database Appliance Virtualized Platform

To use the virtualization features, you must reimage the system and configure the appliance as a virtualized platform.

Oracle Database Appliance ships from the factory with a bare metal ISO image installed. To enable virtualization, you must deploy the Virtualized OS ISO image on both nodes, configure your public network, and then deploy the Oracle Database Appliance Virtualization Platform. Oracle Database Appliance ships with various components, including Oracle Integrated Lights Out Manager (ILOM) to help manage the system remotely. The Oracle Integrated Lights Out Manager (ILOM) client must be on at least version jre-7-linux-i586.rpm to be able to launch the remote console.
Domain Deployment Configuration

Use the Oracle Appliance Kit Command-Line Interface, also known as OAKCLI, to deploy and configure the Oracle Database Appliance Virtualized Platform.

When you deploy Oracle Database Appliance Virtualized Platform, your system is configured with two domains on each server node: Dom0 and ODA_BASE (also known as Dom1). You can use the CPU cores not assigned to Oracle Database (ODA_BASE) for virtual machines, each of which is referred to as a Domain U.

The virtual disk and vm.cfg files are stored in the following directories:

  • Dom0/Repositories/vm_repo_name/.ACFS/snaps/vm_name/VirtualMachines/vm_name

  • ODA_BASE/app/sharedrepo/vm_repo_name/.ACFS/snaps/vm_name/VirtualMachines/vm_name

Once deployed, you can create and manage shared repositories and create guest virtual machines and Oracle Linux driver domain guests.

Overview of Deploying a Virtualized Platform

The following is an overview of the steps to deploy a virtualized platform:

  1. (Optional) Run the standalone Configurator to validate the network and create a configuration file. See “Running the Standalone Oracle Database Appliance Configurator”

    While not required, using the standalone Configurator enables you to define your configuration details and validate the network on a separate system. You can save the settings in a configuration file and use the file to quickly pre-populate the configuration fields when you deploy the platform in Step 5.

  2. Connect the power and public network cables and start up the systems.

  3. Deploy the Virtualized OS ISO image to reimage the appliance operating system on both nodes and create an initial network.

  4. Install the Virtualized Platform Template, then configure and deploy the appliance.

The template deploys ODA_BASE on your system, which includes the Oracle Database clone binaries, Oracle Database templates, customized for Oracle Database Appliance deployments, and Oracle Grid Infrastructure clone binaries. After you install the template, you will use the Configurator to define your configuration and network settings and install the appliance. After you successfully deploy the appliance, you can begin creating a virtual environment and virtual machines.

Overview of Deploying a Guest Virtual Machine

Deploying a Guest virtual machine requires the following steps:

  1. Create a new repository, if necessary. See "How to Create and Manage Shared Repositories".

  2. Import the required template or assembly. See "How to Manage Virtual Machine Templates".

  3. Configure the template or assembly. See "Configuring a Virtual Machine Template".

  4. Clone the template or assembly. See "How to Create Clones and Snap Clones of a Template".

  5. Update the virtual machine as required. See "Modifying a Virtual Machine Template Configuration".

  6. Start the virtual machine. See the oakcli start commands.

  7. Manage the virtual machine using the virtual machine console. See the oakcli show vmconsole command.

A driver domain is a user domain with special privileges. The Driver Domain functionality allows guest virtual machines to use ODA_BASE as the driver domain for access to virtual disks. By default, the driver domain functionality applies to non-system disks. Once a virtual machine is created in driver domain mode, any new vDisks are added in driver domain mode.

When a user domain is configured in driver domain mode, the storage in the vm.cfg file at DomU might be similar to the following:

vm.cfg: disk = [u'file:/OVS/Repositories/myreposh1/.ACFS/snaps/v1_shared/VirtualMachines/v1_shared/System.img,xvda,w', u'file:/u01/app/sharedrepo/Repositories/myreposh1/.ACFS/snaps/v1_shared/VirtualMachines/v1_shared/u01.img,xvdb,w,oakDom1'] 

Note:

The second virtual disk is specified as a file on shared storage (in the shared repository) and it uses the ODA_BASE domain (oakDom1) as the driver domain.

Determining if the System is Configured with a Virtual Machine

Before deploying a Virtualized Platform on Oracle Database Appliance, determine if the system has the Virtualized OS ISO image.

Oracle Database Appliance ships from the factory with a bare metal ISO image installed. To use the virtualization features, the Virtualized OS ISO image must be on the system.

Perform the following steps if you need to re-image Oracle Database Appliance and install the Virtualization Platform ISO image:

  1. Log in as root.
  2. Enter the command oakcli show env_hw
    [root@oda3 ~]# oakcli show env_hw 
    
    • If the output of the command is prefixed with the string VM-ODA_BASE, then the system is configured with a virtual machine (dom0/oda_base) and you do not need to install the virtualized image (ISO). For example, the output of the following command shows that the platform is configured with a virtual machine environment (VM-ODA_BASE) and identifies the hardware platform (ODA X6-2-HA):

      [root@oda3n1 ~]# oakcli show env_hw VM-ODA_BASE ODA X6-2-HA
      
    • If the output of the command is not prefixed with the string , then you must download the Virtualized OS ISO image.

      [root@oda3n1 ~]# oakcli show env_hw ODA X6-2-HA
      

Downloading Images for a Virtualized Platform

Download the Oracle Database Appliance Virtualized OS ISO Image and the VM Template on your local machine.

Oracle Database Appliance ships from the factory with a default OS image. Use the Oracle Database Appliance Virtualized OS ISO Image to re-image the Oracle Database Appliance for Virtualized Machine Restore.

  1. From an external client machine, log on to My Oracle Support.
  2. Download the Oracle Database Appliance 12.2.1.1.0 Virtualized OS ISO Image (Patch) and extract the files.
    1. Locate patch 16186163 for the Oracle Database Appliance Virtualized OS ISO Image.
    2. Select the patch version for release 12.2.1.1.0.
    3. Click Download to download the zip file onto your external client.
      p16186163_122110_Linux-x86-64.zip
      
    4. Use either a Secure Copy (scp) command or a USB storage device to copy the ODA_BASE template from the external client to dom0 on Node 0. Use the /OVS directory as the target location.

      Note:

      If you use a USB drive to transfer the file, then format it first as FAT32, ext3, or ext4. NTFS file formats are not supported.

    5. Extract the files.
      # oakcli unpack -package /tmp/ p12999313_122110_Linux-x86-64.zip 
      
  3. Download the Oracle Database Appliance 12.2.1.1.0 (GI/RDBMS Clone) Template Download for a Virtualized Platform (Patch) and extract the files.
    1. Locate patch 16186172 for the Oracle Database Appliance Virtualized OS ISO Image.
    2. Select the patch version for release 12.2.1.1.0.
    3. Click View Read Me and review the Readme file.
    4. Click Download to download the zip file.
      p16186172_122110_Linux-x86-64.zip
      

Installing a Virtualized OS ISO Image

Reimage Oracle Database Appliance with a virtualized operating system image on both nodes and configure the initial public network.

Oracle Database Appliance ships from the factory with a default OS image. Use the Oracle Database Appliance Virtualized OS ISO Image to reimage the Oracle Database Appliance for Virtualized Machine Restore before deploying the Oracle Database Appliance Virtualized Platform Template.

WARNING:

Oracle Database Appliance Virtualized OS image formats the local disks, which will result in loss of data that was previously stored on the Local and Shared storage. After re-install and deployment steps are completed, it might be necessary to restore data from backup.

Oracle Database Appliance ships with various components, including Oracle Integrated Lights Out Manager (ILOM) to help manage the system remotely. This procedure describes how to use ILOM to reimage the operating system; however, you can choose to use Preboot Execution Environment (PXE) or other methods instead of ILOM.

When you reimage a new Oracle Database Appliance with the Virtualized OS ISO image, you must set up the initial network. The command oakcli configure firstnet runs an interactive script to create an initial network, which enables you to download the deployment software. Be prepared to provide IP addresses for Node0 and Node1 to configure the network interface. While not required, you also have the option to configure DHCP.

Note:

Reimaging is node-specific. You must reimage both nodes. You can reimage both nodes at the same time.

Before reimaging the system, verify that the system is not already configured with a virtual machine.

Perform the following steps to reimage Oracle Database Appliance and install the Virtualized OS ISO image on both nodes and configure the initial network:

  1. Download patch 16186163 for the Oracle Database Appliance 12.2.1.1.0 Virtualized OS ISO Image.
    1. From an external client machine, log on to My Oracle Support.
    2. Locate patch 16186163 for the Oracle Database Appliance Virtualized OS ISO Image.
    3. Select the patch version for release 12.2.1.1.0.
    4. Click Download to download the zip file onto your external client.
      p16186163_122110_Linux-x86-64.zip
      
    5. Use either a Secure Copy (scp) command or a USB storage device to copy the ODA_BASE template from the external client to dom0 on Node0. Use the /OVS directory as the target location.

      Note:

      If you use a USB drive to transfer the file, then format it first as FAT32, ext3, or ext4. NTFS file formats are not supported.

    6. Extract the files.
      # oakcli unpack -package /tmp/ p12999313_122110_Linux-x86-64.zip 
      
  2. Open a browser and connect to Oracle Integrated Lights Out Manager (ILOM) on Node0 as root.
    The Summary home page appears.
  3. Launch the Remote Console.
    1. Expand Remote Control in the left navigation.
    2. Click the Redirection tab.
    3. Click Launch Remote Console.
      The state of the system determines what appears on the Console page.
  4. Add the Virtualized OS ISO Image.
    1. Click the Devices tab, then select CD-ROM.
      Afile browser on the local client opens.
    2. Browse to the Oracle Database Appliance Virtualized OS ISO Image, highlight the image, then click Open.
  5. Configure the CD-ROM as the next boot device.
    1. Expand Host Management in the left menu of the ILOM Remote Console tab.
    2. Click Host Control.
    3. Select CDROM from the Next Boot Device menu, then click Save.
  6. Power cycle the system.
    1. Click Power Control in the Host Management menu.
    2. Select Power Cycle.

    When the node comes back after the power cycle, reimaging starts automatically.

    It can take a couple of hours to reimage. The Running Post-Install scripts page is a static page and might give the impression that the reimaging process is not progressing. The post-install process during reimaging will wait until the synchronization between the partitions of the two mirrored local hard disks is complete, which can take 15 to 20 minutes to complete.

    To check the progress of resynchronization, press the ALT-F2 key combination to open a second console and enter the following command:

    # cat /proc/mdstat
    

    When the resynchronization is complete, reimaging is completed and the machine restarts.

  7. Repeat Steps 1 through 6 for Node1.
    Reimaging is node-specific. You must reimage both nodes.
  8. Verify that the host name in the Console is oak1 for Node0 and oak2 for Node1.
    If the host name is something other than oak1 or oak2, then reboot the node. You might need to reboot more than once.
    Once the image is completed on both nodes, you will see the screen with oak1 for Node0 (sc0).
  9. Use the command oakcli configure firstnet to configure a global network using bond0.
    The global configuration sets the initial public network for both the nodes on Oracle Database Appliance, enabling you to download the deployment software onto the appliance.
    # oakcli configure firstnet
    Configure the network for the node(s)(local, global) [global]:global
    Select the interface to  configure network on [bond0 bond1 bond2 xbond0]:bond0
    Configure DHCP on bond0?(yes/no):no
           INFO: Static configuration selected
           Enter the IP address to configure:192.0.2.18
           Enter the netmask address to configure:255.255.252.0
           Enter the gateway address to configure:192.0.2.1
    Plumbing the IPs now
    Restarting the network
    :::::::::::::::::
    
When the initial public network setup is completed, download and install the Virtualized Platform Template (ODA_BASE).

Installing the Virtualized Platform Template

Use the Virtualized Platform Template to deploy ODA_BASE for a virtualized platform. The template includes the Oracle Grid Infrastructure and Oracle Database clone files

When you deploy Oracle Database Appliance Virtualized Platform Template, your system is configured with two domains on each server node: Dom0 and ODA_BASE (also known as Dom1).

Before installing the template, confirm that the system has the Virtualized OS ISO image. Installing the template requires that the system is imaged with the Oracle Database Appliance Virtualized Platform OS ISO image on both nodes and has an initial network.

You must complete the deployment tasks in the order that they are listed.

Note:

The Oracle Integrated Lights Out Manager (ILOM) client must be on at least version jre-7-linux-i586.rpm to be able to launch the remote console.
  1. From an external client machine, log on to My Oracle Support and download Patch Number 16186172 to obtain the Oracle Database Appliance Oracle Database Appliance VM Template.
    1. Select the latest version from the menu. Click Read Me and review for prerequisites and known issues.
    2. Click Download to download the current Oracle Database Appliance template onto your external client.
  2. Copy the template files to the /OVS directory on Node 0 (Dom 0).
    1. Use either a Secure Copy (scp) command or a USB storage device to copy the ODA_BASE template from the external client to dom0 on Node 0. Use the /OVS directory on Node 0 (oak1-dom0) as the target location.

      Note:

      If you use a USB drive to transfer the file, then format it first as FAT32, ext3, or ext4. NTFS file formats are not supported.

    2. Log in to dom0 as root on Node 0 of Oracle Database Appliance. Remain logged in to dom0 while you complete the remaining steps in this task.
    3. From the /OVS directory, use the unzip command to extract the files to create two files.
      unzip p16186172_12.2.1.1.0_Linux-x86-64_1of2.zip
      unzip p16186172_12.2.1.1.0_Linux-x86-64_2of2.zip
      
      When extracted, you will have two files: oda_base_template.tar.gz00 and oda_base_template.tar.gz01.
    4. Use the cat command to concatenate the files into a single file. The file name changes, depending on the version. Use the file name that is documented in the readme. For the purposes of this document, the file name is myconfig-vm.gz.
      Make note of the file name. You will enter this file name and location in the next step.

      Note:

      The file name changes between versions, ensure that you use the correct file name from the download. Do not change the file name.
  3. Change to the /opt/oracle/oak/bin/ directory and execute the command oakcli deploy oda_base. When prompted, provide the template location, core licensing options, and select the base domain memory allocation.

    Select the core licensing that you need. If you select number six (6) in the Core Licensing Option, then 12 CPU cores are licensed on each node for a total of 24 cores.

    When selecting the memory needed for the ODA_BASE, ensure that you select a sufficient amount of memory. The memory is used for the database.

    The deploy oda_base option automatically deploys ODA_BASE on both nodes. If your ODA_BASE template is in the /OVS directory, then your deployment dialog should look similar to the following example (values, such as the number of available CPU cores, differ between Oracle Database Appliance Virtualized Platform hardware platforms):

    # /opt/oracle/oak/bin/oakcli create vlan vl200 -vlanid 200 -if bond0
    Created vlan vl200
     
    # /opt/oracle/oak/bin/oakcli deploy oda_base
    INFO: Validating LSI HBA PCI Cards on node 0
    INFO: Validating LSI HBA PCI Cards on node 1
    Enter the template location: /OVS/oda_base_12.2.1.1.0.tar.gz
    Core Licensing Options:
            1. 2 CPU Cores
            2. 4 CPU Cores
            3. 6 CPU Cores
            4. 8 CPU Cores
            5. 10 CPU Cores
            6. 12 CPU Cores
            7. 14 CPU Cores
            8. 16 CPU Cores
            9. 18 CPU Cores
            10. 20 CPU Cores
            Selection[1 .. 10](default 20 CPU Cores)        : 10
            ODA base domain memory in GB(min 16, max 244)[default 244]      :
    INFO: Using default memory size i.e. 244 GB
    Additional vlan networks to be assigned to oda_base ? (y/n) [n]:
    INFO: Deployment in non local mode
    INFO: Verifying active cores on local node
    INFO: Verified active cores on local node
    INFO: Verifying active cores on remote node
    INFO: Verified active cores on remote node
    INFO: Running the command to copy the template /OVS/ oda_base_12.2.1.1.0.tar.gz to remote node 1
    oda_base_12.2.1.1.0.tar.gz    100% 7475MB 62.8MB/s   01:59
    INFO: Spawned the process 17728 in the deployment node 0
    INFO: Spawned the process 17729 in the node 1
    INFO: Validating LSI HBA PCI Cards on node 0
    INFO: Validating LSI HBA PCI Cards on node 0
    INFO: Validating LSI HBA PCI Cards on node 1
    INFO: Validating LSI HBA PCI Cards on node 1
    INFO: Deployment in local mode
    INFO: Deployment in local mode
    templateBuild-2017-02-14-23-51/swap.img
    templateBuild-2017-02-14-23-51/swap.img
    templateBuild-2017-02-14-23-51/System.img
    templateBuild-2017-02-14-23-51/System.img
    templateBuild-2017-02-14-23-51/u01.img
    templateBuild-2017-02-14-23-51/u01.img
    INFO: Extracted the image files on node 1
    INFO: The VM Configuration data is written to /OVS/Repositories/odabaseRepo/VirtualMachines/oakDom1/vm.cfg file
    INFO: Running /sbin/losetup /dev/loop0 /OVS/Repositories/odabaseRepo/VirtualMachines/oakDom1/System.img command to mount the image file
    INFO: Mount is successfully completed on /dev/loop0
    INFO: Extracted the image files on node 0
    INFO: Validated dom0 and odabase version
    INFO: Making change to the /OVS/Repositories/odabaseRepo/VirtualMachines/oakDom1
    /tmpmnt/boot/grub/grub.conf file
    INFO: Assigning IP to the second node...
    INFO: The VM Configuration data is written to /OVS/Repositories/odabaseRepo/VirtualMachines/oakDom1/vm.cfg file
    INFO: Running /sbin/losetup /dev/loop0 /OVS/Repositories/odabaseRepo/VirtualMachines/oakDom1/System.img command to mount the image file
    INFO: Mount is successfully completed on /dev/loop0
    INFO: Created oda base pool
    INFO: Validated dom0 and odabase version
    INFO: Making change to the /OVS/Repositories/odabaseRepo/VirtualMachines/oakDom1
    /tmpmnt/boot/grub/grub.conf file
    INFO: Assigning IP to the first node...
    INFO: Created oda base pool
    INFO: Starting ODA Base...
    INFO: Starting ODA Base...
    Using config file "/OVS/Repositories/odabaseRepo/VirtualMachines/oakDom1/vm.cfg"
    .
    Started domain oakDom1 (id=1)
    INFO: Storing the odabase configuration information
    Using config file "/OVS/Repositories/odabaseRepo/VirtualMachines/oakDom1/vm.cfg"
    Started domain oakDom1 (id=1)
    INFO: Storing the odabase configuration information
    #
    
    Continue configuration choices in the next step.
  4. Assign additional virtual local area networks (VLANs) to your ODA_BASE.

    To assign VLANs, respond with y when you are prompted for VLAN networks. Respond with n if you do not want to deploy another VLAN, or if you have completed assigning additional VLANs.

    Additional vlan networks to be assigned to oda_base ? (y/n) : y
    Select the network to assign [Test00,Test01,Test02,Test03]: Test00
    Additional vlan networks to be assigned to oda_base ? (y/n) : y
    Select the network to assign [Test00,Test01,Test02,Test03]: Test01
    Additional vlan networks to be assigned to oda_base ? (y/n) : n
    
    The ODA_BASE setup is complete.
  5. Confirm that ODA_BASE is configured.
    Verify that your deployment of ODA_BASE is valid by running the oakcli show oda_base command.
    # /opt/oracle/oak/bin/oakcli show oda_base
    ODA base domain
    ODA base CPU cores      :2
    ODA base domain memory  :32
    ODA base template       :/OVS/oda_base_12.2.1.1.0.tar.gz
    ODA base vlans          :[ 'priv1', 'net1', 'net2']
    ODA base current status :Running
    

    Alternatively, you can run the xm list command to confirm that ODA_BASE is configured. When properly deployed, oakDom1 appears in the output with your configured memory and vcpus.

    # xm list
    Name                                        ID   Mem VCPUs      State   Time(s)
    Domain-0                                     0  4096    40     r----- 482672.4
    oakDom1                                      2 32768     4     -b---- 132134.6


    Note:

    If you encounter problems, then clean up the existing deployment before starting a new ODA_BASE deployment. Run the following command from dom0 on Node 0 to remove ODA_BASE:

    /opt/oracle/oak/tools/cleanOdabase.py

  6. Validate that the cabling is connected correctly.
    # oakcli validate -c storagetopology

    The command displays errors if the cables between the two nodes and the storage shelf or shelves are not in the correct sockets.

    Caution:

    Do not ignore any errors or warnings in the output. If the cabling validation fails, connect the cables correctly and rerun the command until the command runs without any errors or warnings. Do not deploy Oracle Database Appliance until the cabling is correct.

    If the output includes a warning for jbod nickname, then run the command from the first node /opt/oracle/oak/bin/stordiag/Topology_Validation.sh -deploy to correct the warning. Rerun the command again to verify that the command runs without the warning.

    SUCCESS : Overall Cable Validation on Node1
    WARNING : JBOD0 Nickname is incorrectly set to : Oracle Database Appliance - E1
    WARNING : JBOD1 Nickname is incorrectly set to : Oracle Database Appliance - E0
    INFO    : Above details can also be found in log 
    file=/tmp/StorageTopology-2015-05-13-15:03:36_29149_8856.log
    
  7. Log in to ODA_BASE. Connect to ODA_BASE using vncviewer or vncsession using the dom0 host name and port 5900.
    1. Use a vnc viewer to connect to ODA_BASE using the dom0 host name and port 5900.
    2. Log in with the root user name and password.
  8. Use the oakcli configure firstnet to configure an initial public network on the first node (Node 0) to complete the ODA_BASE deployment.
    1. ssh to 192.168.16.27 from oak1-dom0
    2. Log in as root user.
    3. Run the oakcli configure firstnet command from the /opt/oracle/oak/oakcli directory.
      # /opt/oracle/oak/oakcli configure firstnet
      

      Note:

      Use the command oakcli configure firstnetonly once, to configure the initial network on Oracle Database Appliance. Using the command after configuring the initial network can cause unpredictable changes to your network settings.

    4. Enter the ODA_BASE (Node 0) network information.

      The command uses an interactive script and prompts you for the information needed to configure the network. Enter values based on your environment requirements.

      When prompted to configure the network nodes as global or local, select global. The default is global, which configures the network on both nodes. The local option only configures the network on the logged-on node.

      Configure net1 as the network interface.

    # /opt/oracle/oak/bin/oakcli configure firstnet
    Configure the network for the node(s)(local, global) [global]: global 
    The network configuration for both nodes:Domain Name:  example.com
    DNS Server(s): Primary Dns Server:  <enter your primary DNS server>
                                      Secondary Dns Server:  <enter your secondary DNS server>
                                         Tertiary Dns Server:  <enter your tertiary DNS server>
    Node Name       Host Name
    0               host1-dom0 <- odahostname1
    1               host2-dom0 <- odahostname2
    Choose the network interface to configure (net1, net2) [net1]: net1
    Configure DHCP on net1 (yes/no) [no]: 
    You have chosen static configuration on net1
    Enter the IP address for net1 on Node 0: 192.0.2.1 
    Enter the IP address for net1 on Node 1: 198.51.100.1
    Netmask for net1: 255.255.252.0
    Gateway Address for net1 [<Gateway IP>]:   192.0.0.1
    Plumbing the IPs now on Node 0 … INFO: Restarting the network now on Node 0 ...
    ::::::::::::::::::::::::::::::::::::::::::::::::::
    dom0.xml                                         100% 860 0.8KB/s 00:00
    ::::::::::::::::::::::::::::::::::::::::::::::::::
    
    The IP address is plumbed and the network is restarted on each node.
  9. Deploy the Oracle Grid Infrastructure and Oracle Database software on the appliance.
    1. Connect to ODA_BASE (Node 0) in the vncsession.
    2. Navigate to the /opt/oracle/oak/bin directory and execute the oakcli deploy command.
    # /opt/oracle/oak/bin/oakcli deploy
    
  10. Validate the deployment by executing the oakcli show version -detail command on ODA_BASE (Node 0).
    # /opt/oracle/oak/bin/oakcli show version -detail