Prepare STA for the Upgrade
Make sure STA is ready for the upgrade. Record all important information needed to configure the new version of STA.
Understand What Occurs During the Upgrade
Before beginning an upgrade, familiarize yourself with all upgrade information and identify the instructions that apply to your site.
The upgrade transforms the existing STA data to be compatible with the new version of STA. After the upgrade, the STA processes new data according to the new schema and analytics rules. Historical data is not reprocessed.
Be sure to allocate sufficient time for the entire process. While you are performing the upgrade, STA does not receive exchange information from the monitored libraries. The new version of STA does not begin receiving information from the libraries until after you have completed all upgrade and post-upgrade configuration steps, including testing the SNMP connection to each monitored library.
Some upgrade preparation tasks may require you to coordinate with other groups at your site, such as network administration. You should have all preparation tasks done in advance so you can complete the upgrade in as little time as possible.
Use the Installation and Upgrade Worksheets to organize your upgrade activities and record your settings.
Determine the Current Version of STA
Use the GUI to determine the version of STA currently running on the server. If running 2.0.x or below, there are special considerations for the upgrade.
-
Log in to STA using an STA administrator username.
-
Click About in the Status Bar. Note the STA version.
Verify the Environment Meets 2.3.1 Requirements
Ensure that your environment meets all STA prerequisites.
-
Verify that your site and the target server meet the Requirements for STA. Be sure to allocate sufficient time for the entire process.
-
Ensure the
/tmpfile system on the target STA server has sufficient space for the upgrade. The size of/tmpshould be at least as large as the size of your existing uncompressed STA database; a minimum of 4 GB is required, and for large databases, Oracle recommends you increase the size of/tmpto 32 GB, at minimum. -
Ensure that all required RPM packages are installed on the STA server. See Install Required Linux Packages for instructions. As a final check, the STA installer will also notify you if any packages are missing.
-
Review the file system structure on the STA server and verify that the required users and groups have proper access to the locations used by the STA installer. See Recommended File System Layout and Users, Groups, and Locations Used by the STA Installer.
Review Environmental Changes for Upgrades from STA 2.0.x and Earlier
Review the environmental changes that apply to your site and impact the upgrade. These changes apply only to upgrades from 2.0.x or earlier.
Verify you have the correct Linux version
You may need to install a new version of Linux as part of the STA upgrade process:
STA 2.3.1 supports Linux 6.8, 6.10, 7.7. and 7.8. If you are not running one of these versions, you will have to install a new version of Linux before upgrading STA. You may also need to install or update the required Linux RPM packages—as part of the upgrade preparation, you will ensure that all required RPM package levels are installed, and as a final check, the STA installer will also notify you if any packages are missing.
Check the default WebLogic port numbers
Changes to the default WebLogic Administration console port numbers were introduced in STA 2.1.0. If you are currently using the old default port numbers, you may want to change to the new default values. The new and old default port numbers are as follows:
-
New defaults for STA 2.1.0 and later—7019 (HTTP) and 7020 (HTTPS)
-
Old defaults (STA 1.0.x and STA 2.0.x)—7001 (HTTP) and 7002 (HTTPS)
Note:
The WebLogic Administration console ports are external. Your network administrator may need to configure firewalls and routers to open communication between the STA server and the clients accessing the WebLogic Administration interface.Note the change in username and password requirements
Following are the username and password requirements for STA and MySQL. You may need to coordinate these requirements with any internal requirements at your site.
Username requirements are as follows:
-
Must be 1–16 characters in length
-
All usernames must be unique
Password requirements are as follows:
-
Must be 8–32 characters in length
-
Must include at least one uppercase letter and one number
-
Must not include spaces or tabs
-
Must not include any of the following special characters:
% & ' ( ) < > ? { } * \ ' " ; , + = # !
Verify the required ports for STA managed servers
The default STA managed server port numbers STA 2.0.x and later are as follows:
-
StaUi—7021 (HTTP) and 7022 (HTTPS)
-
StaEngine—7023 (HTTP) and 7024 (HTTPS)
-
StaAdapter—7025 (HTTP) and 7026 (HTTPS)
Note:
The StaUi ports are external. Your network administrator may need to configure firewalls and routers to open communication between the STA server and the clients accessing the STA user interface.Verify STA is Functioning Normally
Verify that your current STA environment is functioning normally before upgrading.
-
Verify STA has had recent, successful communication with each monitored library.
-
Log in to STA as an administrator user.
-
Expand the Setup & Administration tab, select SNMP Connections.
-
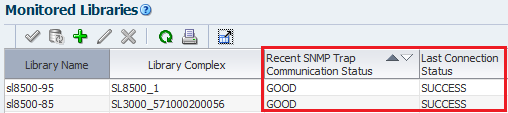
Verify the following values in the Monitored Libraries table:
-
Recent SNMP Trap Communication Status—GOOD
-
Last Connection Status—SUCCESS
-
-
-
Verify that STA is processing exchanges across all libraries.
-
Expand the Tape System Activity tab, select Exchanges – Overview.
-
Click Filter
 . Add Exchange End (No. Days) | Less than # days ago | 1.
-
Click Apply.
-
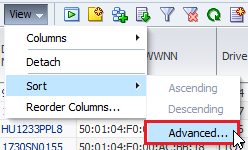
From the table's View drop-down menu, select Sort and then Advanced...
-
Sort by Drive Library Name, Drive Serial Number.
-
Verify that all libraries have exchange activity.
-
Save Existing Logs (optional)
Save any logs you want to keep since existing application and service log bundles are not retained after the upgrade.
-
Locate any installation and database logs you want to retain, and move them to a safe place. Logs that may be of interest are located in the STA logs location you have defined for your installation. See Review STA File System Layout for details.
-
Create an RDA log bundle on the current STA installation.
-
Log in to STA as an administrator user.
-
Expand the Setup & Administration tab, select Logs.
-
Click Create New Log Bundle
 .
. -
Assign a bundle name and click Save. It may take several minutes for the process to complete.
-
-
Download the RDA log bundle you just created, as well as any others you want to retain. You must download the bundles one at a time.
-
In the Service Logs table, select the bundle you want to download.
-
Click Download Selected Log Bundle
 .
. -
Save the log bundle to an accessible location.
-
Record Current STA Users (optional)
Display and record the current user configuration to reuse them for STA 2.3.1.
Record MySQL Usernames
Record existing MySQL usernames used to access the STA database. You cannot retrieve the passwords.
-
On the STA server, open a terminal session. Log in as the Oracle user.
-
Display all STA database usernames. For example:
$ mysql -uroot -p -e "select distinct(user) from user order by user ;" mysql -
Record the usernames.
Record STA SNMP Client Settings
Record SNMP client settings for STA. You will reenter these values after the upgrade. In the new version of STA, the SNMP values must match what is specified on the monitored libraries.
-
Log in to STA as an administrator user.
-
Expand the Setup & Administration tab, select SNMP Connections.
-
In the Client Attributes table, record the values from the following columns:
-
SNMP Username
-
User Community
-
Trap Community
-
Record WebLogic Usernames—Upgrades from STA 1.0.x Only
For upgrades from STA 1.0.x, record existing WebLogic usernames used to log in to STA. You cannot retrieve the passwords.
-
In a browser, go to the WebLogic administration console:
http(s)://<STA host_name>:<WebLogic port_number>/console/
For example:
https://staserver.example.com:7002/console/ -
Log in using the WebLogic administration console username and password.
-
In the Domain Structure navigation tree, click Security Realms.
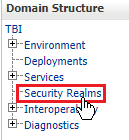
Description of the illustration ''wl_secrealm.png''
-
In the Name column, select the myrealm active link (do not select the check box).
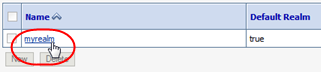
Description of the illustration ''wl_myrealm.png''
-
Select the Users and Groups tab.

Description of the illustration ''wl_checkusers.png''
-
Within the Users table, record the usernames you want to retain.
Record STA Usernames—Upgrades From STA 2.0.x or Later
For upgrades from STA 2.0.x or later, record usernames used to log in to STA. You cannot retrieve the passwords.
-
Log in to STA as an administrator user.
-
Expand the Setup & Administration tab, select Users.
-
Record the usernames and roles you want to retain.
Record STA Email Server Settings
Record the STA email protocol and account username. You cannot display the password.
-
Log in to STA as an administrator user.
-
Expand the Setup & Administration tab, select Email.
-
In the SMTP Server Settings table, select the StorageTek Tape Analytics Alerts record. Click Edit Selected SMTP Server
 .
.
-
In the Define SMTP Server Details dialog, record the following values:
-
Use Secure Connection Protocol
-
Username
-
Rename Custom Templates that Use the STA– Prefix (optional)
Rename any custom templates that have the prefix "STA-" to preserve them during the update. During STA 2.3.1 installation, all templates with the "STA–" prefix are deleted and replaced by new STA predefined templates.
-
Log in to STA as an administrator user.
-
Expand the Setup & Administration tab, select Templates Management.
-
Sort the table by date Created/Updated, to focus on templates that have been modified since the STA installation date.
-
Select the text link of a custom template with name prefixed "STA-".
-
Click Save Template in the Templates Toolbar.
-
In the Template Name field assign a new name. Your entry must be unique.
-
Click Save.
Record Current Custom Template Settings (optional)
After the upgrade, all custom templates are preserved, but they are owned by the STA application ("STA") with public visibility. Record the current ownership and visibility settings so you can restore them after the upgrade, if necessary.
-
Log in to STA as an administrator user.
-
Expand the Setup & Administration tab, select Templates Management.
-
Filter to only display custom templates. Click Filter
. -
Select Match ANY, and add Owner | Isn't | STA.

-
Click Apply.
-
Record the current Owner and Public Visibility settings for each custom template. If you have many templates, you may want to take a screen shot.
Record Executive Report Policy Settings (optional)
You only need to record executive report policy settings if STA has privately owned Executive Report policies. After the upgrade, all Executive Report policies are preserved, but they are assigned public ownership.
Use this procedure to record the current ownership settings for all private policies so you can restore them after the upgrade, if necessary. You can skip this procedure if Executive Report policy ownership is not critical to your implementation.
-
Log in to STA using an STA administrator username.
-
From the Setup & Administration tab, select Executive Reports Policies.
-
Filter to display privately owned policies. Click Filter
. -
Select Match ANY, and add Owner | Isn't | STA.
-
Click Apply.
-
Record the current Report Owner for each policy. If you have many policies, you may want to take a screen shot.
Record Logical Group Ownership Settings (optional)
After the upgrade, all existing logical groups are preserved, but they are owned by the STA application ("STA"). If you want to restore the ownership assignments after the upgrade, record the current ownership of the logical groups.
Logical group ownership is not critical to STA functioning, and any STA user with Operator or Administrator privileges can modify logical groups. Therefore, restoring the ownership assignments after the upgrade is not essential.
-
Log in to STA using an STA administrator username.
-
From the Setup & Administration tab, select Logical Groups.
-
Record the current Logical Group Owner for each group. If you have many policies, you may want to take a screen shot.