Upgrade STA
To upgrade to STA 2.3.1, you must deinstall the current STA version, install the new version, and then convert the existing data and database to the new schema. You can perform the upgrade by using a single-server or two-server method. The method chosen affects the order of the steps in the upgrade.
Before proceeding, review all tasks in Prepare STA for the Upgrade.
Caution:
Only a Linux administrator and STA administrator should perform the upgrade. All tasks are required and must be performed precisely as written in the order specified, or data loss could result.Decide on a Single-Server or Two-Server Upgrade
Choose to use either one or two servers for the upgrade. The upgrade tasks are largely the same for one- and two-server upgrades, but you will perform the tasks in a different order.
Considerations to help you decide on a method:
-
Single-server — Does not require an additional dedicated server for the upgrade. If you do not need to install a new version of Linux, this method may be sufficient. However, STA is not monitoring libraries while you deinstall STA, upgrade STA, and then convert the database. Downtime is longer than with the two-server method.
-
Two-server — Requires a second dedicated STA server. This method reduces application downtime since STA can continue to monitor libraries on the old server while you install Linux and STA on the new server. Even with this method, however, STA is not monitoring libraries while you convert the database. The length of downtime depends on the size of your current database.
Single-server Upgrade Process
For the single server method you perform Task 1 through Task 9 in sequential order.
Figure 7-1 Single-server Post-installation Upgrade Task Overview
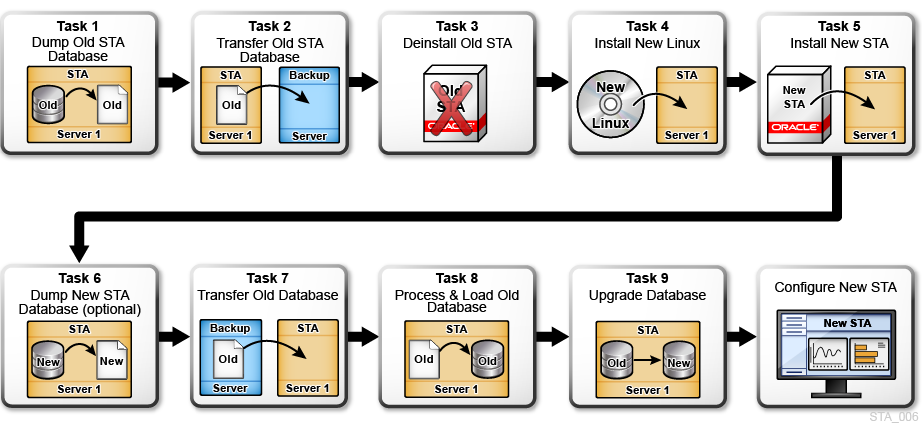
Description of ''Figure 7-1 Single-server Post-installation Upgrade Task Overview''
The single-server upgrade process is:
-
Reestablish connections to the monitored libraries, and perform necessary manual configuration tasks. Because the old version of STA must be deinstalled before you install STA 2.3.1, you must reenter some user configuration data manually.
Two-server Upgrade Process
In the two server upgrade, the order of the tasks is rearranged and Task 3 and Task 7 are omitted.
Figure 7-2 Two-server Upgrade Task Overview
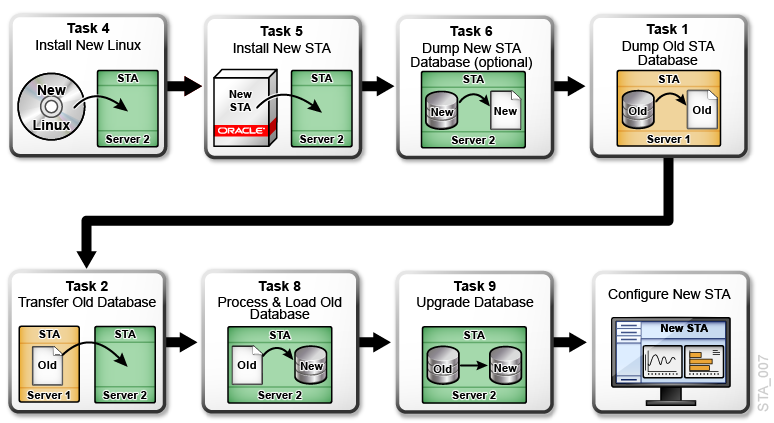
Description of ''Figure 7-2 Two-server Upgrade Task Overview''
The two-server upgrade process is:
-
Reestablish connections to the monitored libraries, and perform necessary manual configuration tasks.
Dump the Old STA Database (Task 1)
Perform a full dump of the STA database before upgrading.
-
IMPORTANT: This is not the first task if using the two-server method. See Two-server Upgrade Process for the order of procedures.
-
Display the size of your current STA database.
-
Log in to STA as an administrator.
-
Click About in the Status Bar.
-
Record the Database Current Size.
-
-
Verify that the location where you want to dump the database has sufficient space.
-
On the STA server, open a terminal session. Log in as the Oracle user.
-
Display the space available in the database dump destination, and verify it is sufficient for the dump file. For example:
$ df -h /dbdumpfiles
Filesystem                       Size  Used Avail Use% Mounted on
/dev/mapper/sta_server-STA_DbVol 200G   53G   243G  27% /dbdumpfiles
-
-
Stop all STA services:
$ STA stop all -
Start the MySQL service:
$ STA start mysql -
Dump the STA database into a single file (do not use the -v (verbose) option). Enter the database root user password when prompted.
$ mysqldump -uroot -p --opt --add-drop-database --comments --complete-insert --dump-date --events --flush-logs --routines --single-transaction --triggers --databases stadb > /dumpfile_path/dumpfile_name.sql
Enter password: mysql_root_password
In the following example, the STA 2.1.x database is dumped into the
/home/oraclefolder on the STA server with filenameJan26_dump.sql.$ mysqldump -uroot -p --opt --add-drop-database --comments --complete-insert --dump-date --events --flush-logs --routines --single-transaction --triggers --databases stadb > /home/oracle/Jan26_dump.sql -
To reduce the dump file size by approximately 50 percent, zip the file. For example:
$ cd /home/oracle
$ zip Jan26_dump.sql
Transfer the Old Database Dump (Task 2)
Transfer the compressed dump of the old STA database to either an off-platform backup server (single-server method) or the new STA 2.3.1 server (two-server method). This is the second task in a single server upgrade, but a later task in the two-server method.
-
IMPORTANT: If you are upgrading from STA 1.0.x with the single-server method, you must back up the STA database to another server. Do not backup the database to a file system on the current STA server, as the Linux installation in will destroy all data on the server.
-
If you have not done so already, stop all STA services:
$ STA stop all -
Record the checksum of the dump file. For example:
$ cksum /home/oracle/Jan26_dump.sql.gz 2169286306 37 /home/oracle/Jan26_dump.sql.gz -
Transfer the file to the target server using a transfer utility such as SCP. The
–poption preserves timestamp values.$ scp -p dump_file target_host:/path/
In the following single-server example, SCP is used to transfer the compressed database dump file
Jan26_dump.sql.gzto the/dbdumpfilesfolder on backup hostbackup1. The/dbdumpfilesfolder already exists on the backup host.$ cd /home/oracle $ scp -p Jan26_dump.sql.gz backup1:/dbdumpfiles
In the following two-server example, SCP is used to transfer the compressed database dump file
Jan26_dump.sql.gzto the/dbdumpfilesfolder on STA 2.3.1 hoststa_new.$ cd /home/oracle $ scp -p Jan26_dump.sql.gz sta_new:/dbdumpfiles
-
On the target server, perform a checksum of the transferred file. Verify that the checksum values match. For example:
$ cd /dbdumpfiles
$ cksum Jan26_dump.sql.gz
2169286306 37 Jan26_dump.sql.gz
Deinstall the Old STA Version (Task 3)
You must deinstall the current version of STA.
Caution:
Uninstalling STA removes all STA data on the server. Make sure you have backed up the database if using the single-server method.-
For the single-server upgrade method, make sure you have completed Dump the Old STA Database (Task 1) and Transfer the Old Database Dump (Task 2).
-
Log in as the system root user.
-
Change to the installation directory.
# cd /Oracle/StorageTek_Tape_Analytics_install -
Launch the STA deinstaller with one of the following commands:
-
To use the STA Deinstallation Wizard:
# ./Uninstall_StorageTek_Tape_AnalyticsSee Deinstall Using the Wizard for instructions. This mode requires an X11 display.
-
To use the STA console deinstaller:
# ./Uninstall_StorageTek_Tape_Analytics -i console
-
Install the New Linux Version (Task 4)
STA 2.3.1 is supported on Linux 6.8, 6.10, 7.7, and 7.8. If the server is not running one of these versions, you must upgrade it. If the server is already running a supported Linux version, skip this procedure.
Caution:
Installing a new operating system destroys all data on the server. Make sure you have backed up the database if using the single-server method.-
For a two-server upgrade, this is the first task performed. For the single-server upgrade method, make sure you have completed Dump the Old STA Database (Task 1) and Transfer the Old Database Dump (Task 2).
-
Install a supported version of Linux.
See Install and Configure Linux on the STA Server for instructions.
Install the New STA Version (Task 5)
Install STA 2.3.1 on the server.
-
See Install STA for instructions.
-
Once installed, log into STA to verify it is working properly. Because the upgrade process is not yet complete, the Dashboard panes display the message "No data to display". This is normal. The library data will display after you upgrade the database and configure the new STA version.
-
Log out of STA.
-
On the STA server, open a terminal session. Log in as the Oracle user.
-
Stop all STA services:
$ STA stop all
Dump the New STA Database (Task 6) - Optional
Dumping the new database is optional but recommended. If the database upgrade fails, you can restore the empty database to recover STA 2.3.1 as if it were newly installed with no data.
-
On the STA server, open a terminal session. Log in as the Oracle user.
-
If you have not done so already, stop all STA services:
$ STA stop all -
Start the MySQL service:
$ STA start mysql -
Create the database backup file (do not use the -v (verbose) option). Enter the database root user password when prompted.
$ mysqldump -uroot -p --opt --add-drop-database --comments --complete-insert --dump-date --events --flush-logs --routines --single-transaction --triggers --databases stadb > /dumpfile_path/dumpfile_name.sql
In following example, the STA 2.3.1 database is dumped to the
/home/oraclefolder on the STA server with filenameSTA_FRESH_INSTALL_BACKUP.sql.$ mysqldump -uroot -p --opt --add-drop-database --comments --complete-insert --dump-date --events --flush-logs --routines --single-transaction --triggers --databases stadb > /home/oracle/STA_FRESH_INSTALL_BACKUP.sqlIf you see, "Can't connect to local MySQL server," the MySQL server is not running. Make sure you have started MySQL.
Transfer the Old STA Database to the STA Server (Task 7)
In the single-server upgrade method, transfer the backup of the old database to the STA 2.3.1 server.
-
Only perform this procedure if using the single-server method. Skip if using the two-server method.
-
Stop all STA services on the STA 2.3.1 server:
$ STA stop all -
Transfer the database. The
–poption on for SCP preserves timestamp values.$ scp -p backup_host:/path_to_dump_file/dump_file_name.sql.gz /local_path
In the following example, SCP is used to transfer the compressed database dump file
Jan26_dump.sql.gzfrom/dbdumpfileson hostbackup1to the/home/oraclefolder on the STA 2.3.1 server.$ scp -p backup1:/dbdumpfiles/Jan26_dump.sql.gz /home/oracle -
Perform a checksum of the transferred file. Verify the checksum value matches the one you received when creating the database dump. For example:
$ cd /home/oracle/
$ cksum Jan26_dump.sql.gz
2169286306 37 /Jan26_dump.sql.gz
Process and Load the Old STA Database (Task 8)
Decompress the old database and reinstate it on the STA 2.3.1 server. The decompressed database may require 10 to 15 times as much space as the compressed database.
-
Stop all STA services on the STA 2.3.1 server:
$ STA stop all -
Decompress the backup file. For example:
$ cd /home/oracle
$ unzip Jan26_dump.sql.gz
-
Purge the STA database of obsolete data, such as processed SNMP records and empty analytics records.
Note:
A permanent record ofpurgerecscommand activity is saved in the STA database. Starting with STA 2.0, database purging also occurs automatically at runtime. Periodically, the MySQL Event Scheduler purges records from various tables to attenuate database growth.-
Change to the STA database updates directory.
$ cd /<Oracle_storage_home>/StorageTek_Tape_Analytics/db/updates
-
Initiate the purge (for help with
purgerecs, use$ ./purgerecs -h).$ ./purgerecs /path_to_dump_file/dump_file_name.sql /path_to_dump_file/dump_file_name_PURGED.sql
In following example,
purgerecsprocesses the MySQL dump fileJan26_dump.sqlin/home/oracle. The output is directed to a new file namedJan26_dump_PURGED.sqlin/home/oracle.$ cd /Oracle/StorageTek_Tape_Analytics/db/updates $ ./purgerecs /home/oracle/Jan26_dump.sql /home/oracle/Jan26_dump_PURGED.sql
-
-
This step is optional. Determine the database file size and estimate the load process time.
$ ls -s -h dump_file_name_PURGED.sql
-
Start the MySQL server:
$ STA start mysql -
Load the old STA database (do not use the -v (verbose) option). Enter the database root user password when prompted. There is no command output as the process runs.
$ mysql -uroot -p -e "SET SESSION SQL_LOG_BIN=0; SOURCE /path_to_dump_file/dump_file_name_PURGED.sql;"
Password: mysql_root_password
Where:
-
–p—Prompts for the database root password established during STA installation. -
–e—Execute the following quote-enclosed statements:-
SET SESSION SQL_LOG_BIN=0;—Turns off unnecessary binary logging, speeding up the load. -
SOURCE/path_to_dump_file/dump_file_name_PURGED.sql—Loads the dump file into the DB.
-
If the command is successful, you are returned to the command prompt once the process completes.
-
Upgrade the Old Database (Task 9)
Upgrade the old STA database schema to the latest one for STA 2.3.1
If upgrading from several levels down, the upgrade script will automatically perform multiple transformations until the database is up to the latest schema. Once successfully upgraded, the STA schema will be at R68.00.
-
Stop all STA services:
$ STA stop all -
If you determined in Verify the Environment Meets 2.3.1 Requirements that the size of
/tmpis not sufficient for the upgrade, increase the size of/tmpas necessary.If this is not possible, set an environment variable for MySQL to use an alternate temp location:
-
Create an alternate temp location and assign open permissions to it. For example:
$ mkdir /dbbackup/tmp
$ chmod 777 /dbbackup/tmp
-
Stop MySQL:
$ STA stop mysql -
Edit the MySQL configuration file. For example:
$ vi /etc/my.cnf -
In the
mysqldsection of the file, add a line defining the alternate temp location, which is identified by thetmpdirvariable. Following is an example of the file after this line has been added.[mysqld] #----- mysqld MySQL Server Options ------------------------- tmpdir = /dbbackup/tmp server-id = 1 ...
-
Restart MySQL:
$ STA start mysql
-
-
Change to the database updates directory.
$ cd /<Oracle_storage_home>/StorageTek_Tape_Analytics/db/updates
-
Start the upgrade script, and enter the database root user password when prompted.
For example:
$ sudo ./upgradedb.sh -
Wait until you see the finish banner before proceeding.
+-------------------------------------------------------------+
| Started.................2020-02-12 15:14:45                 |
| Finished................2020-02-12 17:07:11                 |
| Elapsed Time............01:52:26                            |
| Starting Version........65.00r0                             |
| Final Schema Version....68.00r0                             |
+-------------------------------------------------------------+
-
If you increased the size of
/tmpor created an alternate temp location, restore it to its normal size and location. -
Start all STA services:
$ STA start all -
This step is optional. Delete the
STA_FRESH_INSTALL_BACKUP.sqlfile to free up disk space on the STA database backup volume. -
To check the level of the database, log into the STA GUI and click About... in the bottom right of the screen. The dialog should display "Current Database Schema Version: 68.00".
Recover a Failed Database Upgrade
If the database upgrade does not complete successfully and repeated attempts to upgrade have also failed, you can attempt to recover.
-
IMPORTANT: Only perform this procedure under the direction of your Oracle support representative.
-
Repeat the last step of Process and Load the Old STA Database (Task 8) through Upgrade the Old Database (Task 9).
If the upgrade fails again, the database is in an unknown, possibly damaged state and you should restore the database to its original, freshly installed state. Proceed to the next step.
-
Delete the damaged upgraded database.
$ mysql -uroot -p -e "drop database stadb;" -
Change to the STA database backup location and load the new installation database dump file you created in Dump the New STA Database (Task 6) - Optional.
For example:
$ cd /dbbackup
$ mysql -uroot -p -e < /home/oracle/STA_FRESH_INSTALL_BACKUP.sql
-
Perform Upgrade the Old Database (Task 9).
-
Configure STA as a new installation. See the following sections for details: