| Oracle® Agile Engineering Data Management Administration Guide Release e6.2.1.0 E69111-01 |
|

 Previous |
 Next |
| Oracle® Agile Engineering Data Management Administration Guide Release e6.2.1.0 E69111-01 |
|
Previous |
Next |
Customer adapted files which are part of a deployment, have to be adapted outside the WebLogic server. The same applies for the Tomcat application server for a DFM remote site installation. These adapted files will be available even after applying a hotfix.
|
Note: We do not support the changing of Agile e6 files directly in the Oracle WebLogic server deployment.The same applies for the Tomcat application server for a DFM remote site installation. |
The deployment process in Agile e6 will create a "staging" directory in <ep_root> with four subdirectories and is active for all described batch deployment tasks.
All four subdirectories contain an "installation" directory for all application-independent deployments and an "application" directory containing an additional subdirectory for each Agile e6 application. This subdirectory contains the application specific deployments (e.g. the BusinessService).
product:
This directory contains a subdirectory for every deployed component. Under these subdirectories, the unzipped archives are available. If you want to modify any file in the archive, the file has to be copied to the same directory in the "custom" folder.
|
Note: When redeploying, changes made in this directory and its subdirectories will be lost. |
custom:
|
Note: This is the ONLY folder where you should make changes to files and add directories. |
This directory contains the same directory structure as the "product" folder without files (except one, see Adapting Business Service Notification Mail Templates). Copy the files you want to modify from the "product" folder to the corresponding directory in this folder.
|
Note: Files cannot be deleted from the "product" folder by copying them to the "custom" folder, and deleting them there. |
merged:
This directory contains the merged result of the "product" and "custom" folders. In this directory structure you can check if your adapted files are available in the unzipped archive.
From this directory structure, the final archive will be created in the deploy directory.
|
Note: When redeploying, changes made in this directory and its subdirectories will be lost. |
deploy:
This directory contains the final archive before it will be deployed.
|
Note: When redeploying, changes made in this directory and its subdirectories will be lost. |
If you are installing a hotfix, you might get updates for files you have adapted in the past.
To keep the adaptations, do the following:
Check for changes in the readme file of the hotfix package.
Backup your "product" folder.
Install the hotfix.
Compare the backup of the "product" folder with the new "product" folder to identify any files which have been changed.
If you have modified any of these files in the "custom" folder, then apply the changes to the files in the "product" folder manually.
Redeploy the application to activate the changes.
Business Services are always deployed if a new application is created with the Administration client. Therefore, the availability of the application server is mandatory.
If you want to perform additional changes to the Workflow module, you have to edit the configuration file for the Business Services.
|
Note: For further information about the Workflow module, please refer to the Workflow Online Help. |
To modify the configuration file, you have to perform the steps described in the section Deploying Customer Adapted Files of this document.
Example: Adapt values in "ABS_<application_name>.ini" file of the Business Service.
To modify the configuration file, it can be copied from the "product" directory after the installation. The file is available under: "<ep_root>\staging\product\application\<application_name>\BusinessService\BusinessService.war\WEB-INF\classes".
Save the modified file to the folder:
"<ep_root>\staging\custom\application\<application_name>\BusinessService\BusinessService.war\WEB-INF\classes".
The file that you modified will be used with the next deployment of the Business Service.
The Business Services will connect to the defined database user/schema directly after they are started in the Oracle WebLogic server.
|
Note: Once this connection is lost, e.g. due to database reboot, due to dropping of the database schema, or due to loss of service, you must restart the Business Service inside the Oracle WebLogic server. |
|
Note: It is also possible to restart the complete Oracle WebLogic server, but all the included services will not be available for that time. |
After the first Business Service deployment of a new application, the notification mail templates are unpacked and available under:
"<ep_root>\staging\custom\application\<application_name>\BusinessService\BusinessService.war\WEB-INF\lib\abs-notifier-templates\lay\notifier"
All adaptations made to files in this directory, also all new files, will be available after the next deployment of the Business Service. All files and directories below the "abs-notifier-templates" directory will be automatically packed to "abs-notifier-templates-1.0-SNAPSHOT.jar" file, which will be used for the deployment.
For WebLogic, default settings are available for the data source definition and can be customized. To customize them, the following template file has to be edited:
%EP_ROOT%\build\applicationServer\weblogic_122\tpl_app\ear\tpl_eSeriesDataSource-jdbc.xml
|
Note: For further information about WebLogic, please refer to the respective documentation:http://docs.oracle.com/middleware/1221/wls/JDBCP/ds_annotation.htm |
Example for default values for the connection pool:
<jdbc-connection-pool-params>
<pinned-to-thread>true</pinned-to-thread>
<initial-capacity>5</initial-capacity>
<max-capacity>150</max-capacity>
<statement-cache-size>100</statement-cache-size>
<statement-cache-type>LRU</statement-cache-type>
<connection-reserve-timeout-seconds>120</connection-reserve-timeout-seconds>
<test-table-name>SQL SELECT 1 FROM DUAL</test-table-name>
</jdbc-connection-pool-params>
|
Note: When configuring the minimum/maximum number of connections (<initial-capacity>), every connection needs a database process. Thus, the database has to have enough processes. Please check the configuration values in file: tpl_eSeriesDataSource-jdbc.xml and refer to your database administrator for further details. |
|
Note: Further information about how to increase the performance can be obtained in an Oracle WebLogic training session. |
|
Note: Only supported with the Java Client. |
PLM-API allows the communication with the Agile e6.2.1.0 application server through firewalls (via HTTPS).
For further information on the architecture, refer to the Architecture Guide for Agile e6.2.1.0.
The PLM-API is always deployed if a new Agile e6.2.1.0 server installation is created and can be used for all created applications of the installation. To be able to use the PLM-API, it has to be configured in the Java Client. To use the PLM-API, The WebLogic server needs to be setup for HTTPS usage. Detailed information how to configure the WebLogic Server can be found in the WebLogic Server documentation on the Oracle Technology Network (http://www.oracle.com/technetwork/index.html).
For further information on how to set up the HTTPS support in the Java Client, refer to the section Online Help > Getting Started > Preferences, and the Architecture Guide for Agile e6.2.1.0.
|
Note: Agile e6.2.1.0 has to be installed! |
For all batch tasks set the JAVA_HOME environment variable to Java 8 64-bit JDK before you execute setup.cmd/setup.csh in a cmd/csh shell.
Use the installation user of the Agile e6.2.1.0 installation.
| Windows | UNIX |
|---|---|
| Use an administrator cmd shell. | Use a csh shell. |
| Execute setup.cmd for all batch tasks in:
%ALLUSERSPROFILE%\agile\installer\6.2.1 |
Execute setup.csh for all batch tasks in:
${HOME}/.agile/installer/6.2.1 |
A properties file ("batch.properties") has to be created in one of the following directories by making a copy of the tpl_installation.properties file and adapting the properties in it:
| Windows | UNIX |
|---|---|
| %ALLUSERSPROFILE%\agile\installer\6.2.1\properties | ${HOME}/.agile/installer/6.2.1/properties |
Example:
| Windows | UNIX |
|---|---|
cd %ALLUSERSPROFILE%\agile\installer\6. 2.0 set JAVA_HOME=<java8_64bit_home> setup.cmd application.install setup.cmd application.install -propertyfile properties\batch.properties > batch_ install.log 2>&1 |
cd ${HOME}/.agile/installer/6.2.1
setenv JAVA_HOME <java8_64bit_home>
./setup.csh application.install -propertyfile  properties/batch.properties >& batch_install.log
|
|
Note: On UNIX, use different redirector settings for stderr and stdout |
|
Note: After each batch installation task, check the log file. |
Copy the template properties file installer/properties/tpl_installation.properties to installer/properties/batch.properties.
Replace the text in brackets (<CHANGETHIS>) with the values of your application.
You can use different batch properties files for each application.
# Defines if the schema will be created (system password also has to be applied for creating a schema)
plm.application.creschema=true
# Defines if the content of an existing schema will be deleted (Attention: All objects of the defined schema will be lost)?
plm.application.delschemaobj=false
# Database to import as defined in installation_prop.xml (normally no need to change this)
plm.application.databasedefinition=oradb
plm.oracle.systempwd=<systempwd>
After defining the properties, execute (example):
setup.cmd application.install -propertyfile properties/batch.properties > application_install.log 2>&1
This will create the application directory and the configuration files in the <ep_root>/init directory. Additionally, if enabled, the schema will be created and the reference dump will be imported.
To deploy the J2EE applications for an Agile e6 application, the following additional steps need to be executed.
Create J2EE application domain (example):
setup.cmd j2eeappserver.install.domain_app -propertyfile properties/batch.properties > install_domain_app.log 2>&1
Deploy J2EE applications (Business Service, Web Services) to domain (example):
setup.cmd j2eeappserver.deploy.app -propertyfile properties/batch.properties > deploy_app.log 2>&1
Use this ant task to set the plm manager user password of an existing application. This will overwrite current password of the plm manager user in the database.
Create a properties file "properties/batch.properties" with following properties (example):
plm.inst.name=AgileInstallation
plm.application.name=plmref
plm.application.managerpassword={PLM-AES-128}RSA-PUBLIC-BASE64:O/NCRL5LUX....
Execute:
setup.cmd application.setmanagerpassword -propertyfile properties/batch.properties
Each of the following redeployment tasks requires a property file with at least the following content.
Create a common Properties file (example):
plm.inst.name=<installation_name>
|
Note: Replace <installation_name> with your installation name (e.g. AgileInstallation62). |
|
Note: The following three deployment tasks require additional properties:
|
Redeploying a Business Service causes a recreation of the Business Service 'ear' file and the deployment with the configured values as defined in the installation_prop.xml file.
Add the following lines to the common properties file (example):
plm.application.name=mytest
plm.application.dbpassword={PLM-AES-128}RSA-PUBLIC-BASE64:JoQb6W...
|
Note: The encrypted password "plm.application.dbpassword" is the database schema password for this application and has to be encrypted with epkeytool.For further information about the epkeytool please refer to the Security Guide for Agile e6.2.1.0. |
Redeploy BusinessService (example):
setup.cmd j2eeappserver.deploy.businessservice -propertyfile properties/batch.properties > deploy_businessservice.log 2>&1
Add the following line to the common properties file (example):
plm.application.name=mytest
Redeploy the Web Service (example):
setup.cmd j2eeappserver.deploy.webservices.core -propertyfile properties/batch.properties > deploy_webservices.log 2>&1
Web Development Toolkit is not deployed after default installation. If you want to use it, you have to deploy it first.
|
Note: This can also be used to redeploy the Web Development Toolkit. |
Add the following line to the common properties file (example):
j2eeappserver.deploy.webdevelopmenttoolkit=true
Redeploy (example):
setup.cmd j2eeappserver.deploy.webdevelopmenttoolkit -propertyfile properties/batch.properties > deploy_wdt.log 2>&1
Redeploy (example):
setup.cmd j2eeappserver.deploy.javaclient -propertyfile properties/batch.properties > deploy_javaclient.log 2>&1
Redeploy (example):
setup.cmd j2eeappserver.deploy.webpresentationservice -propertyfile properties/batch.properties > deploy_wps.log 2>&1
Redeploy (example):
setup.cmd j2eeappserver.deploy.httpsupport -propertyfile properties/batch.properties > deploy_httpsupport.log 2>&1
Redeploy (example):
setup.cmd j2eeappserver.deploy.webfileservice -propertyfile properties/batch.properties > deploy_wfs.log 2>&1
Redeploy (example):
setup.cmd j2eeappserver.deploy.fileservices -propertyfile properties/batch.properties > deploy_sfs.log 2>&1
Redeploy (example):
setup.cmd j2eeappserver.deploy.jvue -propertyfile properties/batch.properties > deploy_jvue.log 2>&1
Redeploy (example):
setup.cmd j2eeappserver.deploy.vuelink -propertyfile properties/batch.properties > deploy_vuelink.log 2>&1
|
Note: When redeploying the VueLink, you need to reopen any AutoVue window and restart the AutoVue Metafile Cache Service. |
You can replace the standard random based DataView algorithm for generating C_ID with an algorithm based on database sequences. The mechanism was previously used for environments with database replications only.
The algorithm uses a database sequence to generate the next free C_ID number. Every table uses an distinct db sequence with name <table_name>_SEQ.
To avoids conflicts with already existing C_IDs the values need to be between 01 and 1 Billion (minimum value 1 - maximum value 1 billion. As a standard, DataView uses the value range from 1 billion to 2 billion.
|
Note: The Workflow still creates the C_ID by normal random algorithm between 1 billion and 2 billion. |
Initial setup of your environment to use C_ID generation based on Database Sequences
Activate Library by opening the file ep_root\init\<application_name>.xml and uncommenting the following in the <Modules>:
<Custom>
 <cid_by_seq  Name="CID by Sequence" Library="cid_by_seq" Startup="immediately" />
 </Custom>
|
Note: Do not activate the module in both files (axalant.xml and <application-name>.xml) otherwise the application cannot be started. |
|
Note: Module name "cid_by_seq" must be written in lower case characters. |
Create DB stored function in your oracle dump
Start sql plus as db user of your e6 application in the directory where you have stored the sql script to create the db procedure (axalant\db_util\oracle\sql)
Execute the SQLPLUS> @dbs_cid_by_seq.sql
Create sequences for all tables containing a column C_ID. Available range of C_ID's is from 01 to 1 Billion.
Start sql plus in the directory where you have stored the sql script to create all sequences (axalant\db_util\oracle\sql)
Execute script dbs_cre_seq_all.sql
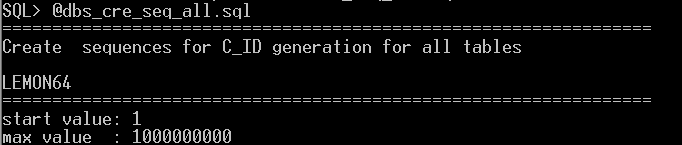
Type in values for Start Value and Max value.
The script generates a sql scripts dbs_cre_seq_all_run.sql containing statements to drop existing sequences for c_id generation and statements to created new sequences with the start and maximum values as defined
You are then prompted to either
Continue with <ENTER> - executes the newly generated script directly
Abort with <CTRL C> - review the generated script first and if necessary adapt the script. The script needs to be execute separately in sqlplus.
To check, if the new algorithm works correctly, do the following:
Log-into e6
Activate SQL-Trace
Insert a document and check in the generated trace file which C_ID was generated (search for insert into t_doc_dat)
Configure new tables with c_id generation based on DB Sequences
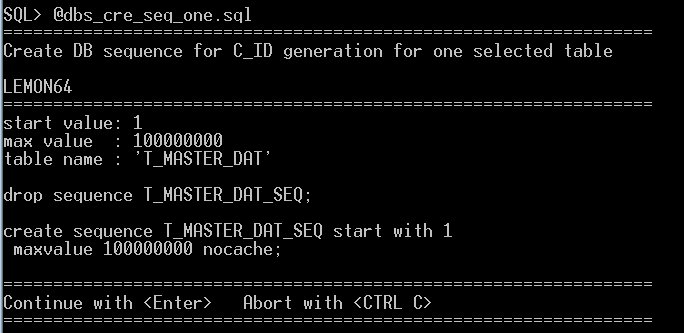
If you create a new table using DataView the necessary sequence for this table will not be created automatically! You have to create the sequence manual using the SQL-Scripts dbs_cre_seq_one.sql (input parameters: start value, max value, table name). The scripts follow the same process as described above in the initial setup, but one additional input parameter is added - the table _name for which the sequence should be created.
Start sql plus in the directory where you have stored the sql script to create the db procedure (axalant\db_util\oracle\sql)
Execute the scripts as follows:
|
Caution: If no sequence exists, the old generation from dtv method will be used! |
