| Oracle® Agile Engineering Data Management Administration Guide Release e6.2.1.0 E69111-01 |
|

 Previous |
 Next |
| Oracle® Agile Engineering Data Management Administration Guide Release e6.2.1.0 E69111-01 |
|
Previous |
Next |
The Agile e6.2.1.0 Administration client lets you create, configure, and delete Agile e6.2.1.0 applications via the web browser. Agile recommends that you use a supported browser (see Prerequisites Guide for Agile e6.2.1.0) to connect to the Administration client.
|
Note: If you are getting a security message from your browser, you might have to add the Administration client to the trusted websites in your browser settings. |
The Administration client will be installed automatically with the installer if you install a server component. It can be used to create new, or modify existing applications. The Administration client is a web based application and is deployed in an Apache Tomcat servlet container. For detailed information on Apache Tomcat servlet container refer to:
Currently we are using Apache Tomcat v8.5.9
In the Agile e6 package, you can find Apache Tomcat in:
Windows: %ALLUSERSPROFILE%\agile\installer\6.2.1\admin
UNIX: ${HOME}/.agile/installer/6.2.1/admin.
|
Note: To prevent sensitive data from being compromised, secure data transfer by using HTTPS is recommended. For more information refer to the Security Guide. |
Windows:
Start the service "AgilePLM_AdminClient".
Set the startup type to "Automatically".
UNIX:
Use the standard Apache Tomcat startup.
Stop scripts.
|
Note: A 64-bit Java 8 version has to be used. |
To set the 64-Bit Java 8 for Tomcat on UNIX:
Create the file "setenv.sh" in the $HOME/.agile/installer/6.2.1/admin/apache-tomcat/bin directory of Tomcat with a line like:
export JAVA_HOME=/usr/local/java/jdk8
Tomcat will automatically use this Java version which must point to a 64-bit Java.
Start Tomcat with "startup.sh".
Stop Tomcat with "shutdown.sh".
Tomcat will show the used Java version at startup with something like:
Using JAVA_HOME: /usr/local/java/jdk8
The Administration client Password has to be defined after the first startup. Login without definition of the password is not possible.
Create new encrypted password.
To create a new password, execute:
Windows:
cd %ALLUSERSPROFILE%\agile\installer\6.2.1
tools\bin\epkeytool.bat -encryptpwd -keyStore file://%ALLUSERSPROFILE%/agile/installer/6.2.1/wallets/adminclient/private/adminclient/cwallet.sso -keyAlias orakey
UNIX:
cd ${HOME}/.agile/installer/6.2.1/tools/bin
./epkeytool.sh -encryptpwd -keyStore file://${HOME}/.agile/installer/6.2.1/wallets/adminclient/private/adminclient/cwallet.sso -keyAlias orakey
The resulting output is your encrypted password.
|
Note: The password is also stored in the clipboard. |
Find encrypted password.
The encrypted password for the Administration client can be found in:
Windows:
%ALLUSERSPROFILE%\agile\installer\6.2.1\admin\apache-tomcat\webapps\AdminClient\metadata\Adminserver_Props.txt
UNIX:
$HOME/.agile/installer/6.2.1/admin/apache-tomcat/webapps/AdminClient/metadata/Adminserver_Props.txt.
Copy the newly generated password into the "Adminserver_Props.txt" file at the password property, and restart the Apache Tomcat process.
The password of the user "weblogic" is used to execute any administrative tasks on a Weblogic Server administration console when the Weblogic Server was installed and is in use together with Oracle Agile e6?
In this section the placeholder <DOMAIN> is used for:
eSeries_Domain when talking about the Installation Domain
eSeries_Domain_<App> when talking about the domain of an application called <App>
Example:
eSeries_Domain_plmref when talking about the domain of the application "plmref")
<Domain Root> is the installation path to the domains of the Oracle Weblogic Server. When installed with Oracle Agile e6 the path looks like this:
Unix:
/app/plm/product/Middleware/user_projects/domains
Windows:
C:\PLM\Middleware\user_projects\domains
Adaptions when using the nodemanager
Log in to the admin console of the domain <DOMAIN> and check that all servers are in "RUNNING" state (if not start them)
In the console on the left (in the domain structure) click "security realms" and select "myrealm". On the right, change to the folder "Users and Groups", click user "weblogic" and change to the sub folder "Passwords". Insert the new password (twice) and finish by clicking "Save".
Again, on the left, in the domain structure, click the root object "<DOMAIN>". On the right, click the folder "Security" and go down that page and click "Advanced" at the bottom: Additional fields are opened further down on that page.
In the upper left corner, in the Change Center, click the "Lock and Edit" button
Now, on the right, go down to the "NodeManger Password" field and insert the new password here and additionally fill the field "Confirm NodeManager Password" with the same value.
Go to the Change Center again and click "Activate Changes".
Now, stop the eSeries-01 server and then the AdminServer in the admin console.
Change the password behind the "password=" tag and add the new value in clear text. in both nodemanager boot files of the admin server and of the eSeries-01 server
<Domain Root>/<DOMAIN>/servers/AdminServer/data/nodemanager/boot.properties
<Domain Root>/<DOMAIN>/servers/AdminServer/data/nodemanager/boot.properties
<Domain Root>/<DOMAIN>/servers/eSeries-01/data/nodemanager/boot.properties
|
Caution: No "non printable" characters like CR or LF are allowed in these files! |
|
Note: If one of the boot.properties files does not exist, then copy that file from the same location of the Installation Domain. In this case both the user (weblogic) as well as the password have to be entered in clear text into that file! |
Finally, restart the servers of that domain through WLST (see note 1439622.1). Be aware and use the new password to connect to the node manager now!
Log in to the admin console with the new password and check if the servers are up and running and all deployments are there and in an active state.
Two files with encrypted user credentials per domain are in use for redeployments. Therefore these files need to be recreated as well.
Create a property file (batch.properties) with the following properties
plm.inst.name=<installation_name>
plm.j2eeappserver.adminserver_password={PLM-AES-128}RSA-PUBLIC-BASE64:JoQb6W...
plm.application.adminserver_password={PLM-AES-128}RSA-PUBLIC-BASE64:JoQb6W...
|
Note: Replace <installation_name> with your installation name (e.g. AgileInstallation62). |
|
Note: The encrypted password "plm.j2eeappserver.adminserver_password" is the new password for the installation domain and has to be encrypted with epkeytool. The encrypted password "plm.applicaton.adminserver_password" is the corresponding new password for the application domain.For further information about the epkeytool please refer to the Security Guide for Agile e6.2.1.0. |
Update the file which contains the encrypted password for (re)deployment.
        "Installation Domain: setup.cmd j2eeappserver.deploysetup -propertyfile batch.properties
        "Application Domain: setup.cmd j2eeappserver.deploysetup_app -propertyfile batch.properties
|
Note: Make sure to remove the batch.properties file again after changing the password. |
Adapt all other Weblogic Server Domains accordingly.
|
Caution: If the boot.properties files in the nodemanager directories are adapted but the appropriate server is never started with the node manager the files stay unchanged and the new password can be read from them as it is still there in clear text.Therefore, after the password changes are finished and all servers are running again properly, double check all files called "boot.properties" that none of them still contains the new password in clear text. |
|
Note: These instructions can be used for one domain only and do not have to be processed for all domains of a Weblogic Server installation at the same time. However, it is not recommended (and will not be supported) to keep different passwords on different domains on the same Weblogic Server. Therefore, please update gradually all domains that the passwords of the weblogic user match everywhere before you execute further administrative tasks on the Oracle Agile e6 installation or on the Weblogic Server itself. |
Tomcat is configured with a HTTP connector by default.
|
Note: The Administration client uses default ports (e.g. 8080 for the HTTP connector). |
If you want to change this port you have to edit the Apache Tomcat "conf/server.xml" file and restart the Apache Tomcat process.
We recommend enabling HTTPs for the Administration client. For more information refer to:
Access the Administration client via
http://<servername>:8080/AdminClient
The login screen opens.
Log in with the following parameters:
User: plm
Password: Your newly generated password
The Welcome screen is opened.

All available installations that can be configured, appear under Components in the navigation pane at the left hand side.
Under References, the available Database Connection, Database Server Definition, and Application Servers can be found.
Under <application name> -> Application, click Create.
The Create new application screen appears.
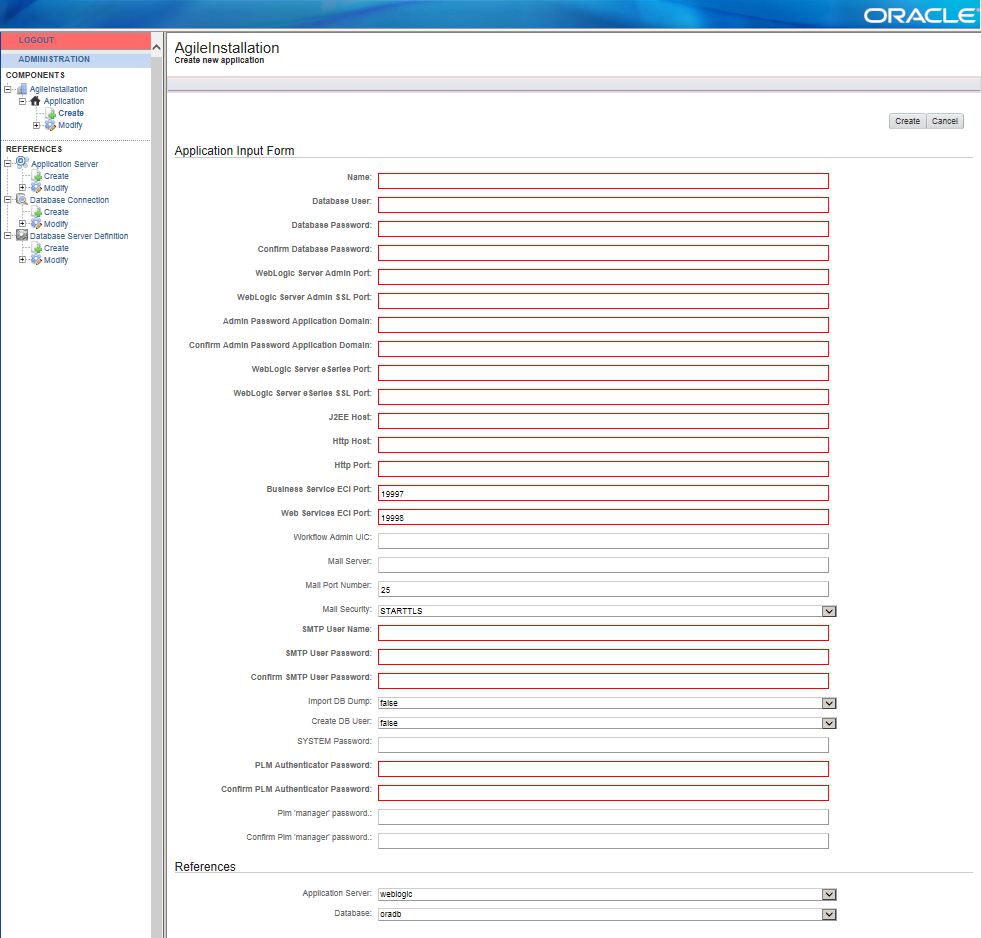
Create a new application with the following parameters:
Application Input Form
| Setting | Description |
|---|---|
| Name | The name of the default application you want to create. |
| Database User | The database user you want to use for the application. |
| Database Password | The password of the database user. |
| Verify Password | The password entered above has to be repeated for the verification. |
| WebLogic Server Admin Port | The listen port for the WebLogic administration server which will contain the WebLogic administration console. |
| WebLogic Server Admin SSL Port | The SSL listen port for the WebLogic administration server which will contain the WebLogic administration console. |
| Admin Password Application Domain | The password of the WebLogic user used for the application domain. |
| Confirm Admin Password Application Domain | The password entered above has to be repeated for verification. |
| WebLogic Server eSeries Port | The listen port for the WebLogic EDM server. The installer will create a separate managed server with the name "eSeries-01" in addition to the administration server. This server will contain the application specific deployments. |
| WebLogic Server eSeries SSL Port | The SSL listen port for the WebLogic EDM server. The installer will create a separate managed server with the name "eSeries-01" in addition to the administration server. This server will contain the application specific deployments. |
| J2EE Host | The host on which Business and/or Web Services are running.
The WebLogic server host name. |
| Http Host | The host where the Web Client can be reached over HTTP.
The WebLogic server host name. |
| Http Port | The port where the Web Client can be reached over HTTP.
The HTTP port of WebLogic server. |
| Business Service ECI Port | The port where the Business Service will be configured to "wait" for requests. |
| Web Services ECI Port | The port where the Web Services will be configured to "wait" for requests. |
| Workflow Admin UIC | The UIC of an Agile e6 user who has administrative rights for the Workflow module. He will receive mails about administrative problems in the Workflow module (1000 - 99999).
This user needs a valid e-mail address as a test e-mail is send when starting the Messenger. The messenger does not work at all if this email is missing or wrong! |
| Mail Server | The name of your SMTP mail server if you want to send emails via the Business Services. Mailing will be disabled if no host name is set. |
| Mail Port Number | The port number of your SMTP mail server if you want to send emails via the Business Services. (587 is the submission port for using encryption. 25 is the old standard SMTP port). |
| Mail Security | Choose the security of your mail server (STARTTLS or SSL/TLS) |
| SMTP User Name | User name for your SMTP mail server. |
| SMTP User Password | SMTP User Password for your SMTP mail server.
Password must be encrypted, plain text will not be accepted |
| Confirm Mail Auth Password | The password entered above has to be repeated for verification. |
| Import DB Dump | Select if you want the standard dump to be imported to the above defined database user. |
| Create DB User | Select if you want the database user to be created automatically. |
| SYSTEM Password | Password of the Oracle database user.
Note: You only have to supply a value here if you want to create a new database user and have selected this in the field above. |
| PLM Authenticator Password | Password of the WebLogic user PlmAuthenticatorDSUser, which secures the Data Source PlmAuthenticatorDS used by the PLM Authentication provider. |
| Confirm PLM Authenticator Password | The password entered above has to be repeated for verification. |
| Plm 'manager' password | If you selected "Import DB Dump", apply the password which the plm 'manager' user of the created application should have. |
| Verify Password | If you selected "Import DB Dump", the password entered above has to be repeated for verification |
References
In the References section you can define which database and application server must be used for this application. Normally, you don't have to change these values.
| Setting | Description |
|---|---|
| Application Server | The name of the reference of the Oracle WebLogic Server where Web Services and Business Service will be deployed. |
| Database | The name of the reference of the database you want to use for the application. |
|
Note: Creating a new application can take up to 20 minutes. If a database user will be created, the database dump for the application has to be imported, the domain created and setup. |
|
Note: In case you receive the error "The connection has timed out", please check if the new application is installed correctly.
|
Click Create.
To update an application click Application > Modify <application name>.
Click "Edit" in the upper right corner to be able to change the values for the application.
Change the necessary values.
To apply the changes, click "Update" in the upper right corner.
The Admin server will redeploy the Web Services and Business Services for this application with the new values.
|
Note: It is NOT recommended updating a production application that is in use and running. |
It is possible to delete the application with the "Delete" button in the upper right corner.
|
Note: Deleting an application will not remove the domain for Web Services/Business Service from the Oracle WebLogic Server. This must be done manually.Refer to the support note "How to Remove/Delete a Weblogic Server (WLS) Domain (Doc ID 1068323.1)" on My Oracle Support. Also, the used database schema remains unchanged. |
To use a new database for an application, the following components are required:
Valid database connection string.
Valid definition of a database used by a database connection.
Running SQL Net.
To create a new database connection:
In the left pane, under References > Database Connection click Create.
The Create new database connection screen appears:
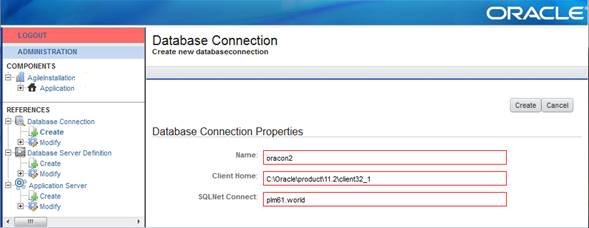
Create a new database connection with the following parameters:
| Setting | Description |
|---|---|
| Name | The new name which identifies the connection. |
| Client Home | The Oracle Client Home directory. |
| SQLNet Connect | The SQLNet connect string as defined in e.g. tnsnames.ora. |
Click Create in the upper right corner.
To define a new database server:
In the left pane, under References > Database Connection, click Create.
The Create new database definition screen appears:
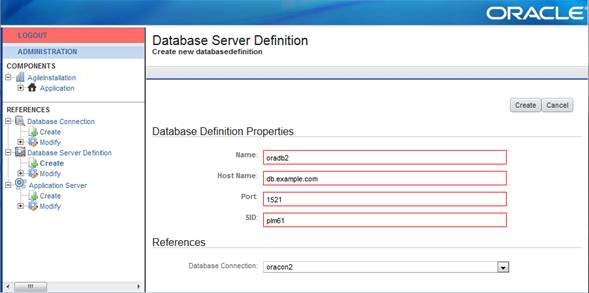
2. Create a new database server with the following parameters:
| Setting | Description |
|---|---|
| Name | The new name which identifies the database definition. |
| Host Name | The host name of your database server. |
| SID | The SID of the database you want to connect to. |
| Port | The port where the listener listens on the database server. |
Under References, define a database connection.
The database connection, which is used to connect to the database in reference section.
Click Create in the upper right corner.
In the left pane, under References > Application Server click Create.
The Create new application server definition screen appears:
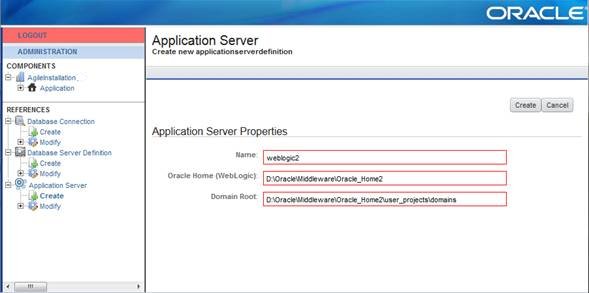
Define a new application server with the following parameters:
| Setting | Description |
|---|---|
| Name | The new name which identifies the Oracle WebLogic server definition. |
| Oracle Home (WebLogic) | The Oracle Home directory where WebLogic is installed (e.g.: D:\Oracle\Middleware\Oracle_Home). |
| Domain Root | The root directory where the Agile e6 WebLogic domains should be created (e.g.: D:\Oracle\Middleware\Oracle_Home\user_projects\domains).
In this directory the installer will create all domains used by the Agile e6 J2EE components. |
Click "Create" in the upper right corner.
In the left pane, expand the "Modify" node of either:
Reference > Database Connection
Reference > Database Server Definition
Reference > Application Server
Select the name of the reference.
Click "Delete" in the upper left corner.
|
Note: This will only delete the reference in the "installation_prop.xml" file if the reference is not in use. If it is in use, an error message is displayed.Nothing else will be deleted. |
|
Note: The enhanced security module is enabled in each newly created application (with a new dump) by default. You can only log in to this application with the user "manager"! |
Perform the following steps:
Start an Agile e6.2.1.0 client and log in to your application with the user "manager". The password of the "manager" user is the one you applied during installation, applicationcreation.
All other users are deactivated and have to be activated by setting a new valid password for them.
Set the password for user "EDBCUSTO" and all other standard users:
Start Agile e6.
Open menu Manager > Permissions > User > Basic Data.
To set the password, click Refresh.
Select user "EDBCUSTO".
Open the context menu and select Set Password.
|
Note: At the first log in of user "EDBCUSTO" with the initial password, the user will be asked to set a new password. This will be the password for future logins. |
Repeat these steps for all newly created users and standard users.
|
Note: Further information about the user management can be found in the Online Help > Customizing Agile e6 > Data View > Data View User's Guide > Users, Groups and Privileges. |
