| Oracle Agile Engineering Data Management Server Installation Guide on Windows and UNIX Release e6.2.1.0 E69109-01 |
|

 Previous |
 Next |
| Oracle Agile Engineering Data Management Server Installation Guide on Windows and UNIX Release e6.2.1.0 E69109-01 |
|
Previous |
Next |
|
Note: This chapter describes the manual installation of the Oracle WebLogic 12cR2 (12.2.1.2.0) Server. Keep in mind that on UNIX only the manual installation can be performed. For the installation on a Windows operating system with the Agile e6 Installer see chapter Installation with the Agile e6 Installer. |
|
Note: Before you begin with the installation of Oracle WebLogic Server, note the following: |
The generic Oracle WebLogic Installer must be started with the installed 64-bit Java 8 JDK.
The Generic Oracle WebLogic Server (jar file) cannot be started with 32-bit JVM.
|
Note: Installing the WebLogic Server and the EDM Server on the same UNIX server machine, requires special attention:If the operating system user for the WebLogic installation is different to the operating system user for the EDM Server installation, a component based installation is required. For further information please refer to the chapter Component Based Installation. |
The Java on HP-UX and Oracle Solaris must be started with the -d64 option. If the option -d64 is not supplied, the Java executable starts in its default 32-bit mode.
The -d64 option is supported on all operating systems, so you can always use it while installing the Oracle WebLogic Server.
Before starting the installation, ensure that the bin directory of the appropriate JDK, used to run the installer, is at the beginning of the PATH variable, or called with the full path to the Java executable.
Set the JAVA_HOME environment variable to the installed 64-bit Java Development environment.
|
Note: This setting is important, because the WebLogic server will use this Java based on this setting. |
Windows
set JAVA_HOME=C:\Program Files\Java\jdk1.8.0_<update_number>
UNIX
setenv JAVA_HOME /usr/local/java/jdk1.8.0_<update_number>
Check the Java version with:
Windows
%JAVA_HOME%/bin/java -d64 -version
UNIX
$JAVA_HOME/bin/java -d64 -version
If you try to start a 32-bit Java, or start a 64-bit Java on a 32-bit operating system, this command will fail.
In this case, run the installer as follows:
Windows
%JAVA_HOME%/bin/java -d64 -jar fmw_12.2.1.2.0_wls.jar
UNIX
$JAVA_HOME/bin/java -d64 -jar fmw_12.2.1.2.0_wls.jar
Run the Oracle WebLogic installer file.
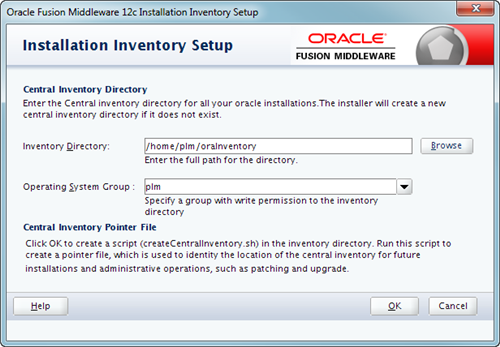
On UNIX the Installation Inventory Setup screen may open.
The following screen will only open if the current user has no write access to the Inventory Directory or it the Inventory Directory does not exists yet
|
Note: The following screens is opened for all Operating Systems |
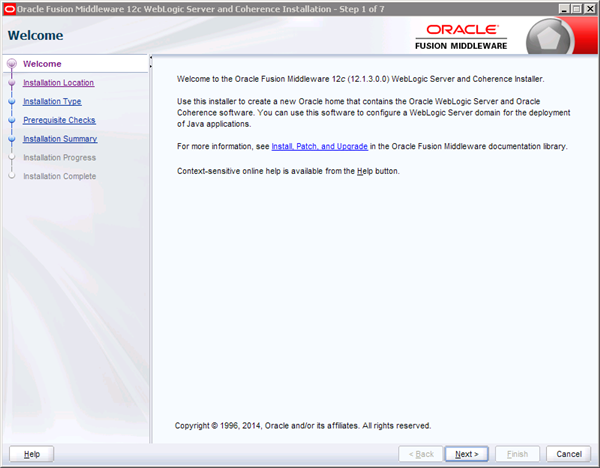
Click Next.
The Installation Location screen is opened.
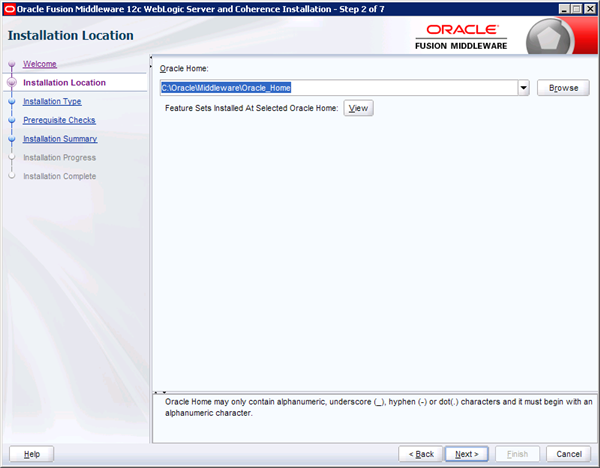
Specify the new Oracle Home Directory path and click Next.
The Installation Type screen is opened.

Select the WebLogic Server Installation and click Next.
The Prerequisite Checks screen is opened.
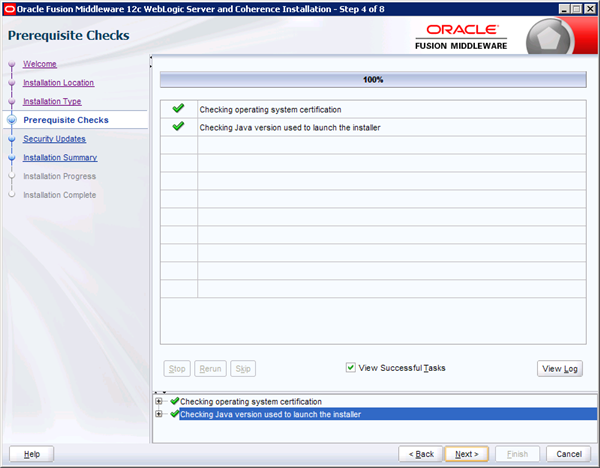
If issues are listed, they need to be resolved first before continuing with the next step.
Click Next.
The Specify Security Updates screen appears.
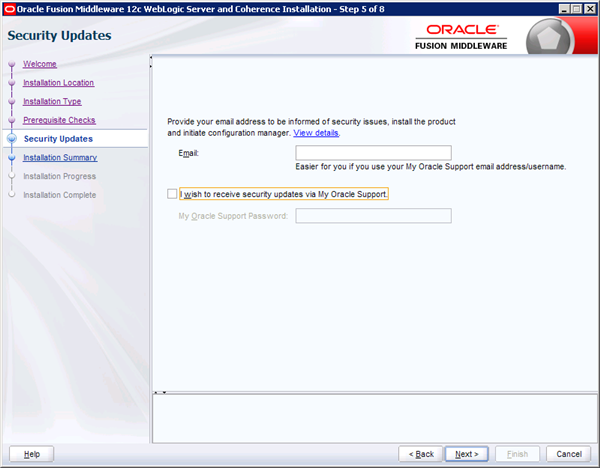
Here you can enter your My Oracle Support account information to receive the latest product information and security updates via your My Oracle Support account.
If you do not wish to register for security updates, or if you do not have a My Oracle Support account, then leave all the fields on this screen empty and click Next.
The following warning screen can be shown.
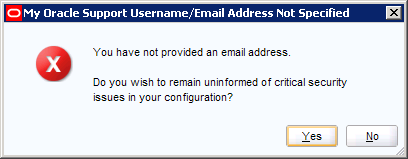
To confirm click Yes.
The Installation Summary screen is opened.
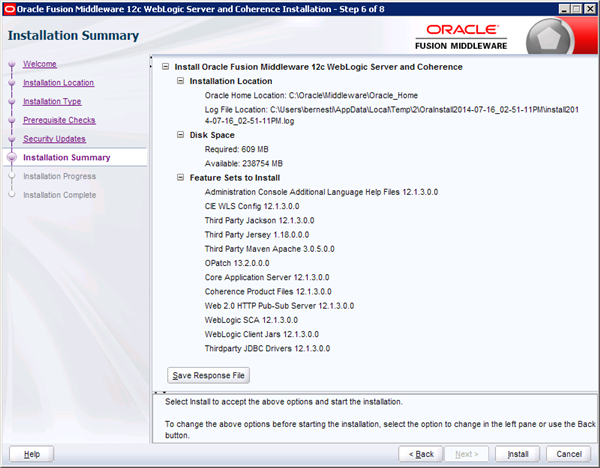
Review the listed options and click Install.
The installation process begins.
When the installation completes, click Next.
The Installation Complete screen is opened.
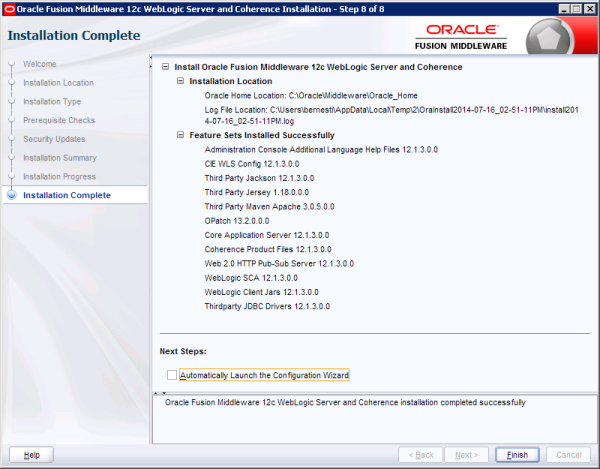
Uncheck Automatically Launch the Configuration Wizard and click Finish.
After the completion of the installation process of the Oracle WebLogic Server, the Node Manager must be configured.
Agile e6.2.1.0 is using one Node Manager for every host.
The Windows Service for the Node Manager has to be created manually.
To create the Windows Service, execute the following command:
<ORACLE_HOME_FOR_WEBLOGIC>\wlserver\server\bin\installNodeMgrSvc.cmd
To start the Node Manager, execute the following commands:
cd <ORACLE_HOME_FOR_WEBLOGIC>/wlserver/server/bin
./startNodeManager.sh &
|
Note: The default setup of the Node Manager is not creating the required certificate. This has to be done manually. |
For information on configuring SSL for Node Manager in production environments, see chapter Adaptation to the Node Manager Configuration.
|
Note: This requires a new property (KeyStores) in the nodemanager.properties file. See Reviewing nodemanager.properties |
|
Note: Only when starting the Node Manager with a valid certificate the file nodemanager.properties will be created. |
The following directory has to be created:
<ORACLE_HOME_FOR_WEBLOGIC>/oracle_common/common/nodemanager/security
|
Note: This directory can be created if you start the Node Manager once. The Node Manager will not continue to run because the required certificate is not available at this point. |
To properly set up the PATH and CLASSPATH variables, run the following command:
Windows (from a command shell):
call <ORACLE_HOME_FOR_WEBLOGIC>\wlserver\server\bin\setWLSEnv.cmd
UNIX (with a /bin/sh shell):
. <ORACLE_HOME_FOR_WEBLOGIC>/wlserver/server/bin/setWLSEnv.sh
|
Caution: The dot and the space character (. ) in front of the UNIX command are required to source the environment in the current bourne shell. |
|
Note: On UNIX, the above command has to be executed from a new bourne shell. This shell can be started with the following command:
This new /bin/sh shell has to be used to execute the following two Java commands also. |
Create a new directory in which you execute the following two steps.
|
Note: Please make sure the PATH and JAVA_HOME environment variable are set correctly. |
Generate a certificate and private key.
java utils.CertGen -keyfilepass DemoIdentityPassPhrase -certfile democert -keyfile demokey
|
Note: By default, utils.CertGen will use the short host name as the owner CN value in the generated certificate. To use the fully qualified DN host name, add the -cn option to the above command and append the full-qualified DN host name after it. See the following example for the host with the name app.example.com:java utils.CertGen -keyfilepass DemoIdentityPassPhrase -certfile democert -keyfile demokey -cn app.example.com |
Import the private key and certificate.
java utils.ImportPrivateKey -keystore DemoIdentity.jks -storepass DemoIdentityKeyStorePassPhrase -keyfile demokey -keyfilepass DemoIdentityPassPhrase -certfile democert.pem -keyfile demokey.pem -alias demoidentity
|
Note: The DemoIdentity.jks keystore now contains one private key and certificate entry. The other files can be deleted. |
Move the DemoIdentity.jks keystore to the following directory:
<ORACLE_HOME_FOR_WEBLOGIC>/oracle_common/common/nodemanager/security
Now it will be possible to successfully start the Node Manager because of the valid Node Manager certificate.
Start the Node Manager. If you already used the Node Manager startup to create the security directory, this will be the second time the Node Manager will be started. This start will generate the nodemanager.properties file.
After the first successful startup of the Node Manager, it must be reconfigured. This configuration file will only be available after the first successful startup with a working Node Manager certificate.
Open the following file with an editor:
<ORACLE_HOME_FOR_WEBLOGIC>/oracle_common/common/nodemanager/nodemanager.properties
Modify the following properties:
SecureListener=false
ListenAddress=127.0.0.1
CrashRecoveryEnabled=true
After the changes, restart the Node Manager.
