| Oracle Agile Engineering Data Management Server Installation Guide on Windows and UNIX Release e6.2.1.0 E69109-01 |
|

 Previous |
 Next |
| Oracle Agile Engineering Data Management Server Installation Guide on Windows and UNIX Release e6.2.1.0 E69109-01 |
|
Previous |
Next |
This chapter describes the installation with the Agile e6 Installer to install the Agile e6 Client, Oracle Database, Oracle WebLogic Server, and EDM Server.
|
Note: Some of the values entered in the following screens will be validated, either while entering the values or after pressing the "Next" button. If the validation fails, the text color is displayed in red, or a message containing the error is displayed. First the error has to be corrected before you can proceed!The input for TCP port numbers is limited to the range 1024 - 65535. The WebLogic passwords must be between 8 and 20 characters long, and is limited to the following characters:
|
Start a command shell.
Windows
Open an Administrative command shell and change to the installer directory: <installation-media-path>\installer.
cd <installation-media-path>\installer
Set the JAVA_HOME environment variable to the installed Java Development Kit. This has to be a 64-bit Java 8 Development Kit.
set JAVA_HOME=C:\Program Files\Java\jdk1.8.0_<update_number>
Start the installer from the command shell with the following command:
gui.cmd
UNIX
Open a command shell and change to the installer directory <installation-media-path>/installer.
cd <installation-media-path>/installer
Set the JAVA_HOME environment variable to the installed Java Development Kit. This has to be a 64-bit Java 8 Development Kit.
setenv JAVA_HOME /usr/local/java/jdk1.8.0_<update_number>
Start the installer with the following command:
./gui.csh
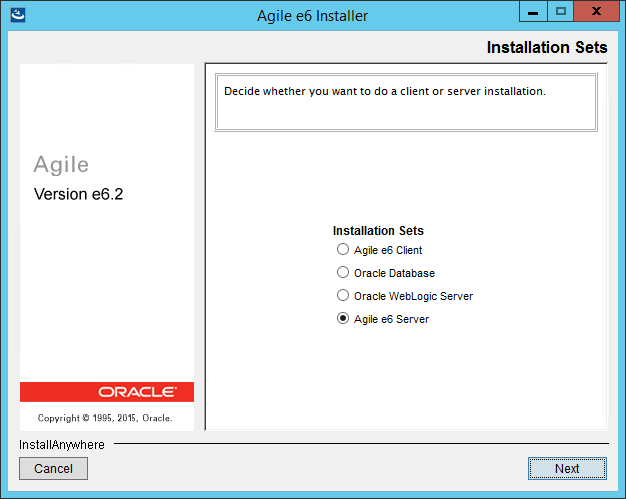
The Installation Sets screen is opened.
|
Note: UNIXOnly the "Agile e6 Server" set is available on a UNIX operating system. |
Select an Installation Set.
Depending on the selected installation, see the following sections for more detailed information:
Oracle Database
Oracle WebLogic Server
Agile e6 Server
|
Note: The Agile e6.2.1.0 client installation is described in the Client Installation Guide on Windows for Agile e6.2.1.0. |
|
Note: UNIXThis section is not available on a UNIX operating system. Please see Chapter 7, "Installing Oracle Database Server" for the manual installation of the Oracle Database. |
Select Oracle Database and click Next.
The Installer Components screen is opened.

| Component | Description |
|---|---|
| Database Server Software | Installs the Database Server Software and performs the instance setup. |
| Database Client Software | Installs the 32-bit Database Client Software.
This is required on the machine where the EDM Server will be installed. |
Select the component which should be installed and click Next.
|
Note: It is possible to install either the Server or the Client Software. |
|
Note: The Agile e6 GUI installer supports the installation of the Database Server - Enterprise Edition only. For the Standard Edition 2 follow the description in Chapter 7 "Installing Oracle Database Server" |
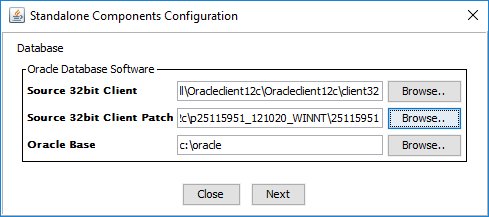
If you selected only the Database Client Software, then the following screen is opened.
| Setting | Description |
|---|---|
| Source 32-bit Client | The source of the 32-bit Oracle client installation media. |
| Source 32-bit Client Patch | The source of the 32-bit Client patch installation media |
| Oracle Base | The ORACLE_BASE directory where you want to install the Oracle client. |
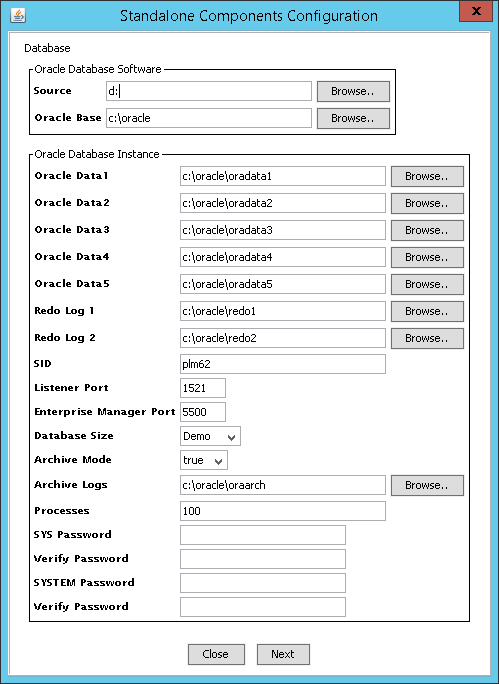
If you selected only the "Database Server Software", then the following screen is opened.
Oracle Database Software Section
| Setting | Description |
|---|---|
| Source | The source of the 64-bit Oracle database server installation media. |
| Oracle Base | The ORACLE_BASE directory where you want to install Oracle or where the instance (e.g. for Oracle 12cR1 the path should look like "C:/oracle") should be created. |
Oracle Database Instance Section
| Setting | Description |
|---|---|
| Oracle Data1-5 | The Oracle database files can be stored on up to 5 disks. If you have less than 5 disks, put more data files on the same disks. Under the selected directory, the directory "oradata/<SID>" will be created (e.g. you selected "c:/oracle/oradata1" the db files will be placed in "c:/oracle/oradata1/oradata/plm62")
Oracle Data1: CONTROL01.CTL, EDB_LOB01.DBF, EDB_TMPIDX01.DBF, EDB01.DBF Oracle Data2: CONTROL02.CTL , EDB_IDX01.DBF, EDB_TMP01.DBF Oracle Data3: CONTROL03.CTL, TEMP01.DBF Oracle Data4: UNDOTBS01.DBF Oracle Data5: SYSAUX01.DBF, SYSTEM01.DBF, TOOLS01.DBF, USERS01.DBF |
| Redo Log 1-2 | The 2 sets of the database Redolog files will be stored on two disks.
1. On location Redolog1 2. The copies on location Redolog2. Under the selected directory, the directory "oradata/<SID>" will be created (e.g. you selected "c:/oracle/oradata1" the database files will be placed in "c:/oracle/oradata1/oradata/plm62"). |
| SID | The SID of the instance. |
| Listener Port | The port of the listener (default is 1521). |
| Enterprise Manager Port | The port number of the Oracle Enterprise Manager Database Express (default is 5500). |
| Database Size | Depending on how big the database dump is, different values can be selected.
Note: Further information can be found in the Hardware Sizing Guide for Agile e6.2.1.0. |
| Archive Mode | True:
Activates the archive mode of the database (mandatory for production usage). False: Does not activate the archive mode for the database. |
| Archive Logs | Destination of the archive log files. |
| Processes | Depending on how many users will connect to the application, an appropriate value has to be applied here.
Processes must be set to at least a number calculated with following formula: number of concurrent user * 2 +50. Depending on your application setup values can be higher. Note: Further information can be found in the Hardware Sizing Guide for Agile e6.2.1.0. |
| SYS Password | The password which should be used for the Oracle SYS user. |
| Verify Password | The password entered above has to be repeated for verification. |
| System Password | The password which should be used for the Oracle SYSTEM user. |
| Verify Password | The password entered above has to be repeated for verification. |
Define the configuration options and click Next.
The Oracle Database installation starts.
|
Note: Database Pump will not be configured during the automatic installation. Please see the Create Directories for the Oracle Data Pump Utility section in Chapter Post-Installation Modifications for the Oracle Database. |
|
Note: UNIXThis section is not available on a UNIX operating system. Please see Chapter 10 ”Installing Oracle WebLogic Server” for the manual installation of the Oracle WebLogic Server |
|
Note: The 64-bit Java 8 has to be installed before starting the Oracle WebLogic Server installation. |
Select Oracle WebLogic Server and click Next.
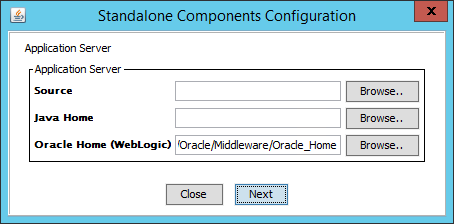
The Standalone Components Configuration screen is opened.
Screen on Windows.
| Setting | Description |
|---|---|
| Source | The full path to the installer of the WebLogic server "fmw_12.2.1.2.0_wls.jar" |
| Java Home | Java 8 64-bit home directory which will be used for the installation and development of the WebLogic Server. |
| Oracle Home (WebLogic) | The Oracle Home where you want to install WebLogic, e.g.:
Windows D:/Oracle/Middleware/Oracle_Home |
|
Note: The Oracle Home (WebLogic) and the Domain Root directories must include only alphanumeric characters, hyphens ('-'), underscore characters ('_') or slash characters ('/'), and contain at least one letter or digit.On Windows, backslash characters ('\'), which will be used while using the Browse button, are later internally replaced to slash characters ('/') while installing the WebLogic server. |
Define the component configuration options and click Next.
The WebLogic installation starts.
The WebLogic Node Manager has to be configured manually after the installation is done. See also section Node Manager Configuration in chapter Installing Oracle WebLogic Server.
|
Note: Make sure the Node Manager is running. |
Select Agile e6 Server and click Next.
The Installation Mode screen is opened.
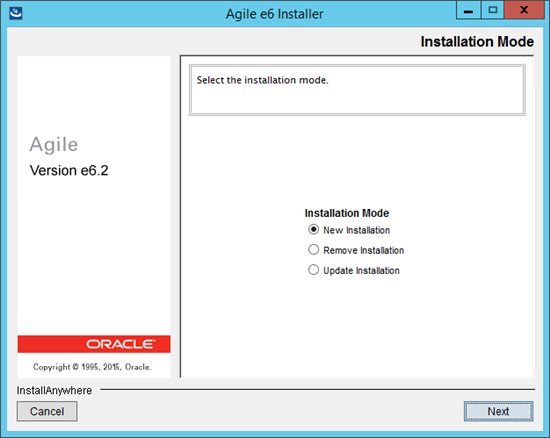
Select New Installation and click Next.
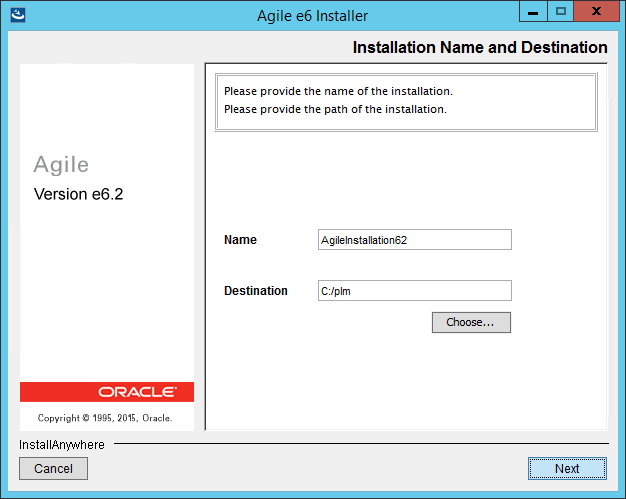
The Installation Name and Destination screen is opened.
| Field | Description |
|---|---|
| Name | Installation name.
This has to be a unique name which identifies the current installation. All components installed during this installation session will be installed under this ID. Note: The installation name can consist of ASCII characters and numbers, and no special characters. |
| Destination | Installation destination.
Root path where Agile e6 is going to be installed. This has to be a non existing path. |
Enter the installation name and the installation destination and click Next.
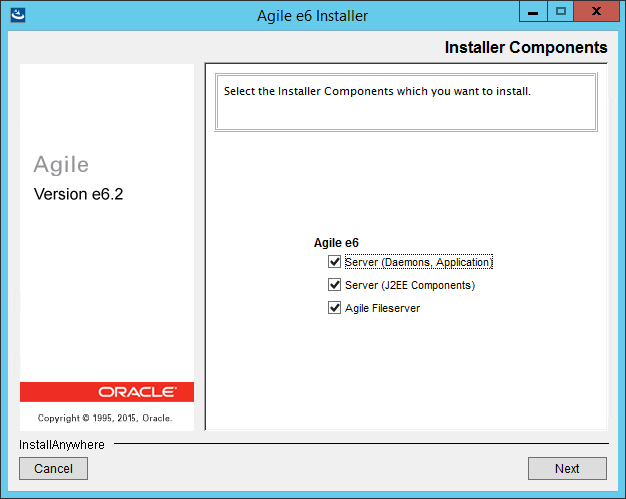
The Installer Components screen is opened.
| Component | Description |
|---|---|
| Server (Daemons, Application) | Core EDM Server components.
Java Daemon, FMS Java Daemon, Portmapper, initial Application. Note: The Oracle database client 32-bit has to be already installed. |
| Server (J2EE Components) | J2EE Agile e6 components
All components which will be deployed to Oracle WebLogic Server. Note: The Oracle WebLogic Server has to be already installed. |
| Agile Fileserver | The Agile Application Files Server. |
Select the component(s) to be installed and click Next.
The Wallet Configuration screen is opened.

|
Note: If you already created Wallet ZIP archives, you can set Create new Wallets to false and navigate to the Wallets Private and Public Archives. |
|
Note: By default, the Create new Wallets field is set to true. That means that the paths to the Wallet's Private Archive and Wallet's Public Archive will be created and cannot be selected.Path on Windows: %ALLUSERSPROFILE%\agile\installer\6.2.1\wallets\installation\<Installation_Name> Path on UNIX: ${HOME}/.agile/installer/6.2.1/wallets/installation/<Installation_Name> File name private Wallet: agile-edm-private-wallets.zip File name public Wallet: agile-edm-public-wallets.zip |
Click Next.
The Reference Configuration screen is opened.
|
Note: Depending on the selected installer components, the following screen can look different. |
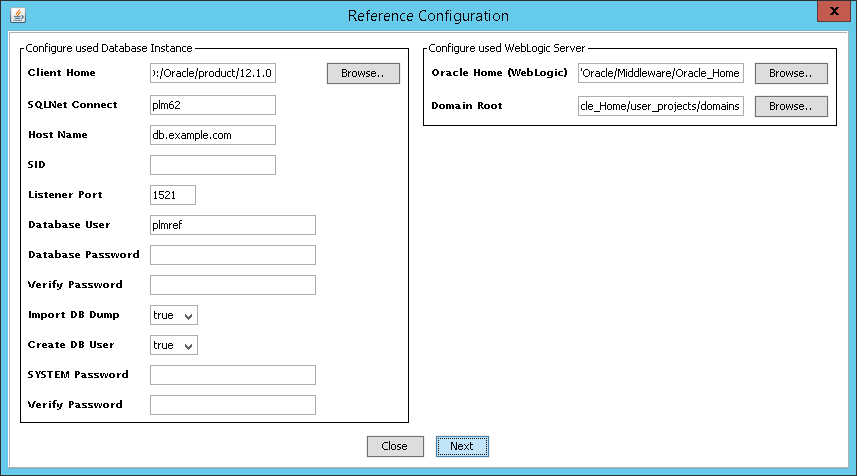
Configure used Database Instance section.
| Setting | Description |
|---|---|
| Client Home | The Oracle database client 32-bit home directory. |
| SQLNet Connect | The connect string as it is defined in your %ORACLE_HOME%/network/admin/tnsnames.ora file.
The entries in tnsnames.ora look like: MYCONNECTIONSTRING= (DESCRIPTION = (ADDRESS_LIST = (ADDRESS = (PROTOCOL = TCP)(HOST = MYDATA.MYCOMPANY.COM)(PORT = 1521)) ) (CONNECT_DATA = (SID = GOSL) (SERVER = DEDICATED) ) ) In this example The SQLNet connect string would be the first line: MYCONNECTIONSTRING. The tnsnames.ora file can be created and configured with Oracle Net Manager. For further information about the SQLNet configuration, please refer to chapter Post-Installation Modification for the Oracle Database, section Configuring the Database Net Service Name. |
| Host Name | The host name of your database server. |
| SID | The SID of the database you want to connect to. |
| Listener Port | The port where the listener listens on the database server. |
| Database User | The database user you want to use for the application. |
| Database Password | The password of the database user. |
| Verify Password | The password entered above has to be repeated for verification. |
| Import DB Dump | Select, if you want the standard dump to be imported to the above defined database user. |
| Create DB User | Select, if you want the database user to be created automatically. |
| SYSTEM Password | Password of the Oracle database user.
You only have to apply a value here if you want to create a new database user and selected that in the field above. |
| Verify Password | The password entered above has to be repeated for verification. |
Configure used WebLogic Server
| Setting | Description |
|---|---|
| Oracle Home (WebLogic) | The Oracle Home directory where WebLogic is installed, e.g.:
Windows: D:/Oracle/Middleware/Oracle_Home UNIX /opt/oracle/Middleware/Oracle_Home |
| Domain Root | The root directory where the Agile e6 WebLogic domains should be created, e.g.:
Windows D:/Oracle/Middleware/Oracle_Home/user_projects/domains UNIX /opt/oracle/Middleware/Oracle_Home/user_projects/domains In this directory, the installer will create all domains used by the Agile e6 J2EE components. |
|
Note: The Oracle Home (WebLogic) and the Domain Root directories must include only alphanumeric characters, hyphens ('-'), underscore characters ('_'), or slash characters ('/'), and contain at least one letter or digit.The Oracle Home (WebLogic) and the Domain Root directories must include only alphanumeric characters, hyphens ('-'), underscore characters ('_'), or slash characters ('/'), and contain at least one letter or digit |
When the reference configuration options are defined, click Next.
The Component Configuration screen is opened.
|
Note: Depending on the selected installer components the following screen can look different. |
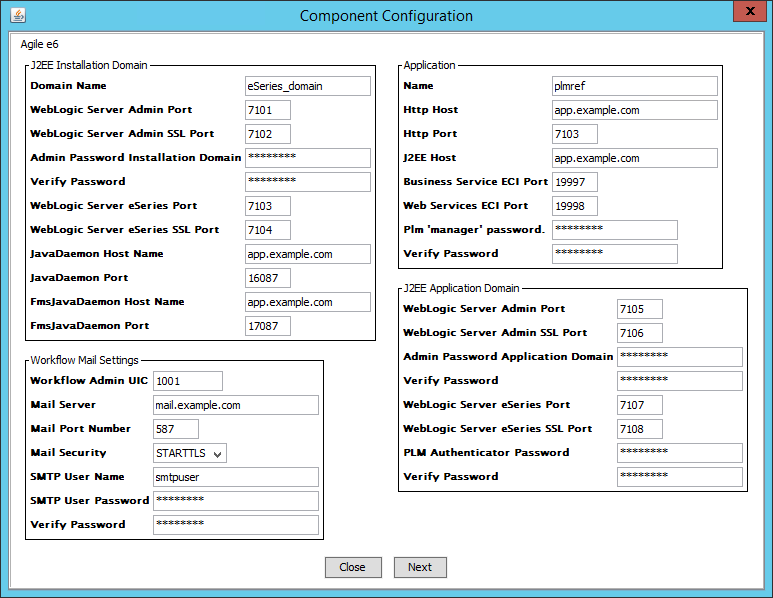
J2EE Installation Domain Section
| Setting | Description |
|---|---|
| Domain Name | Name of the domain for the installation specific Agile e6 J2EE components: |
| WebLogic Server Admin Port | The listen port for the WebLogic administration server |
| WebLogic Server Admin SSL Port | The SSL listen port for the WebLogic administration server for the installation domain. |
| Admin Password Installation Domain | The password of the WebLogic user used for the installation domain |
| Verify Password | The password entered above has to be repeated for verification. |
| WebLogic Server eSeries Port | The listen port for the WebLogic EDM server. The installer will create a separate managed server with name "eSeries-01" in addition to the administration server. This server will contain the installation specific deployments. |
| WebLogic Server eSeries SSL Port | The SSL listen port for the WebLogic EDM server. |
| Java Daemon Host Name | The host name where the Agile e6 Java Daemon is/will be running |
| Java Daemon Port | The Java Daemon port. |
| FmsJavaDaemon Host Name | The host name where the Agile e6 FMS Java Daemon is/will be running. |
| FmsJavaDaemon Port | The FMS Java Daemon port |
Workflow Mail Settings Section
| Setting | Description |
|---|---|
| Workflow Admin UIC | The UIC of an Agile e6 user who has administrative rights for the Workflow module. He will receive mails about administrative problems in the Workflow module (1000 - 99999).
This user needs a valid e-mail address as a test e-mail is send when starting the MESSENGER. The messenger does not work at all if this email is missing or wrong! |
| Mail Server | The name of your SMTP mail server if you want to send emails via the Business Services. Mailing will be disabled if no host name is set. |
| Mail Port Number | The port number of your SMTP mail server if you want to send emails via the Business Services. (587 is the Submission port for using encryption. 25 is the old standard SMTP port). |
| Mail Security | If enabled then SSL will be used to encrypt the connection to your SMTP mail server if you want to send emails via the Business Services. |
| SMTP User Name | User name if the Mail Authentication for your SMTP mail server is activated. |
| SMTP User Password | Password if the Mail Authentication for your SMTP mail server is activated. |
| Verify Password | The password entered above has to be repeated for verification. |
Application Section
| Setting | Description |
|---|---|
| Name | The name of the default application you want to create. |
| Http Host | The host where the Web Client can be reached over HTTP (the WebLogic Server hostname). |
| Http Port | The port where the Web Client can be reached over HTTP (the HTTP port of WebLogic Server). |
| J2EE Host | The host where Business and/or Web Services are running (the WebLogic server host name). |
| Business Service ECI Port | The port where the Business Service will be configured to "listen" for requests sent from an EDM Server process. |
| Web Services ECI Port | The port where the Web Services will be configured to "listen" for requests sent from an EDM Server process. |
| Plm 'manager' password | Only available if "Import DB Dump" was selected in the step before. Apply the password which the plm 'manager' user of the created application should have. |
| Verify Password | Only available if "Import DB Dump" was selected in the step before. The password entered above has to be repeated for verification |
J2EE Application Domain Section
| Setting | Description |
|---|---|
| WebLogic Server Admin Port | The listen port for the WebLogic administration server for the application domain. |
| WebLogic Server Admin SSL Port | The SSL listen port for the WebLogic administration server for the application domain. |
| Admin PWD Installation | The password of the WebLogic user used for the application domain. |
| Verify Password | The password entered above has to be repeated for verification. |
| WebLogic Server eSeries Port | The listen port for the WebLogic EDM Server. The installer will create a separate managed server with name "eSeries-01" in addition to the administration server. This server will contain the application specific deployments. |
| WebLogic Server eSeries SSL Port | The SSL listen port for the WebLogic EDM Server. |
| PLM Authenticator Password | Password of the WebLogic user PlmAuthenticatorDSUser, which secures the Data Source PlmAuthenticatorDS used by the PLM Authentication provider. |
| Verify Password | The password entered above has to be repeated for verification. |
When the component configuration options are defined, click Next.
The Daemon Component Configuration screen is opened.
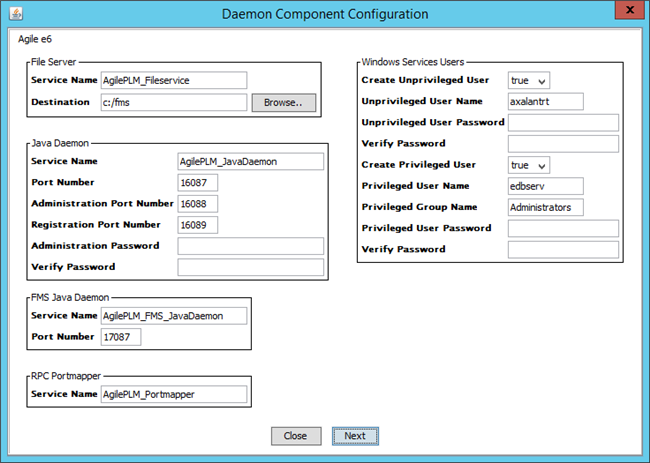
File Server Section
| Setting | Description |
|---|---|
| Service Name | The Windows Service name.
Note for UNIX: This is not available on a UNIX operating system |
| Destination | The destination of the File Server binaries. |
The File Server default RPC port is 804257548.
To use a different RPC port you have to change the value in the Windows registry after the installation has finished and restart the File Server service:
HKEY_LOCAL_MACHINE\SOFTWARE\Wow6432Node\Agile\AgilePLM_Fileservice\RPC_NMB
|
Note: For further information regarding the configuration of the File Server and how to set up vaults, please refer to the Online Help > File Server > Manager Information documentation. |
Java Daemon Section
| Setting | Description |
|---|---|
| Service Name | The Windows Service name.
Note for UNIX: This is not available on a UNIX operating system |
| Port Number | The port number the daemon should use. |
| Admin Port Number | The admin port number the daemon should use. |
| Registration Port Number | The registration portnumber the daemon should use. |
| Administration Password | Password for the administration Interface of the Java Daemon. |
| Verify Password | The password entered above has to be repeated for verification. |
FMS Java Daemon Section
| Setting | Description |
|---|---|
| Service Name | The Windows Service name.
Note for UNIX: This is not available on a UNIX operating system |
| Port Number | The port number the daemon should use. |
RPC Portmapper Section
|
Note: This section is only available on a Windows operating system |
| Setting | Description |
|---|---|
| Service Name | The Windows Service name. |
Windows Service Users Section
|
Note: This section is only available on a Windows operating system. |
| Setting | Description |
|---|---|
| Create Unprivileged User | Select 'true' if you want the Local Unprivileged Windows User to be created automatically. |
| Unprivileged User Name | Local Windows User which is used by the following services: EDM Server, Java, FMS Java, and Portmapper. |
| Unprivileged User PWD | Password for the above user.
Note: The password has to comply with the Windows Password policy. |
| Verify Password | The password entered above has to be repeated for verification. |
| Create Privileged User | Select 'true' if you want the Local Privileged Windows User to be created automatically. |
| Privileged User Name | Local Windows User which is used by the following service: File Server. |
| Privileged Group Name | Local Windows Group which is used by the privileged user. |
| Privileged User PWD | Password for the above user.
Note: The password has to comply with the Windows Password policy. |
| Verify Password | The password entered above has to be repeated for verification. |
When the daemon component configuration options are defined click Next.
The installation begins.
After the installation, the services status depends on the operating system.
Windows
All EDM Server services are not started.
UNIX
After the installation, all required processes should be running except the AdminClient service.
|
Note: Further information about the AdminClient can be found in the Administration Guide for Agile e6.2.1.0. |
