| Oracle Agile Engineering Data Management Server Installation Guide on Windows and UNIX Release e6.2.1.0 E69109-01 |
|

 Previous |
 Next |
| Oracle Agile Engineering Data Management Server Installation Guide on Windows and UNIX Release e6.2.1.0 E69109-01 |
|
Previous |
Next |
This chapter describes the adaptations for a component based installation. Only the differences are described.
The EDM Server J2EE components installation requires the WebLogic server on the machine where the installation is performed. If you have decided to have WebLogic running on a separate server you can follow the steps described below to install J2EE components and native components on separate server. This is called component based installation
|
Note: On Unix, a component based installation also needs to be performed when installing the WebLogic server and the EDM Server on the same machine with two different OS users. Thus, two Administration Clients with the same port numbers are created.To change the listening port numbers of the Administration Client, please refer to the section The Administration Client > Changing the Apache Tomcat Configuration in this guide |
The installation where J2EE components are installed will be called the "J2EE installation", and the installation where native components like Java daemon are installed will be called "native installation".
In general, follow the instructions in the section Agile e6 Server of the chapter Installation with the Agile e6 Installer.
The WebLogic software, as well as the Agile e6 native components need to be installed before installing the Agile e6 J2EE components.
Following components will be installed:
Administration Client
Java Daemon
FMS Java Daemon
Server libraries
File Server
Applications (plmref)
Before starting the installation, be aware of the different Vault types.
PUB (public)
Public vault with direct read access for all users via mounts or client programs. The file is saved with its original file name in the sub-directory 'pub'.
Write access is only given to ROOT and the File Server user. Every user has read access.
|
Note: File names in public vaults are by default in UTF-8 encoding.If you already have public vaults on UNIX with ASCII encoding set the section[Vaults\Encodings] in the fileserver.cfg file as follows: ... [Vaults] FMS=fms/ EIF=area/ PUB=pub/ [Vaults\Encodings] PUB=UTF-8 If the entry is missing, UTF-8 will be used. If you replicate public vaults, all vaults must have the same encoding setting. |
|
Note: If you using public vaults with I18N file names you need to consider the limitation of the used file system. Some file systems support up to 255 characters and others only 255 bytes.In the case of I18N characters one character can need up to 4 bytes. If you have a mixed environment (Windows and UNIX file server) and you replicate public vaults be aware that files which can be checked-in into a Windows file server may not be able to be replicated to a UNIX file server, because of the file system limitations. |
FMS
Standard vault, encrypted machine-dependent vault (with predefined names).
Read and write access is only given to the ROOT and the File Server user.
EIF
Extended storage area, encrypted machine-dependent vault (with cache directories); metafiles are created for each file.
|
Note: 'EIF' or 'PUB' must be on the same machine where the File Server will be executed. |
|
Note: We strongly advise you not to use any mounted hard discs as vaults. If you do so, you loose performance and reliability, and producing a lot of unnecessary net traffic.All needed and mentioned sub-directories will be created when starting the File Server for the first time. All vaults can be handled by a single executable, the File Server itself. Therefore, we recommend to use only one File Server executable on one computer, because a thread will be created with each request. If you enable the logging mechanism of the File Server, be aware that there might be confidential information contained. You should restrict the read/write access. Windows systems only support NTFS drives! |
After the installation on Windows the File Server is started automatically. On UNIX you need to start the File Server manually with the provided start script on UNIX.
This script can be used to start/stop the file server.
./fmssrv start
Login to the machine where you want to install "Agile e6 Native Components”.
Follow the instructions in the section Agile e6 Server of the chapter Installation with the Agile e6 Installer.
|
Note: WebLogic server installation is not required. |
|
Note: Oracle 32-bit database client installation is required. |
The Installer Component screen is opened.
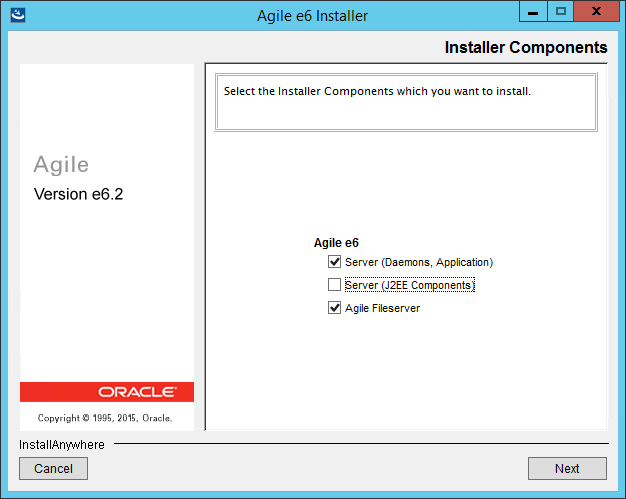
Deselect Server (J2EE Components).
This will prevent the setup of the Agile e6 J2EE Components.
If you do not want the Agile File Server to be installed, deselect it too.
Click Next.
The Wallet Configuration screen is opened.

|
Note: By default, the Create new Wallets field is set to true. That means that the Wallet's Private Archive and Wallet's Public Archive will be created and cannot be selected.Path on Windows: %ALLUSERSPROFILE%\agile\installer\6.2.1\wallets\installation\<Installation_Name> Path on UNIX: ${HOME}/.agile/installer/6.2.1/wallets/installation/<Installation_Name> |
|
Note: If only installing the "Agile Fileserver" on a Windows server, you can either create a new set of wallets or use the existing wallets from another server. A wallet is only used once to create the runtime user or to configure the Windows service to use an existing runtime user. The wallets are not needed to install only the "Agile Fileserver" on an UNIX OS. |
|
Note: The "Server (J2EE Component)" only installation requires to use the same wallets from the "Server (Daemons, Application)" installation. |
Click Next.
The Reference Configuration screen is opened.
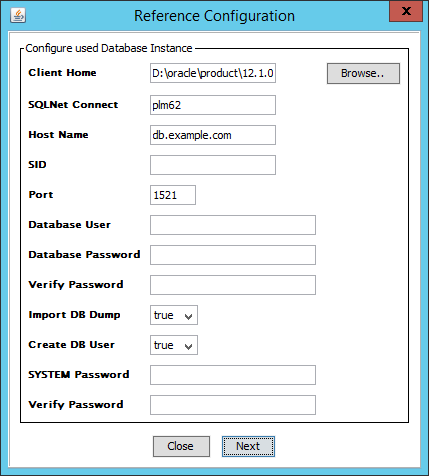
The following values must be identical for the native and the J2EE installation.
| Setting | Description |
|---|---|
| Database User | The database user you want to use for the application. |
| Database Password | The password of the database user. |
When the reference configuration options are defined, click Next.
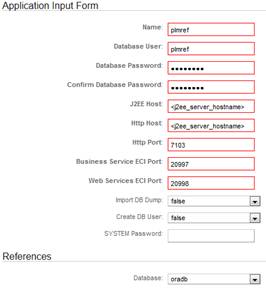
Adapt the values in the Component Configuration mask.
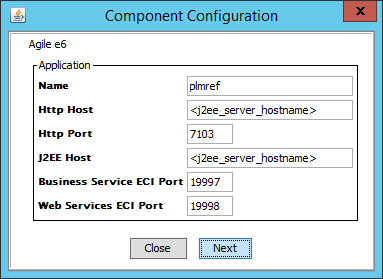
The following values must be identical for the native and the J2EE installation.
| Setting | Description |
|---|---|
| Name | The name of the default application you want to create. |
The J2EE Components are not installed at this point. You have to use the values marked in red later to setup the Agile e6 J2EE components.
Following values must match the values of your J2EE installation. These are references to these values.
| Setting | Description |
|---|---|
| Http Host | The host where the Web Client can be reached over HTTP (the WebLogic server hostname). |
| Http Port | The port where the Web Client can be reached over HTTP (the HTTP port of WebLogic server). |
| J2EE Host | The host where WebLogic is running (the WebLogic server host name). |
| Business Service ECI Port | The port where the Business Service will be configured to "wait" for requests. |
| Web Services ECI Port | The port where the Web Services will be configured to "wait" for requests. |
The Daemon Component Configuration screen is opened.
To continue, please follow the instructions in section Agile e6 Server step Daemon Component Configuration.
|
Note: WebLogic domains will not be set up. |
|
Note: Batch deployment tasks must be executed on the J2EE installation only |
Following components will be installed:
Administration Client
Staging directory (see section "Deploying Customer Adapted Files" in the Administration Guide for Agile e6.2.1.0)
Applications (plmref)
WebLogic Domains containing deployments
To install Agile e6 J2EE components:
|
Note: For the installation you need to copy the private Wallet from the Agile EDM Server to the J2EE server.Please make sure that nobody but the installation user has access rights to the ZIP archive. |
Login to the machine where you want to install Agile e6 J2EE components.
|
Note: You have to use the WebLogic installation user to install the Agile e6 J2EE components. |
Follow the instructions in the section Agile e6 Server of the chapter Installation with the Agile e6 Installer.
|
Note: Oracle database client installation is not needed. |
The "Installer Component" screen is opened. By default, all options are selected.
Deselect Server (Daemons, Application) and Agile Fileserver.
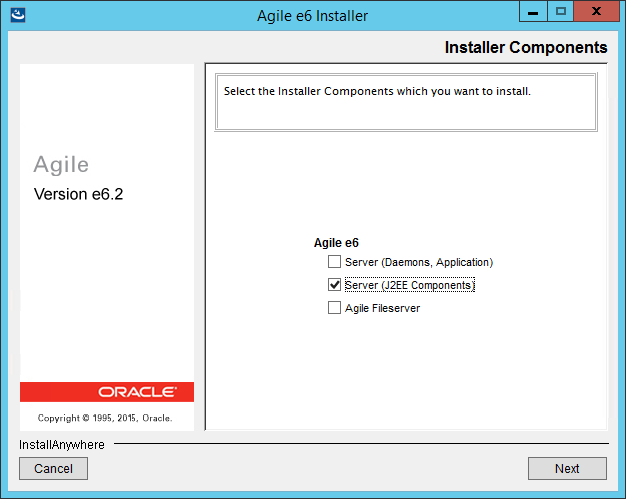
This will prevent the setup of the "Agile e6 Native Components".
Click Next
The Wallet Configuration screen is opened.
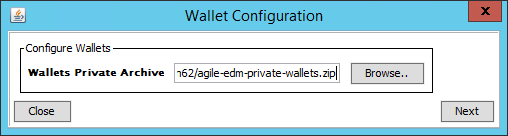
On the J2EE server, select the path to the archive of the private Wallet, which was generated on the Agile EDM Server.
Click Next.
The Reference Configuration screen is opened.
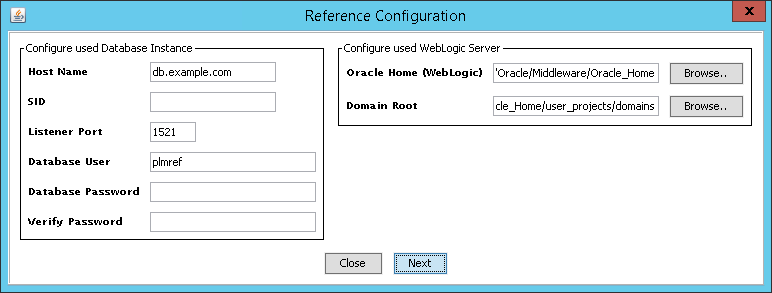
The following values must be identical for the native and the J2EE installation.
| Setting | Description |
|---|---|
| Database User | The database user you want to use for the application. |
| Database Password | The password of the database user. |
When the reference configuration options are defined, click Next.
The Component Configuration screen is opened.
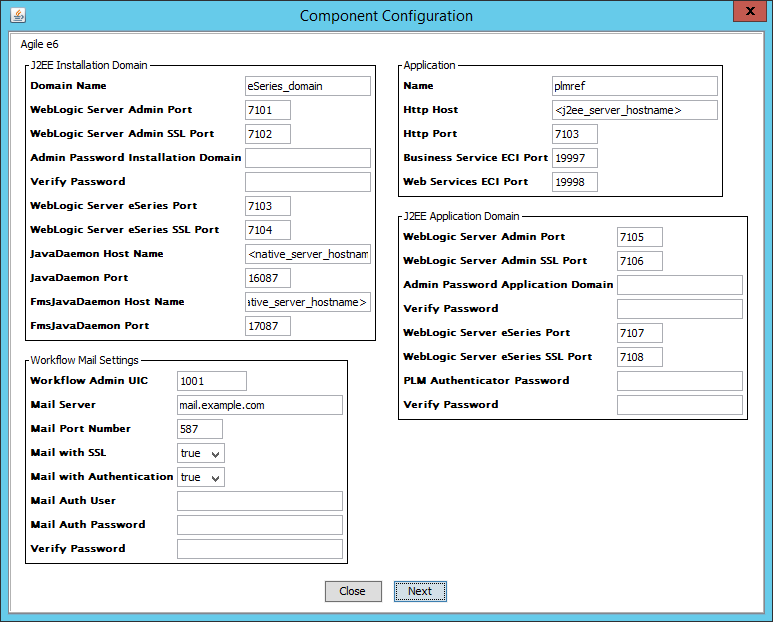
The following value must be identical for the native, and the J2EE installation.
| Setting | Description |
|---|---|
| Name | The name of the default application you want to create |
Apply the values of your native installation as given in fields.
Following values must match the values of your native installation. These are references to these values.
| Setting | Description |
|---|---|
| Java Daemon Host Name | The hostname where the Agile e6 Java Daemon is/will be running. |
| Java Daemon Port | The Java Daemon port. |
| FmsJava Daemon Host Name | The hostname where the Agile e6 FMS Java Daemon is/will be running. |
| FmsJava Daemon Port | The FMS Java Daemon port. |
Follow the instructions in the installation documentation of your operating system.
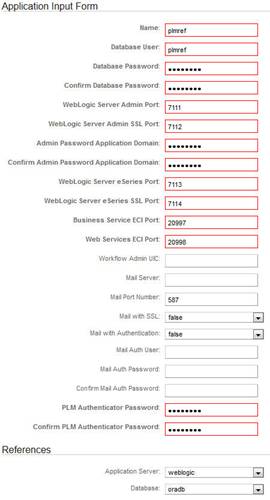
In a component based installation, every application has to be created on the native installation, and on the J2EE installation. The Administration client, however, is available for both installations. The Administration client checks whether it should manage a J2EE or a native installation.
Applications can be created as usual. Following two screenshots show the differences to the default web forms for the application creation with the Administration Client.
J2EE Application Creation
NATIVE Application Creation