CAUTION: This procedure interrupts service.
To create georedundant primary and secondary sites:
- Log in to the CMP system, using its OAM VIP address.
- If this is the first georedundant cluster in your topology, configure the CMP system to enable Manage Geo-Redundant mode.
With georedundancy enabled, the content tree shows the All Sites group when you select Topology Settings from the Platform Setting section of the navigation pane.
- From the Platform Setting section of the navigation pane, select Topology Settings.
The Cluster Configuration page opens.
- From the content tree, select the All Sites group.
The Site Configuration page opens.
- Click Create Site.
The New Site page opens.
- Enter the Name for the site name: Site-1.
- Enter the number of Max Primary Site Failure Threshold.
The default value is zero (0).
- Select the HW Type from the list.
- With the hardware type selected, configure the General Network settings:
- Enter the OAM VLAN ID.
- Enter the SIG-A VLAN ID.
- (Optional) Enter the SIG-B VLAN ID.
- (Optional) Enter the SIG-C VLAN ID.
- Click Save.
The sites become visible on the
Site Configuration page.
Successful Site Creation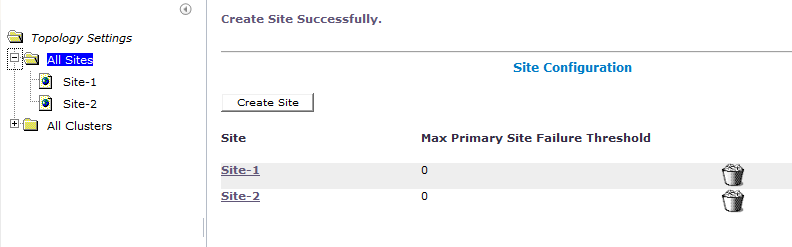
- From the content tree, select the All Clusters group.
The Cluster Configuration page opens, displaying the defined clusters.
- On the Cluster Configuration page, for the MPE cluster you are expanding with Server-C, click the View operation.
The Topology Configuration page opens for the selected MPE cluster.
- Click Modify Primary Site.
The fields in the Primary Site Settings section of the page becomes editable.
- In the Primary Site Settings section of the page:
- In the Site Name field, select the primary site name (Site-1 in this example).
- Confirm the configuration settings in the HW Type field, Network Configuration section, and Signaling VIPs field.
- If the REP network is used, in the User Defined Network section, enter the VLAN ID for the REP network.
- In the Server-A section of the page:
- Confirm the settings in the General Settings section.
- In the Path Configuration section, click Add New.
The
New Path dialog box appears.
- Enter the Static IP address and subnet Mask.
- Select the Interface (for this example, the SIG-A network).
- Click Save.
- If the REP network is used, repeat step 16b for the REP network.
- Repeat step 11 for Server-B.
The Primary Site Settings are defined.
- Click Save.
A restart message appears.
- Click OK.
Server-A restarts.
The two sites, primary and secondary, and the georedundant primary MPE cluster are configured.