25.2 Automated Management Agent Patching Using Patch Plans (Recommended)
Automated patching is a quick, easy, and reliable patching mechanism that is facilitated using patch plans in Cloud Control. Patch plans can be created, accessed, and deployed using the Cloud Control console, or EM CLI. For large scale deployments, you can use EM CLI to create, access, and deploy patch plans. This section only describes how to patch your Management Agent targets using the Cloud Control console. For information about patching targets using EM CLI, see Oracle Enterprise Manager Lifecycle Management Administrator's Guide.
Automated patching can be performed while Cloud Control is running in the Online mode, as well as the Offline mode. When Cloud Control is running in the Online mode, you can connect to My Oracle Support to download the patches that you want to apply. However, if Cloud Control is running in the Offline mode, you must ensure that the patches that you want to apply are already available in Oracle Software Library (Software Library).
This section consists of the following:
25.2.1 Advantages of Automated Management Agent Patching
The advantages of patching your Management Agent targets using the automated approach (as compared to the manual approach) are:
-
Patching operations are more organized, done through a single window, and are always initiated only from the OMS.
-
This approach allows you to schedule periodic patching jobs that connect to My Oracle Support, check for the latest patches, and automatically download them. This saves the effort involved in searching for the latest patches and patch sets, and downloading them whenever they are available.
-
Multiple patches and multiple sets of homogeneous targets can be added to a single patch plan. For example, both core and plug-in component Management Agent patches can be patched by adding them to the same patch plan.
25.2.2 Accessing the Patches and Updates Page
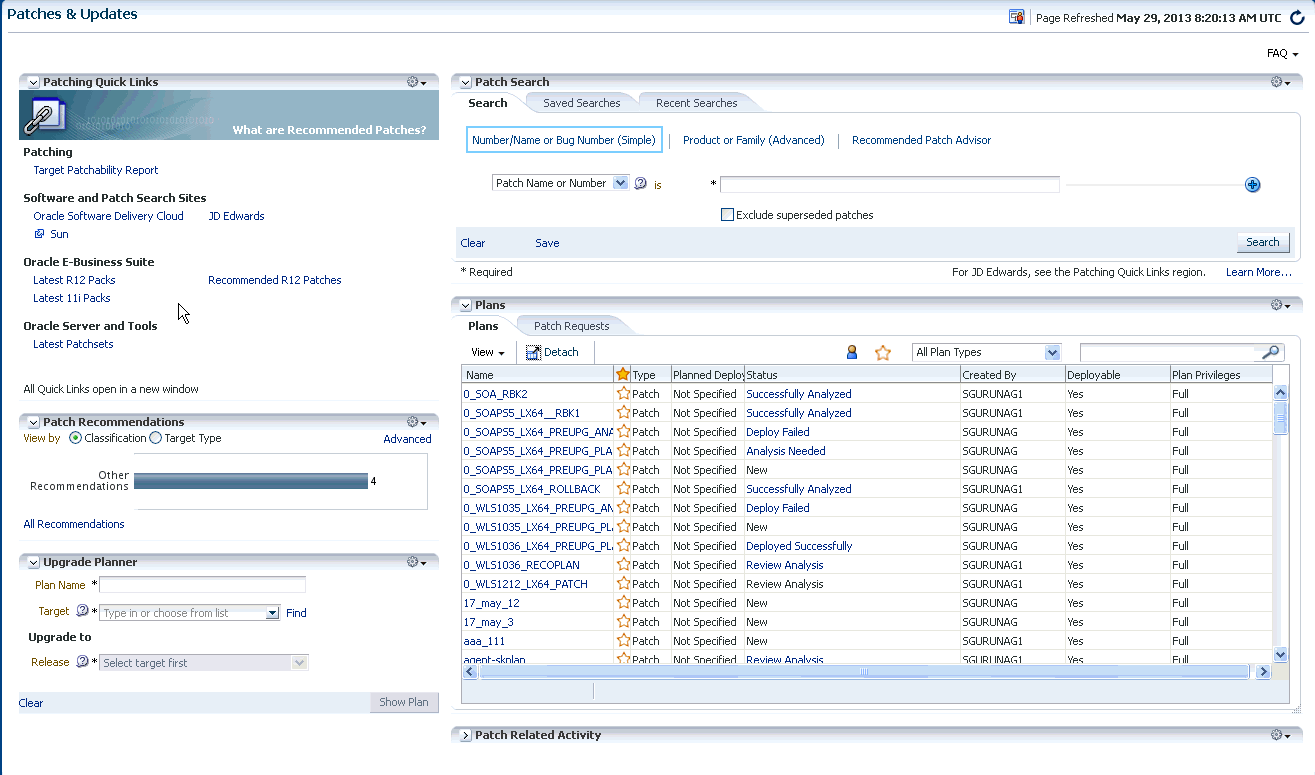
To access the Patches and Updates page in Cloud Control, from the Enterprise menu, select Provisioning and Patching, then select Patches & Updates.
Figure 25-1 displays the Patches and Updates page.
Figure 25-1 Patches and Updates Page
25.2.3 Viewing Patch Recommendations
Patch recommendations are proactive notifications of potential system problems and recommendations that help you improve system performance and avert outages. Patch recommendations minimize the effort required to search for the critical patches that must be applied on your targets.
The Patch Recommendations section is available on the Patches and Updates page. The patches in this section are classified as security patches, and other recommended patches.
For more information about patch recommendations, see Oracle Enterprise Manager Lifecycle Management Administrator's Guide.
Note:
-
Patch recommendations are available only if Oracle Configuration Manager Release 10.3.2 or higher is deployed in your enterprise.
-
Patch recommendations are not available for custom plug-ins. They available only for the default plug-ins that are released with Cloud Control.
25.2.4 Searching for Patches
This section consists of the following:
25.2.4.1 Searching for Patches On My Oracle Support
If you already know about the existence of a patch from external sources such as blogs, Oracle technology forums, or from colleagues, then use the search functionality to search for those patches. The search functionality enables you to perform more flexible and advanced searches, and offers capabilities such as saving a search that is used routinely, and searching based on existing saved searches. All of this enables you to perform searches quickly and efficiently.
To search for a patch on My Oracle Support, follow these steps:
25.2.4.2 Searching for Patches in Software Library
By default, when you search for a patch on the Patches & Updates page, Cloud Control connects to My Oracle Support using the Internet connectivity available on that host, and searches for the requested patch on My Oracle Support. This is because the search functionality is set to perform in online mode by default.
However, if your host does not have Internet connectivity, then you must switch over to offline mode so that the search can be performed in Software Library.
To switch over to offline mode, follow these steps:
-
From the Setup menu, select Provisioning and Patching, then select Offline Patching.
-
For Connection, select Offline.
Note:
In offline mode, you cannot:
-
Search and download patches from My Oracle Support
-
Resolve patch conflicts with merge patches
-
View the Related Activity region
-
Access Quicklinks
-
View or create upgrade plans
To search for a patch in Software Library, follow these steps:
25.2.5 Applying Management Agent Patches
To apply Management Agent patches using patch plans, follow these steps:
Note:
-
Using patch plans, you can apply patches on the core components of Management Agents, as well as on Management Agent plug-ins. The patching process that must be used for both actions is the same, and is described in this section.
-
For a large scale deployments, you can use EM CLI. For information about patching using EM CLI, see Oracle Enterprise Manager Lifecycle Management Administrator's Guide.
-
In Cloud Control, from the Enterprise menu, select Provisioning and Patching, then select Patches and Updates.
-
On the Patches and Updates page, select the Management Agent patches that you want to apply from the Patch Recommendations section, or the Patch Search section.
For more information on the Patch Recommendation section, see Viewing Patch Recommendations. For more information on how to search for patches, see Searching for Patches.
-
From the context menu that appears, select one of the following options:
-
Add to New: Select this option if you want to create a new patch plan that has the selected patch.
Specify a plan name, the targets that you want to patch, then click Create Plan.
The patch and the associated targets are added to the patch plan.
-
Add to Existing Plan: Select this option if you want to add the selected patch to an existing patch plan.
Select the existing patch plan that you want to add the required patch to, specify the patch targets, then click Add Patch to Plan.
Note:
Ensure that the patches you select have the same platform as the targets that you want to patch. For example, Linux x86 patches can be applied only on Linux x86 targets. Any mismatch will result in a patching error.
-
-
If the selected patches are applied on homogeneous targets, then the patch plan is created successfully with a link to view the patch plan. Click the link to view the patch plan details.
If any of the Management Agent targets added to the patch plan are shared agents or cluster Management Agents, then you may see a warning message mentioning that there are issues with adding the patch to the patch plan.

As a solution to this problem, click Add All To Plan to add all the affected targets to the patch plan.
However, if the platform of the selected patch does not match the platform of the selected target, you may see one of the following errors or warnings:
-
A null platform error occurs when the selected target appears with a null platform. The patch plan validation fails as platform of the patch and the platform of the target do not match. This may occur when a target is down. In this case, the patch plan is not created until the error is fixed.
-
A platform mismatch warning appears when the platform of the patch and the platform of a target do not match. This target is ignored, and the patch plan is created without this target. The other homogeneous targets are added to the plan.
Note:
Oracle recommends that you fix the warnings before proceeding, as they may result in an error during patch plan validation. However, if you want to proceed regardless, you can select Ignore Warnings and Add.
-
-
Navigate to the Patches & Updates page. In the Plans region, click the name of the patch plan that you want to view.
The Create Plan wizard is displayed.
-
On the Plan Information page, do the following:
-
In the Overview section, validate the patch plan name. You can choose to edit it if you want.
-
(Optional) Enter a short description for the patch plan.
-
(Optional) In the Allow Access For section, click Add to grant patch plan access permissions to administrators or roles for the current patch plan.
In the Add Privileges to Administrators window, select an administrator or a role, the access permission that you want to grant, then click Add Privilege.
-
Click Next.
-
-
On the Patches page, review the patches added to the patch plan.
To add new patches to the patch plan or add additional targets to a patch that has already been added to the patch plan, click Add Patch. In the Edit Search dialog box, enter the patch number, then click Search. Select the required patch, then click Add to This Plan. Select the targets that you want to add to the patch, then click Add to This Plan.
Click Next.
-
On the Deployment Options page, do the following:
-
In the Where to Stage section, select one of the following options:
Yes, if you want the wizard to stage the patches from Software Library to a temporary location accessible to the target host, before the patch is applied on the target. By default, the wizard stages the patches to a default location on the target host, but if you want to change the location, you can enter a location where the patch can be staged.
No, if you have already manually staged the patches to a temporary location accessible to the target host. This can even be a shared, NFS-mounted location. In this case, ensure that you download the patch you want to apply, navigate to the location (parent directory) where you want to stage the patch, create a subdirectory with the same name as the patch ZIP file, then extract the contents of the patch ZIP file in this subdirectory. In the Where to Stage section, enter the absolute path to the parent directory where you have manually staged the patches.
For example, if you downloaded patch
699099.zip,and the stage location, which is the parent directory, is/u01/app/oracle/em/stagepatch,then in this parent directory, create a subdirectory titled699099and extract the contents of the zip file. Enter/u01/app/oracle/em/stagepatchas the stage path. -
In the Credential Information section, provide the required credentials for patching. You can choose to use preferred credentials, or override the preferred credentials with different credentials.
In Enterprise Manager Cloud Control 12c Release 4 (12.1.0.4), normal Oracle home credentials are not required for patching secure Management Agent targets. If the patches that you want to apply on the Management Agent targets require root user access to perform certain tasks, then you must provide the privileged Oracle home credentials for the Management Agent targets.
If the Management Agent targets that you want to patch are not secure, then you must set the preferred Management Agent host credentials for all the Management Agent targets that you want to patch. To set the preferred host credentials for Management Agent targets, from the Setup menu, select Security, then select Preferred Credentials. Select the Agent target type, then click Manage Preferred Credentials. Set the preferred host credentials for the required Management Agent targets.
For more information about setting preferred credentials, see Oracle Enterprise Manager Lifecycle Management Administrator's Guide.
Note:
The named credentials of type SSH Key Credentials cannot be set as the normal host preferred credentials or the privileged host preferred credentials for Oracle home targets.
Click Validate Credentials to verify the accuracy of the provided credentials.
-
In the Notification section, specify whether or not you want to enable email notifications when the patch plan is scheduled, starts, requires action, is suspended, succeeds, and fails.
To enable email notifications, select Receive notification emails when the patching process, then select the required options. If a warning message, mentioning that the sender or the receiver email address is not set up, is displayed, perform the action mentioned in the warning.
-
In the Rollback section, select Rollback patches in the plan to roll back the patches listed in the plan, rather than deploy them.
-
In the OPatch Upgrade section, select OPatch Upgrade to upgrade the OPatch component before the patching operation begins.
For the OPatch component to be upgraded, ensure that it is downloaded and unzipped to the same location where the patches that you want to apply are staged.
-
In the Conflict Check section, specify whether you want to enable or disable ARU Conflict Check, a check that uses Oracle Automated Release Updates (ARU) to search for patch conflicts within the patch plan during the analysis stage. Also, specify the action that the patching procedure must take when a patch conflict is encountered during deployment.
For Conflicts, select Stop at Conflicts if you want the patching procedure to stop the deployment of the plan when a conflict is encountered, select Force Apply if you want the patching procedure to roll back the conflicting patches and apply the incoming patches when a conflict is encountered, or select Skip conflicts if you want the patching procedure to apply only the non-conflicting patches, and skip the application of the conflicting patches, when a conflict is encountered.
-
Click Next.
-
-
On the Validation page, click Analyze to validate the patch before deploying it. A validation job is submitted, which checks for patch conflicts, checks for the latest OPatch version, checks if the version and platform of the targets and the patch are the same, and so on. To track the progress of the validation job, click Show Detailed Results.
Alternatively, you can navigate directly to the Review and Deploy page to deploy the Management Agent patches without analyzing the plan. If you do so, a deploy job is submitted which analyzes the plan, and deploys it on successful analysis.
Note:
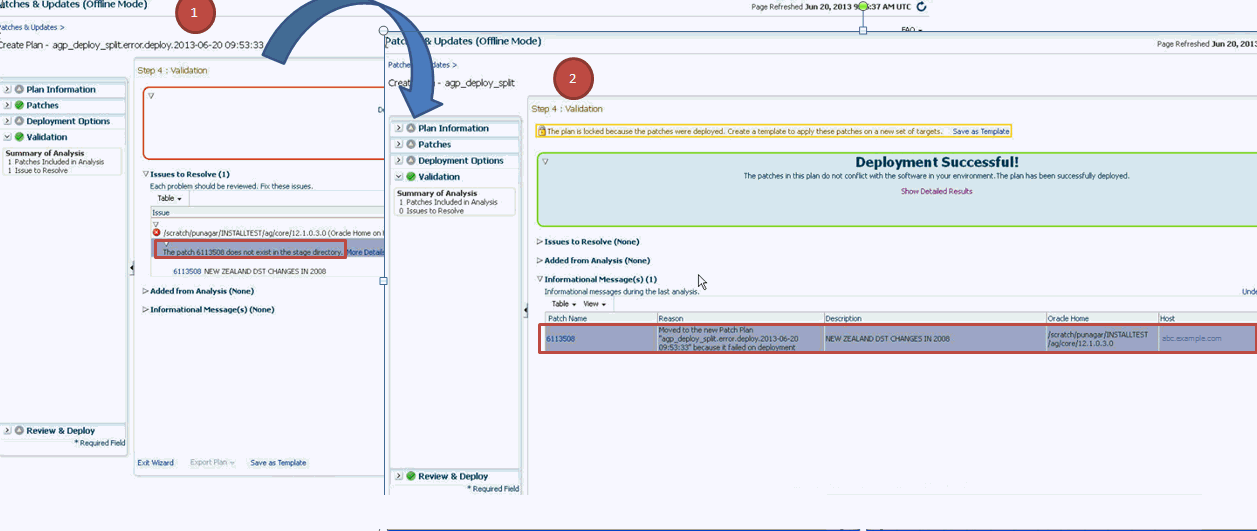
If any problems are encountered during the analysis phase, then the split plan feature is enabled, in which the patch plan is split into two patch plans, one having the targets for which the analysis failed, and another having the targets for which the analysis was successful. The patch plan having the targets for which the analysis was successful is available for deployment, while the other patch plan must be reanalyzed and deployed separately.
Figure 25-5 illustrates the split plan feature.
Upon validation, if there are conflicts between two patches, then it is recommended that you request for replacement patches. In this case, click Request Replacement Patches. If there is a merge patch already available for the conflicting patches, you can choose to directly replace the conflicting patches with the merge patch. To do this, click Replace Conflicting Patches.
For information about the errors that may occur during the validation phase, see Management Agent Patching Errors.
Click Next.
-
On the Review & Deploy page, review the details that you have provided for the patch plan, then click Deploy.
Once you click Deploy, a Deploy Confirmation dialog box appears, which enables you to schedule the Deploy operation. Select Deploy. If you want to begin the Deploy operation immediately, select Immediately. If you want to schedule the Deploy operation such that it begins at a later time, select Later, then specify the time. Click Submit.
After scheduling a deploy operation, the Deploy button on the Review and Deploy page is renamed to Reschedule. If you want to reschedule the Prepare or Deploy operation, click Reschedule, specify the time, then click Submit. If you want to discard the schedule and bring the patch plan back to its last valid state, click Stop Schedule. Note that the deploy operation schedule is discarded if you edit a patch plan deployment option or a patch target. In this case, you must validate the patch plan again.
A deploy job is submitted. To track the progress of the job, click Show Detailed Results.
25.2.6 Verifying the Applied Management Agent Patches
To verify the applied Management Agent patches, perform the following steps:
- In Cloud Control, from the Targets menu, select All Targets.
- On the All Targets page, for the Search Target Name field, enter the name of the Management Agent target that you just patched, then click the search icon. Click the name of the required target.
- On the Management Agent target home page, under the Summary section and the Configuration sub-section, click Oracle Home and Patch Details to view all the jobs that have run on the Oracle home target of the Management Agent.
- Under the Patch Advisories section, select the Patches Applied tab to verify all the patches that have been applied successfully on the Management Agent target.
25.2.7 Management Agent Patching Errors
The following are some of the errors that you may encounter while patching Management Agent targets:
25.2.7.1 Oracle Home Credentials Are Not Set
Error Description
This error occurs when the preferred Management Agent host credentials (for patching Management Agents that are not secure), or the privileged Oracle home credentials (for patches that require root user access) are not set.
Workaround
If the Management Agent targets that you want to patch are not secure, set the preferred Management Agent host credentials for all these targets. To set the preferred host credentials for a Management Agent target, from the Setup menu, select Security, then select Preferred Credentials. Select the Agent target type, then click Manage Preferred Credentials. Set the preferred host credentials for the Management Agent target. Analyze and deploy the patch plan.
If the patches that you want to apply (on the Management Agent targets) require root user access, set the privileged Oracle home credentials for the Management Agent targets. Analyze and deploy the patch plan.
25.2.7.2 Management Agent Target Is Down
Error Description
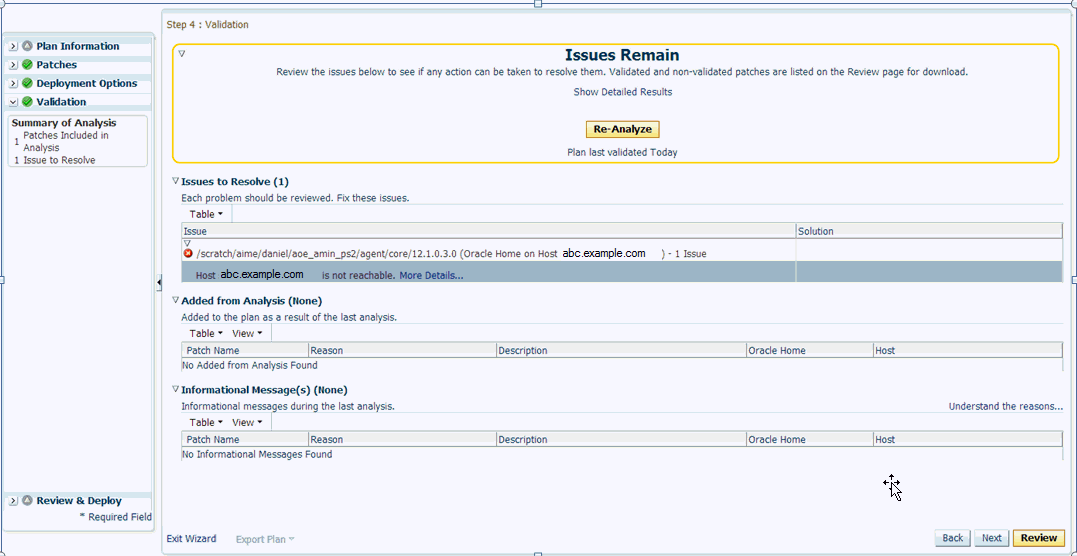
This error occurs when the Management Agent target added for patching is not up and running.
Figure 25-2 displays an example of this error.
Figure 25-2 Patching Error: Management Agent Target Is Down
Workaround
Start the Management Agent target, then analyze and deploy the patch plan.
25.2.7.3 Patch Conflicts Are Detected
Error Description
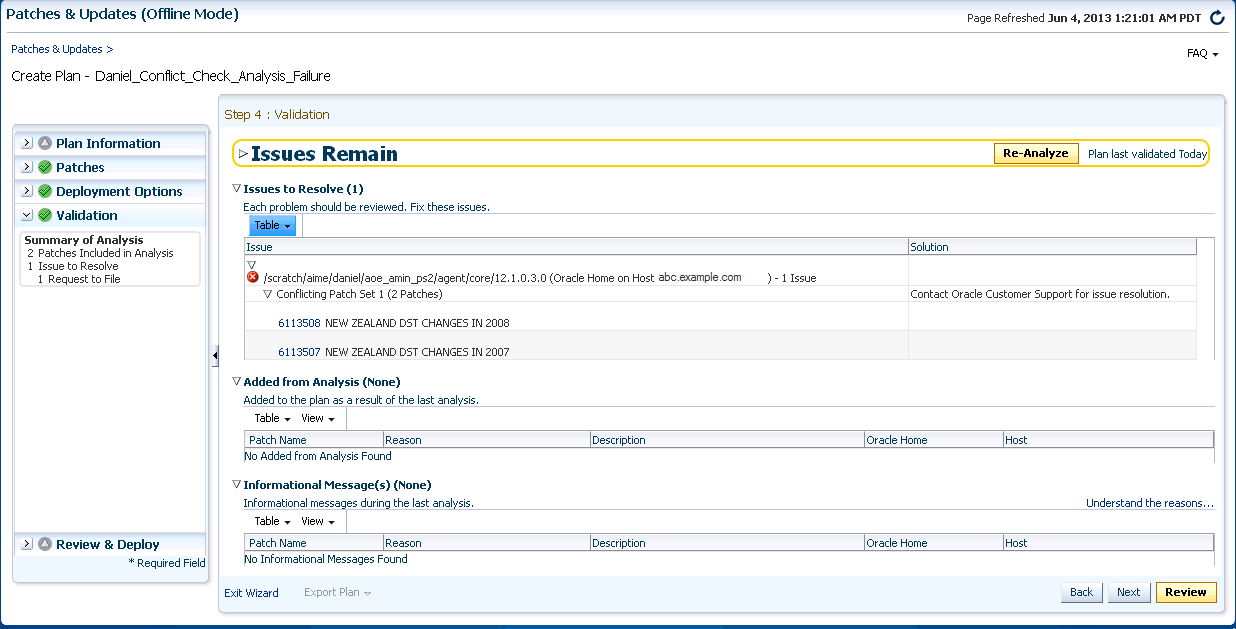
This error occurs when there is a conflict between two added patches.
Figure 25-3 displays an example of this error.
Figure 25-3 Patching Error: Patch Conflicts
Workaround
Do one of the following:
-
Contact Support to obtain a merged patch.
-
Choose the advanced OPatch options to force apply the patch. However, choosing this option and applying the patch will result in the loss of earlier patch changes.
25.2.7.4 User Is Not a Super User
Error Description
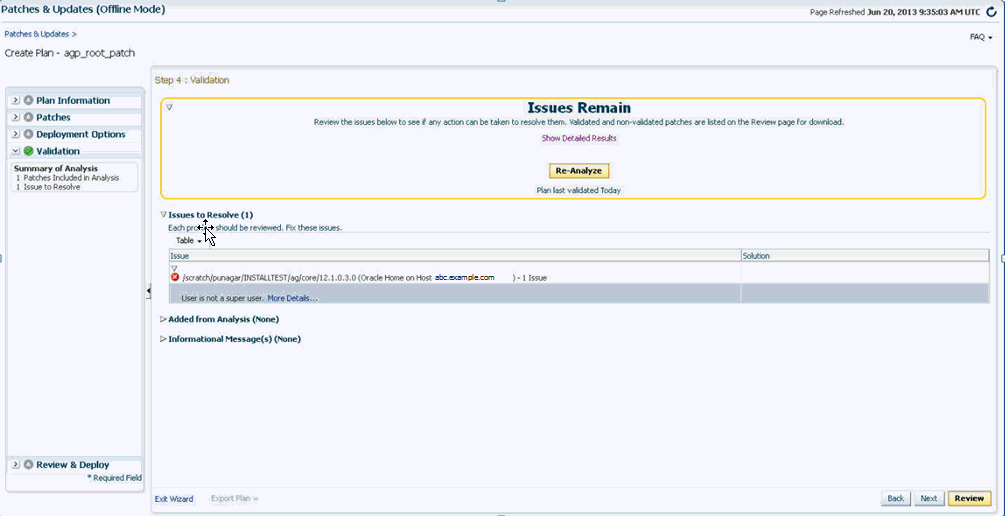
This error occurs when the user that runs the patch plan does not have root access.
Figure 25-4 displays an example of this error.
Figure 25-4 Patching Error: User Is Not a Super User
Workaround
Follow these steps:
-
Create a new credential that has root access.
-
Ensure that privilege delegation settings have been configured on the target Management Agent host. For more information about privilege delegation, see Oracle Enterprise Manager Lifecycle Management Administrator's Guide.
-
Analyze and deploy the patch plan.
25.2.7.5 Patch Is Not Staged or Found
Error Description
This error occurs when the patch is not present in the stage location.
Figure 25-5 displays an example of this error. This figure also illustrates the split plan feature.
Figure 25-5 Patching Error: Patch Is Not Staged or Found
Workaround
Ensure that the patch is available in the stage location. Analyze and deploy the patch plan.