21 Creating Full Clones

This chapter describes how to create a full database clone. It contains the following sections:

21.1 Creating a Full Database Clone Using RMAN Backup from the Self Service Portal

Database backups created by RMAN (Recovery Manager) are stored as image copies or backup sets. You can create profiles using these backups and use these profiles to create full database clones.

Table 21-1 Creating a Full Database Clone Using RMAN Backup

Step Task Role

1

Follow the steps in the Getting Started section to enable DBaaS.

See Getting Started

2

Create one or more resource providers.

See Creating Resource Providers

4

Configure the request settings.

See Configuring Request Settings

5

Define quotas for each self service user.

See Setting Up Quotas

6

Create one of the following types of profiles:

  • RMAN Backup

  • Existing RMAN Backup

See:

8

Create a service template based on the profile you have created.

See Create Service Template Using RMAN Backup Profile

9

Configure the Chargeback Service.

See Configuring Chargeback

10

While deploying a database, select the service template you have created.

See Requesting a Database

21.1.1 Creating Resource Providers

You must create one or more resource providers which include:

21.1.1.1 Creating a Database Pool for Database as a Service

To create a database pool for database as a service, follow these steps:

  1. Log into Enterprise Manager as a user with the EM_SSA_ADMINISTRATOR role.
  2. From the Enterprise menu, select Cloud, then select Cloud Home. From the Oracle Cloud menu, select Setup, then select Getting Started. Click the Setup link next to the Database service family, click the Database Pool link and click Create.

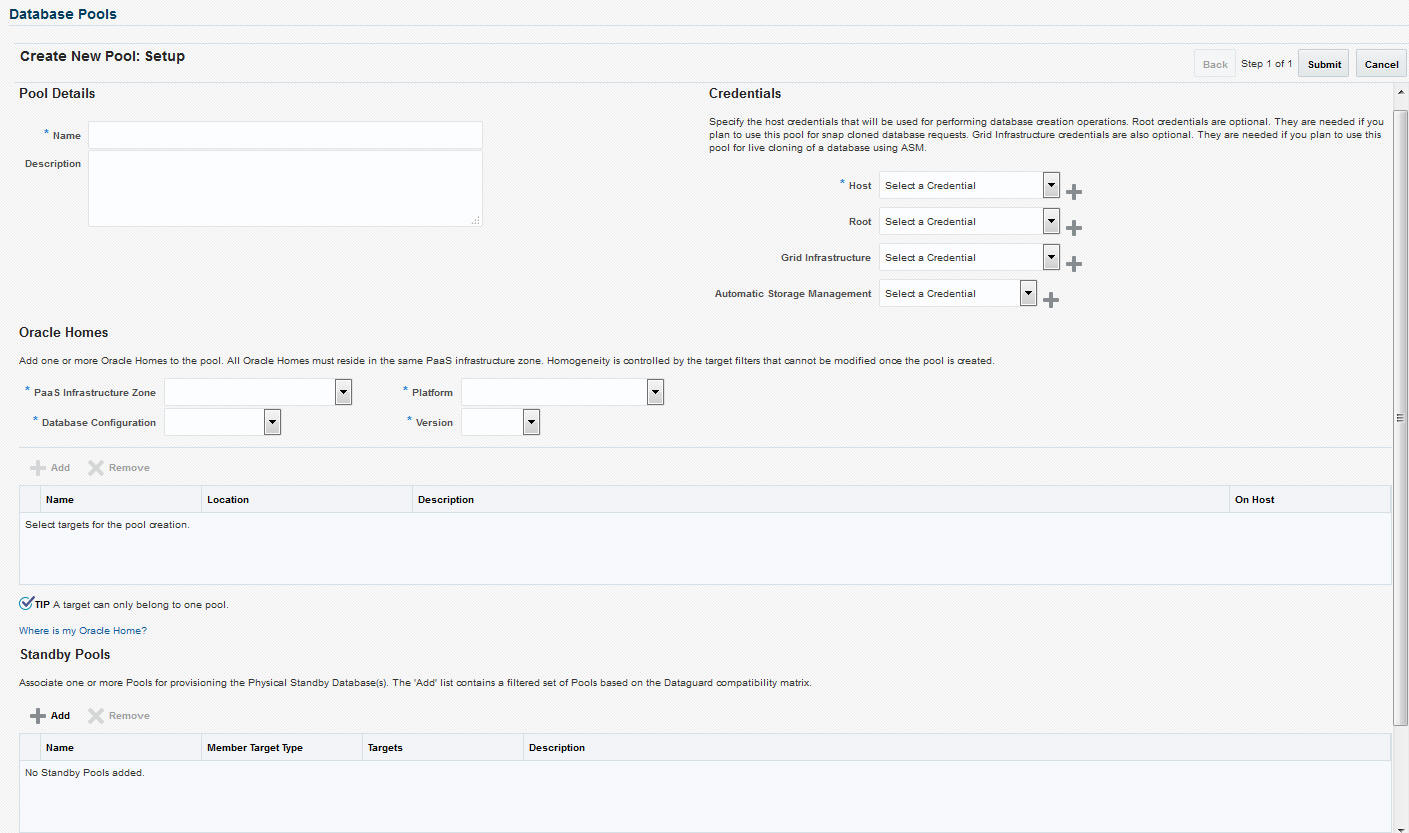
    Figure 21-1 Create Database Pool


    Create Database Pool
  3. In the Credentials region, specify the following credentials:
    • Host: Required for creating and starting the database.

    • Root: This is an optional field. It is required if you plan to use this database pool for database requests based on snap clone profile. See Creating Snap Clones.

    • Grid Infrastructure: This is an optional field. It is required if you plan to use this database pool for live cloning using of a database using ASM.

  4. Enter a name and description for the database pool.
  5. Specify the following details:
    • PaaS Infrastructure Zone: Select the PaaS Infrastructure Zone into which the database instance is to be provisioned.

    • Database Configuration: Specify the configuration of the database being provisioned. This can either be Single Instance or Cluster Database (RAC) but cannot be a combination of both.

    • Platform and Version: Specify the platform and version of the database being deployed.

  6. Click Add and select one or more Oracle Homes to be added to the database pool.
  7. In the Maximum Number of Database Instances (per host), enter the maximum number of database instances that can be running on each host in the pool.

    Note:

    For RAC databases. the value specified in this field is used to ensure that the nodes on which the database is be created meets this criteria.

  8. Click Submit to create a database pool. The newly created pool will appear in the Database Cloud Self Service Portal Setup: Database Pools page. The database pool can now be added to the Service Template.

21.1.2 Creating a Database Provisioning Profile

You can create either of the following types of profiles:

21.1.2.1 Creating a Database Provisioning Profile Using RMAN Backup

To create a database provisioning profile, follow these steps:

  1. You can access the Database Provisioning page using any of the following ways:
    • From the Enterprise menu, select Cloud, and then select Cloud Home. On the Cloud home page, click Oracle Cloud, select Setup, and then select Data Sources. On the Database: Data Sources page, in the Data Profiles tab, click Create.

    • From the Enterprise menu, select Provisioning and Patching, and then select Database Provisioning. On the Database Provisioning page, in the Profiles section, click Create.

    • From the database target home page, click Oracle Database, select Provisioning, and then select Create Provisioning Profile.

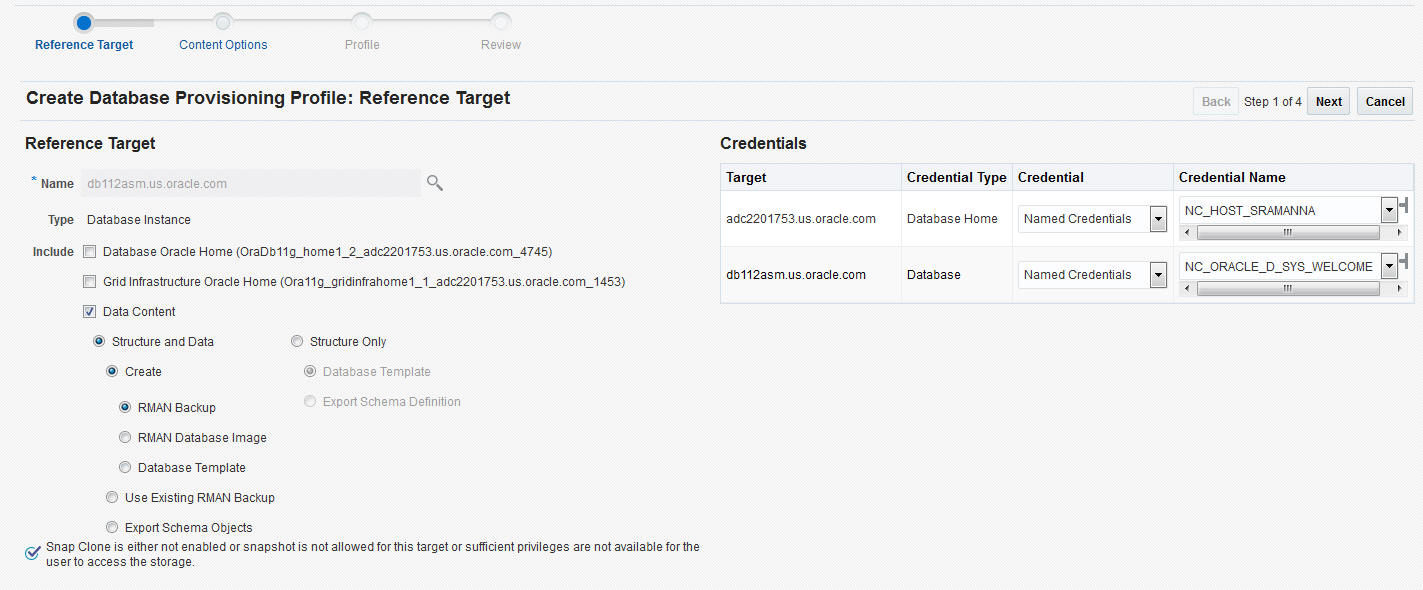
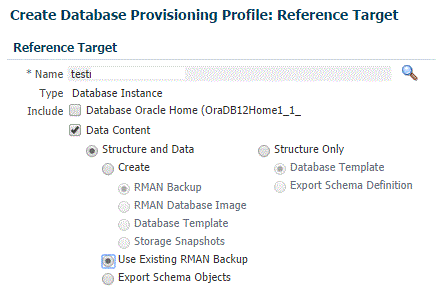
  2. On the Reference Target page, click the search icon to select a target.
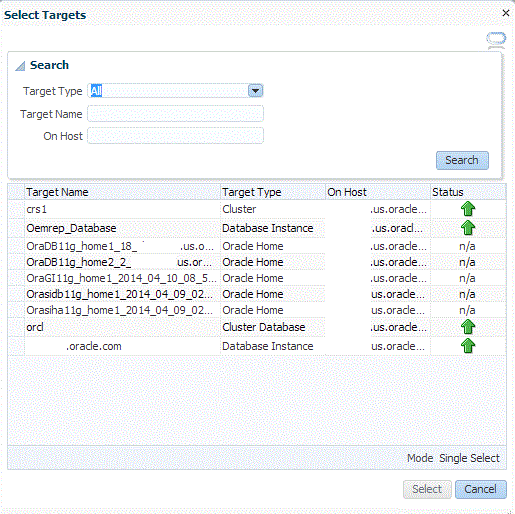
  3. In the Search and Select:Targets display box, select the database you want to create a profile for, and then, click Select.
  4. On the Reference Target page, select the following:
    • Data Content

    • Structure and Data to include physical and structural files from the database.

    • Create

    • RMAN Backup


    Reference Target page
  5. In the Credentials section, select the database. In the Credentials column, you can select Named Credentials and then select a credential name from the Credential Name column (or) select Preferred Credentials. Click Next.
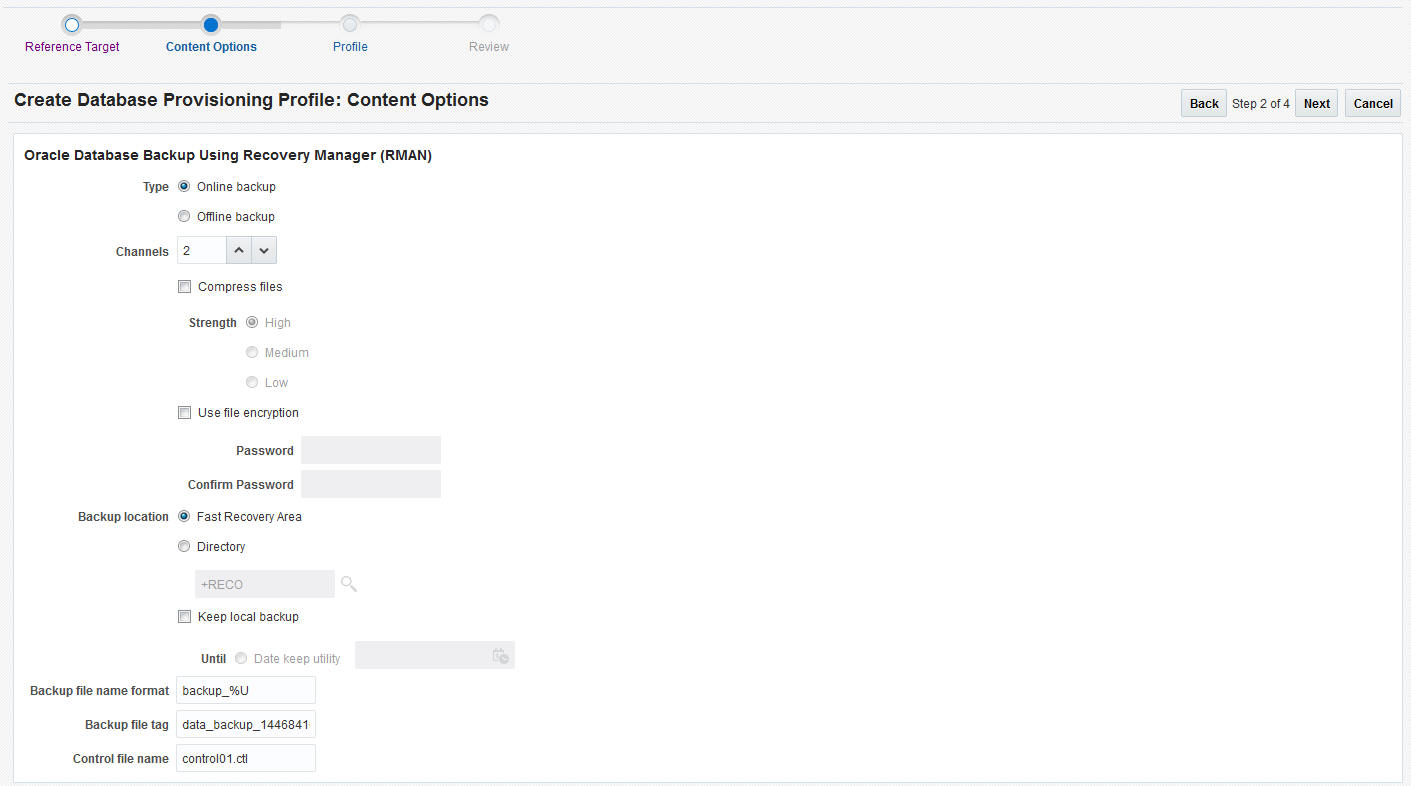
  6. The Content Options page appears. On this page, do the following:
    • Select Online Backup or Offline Backup.

    • Enter the number of channels.

      Note:

      A channel is the connection between the RMAN and the database. The usage of channels in RMAN backups sets the degree of parallelism. Each channel represents one stream of data to the device type. The more number of channels you allocate, the faster the backup jobs run. The maximum number of channels you can use is 25.

    • (optional) Select Compress files and then select High, Medium, or Low strength of compression.

    • (optional) Select Use File Encryption and then, enter the password and confirm the password.

    • Select Directory for the Backup location, and enter the directory path (or) select Fast Recovery Area, which already contains a backup location.

      Note:

      Ensure that the given location is accessible to the nodes in the database pool.

    • Enter the backup file name format. This will be used to generate backup files.

      backup file tag, control file name, and control file tag.

    • Enter the backup file tag. Backup files will be tagged with this tag.

    • Enter the control file name. The control file backup will be generated with this name.

    • Click Next.


    Content Options page
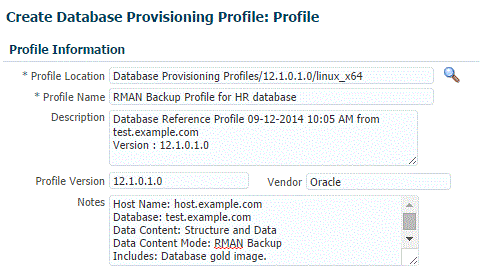
  7. On the Create Database Provisioning Profile: Page, in the Profile Information section, do the following:
    • Specify or select a profile location in the software library where the database profile will be created.

    • Specify a unique profile name.

      For example:
      RMAN Backup Profile for HR database
      
    • Add a description for the profile.

    • Verify the profile version and the vendor.

    • Add any additional notes such as host name, database, data content, data content mode, and the like.


      Profile info for RMAN backup
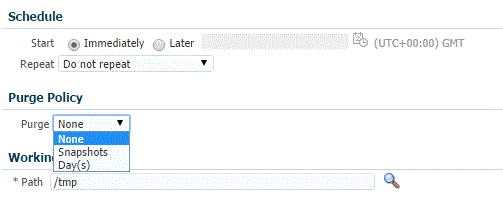
  8. In the Schedule section, you can choose to start the profile creation immediately, or you can schedule it for a later time. You can also choose to repeat the creation of the provisioning profile, and set a repeat time.

    Note:

    If a periodic RMAN profile is being used in a Service Template, then as an SSA_admin, you need to device a way to synchronously transfer all the backup pieces to a shared location among the Pool. Else, you need to take the backup on a shared nfs directory.

  9. In the Purge Policy section, you have three options:
    • None. Select this option you do not want to purge any data collected.

    • Snapshots. This option enables you to specify the maximum number of snapshots that can be purged.

    • Day(s). This option enables you to specify the number of days after which the data component should be purged.

  10. Specify or select a working directory. Click Next.
  11. On the Review page, ensure that the selections you have made in the previous pages are correctly displayed and click Submit. Otherwise, click Back repeatedly till you reach the page where you want to make changes. Click Cancel to abort the provisioning profile creation.

    Once you have submitted the provisioning profile creation job, manually refresh the page if View Data has been set to Real Time: Manual Refresh. Else, set View Data to reload after a specific period of time, and then select an execution step from the Procedure Steps tree on the left pane to view the details.

    To view the submitted jobs, select the Procedure Activity link in the Data Profiles tab.

21.1.2.2 Creating a Database Provisioning Profile Using Existing RMAN Backup

To create a database provisioning profile, follow these steps:

  1. You can access the Database Provisioning page using either of the following ways:
    • From the Enterprise menu, select Cloud, and then select Cloud Home. On the Cloud home page, click Oracle Cloud, select Setup, and then select Data Sources. On the Database: Data Sources page, in the Data Profiles tab, click Create.

    • From the Enterprise menu, select Provisioning and Patching, and then select Database Provisioning. On the Database Provisioning page, in the Profiles section, click Create.

    • From the database target home page, click Oracle Database, select Provisioning, and then select Create Provisioning Profile.

  2. On the Reference Target page, click the search icon to select a target.

    Reference Target page

  3. In the Search and Select:Targets display box, select the database you want to create a profile for, and then, click Select.

    Search and Select Targets display box

  4. On the Reference Target page, select the following:
    • Data Content

    • Structure and Data to include physical and structural files from the database.

    • Use Existing RMAN Backup


    Reference Target page for existing RMAN backup

  5. In the Credentials section, select the database. In the Credentials column, you can select Named Credentials and then select a credential name from the Credential Name column (or) select Preferred Credentials. Click Next.

    Credentials

  6. On the Content Options page, select an existing RMAN backup from the list provided.

    Note:

    The list of existing RMAN backups are fetched from the database. Backups with multiple tags are supported.


    Content Options page

    Click Next.

  7. On the Create Database Provisioning Profile: Page, in the Profile Information section, do the following:
    • Specify or select a profile location in the software library where the database profile will be created.

    • Specify a unique profile name.

      For example:
      Existing RMAN Backup Profile for HR database
      
    • Add a description for the profile.

    • Verify the profile version and the vendor.

    • Add any additional notes such as host name, database, data content, data content mode, and the like.


      Information for RMAN backup profile

  8. In the Schedule section, you can choose to start the profile creation immediately, or you can schedule it for a later time. You can also choose to repeat the creation of the provisioning profile, and set a repeat time.

    Note:

    If a periodic RMAN profile is being used in a Service Template, then as an SSA_admin, you need to device a way to synchronously transfer all the backup pieces to a shared location among the Pool. Else, you need to take the backup on a shared nfs directory.

  9. In the Purge Policy section, you have three options:
    • None. Select this option you do not want to purge any data collected.

    • Snapshots. This option enables you to specify the maximum number of snapshots that can be purged.

    • Day(s). This option enables you to specify the number of days after which the data component should be purged.


      Database snapshot purge policy

  10. Specify or select a working directory. Click Next.
  11. On the Review page, ensure that the selections you have made in the previous pages are correctly displayed and click Submit. Otherwise, click Back repeatedly till you reach the page where you want to make changes. Click Cancel to abort the provisioning profile creation.

    Review page for existing RMAN

    Once you have submitted the provisioning profile creation job, manually refresh the page if View Data has been set to Real Time: Manual Refresh. Else, set View Data to reload after a specific period of time, and then select an execution step from the Procedure Steps tree on the left pane to view the details.

    To view the submitted jobs, select the Procedure Activity link in the Data Profiles tab.

21.1.3 Configuring Request Settings

You can configure the request settings by specifying when a request can be made, its duration, and so on. See Configuring Request Settings.

21.1.4 Defining Quotas

After configuring the request settings, you must define quotas for each self service user. See Setting Up Quotas.

21.1.5 Create Service Template Using RMAN Backup Profile

  1. Log into Enterprise Manager as a user with the EM_SSA_ADMINISTRATOR role.
  2. From the Enterprise menu, select Cloud, then select Cloud Home. The Cloud Home page appears. From the Oracle Cloud menu, select Setup, then select Getting Started.
  3. Click the Setup link next to the Databases option in the left panel. Select Database from the drop down menu.
  4. Click the Service Templates link. The Service Templates page appears. Click Create. The Create Service Template: General page appears.

    Figure 21-2 Create Service Template (RMAN Backup)


    Create Service Template (RMAN Backup)

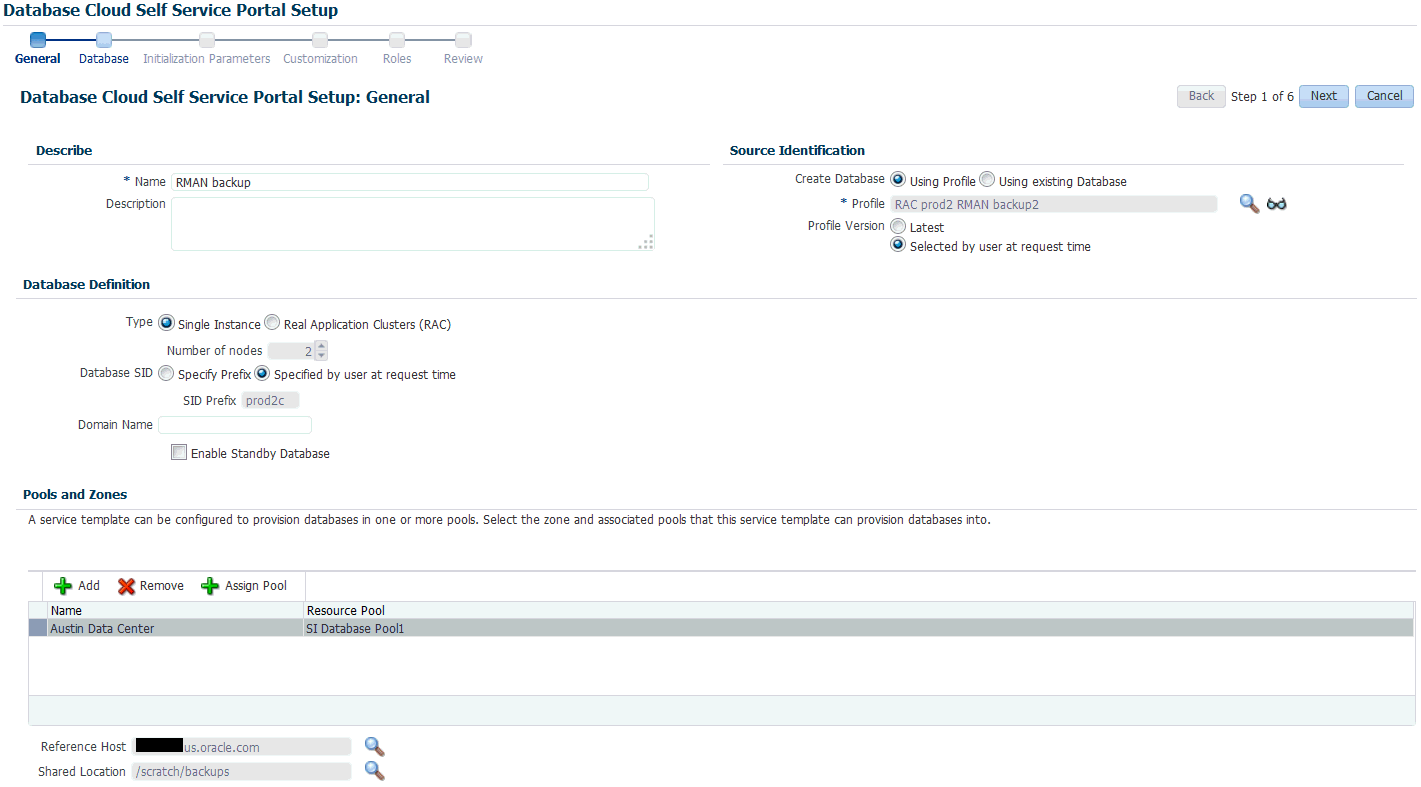
  5. Enter a name and description for the service template. The description must be unique and provide information on the type of service template being created.
  6. In the Source Identification section, select the Using Profile radio button, click the Search icon and select a RMAN Backup profile from the list.
  7. In the Profile Version field, you can select either of the following:
    • Latest: This ensures that the latest profile is always used by the self service user.

    • Selected by user at request time: If this option is selected, the self service user can select a revision of the profile that is to be used when creating a service request.

  8. In the Database Definition region, specify the following:
    • Type: This can be Single Instance or Real Application Cluster (RAC). If you select RAC, specify the Number of Nodes.

    • Database SID: This is an optional field. You can select Specify Prefix or Specified by User at Request Time.

      • Specify Prefix: If you choose this option, enter a prefix that is to be used to generate a unique System Identifier (SID) at the time of database creation. The prefix helps to identify databases created using this service template. The prefix can be a maximum of 6 characters.

        The new database name generated will be based on the SID Prefix specified here. For example, if the prefix is specified as MYDB, the SID for the new database is generated as MYDB0000, MYDB0001, MYDB0002, and so on.

        For existing databases (running databases and in progress requests), a unique SID name is generated for single instance databases, or a unique name is generated for real application cluster databases. For example, if the existing SIDs running on a host are MYDB0000, MYDB0001, MYDB0002 And In progress are MYDB0003, MYDB0004, the new SID or database name generated for the new request is MYDB0005.

      • Specified by User at Request Time: If you choose this option, you can leave this field blank and specify the SID when you are making a database request.

    • Domain Name: This is an optional field. Enter a Domain Name to be used for the new database being created. You must ensure that the domain name does not contain a preceding "." (dot).

    • Enable Standby Database: Select this checkbox if you want to provision standby databases using this service template. If this checkbox is selected, you have to add standby databases.

  9. In the Zones region, click Add to select a PaaS Infrastructure Zone into which the database instance is to be provisioned. Click Assign Pool. Select a pool from the list and assign this pool to the PaaS Infrastructure Zone. The database will be provisioned into this pool.
  10. After you have selected the zone and the pool, the host target is populated in the Reference Host field.
  11. Specify a Shared Location and click Next.
  12. In the Listener Port field, specify listener port number that is to be associated with the new database. If you have selected a 11.2 or later RAC database, you must specify the scan port number. Click Next. The Create Service Template: Database page appears.

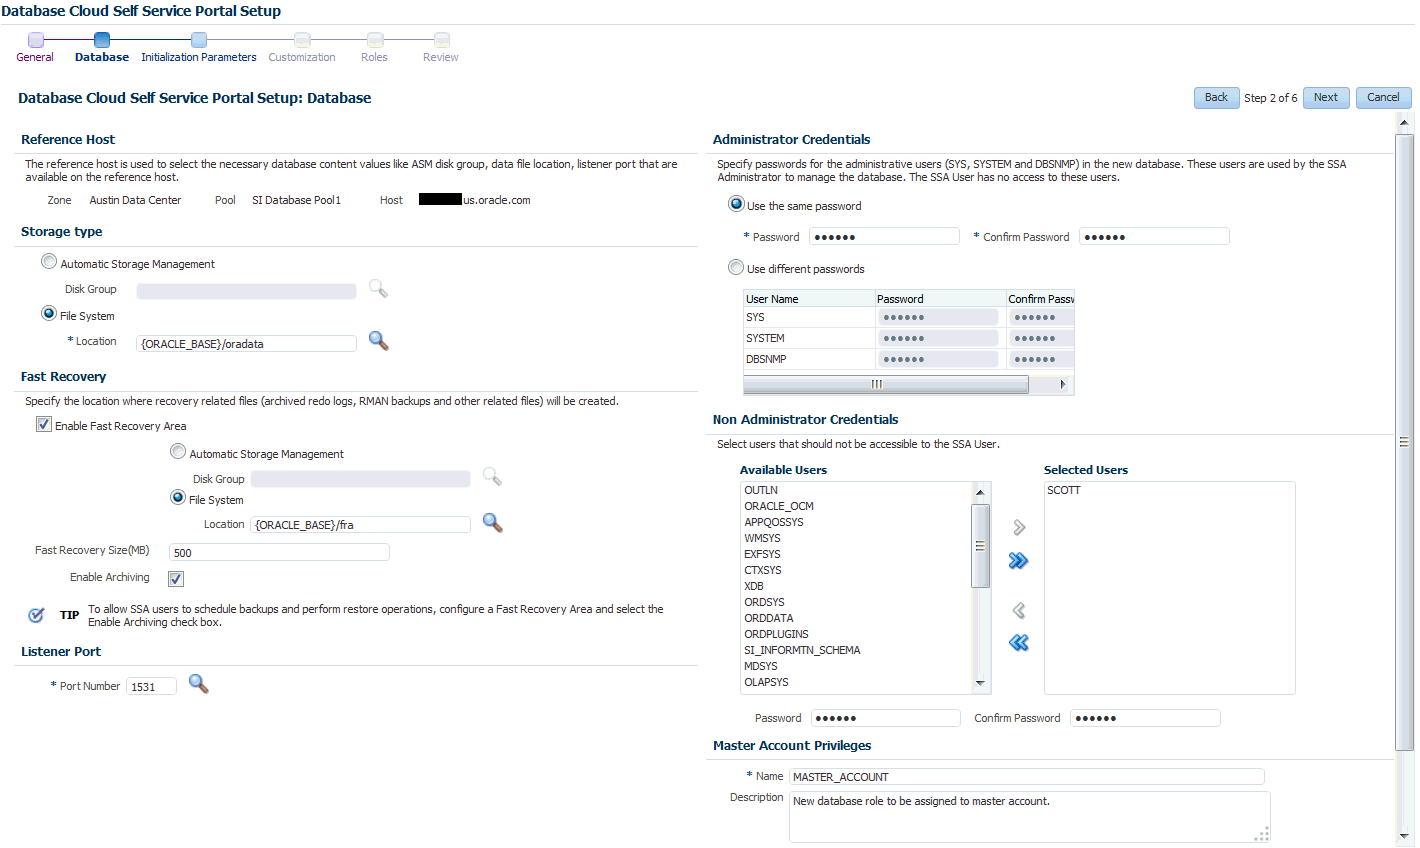
    Figure 21-3 Create Service Template: Database (RMAN Backup)


    Create Service Template: Database (RMAN Backup)

  13. In the Reference Host region, the name of the PaaS Infrastructure zone, the database pool, and the reference host you have selected in the Database Cloud Self Service Portal Setup: General page are displayed.

    The database values such as a Automatic Storage Management (ASM) disk group, location of the file system, and listener port you select must be available on the reference host.

  14. Specify the following:
    • Storage Type: This can be:

      • Automatic Storage Management: The Oracle Automatic Storage Management (ASM) is a volume manager and a file system for database files that supports single-instance and RAC configurations. ASM groups the disks in your storage system into one or more disk groups. If you select ASM, select the Disk Group here.

      • File System: The Oracle Database File System creates a standard file system interface on top of files and directories that are stored in database tables. If you select this option, you must specify or select the Location of the File System.

    • Fast Recovery (Optional): To simplify the management of backup and recovery files, you can create a fast recovery area for your database. Select the Enable Fast Recovery Area checkbox to specify the location in which recovery related files must be stored. The fast recovery area can be a ASM disk group or a file system that provides a centralized disk location for backup and recovery file. Specify the location of the Fast Recovery Area and the Fast Recovery Size. The amount of disk space to allocate for the fast recovery area depends on the size and activity levels of your database.

      If the Enable Archiving check box is selected, the database will not be shut down during a refresh. This allows self service users to schedule backups and restore operations without shutting down the database.

  15. In the Listener Port field, specify listener port number that is to be associated with the new database. If you have selected a 11.2 or later RAC database, you must specify the scan port number.
  16. Specify the Administrator Credentials. Specify passwords for the system schemas of the new database. These schemas will not be available to the EM_SSA_USERS. You can choose to use the same password for all the schemas or different passwords for each schema. If these values are not specified, default values will be used and the EM_ADMINISTRATOR can change them.
  17. Apart from the system schemas, if you want to restrict access to other schemas, you can select them in the Non-Administrator Credentials region and specify the password. These schemas will be locked and the EM_SSA_USERS cannot access them.
  18. Enter the name of the Master Account. You can specify the privileges that are to be provided to the master account user by specifying them in the Privileges field. Click Next.
  19. Click Next. The Create Service Template: Initialization Parameters page appears. In this page, you can specify the following:
    • Database Sizes: Select the database sizes that are to be supported by this service template. You can select sizes such as small, medium, and large. Each database size has a specific memory, storage, CPU cores, and units. Select a size and select Include in Template to associate it with the service template. Click Default to designate it as the default database size.

    • Initialization Parameters: You can configure the values of various initialization parameters that affect the operation of the database instance. Select a parameter and click the Set icon to modify the value of the parameter.

  20. Click Next. The Create Service Template: Customization page appears. Specify the custom scripts that need to be executed before and after the database is created. See Pre and Post Request Creation / Deletion Scripts for details.

    You can also specify a custom Post SQL Script and select the user who can run the script. For more details, see Selecting the Post SQL Script.

  21. In the Target Properties region, you can specify global target properties such as Location, Department, Line of Business, and so on. These properties will be applied to the database clones that are created. You can do the following:
    • Mark a property as mandatory by selecting the Required check box. If a property is marked as mandatory, the self service user must specify a value for this property while requesting a database.

    • Lock a property. When a property is locked, the self service user cannot modify the value of this property while requesting a database.

  22. Click Next. The Create Service Template: Roles page appears. Click Add to select the SSA user roles to which this service template will be available. All users belonging to the selected role can use this service template. Click Next.
  23. The Create Service Template: Review page appears. Click Create. The newly created service template will appear in the Database Cloud Self Service Portal Setup: Service Templates page.

21.1.6 Configuring Chargeback

Optionally, you can configure the chargeback service. See Chargeback Administration.

21.1.7 Requesting a Database

The self service user can now select the service template based on the database template profile and create a database. See Requesting a Database.

21.2 Creating a Full Database Clone Using RMAN Duplicate from the Self Service Portal

You can use the RMAN Duplicate feature to create a test master and use the test master to create a full database clone.

Table 21-2 Creating a Full Database Clone Using a Live Standby Database

Step Task Role

1

Follow the steps in the Getting Started section to enable DBaaS.

See Getting Started.

2

Create one or more resource providers

See Creating Resource Providers.

3

Create the test master by using a live standby database.

See Creating a Service Template Using RMAN Duplicate.

4

Configure the request settings.

See Configuring Request Settings.

5

Define quotas for each self service user.

See Defining Quotas.

6

Create a service template based on the live standby database.

See Creating a Service Template Using RMAN Duplicate.

7

Configure the Chargeback Service.

See Configuring Chargeback.

8

While deploying a database, select the service template you have created.

See Requesting a Database.

21.2.1 Creating a Service Template Using RMAN Duplicate

To create a service template using an existing database, follow these steps:

  1. Log into Enterprise Manager as a user with the EM_SSA_ADMINISTRATOR role.
  2. From the Enterprise menu, select Cloud, then select Cloud Home. The Cloud Home page appears. From the Oracle Cloud menu, select Setup, then select Getting Started.
  3. Click the Setup link next to the Databases option in the left panel. Select Database from the drop down menu.
  4. Click the Service Templates link. The Service Templates page appears. Click Create. The Create Service Template: General page appears.

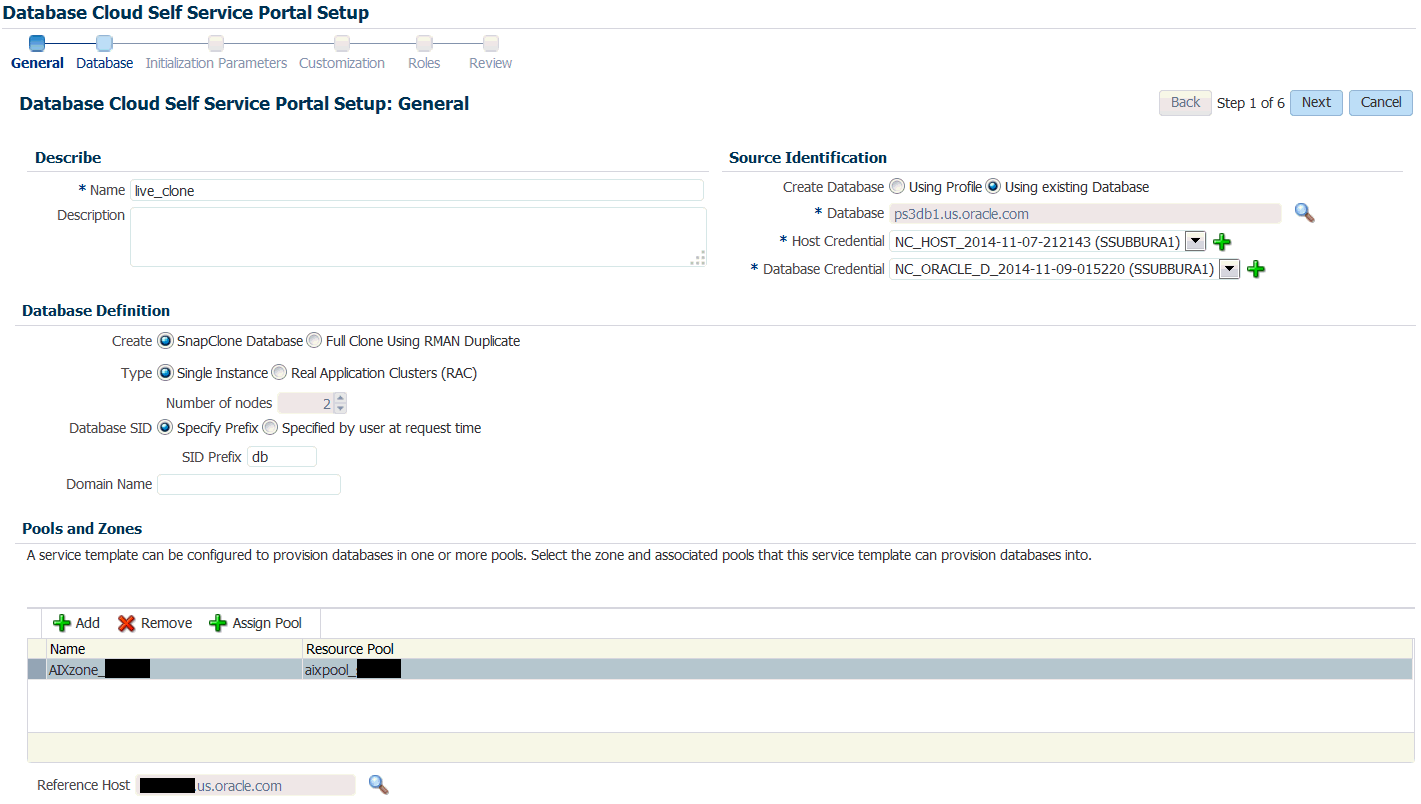
    Figure 21-4 Create Service Template: General: RMAN Duplicate


    Create Service Template: General: RMAN Duplicate

  5. Enter a name and description for the service template. The description must be unique and provide information on the type of service template being created.
  6. In the Source Identification section, select the Using Existing Database radio button, click the Search icon and select the test master database that you had created earlier.
  7. Specify the host and database credentials.
  8. In the Database Definition region, specify the following:
    • Create: Select Full Clone Using RMAN Duplicate. This option is used to create a full database clone using an existing database.

    • Type: This can be Single Instance or Real Application Cluster (RAC). If you select RAC, specify the Number of Nodes.

    • Database SID: This is an optional field. You can select Specify Prefix or Specified by User at Request Time.

      • Specify Prefix: If you choose this option, enter a prefix that is to be used to generate a unique System Identifier (SID) at the time of database creation. The prefix helps to identify databases created using this service template. The prefix can be a maximum of 6 characters.

        The new database name generated will be based on the SID Prefix specified here. For example, if the prefix is specified as MYDB, the SID for the new database is generated as MYDB0000, MYDB0001, MYDB0002, and so on.

        For existing databases (running databases and in progress requests), a unique SID name is generated for single instance databases, or a unique name is generated for real application cluster databases. For example, if the existing SIDs running on a host are MYDB0000, MYDB0001, MYDB0002 And In progress are MYDB0003, MYDB0004, the new SID or database name generated for the new request is MYDB0005.

      • Specified by User at Request Time: If you choose this option, you can leave this field blank and specify the SID when you are making a database request.

    • Domain Name: This is an optional field. Enter a Domain Name to be used for the new database being created. You must ensure that the domain name does not contain a preceding "." (dot).

  9. In the Zones region, click Add to select a PaaS Infrastructure Zone into which the database instance is to be provisioned. Click Assign Pool. Select a pool from the list and assign this pool to the PaaS Infrastructure Zone. The database will be provisioned into this pool.
  10. After you have selected the zone and the pool, the host target is populated in the Reference Host field.
  11. Specify a Shared Location and click Next.
  12. In the Listener Port field, specify listener port number that is to be associated with the new database. If you have selected a 11.2 or later RAC database, you must specify the scan port number. Click Next. The Create Service Template: Database page appears.
  13. In the Reference Host region, the name of the PaaS Infrastructure zone, the database pool, and the reference host you have selected in the Database Cloud Self Service Portal Setup: General page are displayed.

    The database values such as a Automatic Storage Management (ASM) disk group, location of the file system, and listener port you select must be available on the reference host.

  14. Specify the following:
    • Storage Type: This can be:

      • Automatic Storage Management: The Oracle Automatic Storage Management (ASM) is a volume manager and a file system for database files that supports single-instance and RAC configurations. ASM groups the disks in your storage system into one or more disk groups. If you select ASM, select the Disk Group here.

      • File System: The Oracle Database File System creates a standard file system interface on top of files and directories that are stored in database tables. If you select this option, you must specify or select the Location of the File System.

    • Fast Recovery (Optional): To simplify the management of backup and recovery files, you can create a fast recovery area for your database. Select the Enable Fast Recovery Area checkbox to specify the location in which recovery related files must be stored. The fast recovery area can be a ASM disk group or a file system that provides a centralized disk location for backup and recovery file. Specify the location of the Fast Recovery Area and the Fast Recovery Size. The amount of disk space to allocate for the fast recovery area depends on the size and activity levels of your database.

      If the Enable Archiving check box is selected, the database will not be shut down during a refresh. This allows self service users to schedule backups and restore operations without shutting down the database.

  15. In the Listener Port field, specify listener port number that is to be associated with the new database. If you have selected a 11.2 or later RAC database, you must specify the scan port number.
  16. Specify the Administrator Credentials. Specify passwords for the system schemas of the new database. These schemas will not be available to the EM_SSA_USERS. You can choose to use the same password for all the schemas or different passwords for each schema. If these values are not specified, default values will be used and the EM_ADMINISTRATOR can change them.
  17. Apart from the system schemas, if you want to restrict access to other schemas, you can select them in the Non-Administrator Credentials region and specify the password. These schemas will be locked and the EM_SSA_USERS cannot access them. Click Next.
  18. Click Next. The Create Service Template: Initialization Parameters page appears. In this page, you can specify the following:
    • Database Sizes: Select the database sizes that are to be supported by this service template. You can select sizes such as small, medium, and large. Each database size has a specific memory, storage, CPU cores, and units. Select a size and select Include in Template to associate it with the service template. Click Default to designate it as the default database size.

    • Initialization Parameters: You can configure the values of various initialization parameters that affect the operation of the database instance. Select a parameter and click the Set icon to modify the value of the parameter.

  19. Click Next. The Create Service Template: Customization page appears. Specify the custom scripts that need to be executed before and after the database is created. See Pre and Post Request Creation / Deletion Scripts for details.
  20. In the Target Properties region, you can specify global target properties such as Location, Department, Line of Business, and so on. You can do the following:
    • Mark a property as mandatory by selecting the Required check box. If a property is marked as mandatory, the self service user must specify a value for this property while requesting a database.

    • Lock a property. When a property is locked, the self service user cannot modify the value of this property while requesting a database.

  21. Click Next. The Create Service Template: Roles page appears. Click Add to select the SSA user roles to which this service template will be available. All users belonging to the selected role can use this service template. Click Next.
  22. The Create Service Template: Review page appears. Click Create. The newly created service template will appear in the Database Cloud Self Service Portal Setup: Service Templates page.