Working With Free Form Sub Style Sheets
This section discusses how to:
Create free form sub style sheets.
Insert free form sub style sheets into standard style sheets.
Convert standard style sheets into free form sub style sheets.
Rename free form sub style sheets.
Delete free form sub style sheets.
Include meta variables and comments in free form sub style sheets.
Change font and color settings in free form sub style sheets.
To create a free form sub style sheet:
Select
Select Style Sheet from the list.
Select the Free Form Sub Style Sheet style sheet type.
Select to enter a description for documentation purposes; when done, click the OK button.
Select the Free Form tab and enter the text for the style sheet.
Save the style sheet.
Important! The Style Sheet Editor does not perform any syntax checking on free form sub style sheets. You must verify and correct any style errors that occur at runtime.
To insert a free form sub style sheet into a standard style sheet:
Open the receiving standard or sub style sheet.
Click the Fixed Form tab.
Select .
Select Freeform Sub Style Sheet from the Sub Style Sheet Type drop-down list box.
Select the free form style sheet from the Sub Style Sheet drop-down list box.
Click the OK button and save the style sheet.
To convert a style sheet to a free form sub style sheet:
Open a standard style sheet or sub style sheet.
Select .
In the Style Sheet Type drop-down list box, select Freeform Sub Style Sheet and click the OK button.
Note: You will be warned that once the style sheet is saved as a free form type the style sheet data cannot be converted back to the standard or sub style sheet type.
Dismiss the warning dialog box.
Save the style sheet.
Note: You should not modify a PeopleTools style sheet; instead, clone the style sheet and make changes to the copy.
To rename a free form sub style sheet:
Select .
Select Style Sheet in the Definition drop-down list box and then enter search criteria to find the style sheet definition that you are renaming.
Click the Rename button; the definitions that match the search criteria appear in the list box.
Double-click the style sheet definition that you want to rename.
Enter the new name of the style sheet definition in the highlighted area and press the Enter key.
Click the OK button to confirm the rename.
Note: When you rename a free form sub style sheet, PeopleSoft Application Designer automatically renames all references to the style sheet.
To delete a free form sub style sheet:
Select .
Select Style Sheet in the Definition drop-down list box and then enter search criteria to find the style sheet definition that you are deleting.
Press the Delete key; the definitions that match the search criteria appear in the list box.
Click the style sheet that you want to delete and press the Delete key.
Click the OK button to confirm the deletion or click the Cancel button to cancel the operation.
Note: When you delete a style sheet, PeopleSoft Application Designer automatically deletes all references to the deleted style sheet.
This section discusses:
Meta variables.
Comments.
Meta Variables
Free form sub style sheets support these PeopleTools meta variables:
%AlignStart%AlignEnd%AlignAmount%Image
See Working with HTML Areas and Style Sheets.
Note: The system ignores any other meta variables.
Meta variables in the free form sub style sheet are resolved at runtime before the style sheet is downloaded to the client. Meta variable processing does not occur at design time. In PeopleSoft Application Designer, if you select , you do not see any results from meta variable processing.
Comments
To insert comments,
include the text between /* and */.
The use of // is not supported.
When entering code in the Free Form tab of free form sub style sheets, the appearance of the various elements of the code, such as comments, is based on the default font and color settings in the Font and Color Settings dialog box.
Access the Font and Color Settings dialog box. (Open a free form sub style sheet and select Edit, Display Font and Colors.)
Image: Font and Color Settings dialog box
This example illustrates the fields and controls on the Font and Color Settings dialog box. You can find definitions for the fields and controls later on this page.
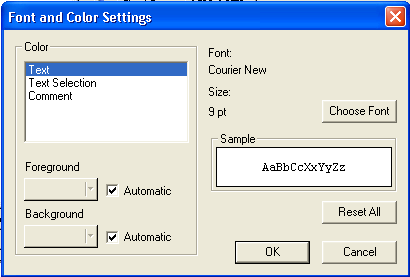
|
Field or Control |
Definition |
|---|---|
| Color |
Select the item whose color you want to change. Values are: Text Text Selection Comment |
| Foreground |
Click to select a font color. |
| Background |
Click to select the color of the background behind the font. |
| Choose Font |
Click to select a font. |
| Reset All |
Click to reset all defaults to the original settings. |
You can change the default font and color settings for free form sub style sheets.
Changing the Default Font and Color Settings
To change a default font and color setting:
In the Color group box, select an item from these choices:
Text
Text Selection
Comment
Select a color from the Foreground drop-down list box.
Select a color from the Background drop-down list box.
Click the Choose Font button to select another font.
Click Reset All to restore the settings to the default settings.
Click the OK button.