Defining Process Definitions
After you specify a process type, you must create a process definition, specify the available options, and set up associated page transfers that might apply.
Access the Process Definition page ().
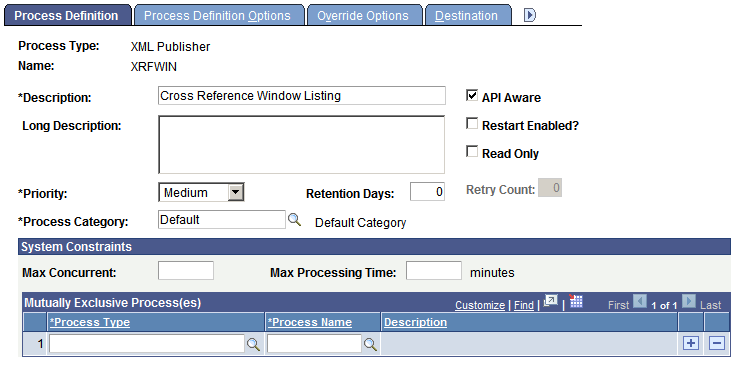
Image: Process Definition page
This example illustrates the fields and controls on the Process Definition page. You can find definitions for the fields and controls later on this page.
|
Field or Control |
Definition |
|---|---|
| Process Type |
Indicates the Process Type selected. |
| Name |
This name must match the file name of the process that you are defining. For example, if you are defining a SQR report named MYSQR.SQR, you must define the process name as MYSQR. |
| Long Description |
This field is optional. |
| Priority |
Select High, Medium, or Low to define the relative priority that is used by the PeopleSoft Process Scheduler Agent to determine which process to initiate first if multiple processes are queued to run on a server. |
| Process Category |
Select a process category for this process. Note: The categories Default and LOADCACHE are delivered with your system. |
| API Aware |
Select this check box if this process is an API-aware process. If this check box is selected for any process that is not API-aware, PeopleSoft Process Scheduler includes this process in the concurrent task count. This can result in improper server load balancing. Selecting this option does not mean that the process becomes API-aware. You must still add API code to the process. The PeopleSoft Application Engine, COBOL, SQR, Cube Builder, nVision, Data Mover, and XML Publisher process types should be API-aware. If API Aware is deselected for any of these process types, it is recorded on the SYSAUDIT report. |
| Restart Enabled? |
Select if the system should attempt to automatically restart this process if it is marked with a run status of Error. |
| Read Only |
Used only on Oracle databases with Oracle Active Data Guard enabled and configured for use within your PeopleSoft implementation. The Read Only option enables a [component | process] to run against the read-only, standby database, rather than your production database. |
| Retry Count |
Enter the number of times the system should attempt to automatically restart this process. Note: This field becomes active only if the Restart Enabled? check box is selected. |
| Retention Days |
Set the retention days that are used to determine the expiration date. The expiration date is determined by adding the retention days from the date on which the report was generated. Note: The retention days value entered for a process definition will be the default retention days when the process is run. |
System Constraints
Important! For system constraints to be evaluated, you must configure the system with a master scheduler. In the absence of a master scheduler, the system ignores settings for the following options.
|
Field or Control |
Definition |
|---|---|
| Max. Concurrent (maximum concurrent) |
Enter the maximum number of occurrences of this process that can be active at one time across all process schedulers. If this field is left blank (default), the value becomes Unlimited. Processes exceeding the maximum appear in the Process Monitor with a run status of Blocked. As active occurrences finish, blocked processes are released and queued. |
| Max. Processing Time (maximum processing time) |
Enter the maximum processing time for this process. If this field is left blank (default), the value becomes Unlimited. The system cancels the process if processing exceeds the time that is entered here. Important! This field is not supported for SQR and COBOL process types that are scheduled on an OS390 operating system and run from UNIX System Services (USS). |
| Mutually Exclusive Process(es) |
Enter the type and name all the processes that must not run at the same time as this process. Processes failing this constraint appear on the Process Monitor with a run status of Blocked. When mutually exclusive processes finish, blocked processes are released and queued. |
Access the Process Definition Options page (). Select the Process Definition Options tab.
Image: Process Definition Options page
This example illustrates the fields and controls on the Process Definition Options page. You can find definitions for the fields and controls later on this page.
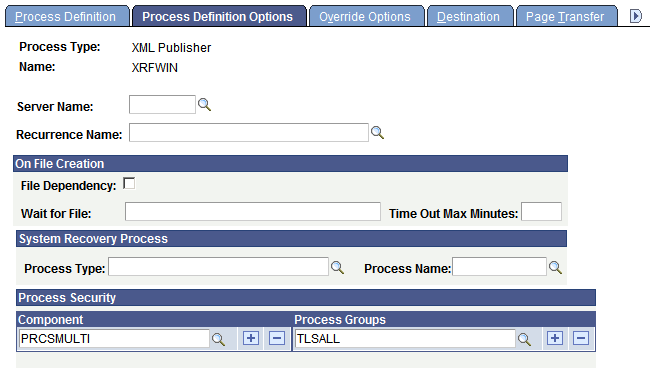
Use the Process Definition Options page to specify a location, server, component, or process group from which to run a process.
|
Field or Control |
Definition |
|---|---|
| (Optional) Server Name |
Specify a server on which the process should run. Specify the server name only to restrict this particular process to this server definition (or if you have only one server platform to submit your requests). Leave blank to have the process requested for the first server or default operating system that can process requests for the specified process class. This enables you to balance the load between multiple process servers because your request is initiated by the first available server on the default operating system. Important! For the system to evaluate values that are entered for the On File Creation feature, you must provide a server name. This is validated when you save your process definition. |
| (Optional) Recurrence Name |
Specify a predefined recurrence definition for this process. |
On File Creation
|
Field or Control |
Definition |
|---|---|
| File Dependency |
Select to activate the On File Creation feature. If this option is activated, Process Scheduler checks for the existence of the file. If the file is found and no other process is using it, the process will run. If the file is not found or is in use, the process does not run but enters a Blocked state. Time counting starts at this point. Process Scheduler continues to check for the file. If the file is found and is not in use, then the process will run. If the file is not found or it is in use even after the time interval specified in Time Out Max Minutes, the process will go to Error state. If the Max Time Out Minutes field is left blank, the process scheduler does not schedule the process as long as the file is not found in the specified location. |
| Wait for File |
Enter the location and name of the file that this process depends on. The process will not run until this file has been found if the file dependency option is activated. Processes on hold due to dependent files not being found appear on the Process Monitor with a run status of Blocked. When the dependent files have been located, blocked processes are released and queued. Note: This information can also be entered or changed at runtime if the File Dependency check box is selected. |
| Time Out Max. Minutes |
Enter a time limit for the system to locate the dependent files. The system compares the current date time to the timestamp of the time that the process was queued. If the time limit is exceeded, the process is marked as Error and the restart procedure is attempted. |
System Recovery Process
|
Field or Control |
Definition |
|---|---|
| Process Type and Process Name |
Enter the type and name of an optional process that can be run if this process runs to an error. The original process will not restart until the system recovery optional process that is entered here has run. |
Process Security
|
Field or Control |
Definition |
|---|---|
| Component |
Attach the process to components. Adding a component to a process definition causes that process definition to appear on the Process Scheduler Request page when you select File, Run in that component, if you have security to run the process. |
| Process Group |
Make the process definition a member of the group. A process definition can be a member of multiple process groups. Select an existing group, or add a new group by entering a unique process group name. To add new rows, click the Add button. Process groups are then assigned to security profiles in PeopleSoft Security Administrator, which enables you to specify the process requests that classes of users can run. |
Access the Override Options page (). Select the Override Options page.
Use the Override Options page to modify values that are passed to the process.
|
Field or Control |
Definition |
|---|---|
| Override Options |
Select a value if you have custom values to send through the parameter list, command line, or working directory: Append: Adds custom parameters to the end of the PeopleSoft string. Override: Sends custom parameters in place of the PeopleSoft defaults. Prepend: Adds custom parameters to the front of the PeopleSoft string. |
| Parameters |
Enter the custom parameter values. |
Access the Destination page (). Select the Destination tab.
Image: Destination page
This example illustrates the fields and controls on the Destination page. You can find definitions for the fields and controls later on this page.
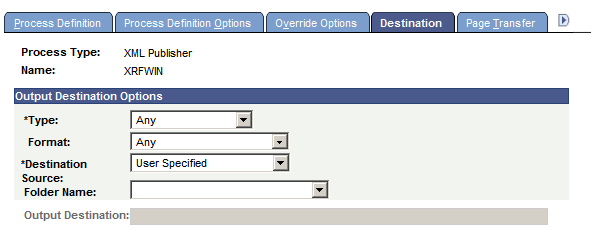
Note: The output source destinations are enforced for users who are not allowed to override the output destination by their user process profiles. If a user is allowed to override it, the user-run control destination is used in the process request.
|
Field or Control |
Definition |
|---|---|
| Type |
Select the default destination type for this process: None: Uses the user run control values. Any: User can specify any valid option. Default: Applicable to PS/nVision only. Depending on the type of process, other selections include Email, File, Printer, Window, and Web. The value that is specified here overrides the value that is specified in the System Settings - Process Output Type page. If the value that is specified here is deactivated, the value that is designated as the default will be used. |
| Format |
Select the format for this process. The value that is specified here overrides the value that is specified in the System Settings - Process Output Format page. If the value that is specified here is deactivated, the value that is designated as the default will be used. |
| Destination Source |
Specify the output destination source for this process: None: Use for processes that do not create output or for processes for which you do not want to produce an output file or report. Process Definition: This request uses the output destination that is specified by the process definition. Process Type Definition: This request uses the output destination that is specified by the process type definition. User Specified: This is the default value. The SQR process will always use values as specified in a run control by the user. So, we need to specify the Destination Output as User Specified. |
| Folder Name |
Select the folder in which the report will be displayed in the Explorer and List tables of the Report Manager. |
| Output Destination |
Use to hard-code the output destination into the process definition. This option is enabled only when the source value is Process Definition. |
To access the Page Transfer page, select
The Page Transfer or Log Transfer feature enables a user to go directly from the Process Monitor to a designated page in the PeopleSoft application to view the results from a successfully completed process.
To enable users to go directly from the Process Monitor to a page, specify the navigational route that an end user must follow through the PeopleSoft menu interface.
Note: If the search keys are not in the level 0 buffer of the current component, the Search page will appear.
|
Field or Control |
Definition |
|---|---|
| Page Transfer Code |
Select the type of transfer for this process: None: Disables this feature for this process. The remaining fields become unavailable when this value is selected. Msg Log (message log): Enables the Log Transfer feature for this process. Next Page: Enables the Page Transfer feature for this process. |
| Menu Name, Menu Bar Name, Menu Item, and Page Name |
Select the navigation path that the user follows through the PeopleSoft menu interface. |
| Menu Action |
Select one of the following menu actions that the user can perform when the page is selected: Add, Correction, Update, or Update All. |
Access the Notification page () . Select the Notification tab.
Image: Notification page
This example illustrates the fields and controls on the Notification page. You can find definitions for the fields and controls later on this page.

Use the Notification page to send messages to a group (using a role ID) or individuals (using a user ID) when a specific activity occurs in the process, such as an error, warning, or successful completion of the process.
You can choose and add a notification channel to a process type and also opt to enable a notification state. When the process reaches the state, the system will generate a notification and inform you using the type of notification channel you have configured in the page. You can enable notifications for the following states of a process:
On Error.
On Warning.
On Success.
On Cancel.
On Delete.
On Hold.
On Queued.
On Initiated.
On Processing.
On Cancelled.
On Not Success.
On Pending.
On Blocked.
On Restart.
This table lists the names and definitions of the elements on the Notification page.
|
Field or Control |
Definition |
|---|---|
| Type |
Select the notification channel from the drop down with the options — EMail, Notification Window, Pop-up Notification. |
| ID Type |
Select User or Role.. |
| Distribution ID |
Select the user ID of the user or group. |
| Disabled |
Select if you do not want to send notifications to the user or group. |
Access the Message page(). Select the Messages tab.
Image: Message page
This example illustrates the fields and controls on the Message page. You can find definitions for the fields and controls later on this page.
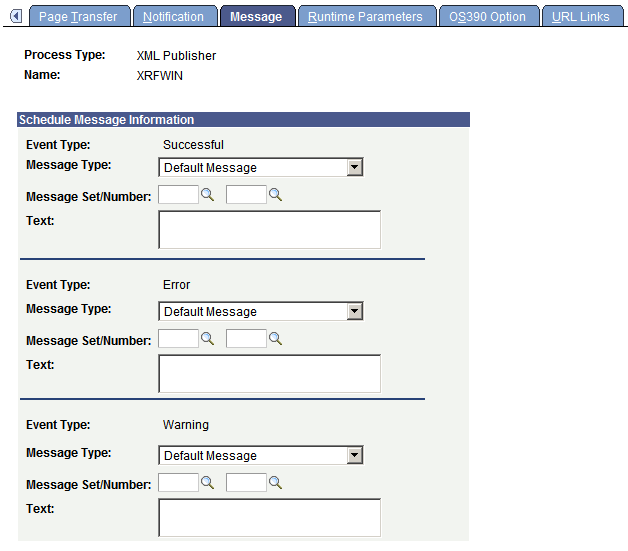
Use the Message page to specify the messages that are sent when the Notification feature is used. You can specify messages for successful completion and errors.
|
Field or Control |
Definition |
|---|---|
| Message Type |
Select the message type: Default Message: Use the basic default message. Customized Message: Create your own message. Message Catalog: Select a message from the Message Catalog. |
| Message Set/Number |
Select the Message Catalog set and number of the message. Complete these fields when the message type is Message Catalog. |
| Text |
Enter the message text when the message type is Customized Message. |
To access the Runtime Parameters page, select
Image: Runtime Parameters page
This example illustrates the fields and controls on the Runtime Parameters page. You can find definitions for the fields and controls later on this page.
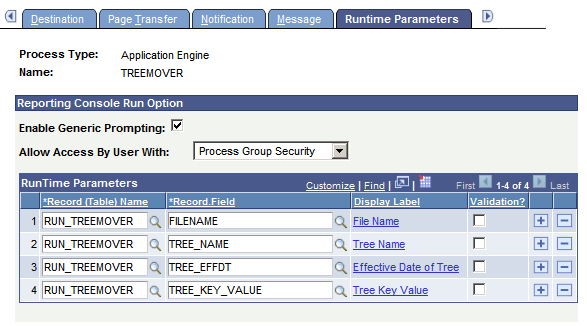
Use this page to enable the Run option from the Reporting Console and register runtime parameters associated with the process.
|
Field or Control |
Definition |
|---|---|
| Enable Generic Prompting |
Select this check box to allow users to schedule this process from the Reporting Console. Note: The prompt button is disabled for the run time record field that do not have a matching prompt record. |
| Allow Access By User With |
Select the type of permission required to schedule the process from the Reporting Console. It specifies whether full process security or process group security should be applied when the process is run from the Reporting Console or a web service.
Note: Users with the role PeopleSoft Administrator will always get the Run option on the Reporting Console if Generic Prompting is enabled. |
RunTime Parameters
Application run control records are used to retrieve the parameter values at execution time. In order to run the process from the Reporting Console, the user must be able to enter the runtime parameters necessary for the process with the correct application run control record. This also allows the user to retrieve saved parameter values from an application run control record.
|
Field or Control |
Definition |
|---|---|
| Record (Table) Name |
Enter the application-specific run control record used in this process. |
| Field Name |
Enter a row for each field used in the run control record. |
| Select Label |
Use this link to select the field label that will display on the generic prompting page. Select the Label Type:
|
| Validation? |
Select this check box to perform validation on parameter values entered using the Reporting Console. A Validation link will appear when the check box is selected. Use this link to specify the validation function from the Application Class. |
Runtime Parameter Restrictions
Not all application run control records can be used for generic prompting. Restrictions include:
Run control records having multiple rows at Level 1 for the same combination of Run Control Id and Operator Id are not supported in the generic prompting page. If a record has keys other than Run Control Id and Operator Id then it implies that it can have multiple rows at level 1 with the same values of Run Control Id and Operator Id. The generic prompting page cannot display multiple rows and can store only one Level 1 row at a time.
Prompt values will be displayed for fields only if the field on the prompt table is the highest order key.
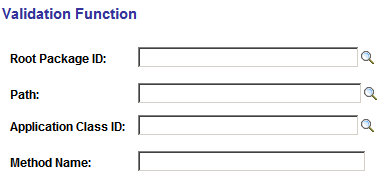
Setting Validation Function
When the user selects Validation for a field, the Validation Function link appears. Select the Validation Function link to enter the location of the validation program.
Image: Validation Function page
This example illustrates the fields and controls on the Validation Function page. You can find definitions for the fields and controls later on this page.
|
Field or Control |
Definition |
|---|---|
| Root Package ID |
Enter the package name that contains the class that you want to specify, or use the Lookup button to search for and select one. |
|
Field or Control |
Definition |
|---|---|
| Path |
Enter the name or names of any subpackages that contain the application class that you want to specify, or use the Lookup button to search for and select one. |
| Application Class ID |
Enter the name of the application class that contains the method that you want to specify, or use the Lookup button to search for and select one. |
| Method Name |
From the Method drop down list box, select the method from the selected application class that you want to specify. |
To access the OS390 Option page, select
The JCL shell and meta-string parameters that are used for constructing JCL that relates the process type to the JCL shell containing the replaceable parameters for the process have already been determined. Use this page to enter additional meta-string parameters for this process definition.
Note: This page is necessary only if you are using an OS390 operating system for the database.
|
Field or Control |
Definition |
|---|---|
| Meta Parameter |
Enter the meta-string parameter that is contained in the Job Shell. |
| Meta Parm Value (meta parameter value) |
Enter the value that replaces the meta-string parameter. |
To access the URL Links page, select
Image: URL Links page
This example illustrates the fields and controls on the URL Links page. You can find definitions for the fields and controls later on this page.
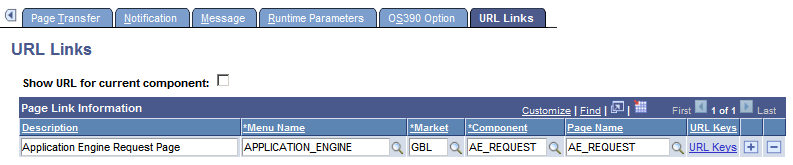
Use this page to associate multiple URLs with a process definition. The links appear on the Report Detail page, which is accessible from the Process Monitor and the Report Manager.
|
Field or Control |
Definition |
|---|---|
| Show URL for current component |
Select to create a link to the current component. |
| Description |
Enter a description for the link. |
| Menu Name, Market, Component, and Page Name |
Select to create the URL path and destination. |
| URL Keys |
Click to access the Edit URL Detail page. |
Editing URL Key Fields
Access the Edit URL Details page.
Image: Edit URL Details page
This example illustrates the fields and controls on the Edit URL Details page.

Use this page to view or edit the key fields of the selected URL.