Defining System Settings
PeopleSoft Process Scheduler maintains a single-row table that stores system-wide parameters and system defaults that are related to all processes. The section discusses varied system setting requirements for the processes.
To access the System Settings page, select
Image: System Settings page
This example illustrates the fields and controls on the System Settings page. You can find definitions for the fields and controls later on this page.

|
Field or Control |
Definition |
|---|---|
| Retention Days |
Enter the number of days before the files that are on the report repository are deleted. This value is used with the current date to calculate the expiration date on reports in Report Manager when retention days are not specified in Process Type definition, Process definition, or Run Control. |
| Primary Operating System |
Enter the default operating system. A run location of Any picks a server of this type. Note: If this field is left blank, the request will be scheduled by a Process Scheduler server with the default O/S. |
| System Load Balancing Option |
Select to assign to primary O/S only or server in any O/S. Assign To Primary O/S Only: Select to have Master Scheduler reassign workload to another Process Scheduler server with the primary O/S Assign To Server In Any O/S: Select to have Master Scheduler reassign workload to any available Process Scheduler server. When the Do Not Use Option is selected on the Server Definition page, the server takes a request only when the name of the server has been specified on the Process Request page or in any of the definition tables. Note: This field is used in conjunction with a Master Scheduler server. This field will be ignored if no Master Scheduler server is available to perform the load balancing. |
System Settings
Set system settings for the following sequence keys: Process Instance, Report Instance, and Transfer Instance. The instance number acts as a counter.
|
Field or Control |
Definition |
|---|---|
| Sequence |
Indicates the last instance number that was used. |
| Min Seq (minimum sequence) |
Indicates the lowest instance number to be used. |
| Max Seq (maximum sequence) |
Indicates the highest instance number to be used. When this number is reached, the system starts numbering again from the minimum sequence number. |
Note: The maximum value for Process Instance is 2,147,483,646. The maximum value for Report Instance and Transfer Instance is 999,999,999,999,999.
To access the Process Output Type Settings page, select
Image: Process Output Type Settings page
This example illustrates the fields and controls on the Process Output Type Settings page. You can find definitions for the fields and controls later on this page.
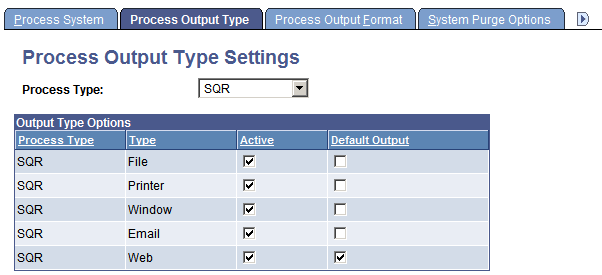
Use this page to specify active and default output types for each process type.
Note: When you are scheduling a process through PeopleCode using the ProcessRequest object, the default output type is used when the output type that is specified has been deactivated or the output type was not specified.
|
Field or Control |
Definition |
|---|---|
| Process Type |
Select the process type that you want to edit or leave blank to display all process types. |
| Type |
Lists the output types that are available for the selected process type. This field is display-only. |
| Active |
Select the appropriate check box to make the output type active for the selected process type. |
| Default Output |
Select the check box next to the output type that you want to display as the default on the Process Request page. |
Note: The Process Output Format Settings page uses information about output types; therefore, you need to save any changes that were made to output type settings before attempting to change an output format setting.
To access the Process Output Format Settings page, select
Image: Process Output Format Settings page
This example illustrates the fields and controls on the Process Output Format Settings page. You can find definitions for the fields and controls later on this page.
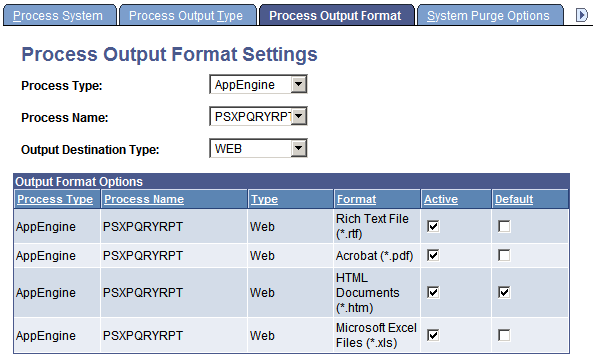
Use the Process Output Format Settings page to specify active and default output formats for each process type.
Note: When you are scheduling a process through PeopleCode using the ProcessRequest object, the default output format is used when the output format that is specified has been deactivated, or the output format was not specified.
|
Field or Control |
Definition |
|---|---|
| Process Type |
Select the process type, or leave blank to display all process types. |
| Process Name |
For process types that have registered non-unique processes, this field is used to identify the non-unique process. Note: Non-unique processes include Connected Query (PSCONQRS), Query (PSQUERY), and BI Publisher (PSXPQRYRPT). |
| Output Destination Type |
Select a specific output type to further define the output format options. Only output types specified as Active appear. |
| Format |
Lists the format types that are available for the selected process type and output type. This field is display-only. |
| Active |
Select the appropriate check box to make the format type active for the selected process type and output type. |
| Default |
Select the check box next to the format type that you want to appear as the default output on the Process Request page. A message appears, informing you that the format type is disabled if you select a format type for which the Active check box is deselected. |
To access the System Purge Options page, select
Image: System Purge Setting page
This example illustrates the fields and controls on the System Purge Setting page. You can find definitions for the fields and controls later on this page.
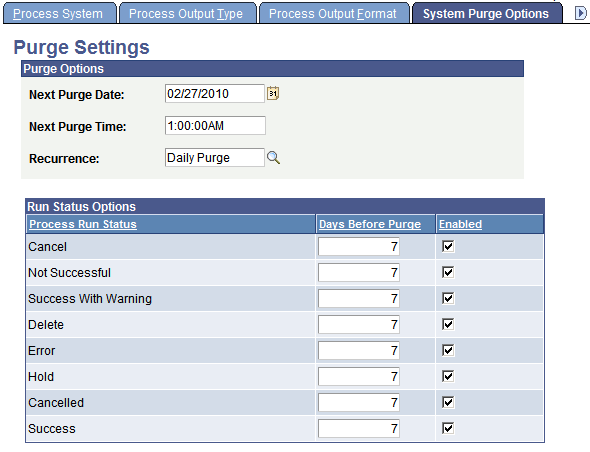
Use the Purge Settings page to empty the PeopleSoft Process Scheduler tables and file system. This operation will schedule the Application Engine program PRCSYSPURGE.
The PRCSYSPURGE program:
Updates statistics to all of the process request tables before deleting content.
Purges all process requests with a last update date that is past the Days Before Purge value for the specified run statuses.
Deletes all of the subdirectories in the Log_Output directory that are associated with the process requests that are purged from the process request table if the Purge Process Files option was selected.
Purges the report repository tables with expired dates, based on the specified number of retention days.
Deletes all directories from the report repository that are associated with processes that were purged from the report repository tables.
Schedules the Application Engine PRCSRVCLN program if more than one active Process Scheduler server exists.
PRCSRVCLN refreshes the Log/Output directory for all active servers.
Purges the BusinessObjects Enterprise XI report repository.
Schedules the Application Engine PSXPARCHATTR program for BI Publisher reports to archive report-related metadata and the URLs of the report files.
|
Field or Control |
Definition |
|---|---|
| Next Purge Date |
Enter the date on which the next file purge process is to run on the server. This is based on the recurrence schedule. |
| Next Purge Time |
Enter the time when the next file purge process is to run on the server. This is based on the recurrence schedule. |
| Recurrence |
Select a recurrence schedule for the purge process. |
Purge Settings
Specify purge criteria for each process run status that is listed.
|
Field or Control |
Definition |
|---|---|
| Days Before Purge |
Enter the number of days before a process should be physically deleted from the request table. |
| Enabled |
If this check box is cleared, process requests with this run status are not purged. |
To access the Distribution File Options page, select
Image: Distribution File Options page
This example illustrates the fields and controls on the Distribution File Options page. You can find definitions for the fields and controls later on this page.
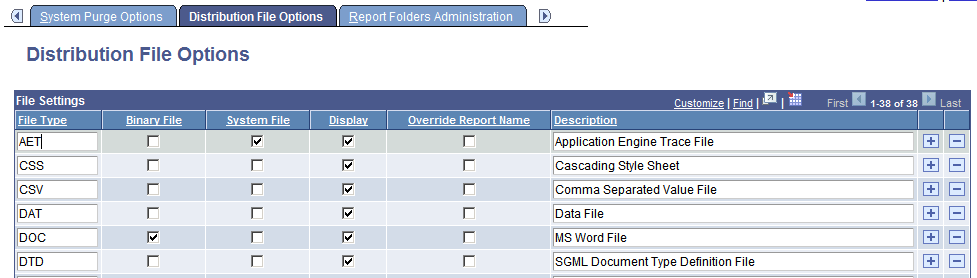
Use the Distribution File Options page to identify all the different types of files and the manner in which they are distributed throughout the system. File types are identified based on the file extensions. This is used by the Distribution Agent to determine how a specific file type will be transferred to the Report Repository using File Transfer Protocol (FTP) or HTTP. Also, this determines the description that is displayed in the Report Manager.
Use the Add and Delete buttons to add and remove available file types.
|
Field or Control |
Definition |
|---|---|
| File Type |
Identifies the type of file. |
| Binary File |
Deselect for TXT and HTML files. Note: When this check box is selected, the report distribution system will not perform a conversion on the file when moving it between operating systems. |
| System File |
Select to mark this file type as a system file. The file will be available to be viewed in the Process Monitor regardless of output type. Note: This feature requires that the Process Scheduler server definition has the attribute Transfer System Files to the Report Repository selected. |
| Display |
Select to have the file shown on the report list page. |
| Description |
Enter a description to be used for this file when it is displayed for viewing. If a description is not specified, the name of the file is used. |
To access the Report Folders Administration page, select
Image: Report Folders Administration page
This example illustrates the fields and controls on the Report Folders Administration page. You can find definitions for the fields and controls later on this page.
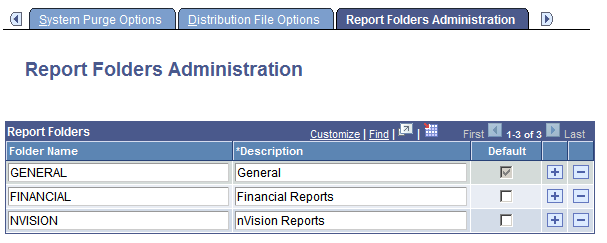
Use the Report Folders Administration page to create folders for organizing reports in Report Manager.
|
Field or Control |
Definition |
|---|---|
| Folder Name |
Use the Add and Delete buttons to add and remove folder names. |
| Description |
Enter a more detailed description for the folder to identify its use. |
| Default |
Select the check box next to the folder that you want to display as the default. The default folder is automatically selected on the Process Scheduler Request-Distribution Detail page. Note: A default folder is required. |
Event Notification is a feature that is associated with the PeopleTools Reporting process output type Window. It is also used by Multi-Channel Framework. A new Application Server process called PSRENSRV is required, which acts as a special web server to deliver report results to a new browser window.
Any Process Scheduler can use a REN server. The REN server is an optional component of the PeopleSoft Application Server. Four parameters are located in the PSRENSRV section of the Application Server configuration file that may have to be configured.
To access the Event Notification page, select
Note: A REN server must be configured before you can test Event Notification.
See Defining Event Notifications and Configuring a REN Server.
Image: Event Notification page
This example illustrates the fields and controls on the Event Notification page. You can find definitions for the fields and controls later on this page.

Multiple REN servers can be used by the system. However, only information for REN servers that have been configured with the REN server cluster owner as either Reporting or ALL (PeopleSoft Multi-Channel Framework, Optimization, and Reporting), are listed on this page.
To verify the REN server cluster owner, select
|
Field or Control |
Definition |
|---|---|
| Cluster ID |
Displays the unique ID for the REN server. |
| Cluster URL |
Displays the following URL: http://<hostname>:7180 hostname: Application server machine name. 7180: Default REN server port number. Note: If you change the default, then you must change the values for the Cluster and Browser URLs. |
| Browser URL |
Displays the following URL: http://<hostname>.<default_auth_token>:7180 hostname: Application server machine name. default_auth_token: PIA Auth Token Domain name, specified as the default_auth_token when configuring the REN server. |
| Active Flag |
Indicates whether the REN server is Active or Inactive. An active REN server enables the Window output type. An inactive REN server does not accept the Window output type. However, pending reports will finish on current popup windows. |
| Test |
Click to display the Test REN Server page. Use this page to verify that the URLs are valid. |
Testing Cluster and Browser URLs
Access the Test REN Server page.
Image: Test REN Server page
This example illustrates the fields and controls on the Test REN Server page. You can find definitions for the fields and controls later on this page.
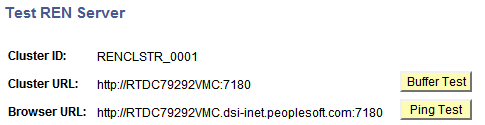
Two different tests can be performed:
Buffer: This test is performed on the Cluster URL. It tests the ability of PSRENSRV to break up and send a large file (over 50,000 characters) using multiple internal buffers. The numbered blocks count visible characters, but invisible HTML markup commands are on every line, so the actual server reply content length is 55,902 characters.
Note: The test is successful if all characters are shown and an End of file message appears at the bottom of the page.
Ping: This test is performed on the Browser URL. It sends a sequence of ping events to the PSRENSRV, waiting for each to respond before sending the next.
Note: The test is successful if Events Sent and Events Received both reach the same final value. The average latency depends on network configuration, machine load, and whether debugging is enabled.
To perform a Buffer test:
Click the Buffer Test button.
The Buffer Test for PSRENSRV page appears in a new browser window.
Verify that all characters are shown and that an End of File message appears at the bottom of the page.
Close the browser window.
To perform a Ping test:
Click the Ping Test button.
The Ping Test for PSRENSRV page appears in a new browser window.
Click the Run Ping Test button.
The system performs a total of 10 pings.
Close the browser window.
Click the Return button to return to the Event Notification page.
To access the Process Categories Administration page, select
Image: Process Categories Administration page
This example illustrates the fields and controls on the Process Categories Administration page. You can find definitions for the fields and controls later on this page.
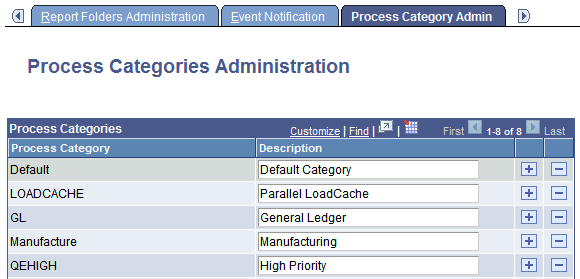
Use process categories to group processes together for the purpose of server load balancing and prioritization. You can select to run jobs or processes belonging to certain process categories on specific servers, and then you can set a priority of high, medium, or low for each category.
For example, you can group your manufacturing processes into one category and your General Ledger (GL) processes into another category. You can then set the priority for your GL category to high so that GL processes always run first.
|
Field or Control |
Definition |
|---|---|
| Process Category and Description |
Enter the name and description for each new process category. Note: The categories Default and LOADCACHE are delivered with your system. |
Note: The process category LOADCACHE is only used to run the Parallel LoadCache job.
To access the Console Preference page, select .
Image: Console Preferences
This example illustrates the fields and controls on the Console Preferences. You can find definitions for the fields and controls later on this page.

This page is used to identify the icons that are displayed in the Reporting Console for each process type.
If you add any custom process types, you will need to add the custom process type to the Console Preferences.
You can perform search indexing on PTSEARCHREPORT only after configuring the search index parameters after installing the PeopleTools version.
To access the Configure Search Index page, select .
Image: Configure Search Index page
This example illustrates the fields and controls on the Configure Search Index page. You can find definitions for the fields and controls later on this page.
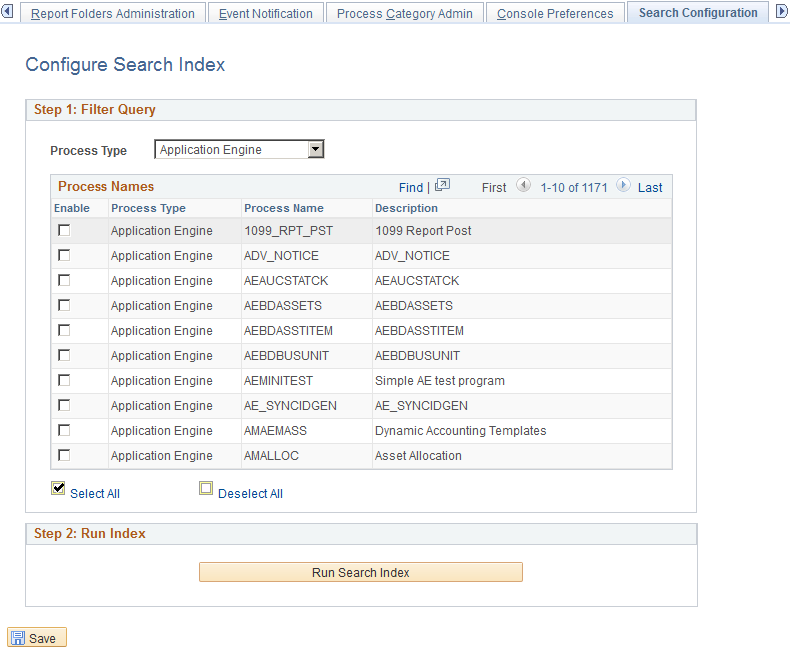
From the Process Type list, select the process type that you want to edit.
This list the process types in the Process Name grid.
From the Process Name section, enable the process names to enable search indexing.
Click the Run Search Index button to run the search index.
To enable Process Status Notifications, you must configure the Notification Settings page. You can enable some or all the states of a process to receive notification. These notification states are set for the notification channels — E-mail, Notification Window and Pop-up Notification.
Note: For pop-up notifications, if you configure settings under section, it will override the configurations set here. See Defining User Preferences.
Access the Notification Settings page ().
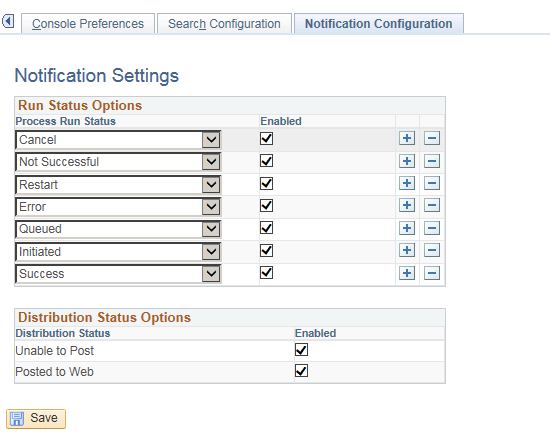
Image: Notification Settings page
This example illustrates the fields and controls on the Notification Settings page. You can find definitions for the fields and controls later on this page.
|
Field or Control |
Definition |
|---|---|
| Run Status Options |
Enable the Run Status Options for which you wish to receive notifications. You can also add or delete states as per your requirement. For more information about process request run status, see Viewing the Process List, “Process Request Run Status”. |
| Distribution Status Options |
Select the Enabled check box for enabling notification for reports which may successfully post to the web or may not post to the web. |