Using Administration Utilities
This section provides an overview of the executables for using administration utilities.
Select to access the Event Messages page.
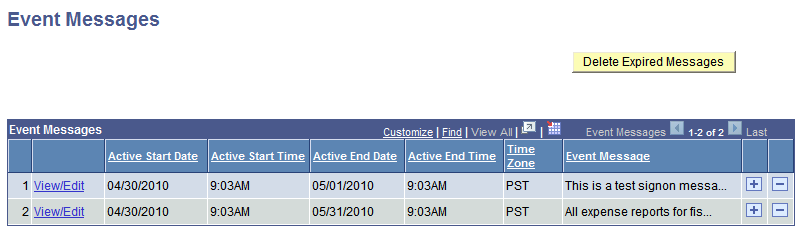
Use this page to define messages to display to end users when they sign on to the PeopleSoft system. As long as the signon message is active, each time a user signs on to PeopleSoft, the event message will appear after the user clicks Sign In on the signon page.
Image: Event Messages page
This example illustrates the fields and controls on the Event Messages page. You can find definitions for the fields and controls later on this page.
|
Field or Control |
Definition |
|---|---|
| View/Edit |
Click to view or modify a signon message. |
| Delete Expired Messages |
Click to delete messages that have an End Time and End Date value earlier than current time. Note: To delete individual messages at any time, use the Delete row (-) button. |
Note: Only users with the role of PeopleSoft System Administrator will have access to the pages used to view and define signon event messages.
Adding Signon Event Messages
To add a new signon event message:
Select .
Add a new row to the Event Messages grid.
Defining Signon Event Messages
Use the Message Definition dialog box to define signon event messages.
Click View/Edit in the Event Messages grid to display the Message Definition page.
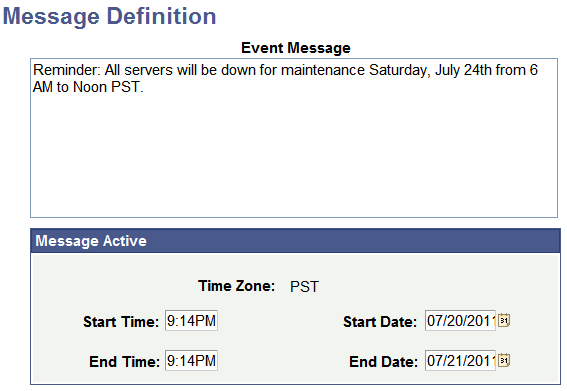
Image: Message Definition page
This example illustrates the fields and controls on the Message Definition page. You can find definitions for the fields and controls later on this page.
|
Field or Control |
Definition |
|---|---|
| Event Message |
Compose the signon message in this edit box. The system will display to the user all text entered into this edit box. When creating messages, consider:
|
| Message Active |
Specify the duration for which the message will be active by setting a start time and date and an end time and date. The system only displays messages where the current time is after the start time and date and before the end time and date. Note: The Time Zone is read-only, and displays the time zone in which the database runs. It does not necessarily reflect the time zone that would be applicable to the text in the message. If there are any specifics related to the time zone that users need to be aware of, that should be communicated in the event message text. |
Working With Signon Event Messages
The Event Messages grid can contain multiple signon event message definitions. However, only those messages that are currently active will be displayed to the user.
Image: Event Message display page
This example illustrates the fields and controls on the Event Message display page. You can find definitions for the fields and controls later on this page.
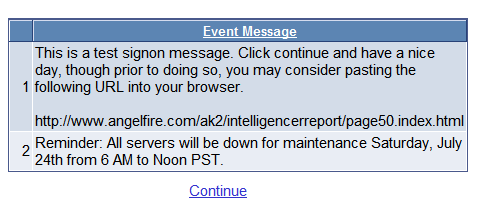
Multiple signon event messages are displayed to the user by start time and date, with the earliest appearing first.
After reading the message, the user clicks Continue, and accesses the application as usual.
Important! The event message display uses the component PT_EVENTDISPLAY. If you intend to use signon event messages, all users of your system need to be able to access the PT_EVENTDISPLAY component. By default, the Permission List PTPT1000 ships providing access to PT_EVENTDISPLAY. If you use custom permission lists, make sure that all users have access to the PT_EVENTDISPLAY component through their permission lists.
Select to access the PeopleTools Options page. Use this page to set a number of options that affect multiple PeopleTools and applications, such as language options and change control settings.
Image: PeopleTools Options (1 of 2)
This example illustrates the fields and controls on the PeopleTools Options (1 of 2). You can find definitions for the fields and controls later on this page.
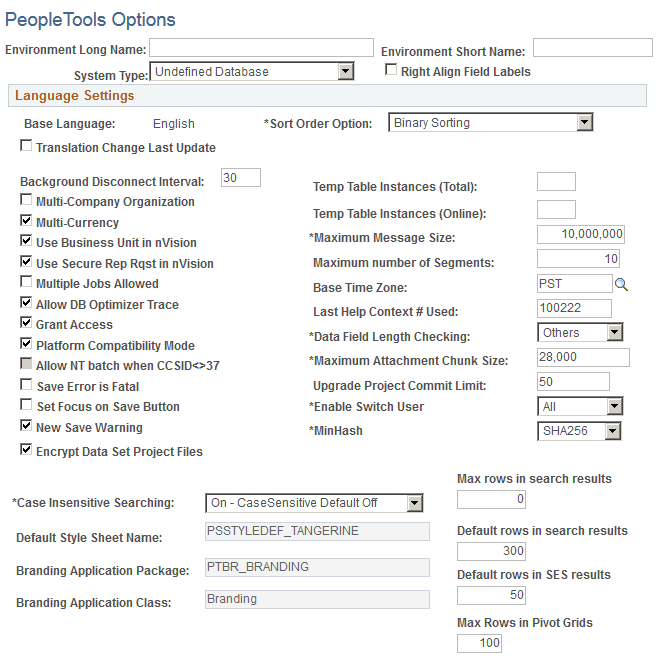
Image: PeopleTools Options (2 of 2)
This example illustrates the fields and controls on the PeopleTools Options (2 of 2). You can find definitions for the fields and controls later on this page.
|
Field or Control |
Definition |
|---|---|
| Environment Long Name and Environment Short Name |
Enter a long name and a short name for the current PeopleSoft environment. PeopleSoft software update tools use this information to identify the database when searching for updates. For example, enter HR Demo Environment for the long name, andHR Demo DB for the short name. |
| System Type |
Select an appropriate system type from the dropdown list, for example, Demo Database. This information helps to further identify the current environment for the purpose of searching for and applying software updates. |
| Right Align Field Labels |
By default, the system uses left label alignment when adding new fields to pages in Application Designer. To make all new page field labels use right label alignment (at design time), set the Right Align Field Labels check box on the PeopleTools Options page. |
Language Settings
|
Field or Control |
Definition |
|---|---|
| Language Code |
Identifies the database's base language. The base language of an application is the application's primary language, normally the language that is used most commonly throughout the enterprise. A database can have only one base language. All other language translations that are stored in the database are referred to as nonbase languages (or sometimes as foreign languages). You can't change the base language setting on this page. This field is for display purposes only. To change the base language, use the SWAP_BASE_LANGUAGE Data Mover command. |
| Translations Change Last Update |
If you select the Translations Change Last Update check box, and you use the PeopleTools translate utilities to translate objects, the system updates the Last Updated information of the translated object to the date/time/userid of the translation. If it's turned off, then the date/time/userid of the object does not change when it's translated. Note: This only applies when you're using the page-based PeopleTools translation utilities; the Translation Workbench always updates the last updated information. |
| Sort Order Option |
Select the sort order that is appropriate for the site. See the Global Technology PeopleBook for descriptions of the options. |
General Options
|
Field or Control |
Definition |
|---|---|
| Background Disconnect Interval |
The value in seconds that you enter here acts as the default for Security Administrator profiles. |
| Multi-Company Organization |
Turn on Multi-Company Organization if more than one company makes up the organization. This option affects how Application Processor displays company-related fields in search dialogs and pages. See the HRMS documentation for more details. |
| Multi-Currency |
The Multi-Currency setting is a systemwide switch that enables automatic formatting of currency amount fields that have associated currency control fields. Another function of this setting is to globally display currency control fields. If you turn off this option, automatic formatting based on currency control fields is no longer active and all currency control fields are thus hidden. When the Multi-Currency setting is on, it also validates user-entered currency data against the currency's defined decimal precision. This validation causes the system to issue an error if a user attempts to enter a decimal precision that is greater than that which is allowed by the currency code definition. Under most circumstances, leave Multi-Currency selected. |
| Use Business Unit in nVision |
Deselect the Use Business Unit in nVision option if you're using an HRMS database. Otherwise, select it. |
| Use Secure Rep Rqst in nVision |
Select this check box if you want the report request in nVision to be secure. The default setting is selected. |
| Multiple Jobs Allowed |
Selecting Multiple Jobs Allowed enables HRMS systems to support employees holding concurrent jobs with more than one set of enrollments. This option affects how Application Processor displays employee-record-number-related fields in search dialogs and pages. See the HRMS documentation for more details. |
| Allow DB Optimizer Trace |
Typically, you turn on this trace only during periods in which you are collecting detailed performance metrics. When you are not tuning your performance, the DB Optimizer trace should be turned off. |
| Grant Access |
When adding a new user by using PeopleTools Security, the system automatically grants the new user select-level access to a set of PeopleTools SQL tables used for security. If you are using a SQL security package and do not want PeopleTools Security to perform any SQL grants, turn off Grant Access. |
| Platform Compatibility Mode |
Enables you to add the capability to set a database compatibility mode as an overall database setting, forcing developers to create applications by using all platforms as the least common denominator. This option enables developers, who create applications for multi-platform deployment, to catch platform-specific issues at design time rather than during testing. Note: This option is used mainly by PeopleSoft development teams that need to develop applications to run on all supported database platforms. To support numerous database platforms, PeopleSoft needs to have a tablespace for each physical table record definition. If platform compatibility is enabled for a database, the system forces developers to enter a tablespace name when saving a record definition regardless of the current platform. If this option is disabled, you are only prompted for a tablespace name if you are developing on a platform that utilizes tablespaces. This prevents table record definitions being added to the database without a tablespace name. |
| Allow NT batch when CCSID <>37 |
Enables you to override non-z/OS COBOL batch restrictions. If the DB2 z/OS database's CCSID is NOT 37, PeopleSoft blocks batch COBOL from running against z/OS Databases on Windows unless you choose this override. Note: Even if you choose this override, if you use %BINARYSORT() in the COBOL, the system issues an error on Windows. RemoteCall COBOL can run on Windows and UNIX regardless of this option setting, even if CCSID is NOT 37, but the system issues an error. |
| Save Error is Fatal |
Select this option when you have non-repeatable PeopleCode logic in your application's SavePreChange or Workflow. In previous releases, PeopleSoft applications were coded to assume that errors during save are always fatal, but the current PeopleTools release no longer behaves this way. Use this option to ensure predictable behavior with your application without having to modify your older application code. This check box is cleared by default. If you get an error during save processing, the transaction continues and you're allowed to attempt to save again. When this option is selected, if you get an error during save processing the transaction is aborted and all changes are lost. This applies to errors that occur between and including the SavePreChange event to the SavePostChange event. It also includes the component processor save processing. It doesn't include errors from the SaveEdit event. For example, suppose you have some calculations that occur in SavePreChange which are based on the buffers and also modify the buffers. If there's an error during the save and you attempt to save again, the calculations are repeated, but this time based on the buffers that were already modified by the first time the calculations where done. Therefore the second time the calculations are done they will be incorrect, which could lead to incorrect data being saved to the database. In this case you would want to turn on the Save Error is Fatal option, because a fatal error on save is more desirable than incorrect data being put into the database. |
| Set Focus on Save |
If selected, focus is set on the Save button when a user saves a component. If not selected, focus is set on the first control on the page that can assume focus when a user saves a component. By default, the option is not selected. Note: This setting has a system-wide effect. |
| Temp Table Instances (Total): |
The value that you specify in the Temp Table Instances (Total) edit box controls the total number of physical temporary table instances that Application Designer creates for a temporary table record definition when you perform the Build process. This value indicates the total number of undedicated temporary table instances. The maximum number of temporary table instances that you can specify is 99. |
| Temp Table Instances (Online) |
Enter the available online instance values. When you invoke a process online, PeopleTools randomly allocates a single temporary table instance number to programX for all of its dedicated temp table needs. The higher the number of online instances that is defined, the less likely it is for two online processes to get the same value. |
| Maximum Message Size |
Use this parameter to set the maximum message size being handled by Integration Broker. There is a practical limit to how large a message can be. This limit can be determined by a variety of factors, including network speed, available memory, processing load, and so on. |
| Base Time Zone |
Although you can display time data a number of different ways, PeopleSoft databases store all times relative to a system-wide base time zone. You can adjust the display of the time that an end user sees using the Use Local Time Zone (LTZONE) setting in PeopleTools, Personalizations. This base time zone is the one that the database server uses. In order for PeopleSoft to properly manage time data, the system needs to know which time zone that is. Set the Base Time Zone to the time zone that the database server's clock uses. Note: After changing this setting, reboot any application servers that are connected to the database. It is critical for the correct operation of the system that this time zone match the time zone in which the database is operating. Any discrepancy in the base time zone as defined in this page and the time zone in which the database system is operating leads to inaccurate time processing. |
| Last Help Context # Used |
This field is no longer used. |
| Data Field Length Checking |
Normally, field length validation is based on the number of characters that are allowed in a field. For example, a field defined as CHAR(10) in Application Designer holds ten characters, regardless of which characters you enter. In a Unicode database, double-byte characters, such as those found in Japanese, are counted the same as single-byte characters, such as those found in the Latin alphabet. If you create a non-Unicode database, the field length in Application Designer represents the number of bytes that are permitted in the field, not the number of characters. When the non-Unicode database uses a single-byte character set (SBCS), you can only enter single-byte characters, so the number of characters and the number of bytes are the same. However, because double-byte character sets (DBCS) typically allow a mix of single- and double-byte characters, the number of characters that are allowed in a field in a non-Unicode DBCS database varies. This is true for both shifting and non-shifting double-byte character sets. For example, a if a user enters ten Japanese characters into a field that is defined as CHAR(10) in Application Designer, this string needs 20 bytes of storage in a nonshifting double-byte character set and 22 bytes of storage in a shifting double-byte character set. This ten-character input fails insertion into both these databases. Use the Data Field Length Checking option to ensure field length validation appropriate to the database's character set. Values are DB2 MBCS, MBCS, and Others. Choose Others if you are using a Unicode-encoded database or a non-Unicode single-byte character set database. This prevents special field length checking. As discussed above, these types of databases do not require such checking. Choose DB2 MBCS if you are running a Japanese database on the DB2 UDB for z/OS platform. This enables field length checking based on a shifting DBCS character set. Choose MBCS if you are running a non-Unicode Japanese database on any other platform. This enables field length checking based on a nonshifting DBCS character set. The non-Unicode DBCS settings are specifically oriented towards Japanese language installations, as Japanese is the only language that PeopleSoft supports in a non-Unicode DBCS encoding. All other languages requiring double-byte character sets are only supported by PeopleSoft by using Unicode encoded databases. |
| Maximum Attachment Chunk Size |
Controls the size of the file attachment chunks that are stored in the database. This allows you to upload a file attachment that is larger than could be stored in a single row of the database. The system divides the data into chunks to store in different rows of the database table. The default is 28,000 bytes, and maximum attachment chunk size allowed by PeopleTools is 50 MB. Application Designer data types control how the system manages "long data." If you want to store your files in the database in a form that allows for portability across the database platforms supported by PeopleTools, you must set the Maximum Attachment Chunk Size option to a value that would be permitted by all of the database platforms supported by PeopleTools — no more than 28,000 bytes. However, if you do not want to consider the portability of files across database platforms supported by PeopleTools, you may set the Maximum Attachment Chunk Size option to the maximum value that your database supports. For example, if you are using the Oracle database, you can set the value to 2 GB. Note: The Maximum Attachment Chunk Size determines the size of the chunks stored in the database. This setting does not affect the maximum size of the file chunks that can be read from that table. The maximum size of the file chunks that the system reads from the database table is determined by the Maximum Length property defined for that field in Application Designer. Note: When working with file attachments it is imperative that you understand how the file processing PeopleCode constructs behave, such as the AllowLargeChunks parameter, used with the AddAttachment built-in function. |
| Upgrade Project Commit Limit |
Sets the limit on how many rows can be modified by an upgrade project before the system issues a COMMIT statement. |
| Enable Switch User |
The Enable Switch User option enables you to limit the users who can change identities in a PeopleSoft system. The feature applies only when accessing PeopleSoft using a browser; it has no effect on two-tier or three-tier connections. Most sites have no reason for individual users to change their PeopleSoft system identity during a session. For those sites that do require this capability, the number of users who need to switch to another user profile typically is fairly small. For example, the users who can switch identities are usually limited to the system's GUEST user (if the system has one) and, perhaps, a few system administrators or power users. Options for Enable Switch User are:
Once you specify which users can switch identities, if an identity change is attempted (switch user) by an unauthorized user, the system:
Note: Assume that the user profile to which a user switches is the “destination” user profile, and the user profile from which a user switches is the “source” user profile. If a user is allowed to switch identities during a session, it is allowed by the source user profile, not the destination user profile. For example if you allow UserA to switch to UserB, it is UserA's user profile that must have the Allow Switch User option selected. The setting for UserB's profile is not relevant in determining whether a switch user from UserA to UserB is allowed. This feature does not control the user profile to which a user can switch; it only addresses which users are permitted to switch identities during a browser session. |
| MinHash |
The MinHash option enables you to set the minimum hash algorithm that all sites participating in single signon (SSO) must use in order to talk to each other. The default value is SHA256. Options for MinHash are:
Note: PeopleSoft recommends that you do not change the default value. During the PS_TOKEN validation at the Web tier, PeopleSoft uses the MinHash value to prevent Web sites with weaker hashing algorithm from talking to other sites participating in single signon. The MinHash option is not used for PS_TOKEN generation. See Implementing PeopleSoft-Only Single Signon for more information on PS_TOKEN. |
|
Field or Control |
Definition |
|---|---|
| Case Insensitive Searching |
Enables you to provide case-insensitive searching for the PeopleSoft search records when searching for PeopleSoft definitions. The options are:
Note: This option is not associated with Search Framework. |
| Style Sheet Name|Branding Application PackageBranding Application Class |
Display the default, system-wide branding settings, which are defined on the Branding System Options page:
See Configuring Branding System Options for more information on setting these values. |
| Max rows in search results |
Sets the absolute maximum number of rows, system-wide, an end user can specify to be returned on a standard search page. The default value is 0, which makes the Default rows in search results value the absolute maximum. If this value is greater than 0 (enabled), then the following will appear at the top of the search page: "Maximum number of rows to return (up to <Max rows in search results>):" End users specify a custom number of rows on the search results page in the edit box appearing after this line. When the user clicks Search, if the key values supplied retrieve more than the <Max rows in search results> value, then a message will appear above the search results similar to: "Only the first 300 results of a possible 386 can be displayed." In this case, 300 is the value of the Default rows in search results edit box, unless the user has changed it. The 386 is the actual number of results the search key values would have returned. The system runs a separate query to report this value. This has performance implications, so system administrators should consider whether to enable this feature. To prevent end users from specifying any custom number of rows returned by the search, set Max rows in search results to 0. If disabled, the number of rows returned by a search is the value from the Default rows in search results setting, and cannot be modified by the end user. Note: When setting this value to add flexibility to your end users search experience, consider the performance implications of setting this number too high for your system. Perform adequate testing and adjust this value to suit the requirements of your system. |
| Default rows in search results |
Sets the default number of rows, system-wide, to be returned on a standard search page. The default value is 300. If an end user needs to increase the number of rows returned on a search page, they can specify a number up to the maximum, specified by the Max rows in search results value. |
| Default rows in SES results |
Sets the default number of search results displayed by the Search Framework to an end user. |
| Max Rows in Pivot Grids |
Sets the maximum number off rows displayed in a pivot grid. |
|
Field or Control |
Definition |
|---|---|
| Branding Application Class |
The main branding application class that generates header, footer, and menu pagelet icons. The default is the standard PeopleTools branding, BrandingBase. For PeopleSoft Interaction Hub, a different branding application class from a different branding application package is used. It generates different header, footers , and menu pagelet icons dynamically, based on the user role or security. |
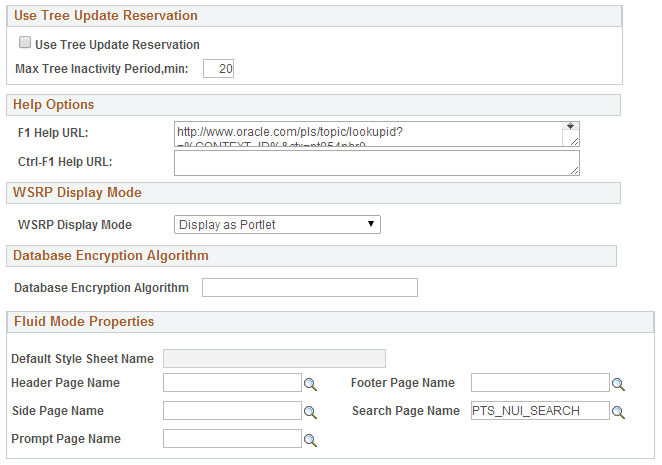
Help Options
|
Field or Control |
Definition |
|---|---|
| FI Help URL |
Specify the URL that points to an installation of PeopleTools online help. When users press the F1 key in Application Designer or other Windows client applications, the appropriate context-sensitive PeopleTools documentation is displayed. You can point to either a local installation of PeopleTools online help or to an installation on Oracle’s hosted documentation website:
Important! This setting applies only to F1 help accessed through Application Designer and other Windows client applications. Therefore, you must configure this link to point to a PeopleTools library, and not to some other PeopleSoft application. Use the Web Profile Configuration page to configure the Help link displayed on PeopleSoft pages accessed through a browser. See Configuring General Portal Properties for more information. |
| Ctrl-F1 Help URL |
This setting only applies to the Windows environment (such as Application Designer). The Ctrl+F1 URL allows you to provide an alternate location for help. For example, you may set the main F1 Help URL to PeopleTools online help and the Ctrl+F1 for the company's help site. |
WSRP Display Mode
This option determines how WSRP-enabled content appears for users of remote WSRP portals that consume PeopleSoft WSRP content.
Database Encryption Algorithm
(Applies to Oracle databases only.) Enables you to select the encryption algorithm the system uses to encrypt database fields to additional security.
Fluid Mode Properties
These properties apply to fluid applications only.
Select to access the Message Catalog page.
Image: Message Catalog page
This example illustrates the fields and controls on the Message Catalog page. You can find definitions for the fields and controls later on this page.
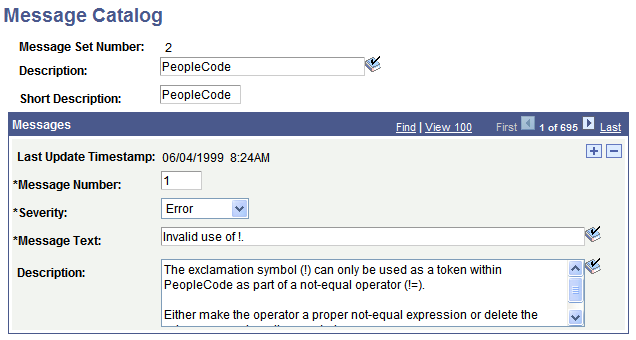
You add and maintain system messages by using the Message Catalog page. PeopleSoft error messages are stored in the Message Catalog, and organized by message set number. Each message set consists of a category of messages, ranging from PeopleTools Message Bar Items and PeopleCode Runtime Messages to PeopleSoft Payroll and PeopleSoft General Ledger application messages.
|
Field or Control |
Definition |
|---|---|
| Message Set Number |
Identifies the message set. |
| Description |
The Message Set Description is a reference that is used on reports and pages for easy identification. |
| Short Description |
The Message Set Short Description is a reference that is used on reports and pages for easy identification. |
| Message Number |
Each message set consists of one or more rows of messages that are identified by a message number. |
| Severity |
You assign each message a severity, which determines how the message appears and how the component processor responds after the user acknowledges message. The severity levels are: Cancel: This severity should be reserved for the most severe of messages, as when a critical error occurs and the process must be aborted or a machine needs to be shut down. To indicate how rarely this severity level is appropriate, of all PeopleTools messages only five or so have a severity level of Cancel. In almost all cases, you use one of the other severity levels. Error: Processing stopped, and data cannot be saved until the error is corrected. Message: This is an informational message and processing continues normally. Warning: User can decide to either stop or continue processing despite the error. |
| Message Text |
In the Message Text edit box, you see the message text. Any reference to the characters %n, as in %1 or %2, is replaced by parameter values that the system provides. |
| Explanation |
The Explanation text provides a more in-depth explanation of why the message is generated and how to fix the problem. This text appears below the Message Text when the message appears. |
PeopleTools uses some messages, but the applications use the other messages, which get called by the Error, Warning, Message Box, MsgGet, and MsgGetText built-in PeopleCode functions.
Note: You can create messages and message sets to support new or customized functionality in the system. You can also edit the messages that PeopleSoft delivers if required. In both of these cases, remember that Oracle reserves all message sets up to 20,000 (that is, 1 to 19,999). If you add a message set or edit a message set with a number that is less than 20,000, it may be overwritten in future upgrades. Message sets must not exceed 32,767, and PeopleSoft recommends that you use message sets from 20,000 to 30,000 to create new messages.
To add a message set:
Select Utilities, Administration, Message Catalog, and on the search page click Add New Value.
Enter the value of the new Message Set Number and click OK.
Enter a description and short description of the type of messages that this message set contains.
Try to group the messages logically. For instance, create one message set for the new budgeting application and a different one for the customized billing pages.
Add messages.
Save your work.
To add a message:
Open the desired message set.
In the Message Catalog page, click the plus sign button to add a new row.
The Message Number value is automatically set to the next unassigned number in the message set.
Select a Severity level, enter message text and a detailed explanation.
Save your work.
PeopleSoft PeopleTools provides personal and system-level dictionaries. End users and system administrators can add words to the dictionary for use with the spell check feature. Typically, system administrators add words to the system-level dictionary that are used company-wide; end users add additional role-specific terminology to their personal dictionaries.
Select to access the system-level dictionary.
Select the All Languages page to enter words that are valid across all languages. Select the Language Specific page for those words that are valid to a specific language:
To add words to the system dictionary by language:
Select Spell Check System Dictionary, Language Specific.
Select the desired language from the Spell Check Language drop-down list box.
Select Session to add a word to the current session's spell check dictionary. After saving this word, the language field refreshes to the current spell check language.
Enter the word (maximum 40 characters) that is to be added in the Spell Check Word field.
Save your changes.
Case Sensitivity for Spell Check
The words that you add to your personal dictionary are case-sensitive and are validated by the following rules:
If the added word is all lower case, such as worklist, then the following are considered valid:
Exact match, all lower case (worklist).
All uppercase (WORKLIST).
Initial capitals (Worklist), regardless of its position in the sentence. Mixed case (WorkList) is considered incorrect.
If the added word is all uppercase, such as CRM (customer relationship management), then only an exact match is valid.
If the added word is in initial capitals, such as California, then only an exact match and all upper case (CALIFORNIA) are considered valid.
If the added word contains an embedded capital letter, such as PeopleSoft, then only an exact match is valid. Therefore, if case is not relevant to the validity of the word, use all lower case.
Table Structure for Word Storage
System and personal words are stored in the database in the PSSCWORDDEFN table with the following fields:
SCOPRID indicates whether a word is a system word or a user's personal word.
SCLANG stores the dictionary language for which the word is considered valid. If the system administrator chooses to store the word for all languages, this field is left blank.
SCWORD stores the actual word, with a maximum length of 40 characters.
SCNEGWORDFLG is a flag used to determine if a word is negative (incorrect) or not. Values can be 'N' or 'Y'. PeopleSoft does not currently use this feature, so the value should always be set to 'N'.
To load values in bulk into PSSCWORDDEFN:
Using the method of your choice (as in a SQL script), issue SQL similar to the following:
insert into PSSCWORDDEFN (SCOPRID, SCLANG, SCWORD, SCNEGWORDFLG)
values ('SYSTEM', 'SC00', 'nnn', 'N')
Note: For each word you want to add to the library, you need a separate insert command, and the value 'nnn' will be changed in each of those insert statements to be the next value in the list of words you want to add.
Add a value (any value) to the Language Specific tab and click Save.
This alerts the runtime system to update the cached version of the PSSCWORDDEFN table.
Note: In the current release, the maximum number of rows in the PSSCWORDDEFN table should not exceed 2,850.
You use the Translate Values interface to maintain the values in the translate table. If it's allowed by site security administrators, power users can now learn to add their own pick lists (translate values) to an application:
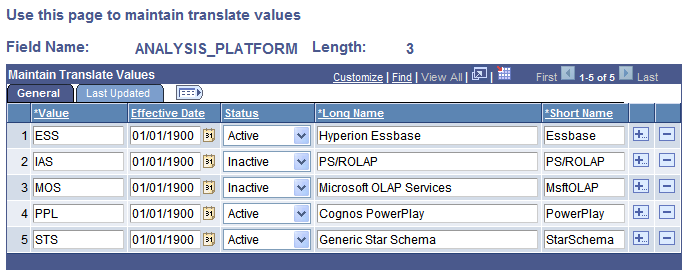
Select to access the Maintain Translate Values page.
Image: Maintain Translate Values page
This example illustrates the fields and controls on the Maintain Translate Values page. You can find definitions for the fields and controls later on this page.
|
Field or Control |
Definition |
|---|---|
| Value |
Enter the value for the translate selection. |
| Effective Date |
Specify a date for the value to become active. Note: If you are adding a second row for the same translate value, you must enter a unique effective date. |
| Status |
Specify whether the value is active or not. |
| Long Name |
Enter a long description for identification. There is a 30-character limit. |
| Short Name |
Enter a shorter description for identification. There is a 10-character limit. |
The Load Application Server Cache page enables you to run Application Engine programs that loads the shared file cache or the database cache for application server domains.
Select to access the Load Application Server Cache page.
Image: Load Application Server Cache page
This example illustrates the fields and controls on the Load Application Server Cache page. You can find definitions for the fields and controls later on this page.

You need to run a cache loading program described in this section only if you intend to implement shared file caching on the application server or database caching.
To load non-shared file cache or database cache with specific cache projects, you use a separate process, which is documented elsewhere in this guide.
See Configuring an Application Server Domain to Preload Cache.
See ServerCacheMode.
Understanding Application Server Caching
Each server process running within a domain has these caching features:
|
Cache Type |
Description |
|---|---|
|
Memory cache |
Stores PeopleTools definition metadata to improve system performance. Memory cache is always enabled for each server process in a domain. |
|
File cache |
Stores PeopleTools definition metadata, such as the metadata for pages, locally on the application server. File caching is controlled by the EnableServerCaching parameter in PSAPPSRV.CFG. |
|
Database cache |
Stores PeopleTools definition metadata, such as the metadata for pages, in database tables. Database caching is controlled by the EnableDBCache parameter in PSAPPSRV.CFG. Any domain that has EnableDBCache enabled and connects to the database uses the cache information stored in the database. |
With file caching, you have the option of implementing shared or non-shared file caching.
|
File Cache Option |
Description |
|---|---|
|
Shared |
With shared file caching, all of the server processes within a single domain share the same file cache location. |
|
Non-shared |
With non-shared file caching, each server processes within a single domain maintains its own file cache. For example, with non-shared caching configured, each PSAPPSRV server process uses its own file cache. |
Oracle provides cache loading programs designed specifically to load cache prior to users accessing the system, which you run from the Load Application Server Cache page. The cache loading programs retrieve all of the PeopleTools definition metadata from the database and builds either file cache that you can deploy locally on an application server or it populates the database cache tables, depending on what type of cache you are implementing.
Running a cache loading program is the equivalent of having a user access every page in the system once so that all the metadata associated with each page is retrieved from the database and stored in the local cache. With all the metadata already stored in cache, the end users experience more predictable performance.
With cache already loaded, end users don't have to wait for the system to retrieve a definition from the database and cache it, each time a definition is accessed for the first time. The system retrieves all of the required objects from the cache as opposed to querying the database for each request. This provides significant performance benefits for first-time and large transactions.
If you elect to run a cache loading program, consider the following items:
You need to run one of the cache loading programs at least once. Once the cache is loaded, the cache loading programs download only new or changed metadata to the cache.
Note: Items that are outdated in the cache are marked invalid but are not deleted. This includes design time changes, upgrades, patches, and so on. However, the system uses only the most current cache definitions.
The first time that you run a cache loading program, it can take a significant amount of time to complete, for example 2 to 30 hours. The duration of the program run depends on a number of factors, including the number of active languages selected, the size of the database, and the power of the server machine. Subsequent program runs complete in less time if there is already valid cache data in the target cache directory or the database cache tables. The programs are designed to update only the changed objects.
You can copy the output of a cache loading program to other machines (for shared file caching).
Note: Shared file cache output is not portable to different operating systems. For instance, if you generate the cached metadata on a Windows server, you can't copy the cache files to a UNIX server.
Warning! If for any reason you update PSSTATUS.LASTREFRESHDTTM, the system marks all items in the shared cache as invalid, and you will need to rerun one of the cache loading programs again.
Oracle provides these options for loading your cache:
|
Preloading Cache Option |
Process Scheduler Process Type |
Description |
|---|---|---|
|
Serial cache loading |
Process |
Serial cache loading refers to running an Application Engine program named LOADCACHE. The LOADCACHE program, adds each applicable cache object to the cache, sequentially. |
|
Parallel cache loading |
PSJob |
Parallel cache loading is intended to reduce the time required to build the cache. Parallel cache loading splits the work of the LOADCACHE program into two separate Application Engine programs that run simultaneously within the PSJob PLCACHE. The PLCACHE job runs a basic setup program, and then runs these programs:
|
Loading Shared File Cache or Database Cache
To load shared file cache or database cache:
Make sure that the database that the application server runs against produces a clean SYSAUDIT report.
If SYSAUDIT is not clean, the cache loading programs can fail.
Access the Load Application Server Cache page, entering an appropriate Run Control ID.
Select to access the Load Application Server Cache page.
(For shared file cache) In the Output Directory field, enter a valid location.
Note: In almost all situations, the system ignores any custom value entered in the Output Directory and generates output into the default cache-loading output directory: PS_CFG_HOME\appserv\prcs\ProcessScheduler_domain\CACHE\CACHE\stage\stage. However, if a cache loading program runs through a PSNT Process Scheduler server running on a remote drive, and the application server cache directory and Process Scheduler cache directory are located on the local drive, then the value entered in the Output Directory field supersedes the default output directory.
(For database caching) Select the Database Cache check box.
This disables the output directory field. With database caching enabled, the cache loading program inserts the cache directly into the database cache table, PSOBJCACHE.
Select the languages to load.
If not all possible languages are required to be loaded for a domain, you can improve performance of the program run by selecting only those languages that are required.
Click Run.
The Process Scheduler Request page appears.
From the Server Name dropdown list, select the name of the server to run the cache-loading process.
From the Process List, select Serial LoadCache to run the single LOADCACHE Application Engine program, or select Parallel LoadCache to run the PLCACHE PSJob to run multiple Application Engine jobs in parallel.
(For Parallel LoadCache) Ensure that the Process Scheduler server definition is set to run the LOADCACHE process category and that the Max Concurrent value is set appropriately.
Parallel LoadCache is assigned to the LOADCACHE process category. It will run only on servers that are configured to run the LOADCACHE process category.
For the LOADCACHE process category, set the Max Concurrent value greater than 0. The recommended value is 2.
If you modify the server definition, restart the server for your changes to take effect.
Note: When running the cache loading programs, only one server at a time should have the MaxConcurrent value set greater than 0. This guarantees that the processes running within the Parallel LoadCache job will run on the same server. If processes within the job run on different servers, this could result in each server having an incomplete set of generated cache files.
Click OK to launch the cache loading program.
After you invoke the process, you can use the Report Manager andProcess Monitor links to monitor the progress.
The first time that you run the program, the process may take numerous hours to complete (less time for the Parallel LoadCache option).
When the cache loading program completes, verify the existence of the cache contents.
For shared caching, the cache loading program creates the shared file cache in the following directory:
Windows: PS_CFG_HOME\appserv\prcs\ProcessScheduler_domain\CACHE\CACHE\stage\stage
For UNIX\Linux: PS_CFG_HOME/appserv/prcs/ProcessScheduler_domain/CACHE/STAGE/stage
Where ProcessScheduler_domain is the Process Scheduler domain in which you ran the process.
If database caching is enabled, the program loads the cache directly into the database. To verify the existence of the database cache, run the following SQL statement using your SQL editor:
SELECT * FROM PSOBJCACHE;Once you've determined that the cache has been successfully loaded, shut down the application server domain(s), and modify the domain configuration to recognize the generated cache.
For shared file caching, edit the PSAPPSRV.CFG file, and enable shared caching, by uncommenting and setting
ServerCacheMode=1for all appropriate domains.For database caching, edit the PSAPPSRV.CFG file, and enable database caching, by uncommenting and settting
EnableDBCache=Yfor all appropriate domains.(For shared file cache) Create a \SHARE directory within the CACHE directory for the appropriate application server domains, and copy the output of the load caching program into the \SHARE directory.
For example, copy the output of the load caching program to PS_CFG_HOME\appserv\domain\CACHE\SHARE directory for the appropriate application server domain(s).
Note: UNIX and Linux systems expect an uppercase \SHARE directory. For Windows, the \SHARE directory can be mixed case.
Boot (or reboot) the application server domain(s).
Working with Database Cache
Database caching provides another implementation option. Determining which caching option works best for your site requires analysis and testing. For many cases, file caching will continue to be the preferred method.
The benefits of database caching include:
Cache loading only needs to be run once for all domains connecting to a database as they will all share the same database cache.
New domains can immediately take advantage of the database cache once EnableDBCache is set in the domain configuration. That is, no additional cache loading programs need to be run or additional output that needs to be copied.
Eliminates administrative overhead of managing disk space and cache files on the file system.
Note: The database cache stores the cached metadata as a BLOB in a single table for the most efficient retrieval.
Note: The database cache is generated specific to the system's byte-order (little-endian or big-endian). The database cache is shared by all systems that have the same byte-order.
Maintaining the Versions of Cached Definitions
PeopleTools uses version numbers to keep cached objects synchronized with the data in the database. When a system undergoes change (such as during custom configurations, updates, or upgrades) versions can get out of sync, and they need to be reset.
Use the VERSION Application Engine program to maintain the definition version synchronization in your system. VERSION can run in these modes.
|
Mode |
Invoked From |
Run Control ID |
Description |
|---|---|---|---|
|
Reset All Versions |
Command line only |
Must start with RESETVERSIONS. For example, the run control ID could be RESETVERSIONS, RESETVERSIONS2, RESETVERSIONS3, and so on. Note: The run control ID is not case sensitive. |
Resets all versions to 1. Before running in this mode, shutdown all servers and client connections. After running, regenerate cache. |
|
Reset Differences Only |
Command line or Process Scheduler |
Any run control ID, not beginning with RESETVERSIONS or REPORTONLY. |
Synchronizes only the definition versions where discrepancies exist. Severs can remain running and clients can remain connected. Cache does not need to be regenerated. |
|
Report Only |
Command line or Process Scheduler |
Must begin with REPORTONLY. For example, the run control ID could be REPORTONLY, REPORTONLY2, REPORTONLY3, and so on Note: The run control ID is not case sensitive. |
Generates a report indicating where version discrepancies exist, but does not update any versions. Severs can remain running and clients can remain connected. Cache does not need to be regenerated. |
When running VERSION in any mode, the system generates a report and writes it to %PS_SERVDIR%\log_output.
When running VERSION through Process Scheduler, keep these items in mind:
Invoke VERSION from PeopleTools > Application Engine > Request AE.
Create the appropriate run control ID (or use an existing run control ID), such as REPORTONLY.
Set Process Frequency to Always so that the run control ID can be used more than once.
Working with the Dynamic Cache Repair Utility
PeopleTools provides a dynamic cache repair utility that enables you to configure the system to monitor and adjust automatically a domain’s cache while it runs, requiring no intervention from system administrators, and without requiring the domain or a server process to be restarted.
For more information on enabling and using the cache repair utility, see EnableCacheRepair.
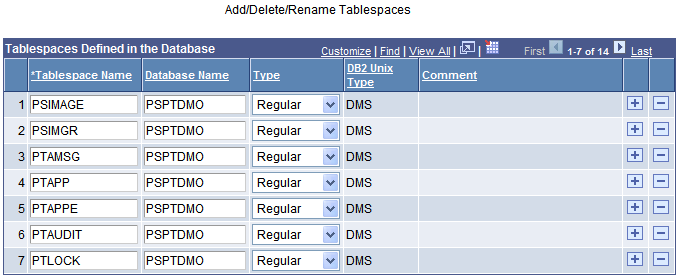
Select to access the Tablespace Utilities page.
To comply with requirements for DB2 UDB for z/OS, the Tablespace Utility now includes both tablespace name and database names when you define a tablespace using the Tablespace Management page. Use the Add/Delete/Rename Tablespaces page to change the list of tablespace and database names.
Image: Add/Delete/Rename Tablespaces
This example illustrates the fields and controls on the Add/Delete/Rename Tablespaces. You can find definitions for the fields and controls later on this page.
|
Field or Control |
Definition |
|---|---|
| Tablespace Name |
Enter the name of the Tablespace that you want to add. |
| Database Name |
Enter the database name into which you want to add the space. |
| Type |
Select the type of Tablespace. |
Use the plus/minus buttons to add and delete tablespaces.
Select to access the Tablespace Management component
These pages enable you to modify the tablespace definition.
Tablespace Defn Page
This page shows the identification values for the tablespace.
Tablespace List Page
This page is where you add records to a particular tablespace. Use the plus and minus buttons to add and delete rows from the list.
Tablespace DDL Page
This page enables you to view and override DDL parameters if needed. View the default DDL in the Default Tablespace DDL list. You override specific parameters, if needed, in the Override Tablespace DDL list. Enter the parameter that you want to override in the Parameter Name column, and enter the override value in the Override column.
Select to access the DDL Model Defaults page.
This page is used to view and edit the DDL for creating tablespaces, indexes and tables. Any changes that you make here are global.
Important! Oracle recommends that you do not use the DDL Model Defaults page to edit the model SQL because if you edit the SQL incorrectly, DDL generation may fail at runtime and the Record DDL menu item from Application Designer may not work correctly.
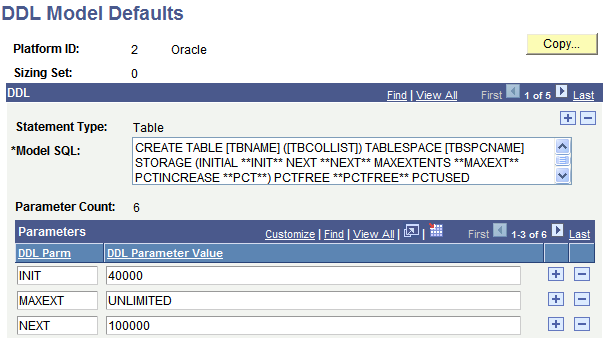
Image: DDL Model Defaults
This example illustrates the fields and controls on the DDL Model Defaults. You can find definitions for the fields and controls later on this page.
|
Field or Control |
Definition |
|---|---|
| Platform ID |
Identify the type of platform of the current database type. |
| Sizing Set |
Specify multiple Sizing Sets if needed. Sizing Sets are a way to maintain multiple versions of the DDL Model statements for a particular database platform. For example, you could have one sizing set to be used during a development phase, when tables only have test data, and you could have separate sizing set to be used during production, when tables have much more data. |
| Copy |
Copies information from one sizing set to another. |
| Statement Type |
Indicates the type of statement that's entered in the Model SQL edit box. Values for this field can beTable,Index, andTablespace. |
| Model SQL |
This field displays the model SQL statements, which you can edit. Valid statements are CREATE TABLE, CREATE INDEX, CREATE TABLESPACE, and a platform-specific statement for updating statistics. Some platforms have all the statements, some do not. When you edit the model SQL statements, consider the following:
Note: If the rules for adding new DDL parameters are not adhered to, DDL generation may fail at runtime and the Record DDL menu item from Application Designer may not work correctly. |
| Parameter Count |
The Parameter Count is calculated based on how many nonblank DDL Parm rows that you define. |
| DDL Parm |
Enter the DDL Parm (parameter) to which you want to assign a default. |
| DDL Parameter Value |
The DDL Parameter Value field is where you override a DDL parameter's default value with your own for the selected statement type. |
Using the DDL Model Defaults page, you can maintain DDL model statements and default parameters for Data Mover and Application Designer when DDL (PSBUILD.SQL, for example) is generated during the build process.
Using this utility, you can:
Scroll through all the statement types and platforms that are defined in the PSDDLMODEL table.
Change the default values or overrides for the parameters in the DDL model statements.
Add, delete, or change DDL parameters and values.
Note: There is no validation performed on the Model SQL statement, the DDL Parm syntax, or the relationship between the statement and the parameters.
The Platform IDs are as follows:
|
Number |
Platform |
|---|---|
|
0 |
SQLBase (no longer supported). |
|
1 |
DB2. |
|
2 |
Oracle. |
|
3 |
Informix (no longer supported). |
|
4 |
DB2/Unix. |
|
5 |
Allbase (no longer supported). |
|
6 |
Sybase (no longer supported). |
|
7 |
Microsoft. |
|
8 |
DB2/400 (no longer supported). |
Select to access the Strings Table page.
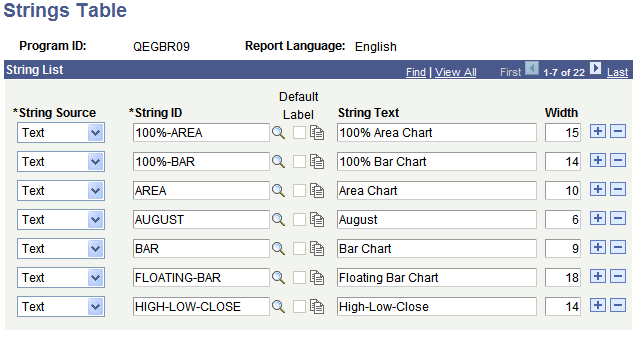
Image: Strings Table page
This example illustrates the fields and controls on the Strings Table page. You can find definitions for the fields and controls later on this page.
|
Field or Control |
Definition |
|---|---|
| String Source |
Options are: RFT Long: Select if you want the long description of the field to be displayed in the column heading as set in Application Designer. RFT Short: Select if you want the short description of the field as set in the Application Designer to be displayed in the column heading. Text: Select to enter a custom column heading for the report. |
| String ID |
Use the browse button to select the string ID that is to be used for the column heading in the SQR report. |
| Default Label |
The default label is enabled if you select the RFT Long or RFT Short string source, otherwise, the check box is disabled. Remember that fields can have multiple labels. Select the Default Label option to ensure that the default label is used. If you do not use the field's default label, you must select which of the field's labels to use using the label properties button. |
| String Text |
Enter the text for the custom column heading, This is the text that is displayed if you set the string source to Text. |
| Width |
The default value is the current width of the string that you enter or select. Be sure to update the width based on the actual space that is available on the report layout to avoid limiting a translator to an artificially short length, which is likely to degrade the quality of the translation. |
Enter the record name for the tables you want to exclude from the auto lookup feature. A prompt or lookup button opens a lookup page in the user's browser populated with up to 300 available values for that field. The user can then either select the desired value or refine their search further. For extremely large tables, the system administrator has the option of excluding that table from auto prompting by adding the table to this list.
The XML Link Function Registry is used exclusively in conjunction with the XML Link technology, which is associated with PeopleSoft Business Interlinks.
Note: PeopleSoft Business Interlinks is a deprecated product. This option currently exists for upgrade compatibility and transition.
There are two utilities that are related to the Merchant Integration technology that are provided for upgrade support only: Merchant Categories and Merchant Profile.
Refer to PeopleSoft documentation from previous releases for information regarding these utilities. These utilities are not intended for any new development purposes.
Select to access the Tableset ID page.
Use this utility to create Set IDs. Before doing this:
Add the SETID field (as a key field) to the record definition for that table.
Define a Set Control Field as the field controlling the assignment of table sets.
|
Field or Control |
Definition |
|---|---|
| SetID |
Enter the set ID as defined in the record definition. |
| Descriptions/Comments |
Add any descriptions and comments that are necessary for identification and internal documentation. |
Used to group record definitions for the tables that you want to share, as well as any dependent record definitions.
Select to access the Record Group page.
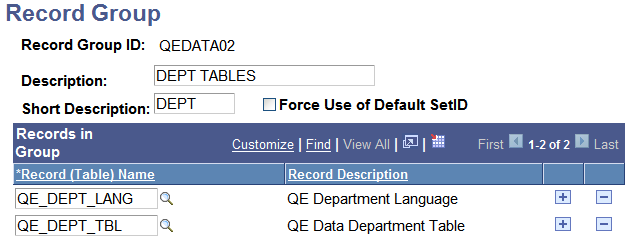
Image: Record Group page
This example illustrates the fields and controls on the Record Group page. You can find definitions for the fields and controls later on this page.
|
Field or Control |
Definition |
|---|---|
| Description |
The Record Group ID description should provide enough information to encompass a category of related tables, not just the table that you are specifically sharing. |
| Short Description |
Enter a short description. |
| Force Use of Default SetID |
This overrides alternate setIDs that are entered so that the default is used. |
| Record (Table) Name |
This prompt list comes from a SQL view of record definitions that are defined with that Set Control Field that aren't already associated with a record group. |
| Record Description |
Automatically populated when the Record (Table) Name is selected. |
The following pages are used to control table sets.
Record Group Page
Select to access the Record Group page.
Used to define which record groups use which table set.
|
Field or Control |
Definition |
|---|---|
| Default SetID |
This is the setID that the system uses as you add additional record definition groups to be shared within this tableset. |
| SetID |
Although this database is set up to share only one accounting-related record group, you may have multiple record groups to which you assign default unique Set IDs. |
Tree Page
Select to access the Tree page.
Used to share Trees as well as tables and views.
|
Field or Control |
Definition |
|---|---|
| Default SetID |
The Default setID that you assign to this field value automatically appears. If you create another tableset for sharing trees, you can change this value. |
| Tree Name |
Use the browse button to select from a list of only the tree definitions that are defined with the same Set Control Field. |
| SetID |
Use the browse button to select the appropriate SetID. |
The following pages are used to convert panels that are used in previous PeopleSoft Windows applications to pages that are used for browser access.
Scope Page
Select to access the Scope page.
This utility helps you update panels from PeopleTools 7.5x versions to reflect the pages that are used for the PeopleSoft Internet Architecture.
|
Field or Control |
Definition |
|---|---|
| Project List |
Insert projects, containing panels that you want to convert, into this scroll. In addition, if you use the Apply Panel Group Defaults option, any panel group that is contained in projects in this scroll are processed. Note that exceptions may be defined see the task titled, Project Exceptions. |
| Page List |
Insert panels that you want to convert to pages into this scroll. |
| Project Exceptions |
If you want to ensure that a group of panels or panel groups is never processed for conversion, you can insert them into an application upgrade project and insert the project name in this scroll. |
| Page Exceptions |
Panels that are inserted into this scroll are not be processed. |
See PeopleSoft ugrade documentation.
documentation for more information.
Options Page
Select to access the Options page.
Specify the options for the conversion process:
|
Field or Control |
Definition |
|---|---|
| Convert Scrolls to Scroll Areas |
If you select this option, scroll-to-scroll area conversions take place for panels with scroll bars. If this is unchecked, no scroll-to-scroll area conversion takes place. |
| Convert Scroll Action Buttons to Scroll Areas |
Some scroll bars may exist with scroll action buttons that are already defined. This option determines whether these scrolls should be converted or ignored. If they are converted, the scroll action buttons are removed before the scroll bar is converted to a scroll area. If you select this option, scrolls with scroll action buttons are converted. If this options is not checked, scrolls with scroll action buttons are ignored. |
| Panels with Level 1 Scrolls |
If you select this option, panels with level 1 scrolls are processed for scroll conversion. |
| Panels with Level 2 Scrolls |
If you select this option, panels with level 2 scrolls are processed for scroll conversion. |
| Panels with Level 3 Scrolls |
If you select this option, panels with level 3 scrolls are processed for scroll conversion. |
| Convert Level 1 Scrolls |
If you select this option, level 1 scrolls are converted to scroll areas. |
| Convert Level 2 Scrolls |
If you select this option, level 2 scrolls are converted to scroll areas. |
| Convert Level 3 Scrolls |
If you select this option, level 3 scrolls are converted to scroll areas. |
| Max # Scrolls |
This parameter is a general scroll count limit for scroll conversion processing. For example, if this is set to 5, any panel with more than five scrolls that are not invisible is ignored. This is a simple way of eliminating complex panels from automatic scroll conversion. |
| Apply Specific Page Size |
This option is used to define whether a specific size should be assigned to a panel. If you select this option, the panel size that is defined in the drop-down list box is applied to the panel. If this is unchecked, no changes are made to the panel size. Note: Note. When you select a specific panel size, the panel size is applied to standard panels only (secondary panels and subpanels are not sized automatically). |
| Apply Default Style Sheet |
If you select this option, the style sheet that is associated with a panel is updated with a blank value, so that the panel's style sheet appears by default from PSOPTIONS.STYLESHEETNAME ('PSSTYLEDEF'). |
| Apply Frame/Horz/GrpBox Styles |
If you select this option, the conversion process looks for frames, group boxes, and horizontal rules that have no styles associated with them, and that appear to be associated with a specific scroll area by virtue of their position within a scroll area. It then assigns level-specific styles, based on the occurs level of the scroll area. |
| Convert Frames to Horizontal |
Horizontal lines were a new page object for PeopleSoft 8. This option applies only for applications upgraded from releases previous to PeopleSoft 8. If you select this option, the conversion process looks for frames on the panel with upper and lower coordinates less than nine grid units apart. These frames are then converted to horizonal lines. |
| Delete All Frames |
If you select this option, the process removes all frames on the converted panel. Note: If Convert Frames to Horizontal and Delete All Frames are both checked, the conversion from frame to horizontal takes place first, then any remaining frames are deleted. |
| Turn On Grid 'Odd/Even Style' |
This applies to grids that are on a panel being converted. If you select this option, the conversion process determines if grids on the panel have their 'Odd/Even Style' turned on. If it is not turned on, the conversion process turns on this option. |
| Turn On 'Show Prompt Button' |
This option applies to edit box fields that are not invisible and are not display-only. If you select this option, the conversion process turns on the Show Prompt Button option for edit box fields that have it turned off. |
| Apply Component Defaults |
Used to apply standard defaults to component definitions. The defaults that are set are dependent on the Use characteristics of the component. See Application Designer, Component Properties/Use and Component Properties/Internet tabs. |
| Turn Off 'Show Grid Lines' |
Turns off the Show Grid Lines option for grids that have it checked on. |
| Language Code |
Enables you to convert panels whose language code differs from that in PSOPTIONS. Select a language code from the drop-down list box. |
The Update utilities enable you to keep track of the PeopleSoft updates that you apply to the database.
Updates By Release Label
The release label refers to the official release name, such as PeopleTools 8.53.00
Updates By Update ID
The update ID refers to the patch or project name that you apply to the system. The update ID is typically the report ID for a TPRD incident.
Use the Remote Database Connection page to set up remote databases for use with the Remote Data Access (RDA) feature. Select to access the Remote Database Access Management page.
|
Field or Control |
Definition |
|---|---|
| Name |
Enter the name of the remote database connection. |
| Database Type |
Available types are Microsoft, DB2 (z/OS), DB2/UNIX, and Oracle. |
| Description |
Enter a description of the remote database. |
| Server |
Enter the server name where the remote database resides. |
| Database |
Enter the remote database name. |
| Local Connect |
One connection must defined as the Local Connect for the current PeopleSoft instance (the local database). Check this to specify which database is the local. |
| DB Server Port |
This value is automatically populated with a default value that is based on the database type. You may need to change this value depending upon the database server configuration. |
| User ID |
Enter the user ID that is needed to connect to the remote database. |
| Password |
Enter the password that is associated with the user ID. |
| Test Connection |
Select this to test the remote database connection. |
| Connection Type |
For Oracle database type only. TNS Names or Specific. TNS Names represent a preconfigured file (tnsnames.ora) that consists of previously defined database connection information. Enter Specific if you want to set up a database that does not already have a TNS entry defined. |
| TNS Entry |
For Oracle database type only. |
Security in Remote Databases
To ensure security and limit the risk of unauthorized access to databases, follow these recommendations:
The remote system's database administrator should create a user with read-only access to the tables that may be accessed by other systems using PeopleSoft's RDA.
Use this restricted user ID and password in configuring a source RDA node.
The local system's database administrator should create a user with insert/update access to the RDA destination tables only.
Use this restricted user ID and password in configuring the target RDA node.
Select PeopleTools, Utilities, Administration, URLs to access the URL Maintenance page.
Use the URL Table to store URL addresses and to simplify specifying and updating URLs. URLs that are saved here can be referenced from page controls such as a push button or link. The associated URL can be either an internet or intranet link.
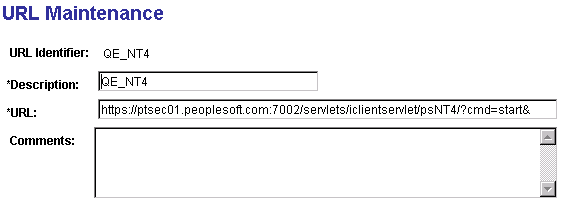
Image: URL Maintenance page
This example illustrates the fields and controls on the URL Maintenance page. You can find definitions for the fields and controls later on this page.
|
Field or Control |
Definition |
|---|---|
| Description |
Users can search for URLs by description. |
| URL |
Enter the entire URL. Note: For the file attachment functionality, in specifying the URL for the FTP server, the FTP server's machine name can be more than 30 characters, but the length of the full URL is limited to 120 characters. The URL format for file attachments stored in the database is record://recordname, as inrecord://ABSENCE_HIST_DB. |
| Comments |
This field can be used to make notations and comments and is not displayed elsewhere. |
Adding New URLs
To add a new URL entry in the URL table:
Click the Add a New Value link.
A new page appears, prompting you to enter the URL Identifier. Enter the name that you want to use to identify the new URL address.
Select Add.
Enter the Description, URL, and Comment, if any.
Select Save.
You must save the page before you can add another URL, or update or display existing URL addresses.
Select Add to add another URL.
Viewing and Updating the URL Table
To update or display the URL table:
From the URL Maintenance search page, click Search.
Select the URL Identifier link that you want to update from the Search Results.
Make changes to the page and save.
Specifying URL Properties
You access the URL Properties page by clicking the URL Properties link on the URL maintenance page.
Image: URL Properties page
This example illustrates the fields and controls on the URL Properties page. You can find definitions for the fields and controls later on this page.
You create the URLID using the URL Maintenance page, but you assign various properties to the URLID for the following protocol types using the URL Properties page.
FTP
FTPS
SFTP
HTTP
HTTPS
The properties you assign depend on the protocol and the type of security you are implementing.
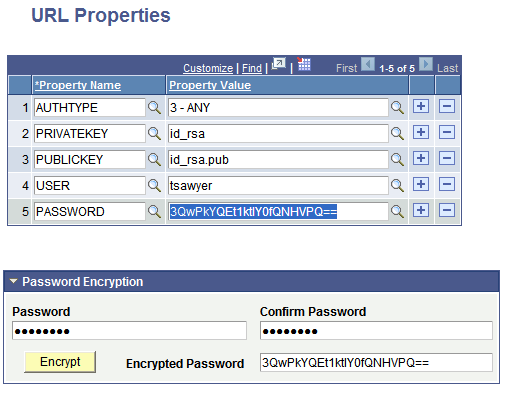
The Password Encryption box enables you to encrypt a password value that you intend to assign to the PASSWORD property. Click Encrypt to encrypt the password, then copy the encrypted password into the edit box for the PASSWORD property. The value of this property must be the user password in an encrypted form.
Note: If you intend to implement secure FTP, SFTP, HTTP, or HTTPS, Oracle recommends you understand the details and behavior of the attachment PeopleCode constructs, such as AddAttachment.
See Understanding the File Attachment Functions.
To assign properties to a URL:
On the URL Maintenance page, add a URL value containing ftp://, ftps://, sftp://, http://, or https:// in the URL field.
Click Save.
Click the URL Properties link.
Set the URL properties for the protocol and your security preference.
Click Save.
The available URL properties for each protocol appear in the following table:
|
Protocol |
Properties |
Description |
|---|---|---|
|
FTP/S |
ACTIVEMODE |
To enable active mode, add the ACTIVEMODE property to the URL and set it to Y. The default FTP connection mode is extended passive mode. |
|
ACTIVEPORTOPTION |
This property can be used along with ACTIVEMODE. When active mode is enabled, you can use ACTIVEPORTOPTION to specify the IP address and port on which the FTP server can be accessed. This is useful when the server is behind a firewall. By default, ACTIVEPORTOPTION uses the default IP address of your system. If you want to use a particular IP address, set the ACTIVEPORTOPTION value to either the full IP address, a host name to resolve to an IP address, or a local network interface name. You can also specify a port range. For example: 10.176.147.111:10000-13000 |
|
|
CERTALIAS |
(Certificate Alias) The Certificate Alias must be an alias name of a certificate stored in the database (using the PeopleTools Digital Certificates page). Note: Currently, only PEM certificates are supported for FTPS. |
|
|
ENABLEEPRT |
This option can be used only with Active Mode. If Active Mode is enabled and ENABLEEPRT is set to N, then the system will use a PORT (IPv4) Active Mode connection. By default, ENABLEEPRT is Y, if Active Mode is set to Y. |
|
|
FILE_EXT_LIST |
Select the name of a file extension list created using the File Extension List page. A file extension list enables you to restrict file attachment features to work only with appropriate file types, and reject those file types that you believe may be suspicious, potentially harmful, or not appropriate for a particular call to a file-processing built-in PeopleCode function. See File Extension List. |
|
|
KEYSTOREPASSWORD |
Required for FTPS and HTTPS repositories. For attachments transferred from the PeopleSoft system to the FTPS or HTTPS repository, the system retrieves the key pair for the client certificate from the digital certificate store and writes them to a file in PKCS12 format with password protection. The value of this property will be used as the password for the PKCS12 file. The PKCS12 file enables connection and file transfer, and it exists only temporarily in <PS_SERVDIR>\files\<CERT ALIAS NAME> for the duration of the file transfer. The system deletes the file after the file transfer transaction. Note: If the system fails to delete the certificate alias file, a message will be written to the application sever log. The maximum number of files that can exist at any time is equal to the total number of FTPS and HTTPS URL identifiers defined in the system. |
|
|
EXTENDEDPASSIVEMODE |
Enables you to control whether extended passive mode (EPSV) will be used by FTP. To enable select 1, to disable select0. EPSV is used by default. That is, by default, this value is considered to be 1. If the client fails to connect to the server with EPSV, then the system will try passive mode (PASV). To use PASV only, add EXTENDEDPASSIVEMODE to the URL Properties and set it to 0. |
|
|
PASSWORD |
The password associated with the USER property, which identifies the FTP user ID. The value of this property must be the user password in an encrypted form. |
|
|
SSLUSAGELEVEL |
0 - No SSL: No SSL will be used. 1 - Try SSL: Try using SSL, but proceed as normal otherwise. 2 - Control: Require SSL for the control connection. 3 - SSL Only: (Default) Require SSL for all communication. |
|
|
USER |
The FTP user ID used for authentication when accessing the FTP site. |
|
|
VERIFYHOST |
0: Do not verify the server for host name. 1: (Default) Checks for a match with the host name in the URL with the common name or Subject Alternate field in the server certificate. |
|
|
VERIFYPEER |
False: Do not verify the peer. True: (Default) Verify the peer by authenticating the certificate sent by the server. |
|
|
SFTP |
AUTHTYPE |
Select the authentication type:
|
|
FILE_EXT_LIST |
Select the name of a file extension list created using the File Extension List page. A file extension list enables you to restrict file attachment features to work only with appropriate file types, and reject those file types that you believe may be suspicious, potentially harmful, or not appropriate for a particular call to a file-processing built-in PeopleCode function. See File Extension List. |
|
|
PASSWORD |
The password associated with the USER property, which identifies the FTP user ID. The value of this property must be the user password in an encrypted form. |
|
|
PASSWORDKEY |
Enter the password for the private key. |
|
|
PRIVATEKEY |
Select the private key. |
|
|
PUBLICKEY |
Select the public key. |
|
|
SSHKEYALIAS |
Select the SSH certificate saved to the database using the PeopleTools Security, Digital Certificates page (PeopleTools, Security, Security Objects, Digital Certificates). The SSH certificate added through the Digital Certificates page contains both the public and private key data, identified by the Alias column value on the Digital Certificates page. If using the SSHKEYALIAS URL property, the Property Value prompt displays only the list of SSH certificates that have been added to the Digital Certificates page. If you have added the SSH certificate using the Digital Certificates page, and you have assigned an SSH certificate to the SSHKEYALIAS URL property, the system ignores the PUBLICKEY and PRIVATEKEY properties, regardless if they refer to valid key files in the file system. If you provided a password (or passphrase) when generating your SSH certificate, specify that value using the PASSWORDKEY URL property. |
|
|
USER |
Specify the user ID to be authenticated. |
|
|
HTTP |
FILE_EXT_LIST |
Select the name of a file extension list created using the File Extension List page. A file extension list enables you to restrict file attachment features to work only with appropriate file types, and reject those file types that you believe may be suspicious, potentially harmful, or not appropriate for a particular call to a file-processing built-in PeopleCode function. See File Extension List. |
|
PASSWORD |
The password associated with the USER property, which identifies the FTP user ID. The value of this property must be the user password in an encrypted form. |
|
|
PROXY |
Specify the proxy server (if used). |
|
|
PROXYPORT |
Specify the proxy server port (if used) |
|
|
USEAUTHTOKEN |
Uses the PS_TOKEN authentication cookie, if single signon is configured between source and target destination. Note: This must be set to Y if a PeopleSoft web server is used for the HTTP repository. |
|
|
USER |
Specify the user ID to be authenticated. Note: USER must be set if a PeopleSoft web server is used for the HTTP repository. |
|
|
HTTPS |
CERTALIAS |
(Certificate Alias) The Certificate Alias must be an alias name of a certificate stored in the database (using the PeopleTools Digital Certificates page). Note: Currently, only PEM certificates are supported for FTPS. |
|
KEYSTOREPASSWORD |
Required for FTPS and HTTPS repositories. For attachments transferred from the PeopleSoft system to the FTPS or HTTPS repository, the system retrieves the key pair for the client certificate from the digital certificate store and writes them to a file in PKCS12 format with password protection. The value of this property will be used as the password for the PKCS12 file. The PKCS12 file enables connection and file transfer, and it exists only temporarily in <PS_SERVDIR>\files\<CERT ALIAS NAME> for the duration of the file transfer. The system deletes the file after the file transfer transaction. Note: If the system fails to delete the certificate alias file, a message will be written to the application sever log. The maximum number of files that can exist at any time is equal to the total number of FTPS and HTTPS URL identifiers defined in the system. |
|
|
FILE_EXT_LIST |
Select the name of a file extension list created using the File Extension List page. A file extension list enables you to restrict file attachment features to work only with appropriate file types, and reject those file types that you believe may be suspicious, potentially harmful, or not appropriate for a particular call to a file-processing built-in PeopleCode function. See File Extension List. |
|
|
PASSWORD |
The password associated with the USER property, which identifies the FTP user ID. The value of this property must be the user password in an encrypted form. |
|
|
PROXY |
Specify the proxy server (if used). |
|
|
PROXYPORT |
Specify the proxy server port (if used). |
|
|
SSLUSAGELEVEL |
0 - No SSL: No SSL will be used. 1 - Try SSL: Try using SSL, but proceed as normal otherwise. 2 - Control: Require SSL for the control connection. 3 - SSL Only: (Default) Require SSL for all communication. |
|
|
USEAUTHTOKEN |
Uses the PS_TOKEN authentication cookie, if single signon is configured between source and target destination. Note: This must be set to Y if a PeopleSoft web server is used for the HTTP repository. |
|
|
USER |
Specify the user ID to be authenticated. Note: USER must be set if a PeopleSoft web server is used for the HTTP repository. |
|
|
VERIFYHOST |
0: Do not verify the server for host name. 1: (Default) Checks for a match with the host name in the URL with the common name or Subject Alternate field in the server certificate. |
|
|
VERIFYPEER |
False: Do not verify the peer. True: (Default) Verify the peer by authenticating the certificate sent by the server. |
Working with FTP/FTPS
FTP over SSL (FTPS) can be achieved in two ways: implicit and explicit. Implicit SSL uses ftps:// and explicit uses ftp://.
To use PASV only, set URL property EXTENDEDPASSIVEMODE to 0.
Working with SFTP
With SFTP, these authentication methods are supported:
password.
key authentication.
Note: With key authentication, you have two choices: storing the public and private keys as files within the file system, or storing the public and private keys within an SSH certificate added using the Digital Certificates page.
To set up password authentication create a URL identifier with an SFTP URL value, such as sftp://10.145.641.122/, then set these URL properties:
AUTHTYPE: 2 - PASSWORD
USER: user ID
PASSWORD: encrypted user password
For public key authentication with key files stored in the file system, you can copy the public key file to <PS_SERVDIR>\sshkeys\public and the private key file to <PS_SERVDIR>\sshkeys\private. Alternatively, you can copy the key files to a different location and define an environment variable PS_SSHKEYPATH.
Note: PS_SSHKEYPATH can replace only PS_SERVDIR. The following directory structure must exist in your custom location, .\sshkeys\public and .\sshkeys\private. For example, <PS_SSHKEYPATH>\sshkeys\public.
If storing the SSH key data in the file system, set these URL properties appropriately:
AUTHTYPE: (1 - PUBLIC KEY)
USER
PRIVATEKEY
PUBLICKEY
PASSWORDKEY
For public key authentication with an SSH certificate stored in the PeopleTools keystore, save the private key and public key data to the database using the Digital Certificates page (PeopleTools, Security, Security Objects, Digital Certificates page). If your SSH certificate is stored in the database by way of the Digital Certificates page, set these URL properties appropriately:
AUTHTYPE: (1 - PUBLIC KEY)
USER
SSHKEYALIAS
PASSWORDKEY
Note: Oracle recommends storing the SSH public and private key data in the database by creating an SSH certificate stored in the PeopleTools keystore for increased security and ease of maintenance. If the private key and public key files are stored in the file system, Oracle recommends implementing a password-protected private key.
For more information on the Digital Certificates page, see Configuring Digital Certificates.
Working with HTTP/HTTPS
HTTP/S file transfer requires the http/https repository available (file storage location). The repository can either be on a PeopleSoft web server or non-PeopleSoft server. The PeopleSoft Internet Architecture provides a handler servlet (psfiletranfer) to handle the requests. If you use a non-PeopleSoft web server you need to create a handler for non-PeopelSoft servers/repositories.
Once the repository is created, the configuration.properties file for the appropriate PeopleSoft site needs to be modified to include the HttpRepository property. For example:
HttpRepositoryPath=D:/HttpRepository
Note: Use a forward slash (/).
To set up HTTP:
After creating a URL identifier with an http:// URL (as in, http://<PIA URL>/psfiletransfer/<sitename>/), select these URL properties:
USEAUTHTOKEN: Y
USER: user_ID
Set the Authentication Option field on the default local node to Password.
To set up HTTPS:
Setup the target web server for HTTPS, and add the Root CA and Client Certificate to Digital Certificate store.
Create an URL Identifier using https://, and add these URL properties:
CERTALIAS: your certificate alias
SSLUSAGELEVEL: 3-SSL Only
VERIFYHOST: 1
VERIFYPEER: Y
USER: user ID
USEAUTHTOKEN: Y
You can have the HTTP repository on a separate PeopleSoft web server too. For example, PIAsystem1 can have the URL identifier pointing to a URL on PIAsystem2. This requires following to be in place:
The user specified in the URL properties must exist in both the systems with the proper permissions.
The default local nodes on both systems should have Authentication Option set to Password and should be pinged successfully.
The default local nodes of each system are added to single-signon list for each database.
Note: To upload non-ASCII file names to an HTTP Repository, the application server needs to be booted in the native language (such as Japanese or Chinese). If the application server is booted in English, file names with non-ASCII characters will not be uploaded to the HTTP Repository.
See Understanding Character Set Selection for more information on how character sets on various tiers of the PeopleSoft system can affect file attachment processing.
Specifying URLs When Attaching Files
When attaching files, whether you can pass a string URL or only use the URL identifier depends on the protocol and repository type being used. When attaching files, keep these guidelines in mind:
Using the URL Identifier is mandatory for FTPS, SFTP, HTTP, and HTTPS.
For FTP, Record, and File, you can use the URL Identifier or use a URL string (and not reference the stored URL Identifier).
For example, with plain FTP you could use a URL string, such as:
ftp://user:password@site/
Or, if a URL Identifier has been created, you can reference that in one of these formats:
ftp://userid:password@ftpurl/: where the FTP user and FTP password are provided in clear text, but the URL information comes from the URL Identifier.
ftp://userid@ftpurl/: where the FTP user is provided in clear text, but the FTP password and the URL information comes from the URL Identifier.
ftp://ftpurl/: where all the required information comes from the URL Identifier.
Select to access the File Extension List page.
A file extension list contains a list of file types, identified by file extension, that the system either accepts or rejects during specific file attachment operations. Once you have created a file extension list you specify it as the value for the FILE_EXT_LIST property of a URL object using the URL Maintenance page. This enables you to only upload the appropriate file types at runtime, and reject those file types you think may be suspicious, potentially harmful, or not appropriate for a particular call to a file-processing built-in PeopleCode function.
A file extension list applies only when performing these file attachment operations:
Uploading files (AddAttachment, MAddAtachment PeopleCode)
Viewing files (ViewAttachment PeopleCode)
Detaching files (DetachAttachment PeopleCode)
Note: File extension lists can be assigned only to a URL object by way of the FILE_EXT_LIST property, and they apply only to these file attachment operations.
See URL Maintenance.
See Understanding the File Attachment Functions.
You can create different file extension lists to restrict certain file types, depending on the needs of the application. For example, for an application that users access from outside your firewall, such as a job applicant interface, you might want to impose strict restrictions on the accepted file types to avoid allowing potentially harmful file types into your system. For an internal-facing application, you may not require such strict requirements for file attachments.
Image: File Extension List page
This example illustrates the fields and controls on the File Extension List page. You can find definitions for the fields and controls later on this page.
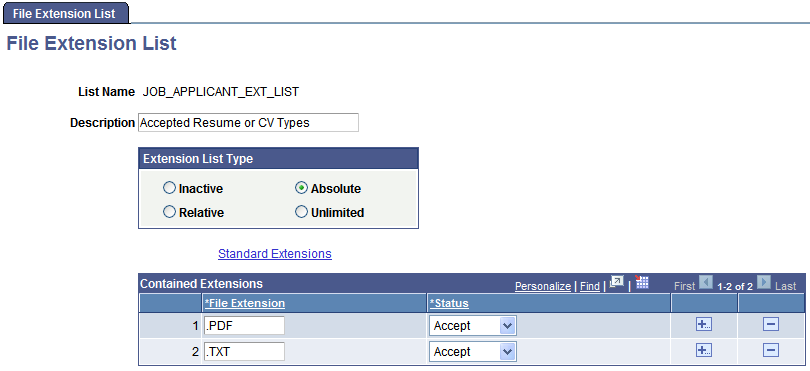
|
Field or Control |
Definition |
|---|---|
| List Name |
Displays the name you entered for the file extension list in the Add New Value tab. File extension list names cannot exceed 30 characters. |
| Description |
Enter any descriptive information to help indicate how this list is to be used. |
Extension List Type
|
Field or Control |
Definition |
|---|---|
| Inactive |
When set to Inactive, the system ignores the file extension list. Any file extension entries in the Contained Extensions grid are ignored at runtime for an Inactive list type. From a development perspective, it may be useful to keep a working list of file extensions, but keep the list itself inactive until it is fully tested. Note: When troubleshooting or testing, setting a file extension list to Inactive, immediately disables any restrictions imposed by that file extension list. |
| Absolute |
With an Absolute file extension list, you can create a list in which all the acceptable filename extensions are explicitly enumerated and have a status ofAccept. That is,only the file extensions that appear in the Contained Extensions gridand have the Status set toAccept will be accepted for that file attachment operation at runtime. An Absolute file extension list is most appropriate for situations where you wish to accept a relatively small number of file types. Any file extension set to Reject will not be accepted at runtime. However, not including such a file extension in your absolute list will have precisely the same effect. |
| Relative |
The Relative file extension list type is based on the Standard Extensions list, and provides a flexible means to specify a finite number of files that are acceptable, as well as enabling you to extend the Standard Extensions list, if needed. A Relative file extension list is most appropriate for situations where you wish to reject a relatively small number of file types. After reviewing the Standard Extensions list, add specific file extensions that you do not want to authorize for file attachment operations to the Contained Extensions grid, and set the Status value toReject. By doing so, you indicate to the system that you authorize all of the extensions on the Standard Extensions list,except for those you've added to the Contained Extensions grid and set toReject. For a Relative file extension list type, you can use the Accept status value to effectively extend the current list of Standard Extensions for this specific relative file extension list. For example, assume that at your site you use a product that uses a file extension that does not appear in the Standard Extensions list. By adding that file extension to the Contained Extensions grid and setting its Status value toAccept, the PeopleSoft system will accept that file type for file attachment operations involving this specific relative file extension list. Note: PeopleTools does not permanently add the extension to the Standard Extensions list when it is set to Accept for a relative file extension list type. That is, when you view the Standard Extensions list after setting the Status toAccept for a particular file extension, it will not appear in the list and will not affect the contents of the Standard Extensions list when it is accessed at runtime by other file extension lists you use. However, at runtime, the system will recognize that file extension as acceptable for this specific relative file extension list. |
| Unlimited |
Do not use the Unlimited extension list type in the current release. This type of list is intended for possible use with future functionality. |
Standard Extensions
Click to display a read-only list of standard file extensions that are known and potentially acceptable to the PeopleSoft system. This list comprises the standard list of file types that a PeopleSoft web server will handle. The displayed Standard Extensions list is provided for informational purposes to help you complete your file extension lists by indicating the set of file extensions that the PeopleSoft system recognizes.
To include additional file extensions to the Standard Extensions list, refer to the Relative file extension list type description.
Contained Extensions
|
Field or Control |
Definition |
|---|---|
| File Extension |
Enter the file extensions you want to accept or reject. Add one extension per row, with each extension not exceeding ten characters. The system saves the value of an individual file extension as all upper case, regardless of the case you enter, and prepends a period ('.') to the file extension unless its first character is already a period. Note: Files having no file extension may be indicated collectively by specifying a file extension of a period ("."). |
| Status |
For a specified file extension of type Absolute or Relative, you have these Status options:
|
Bypassing Restrict-by-File-Type Functionality for System Administrators
System administrators managing the file attachment features of your PeopleSoft system can bypass restrictions otherwise imposed by filename extension lists by using a delivered security role, PTFX Ignore Download Ext Lists.
During a call to ViewAttachment or DetachAttachment, if the user profile initiating the transaction is associated with the PTFX Ignore Download Ext Lists role, then the system ignores file download restrictions specified by any filename extension list.
Note: The PTFX Ignore Download Ext Lists role should be associated only with the appropriate user profile(s).
Note: The PTFX Ignore Download Ext Lists role contains no permission lists, however, its association with a user profile triggers internal PeopleTools security rules.
Select to access the Manage Attachment Repositories page.
This page enables you to manage your attachment archives. You can transfer file attachment archives from one location (source) to a new location (destination), and you can perform general housecleaning by deleting orphaned attachments.
Image: Manage Attachment Repositories
Copy file attachments from one location to another as well as purge system of orphaned file attachments
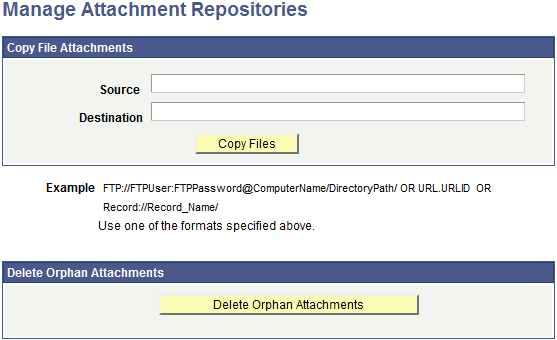
Copy File Attachments
|
Field or Control |
Definition |
|---|---|
| Source |
Enter the URL that corresponds to the current (source) location of the file attachment archive to be copied. |
| Destination |
Enter the URL that corresponds to the destination location of the file attachment archive to be copied. |
| Copy Files |
Invokes the PeopleCode function (CopyAttachment) that copies the file attachment archive from the specified source storage location to the specified destination storage location. For example, you can copy from the FTP server to a database, a database to the FTP Server, and so on. Note: For the file attachment functionality, in specifying the URL for the FTP server, the FTP server's machine name can be more than 30 characters. The length of the full URL is limited to 120 characters. Prior to copying files to a database storage location, you must first prepare the target record to store the attachments, which is discussed in the PeopleCode Developer's Guide. |
| Example |
Displays the sample formats used for FTP, URL, or Record attachment transfers. These sample formats apply to both the Source and Destination edit boxes. |
Deleting Orphan Attachments
The accumulation of file attachments can consume a significant amount of space in your database. Therefore, on a regular basis, it is recommended that you make sure that orphaned file attachments are deleted from the storage location, reclaiming disk space being used unnecessarily. Orphan file attachments are stored file attachments for which there is no longer a corresponding file reference in a valid file reference table.
Click the Delete Orphan Attachments button to complete this task. This button invokes the CleanAttachments PeopleCode function.
Warning! There is no way to roll back changes made by the CleanAttachments function. Review the CleanAttachments documentation in the PeopleCode Language Reference PeopleBook describing the behavior of CleanAttachments in order to appropriately anticipate how it will behave. Oracle suggests that you perform a database backup before deleting orphan attachments.
Note: When large numbers of orphaned file attachments may exist, Oracle recommends using the delivered Application Engine program, CLEANATT84, rather than the Delete Orphan Attachments button to remove the orphaned files. This avoids potential time-out issues.
See CleanAttachments
Select to access the Copy File Attachments (Batch) page.
This page enables you to run a CopyAttachments process via the COPYATTS Application Engine program on the Process Scheduler. .This ensures that a large CopyAttachments job does not terminate prematurely due to PIA time-out.
Image: Copy File Attachments (Batch) page
This example illustrates the fields and controls on the Copy File Attachments (Batch) page.
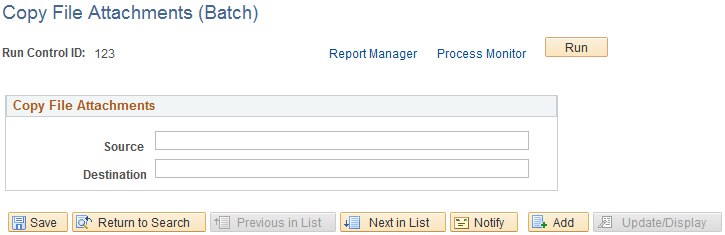
|
Field or Control |
Definition |
|---|---|
| Report Manager |
Click this to view reports. For more information about viewing reports, see Viewing Reports. |
| Process Monitor |
Click this to review the status of scheduled or running processes. For more information about viewing the status of processes, see Viewing the Status of Processes |
| Run |
Click this to execute the processes. When you click Run, the Process Scheduler Request page appears, showing all of the jobs and processes that you have the security to run. |
| Source |
Enter the URL that corresponds to the current (source) location of the file attachment archive to be copied. |
| Destination |
Enter the URL that corresponds to the destination location of the file attachment archive to be copied. |
Select to access the Delete Orphan Files (Batch) page.
This page enables you to run a CleanAttachments process via the CLEANATT84 Application Engine program on the Process Scheduler. This ensures that a large CleanAttachments job does not terminate prematurely due to PIA time-out.
Image: Delete Orphan Files (Batch) page
This example illustrates the fields and controls on the Copy File Attachments (Batch) page.
|
Field or Control |
Definition |
|---|---|
| Report Manager |
Click this to view all of the reports that are in the PeopleSoft system (across multiple databases) that the user is authorized to access. |
| Process Monitor |
Click this to review the status of scheduled or running processes. |
| Run |
Click this to access the Process Scheduler Request page. Select the process and click OK to delete. |
System administrators can use Query Administration to monitor query performance and usage. Some of the conditions that you can monitor include average runtime, number of times run, and the dates last run. Using a predefined search, you can also select queries to review and report on.
The Sync ID Utilities are used exclusively with PeopleSoft Mobile Applications technology.
Important! PeopleSoft Mobile Agent is a deprecated product. These pages currently exist for backward compatibility only.
Defines upgrade drivers, providing details regarding Application Engine program, section, group, and calling sequence. If you need to specify any of these values, your upgrade documentation will provide the details.
See your upgrade documentation for more information.
The Gather utility facilitates communications between PeopleSoft and the customer on technical questions or issues. The Global Support Center (GSC) directs the customer to the Gather Utility when problems arise. Customers can also use a self-service website to run this utility and send in relevant information about their problems or issues.
Using a simple command line interface, the Gather utility is a small Java application that can run on any platform to collect various files from the following environments:
Application Server.
Web Server.
Any additional files that the user chooses (SQL Trace files, PeopleCode Trace Files, and so on).
The collected files are placed in a single jar file with psft.jar as the default name, in the temp directory. Subsequently, these files are sent to PeopleSoft.
Note: For this utility to work, the supported version of Java (JRE) must be installed on the target machine.
Getting Started
The following files reside in the starting directory:
Gather.class: The main Java class file
Helper.class: This class file is called by Gather.class
Runnit.bat: A MS-DOS batch file that is used by Windows users.
UNIX users have to run the Gather utility manually.
Vars.sh: a UNIX shell script.
Gather calls this automatically if the UNIX operating system is detected.
Windows Users
The following steps are used for Windows:
Make sure that you have the PS_HOME environment variable set.
This saves the user from having to type it in.
Go to PS_HOME\utility.
Type
runnit.Follow the directions that are on the screen.
UNIX Users
Use the following steps for UNIX:
At a command prompt, run the following command where PeopleSoft is installed:
../psconfig.shGo to the PS_HOME/utility directory.
Change permissions for all files:
chmod 777 *.*Enter the following to start the utility:
java -cp .:$CLASSPATH GatherNote: UNIX is case-sensitive – Gather is spelled with a capital G.
Follow the instructions that are on the screen.
Environmental Data
On Windows, both the set and netstat commands are invoked with the results copied to a file that is collected. On UNIX, the same thing is done with the env command.
Application Server Data
The following files are collected from the Application Server:
PSAPPSRV.CFG
PSAPPSRV.UBB
LOGS/*.*—this usually includes all application serv/tuxedo logs, dump, and replay files.
This includes all subdirectories under LOGS .
Web Server Data
The gather utility collects numerous files (log files, configuration files, and so on) from each of the supported web servers. If an analyst only asks for a specific file, send that, but make sure to keep the other collected files in case they are needed.
Additional Files
There is always a need to include files that are not on the above list. These can include PeopleCode Trace files, SQL Trace files, SQL output, and so forth. The command line interface allows you to specify any file that you want to be included in the jar file.