Using Reverse Proxy Servers
This section provides an overview of reverse proxy servers and discusses how to:
Make reverse proxy settings.
Issue requests by using a proxy server.
Specify hosts that should not be proxied.
Image: Example of the reverse proxy architecture
A reverse proxy server accepts requests from client browsers on behalf of another web server and then relays those requests to the web server. The reverse proxy server checks web requests and responses to ensure that they adhere to network security policies. For example, a reverse proxy server validates that a command intended for the target web server is a valid command for that server. In this diagram, the HR web server, corp.hr, is behind a reverse proxy server, www.pshr.com:
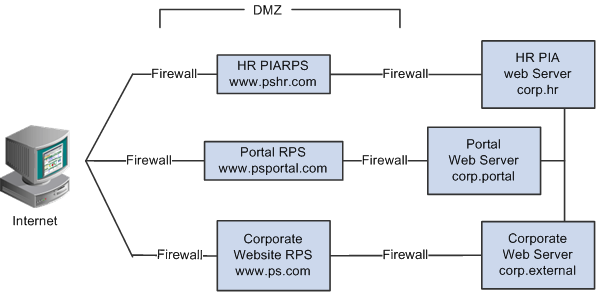
All internet requests for the HR web server are relayed by www.pshr.com to corp.hr. The site URL routes the client to the proxy as if it were a web server. Replicated content is delivered from the proxy cache to the external client without exposing the origin server or the network residing safely behind the firewall. You can balance the load of an overtaxed web server by installing multiple instances of the web server.
Any external content must come from a node that's registered in the portal database so that the portal servlet can look up the node name based on the URL of the content. The external content HTML is rewritten to use that proxied format.
On the Web Profile - Virtual Addressing page, specify the reverse proxy server to use by entering it in the Reverse Proxy Server List grid. Include the protocol, the host name, the HTTP port, and the HTTPS port.
For you to make a portal issue requests by using a proxy server, the proxy server settings are controlled by these Java system properties:
http.proxyHost
http.proxyPort
https.proxyHost
https.proxyPort
To use a proxy server for the HTTP protocol, set these properties:
http.proxyHost=http_proxy_server_host_name
http.proxyPort=http_proxy_server_port
To use a proxy server for the HTTPS protocol, set these properties:
https.proxyHost=https_proxy_server_host_name
https.proxyPort=https_proxy_server_port
The method for setting the Java system parameters varies by web server (Oracle WebLogic or IBM WebSphere). The properties must be passed to the Java interpreter as command-line directives.
For Oracle WebLogic
Alter the setEnv.cmd or setEnv.sh file located in WebLogic domain’s bin folder. Define the properties on the command line that starts the Java Virtual Machine like this:
set PROXY=-Dhttp.proxyHost=proxyhostname -Dhttp.proxyPort=proxy_port -Dhttps.proxyHost=proxyhostname -Dhttps.proxyPort=proxy_portLater add the preceding property in startPIA.cmd or startPIA.sh in the Java command line that starts the WebLogic server domain.
%JAVA_HOME%\bin\java -ms64m -mx64m
-classpath %JAVA_CLASSPATH% %PROXY%
-Dweblogic.class.path=%WEBLOGIC_CLASSPATH%
-Dweblogic.home=. -Djava.security.manager -Djava.security.policy==.\weblogic.policy weblogic.Server

goto finish
For IBM WebSphere
All the Java Virtual Machine settings for IBM WebSphere are set in <was_home>\profileTemplates\default\documents\config\templates\servertypes\APPLICATION_SERVER\servers\default.
Note: Here, the profile type is default and WebSphere has four types of profiles: cell, default, dmgr, and managed. The preceding path varies based on the type of profile.
Java Virtual Machine properties are embedded within the <jvmEntries> and </jvmEntries> elements.
<jvmEntries xmi:id="JavaVirtualMachine_1164791211226" verboseModeClass="false" verboseModeGarbageCollection="false" verboseModeJNI="false" runHProf="false" hprofArguments="" debugMode="false" debugArgs="-Djava.compiler=NONE -Xdebug -Xnoagent -Xrunjdwp:transport=dt_socket,server=y,suspend=n,address=7785" genericJvmArguments="-Dprofile.name=peoplesoft_auth">
      <systemProperties xmi:id="Property_1164791897101" name="ps_vault" value="c:/pt849-802-r2-debug/webserv/peoplesoft_auth/installedApps/peoplesoft_authNodeCell/peoplesoft_auth.ear/psvault" description="Vault location"/>
      <systemProperties xmi:id="Property_1164791897102" name="HttpSessionIdReuse" value="false" description="HttpSessionIdReuse"/>
    </jvmEntries>
If your portal implementation retrieves content from both an intranet and the internet, you may have a problem retrieving both internal and external content if the proxy server is not aware of the address of the intranet content. You can pevent this situation by specifying that certain hosts (such as your intranet hosts) should not be accessed through the proxy server.
For Oracle WebLogic, specify the hosts not to be proxied in the HTTP_PROXY_NONPROXY_HTTPHOSTS and HTTP_PROXY_NONPROXY_HTTPSHOSTS environment variables with the setEnv.cmd (setEnv.sh in Unix) script. Refer to comments in setEnv for specific syntax.
For IBM WebSphere, specify the hosts not to be proxied in the Java system variables http.nonProxyHosts and https.nonProxyHosts in the IBM WebSphere console:
Access the IBM WebSphere administration console.
Select Application Servers, server_name, Process Definition, Java Virtual Machine, Custom Properties.
Click New.
Set the property http.nonProxyHosts: List the internal machines for which authentication is not required for routing through the proxy. Separate each machine name in the list with a vertical bar ( | ).
Save the configuration, then sign out and restart IBM WebSphere.
For all the web server platforms, you can list a set of patterns that should not be accessed through proxies, with each one separated by the pipe character ( | ). This example shows a setting that makes all HTTP connections to the eng domain bypass the proxy settings:
*.eng|*.eng.example.com