Adhoc Payment
Application provides an option to the user to initiate Adhoc Payments. Using an Adhoc payment transaction, users can initiate payments without maintaining payees. User is expected to enter the payee details manually along with the payment details to initiate a payment.
The Adhoc payment transaction allows the user to add the adhoc payee from the Adhoc Payment Confirmation screen, so that the user can easily initiate any future transfers towards the payee.
Note: Adhoc Payment is supported only for Domestic - India payments.
Pre-Requisites
- Transaction and account access is provided to corporate user.
- Approval rule set up for corporate user to perform the actions.
- Transaction working window is maintained.
- Purposes of Payments are mandatory for Internal and Domestic Payment
- Transaction limits are assigned to user to perform the transaction.
Workflow
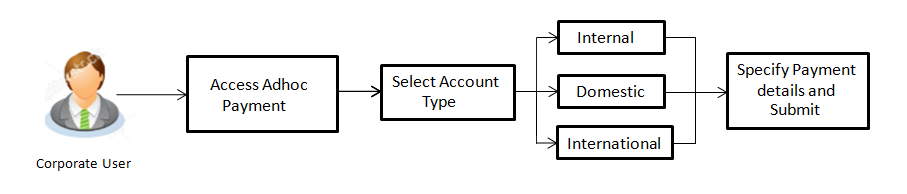
Features Supported In Application
Following type of transactions are supported under Adhoc Payments
![]() How to reach here:
How to reach here:
Dashboard > Toggle menu > Payments > Payments and Transfers > Adhoc Payment
OR
Dashboard > Quick Links > Adhoc Payment
Adhoc Payment - Internal Fund Transfer
Internal Bank Account transfer is a transfer to an account which is maintained within the Bank. Basic information about the payee along with the payee account is captured while initiating an Adhoc Payment. Along with the payee details, customer is expected to provide the payment details on the Adhoc Payment – Internal transfer screen. User can also view the transaction limits associated with a current transaction.
E-Receipt gets generated on successful completion of transaction in the Core Banking application. E-Receipt gets displayed in Activity Log detailed view.
To initiate an internal fund transfer:
|
Field Name |
Description |
|---|---|
|
Account Type |
Type of account associated with the payee. The type can be:
|
|
Account Number |
Account number of the payee. |
|
Account Name |
Name of the payee in the bank account. |
|
Transfer From |
Source account from which the funds are to be transferred. The account nickname, if the user has set a nickname for the account, it will be displayed. |
|
Balance |
Net balance in the selected account. |
|
Amount |
Amount to be transferred along with the currency. |
|
View Limits |
Link to view the transaction limits for the user. |
|
Transfer When |
Specify when to transfer funds. The options are:
|
|
Transfer Date |
Date of transfer. This field appears if you select the Later option from the Transfer When list. |
|
Purpose |
Purpose of transfer. |
|
Note |
Narrative for the transaction. |
- In the Account Type field, select the Internal option as type of account associated with the payee.
- In the Account Number field, enter the payee’s account number.
- In the Account Name field, enter the payee name.
- From the Transfer From account list, select the account from which transfer needs to be done.
- In the Amount field, enter the transfer amount.
OR
Click the View Limits link to check the transfer limit. - In the Transfer when field, select the appropriate transfer date.
- If you select the Now option, transfer will be done on same day.
OR
If you select Later option in the Transfer when field, select the appropriate future date for transfer. - From the Purpose list, select the appropriate purpose of transfer.
- Click to initiate payment.
OR
Click to cancel the transaction. - The Adhoc Internal Transfer - Reviewscreen appears. Verify the details, and click .
OR
Click , user is directed to Adhoc Internal Transferscreen with values in editable form.
OR
Click to cancel the transaction and go back to the Dashboard. - The success message appears, along with the reference number, host reference number, status and payment details of the transaction.
Click to go to the Dashboard screen.
OR
Click to add the adhoc payee.
OR
Click the e-Receipt link to download the electronic receipt. For more information, click here.
Adhoc Payment - Domestic Fund Transfer
Domestic Bank Account transfer is a transfer of funds to an account which is maintained outside the Bank but within country. Customer provides payee details along with the bank account number and the IFSC of a destination Bank; also specifies a payment network using which the payment is to be processed. Along with the payee details, customer is expected to provide the payment details on the Adhoc Payment – Domestic Transfer screen.
Customer can view the transaction limits associated with a current transaction. Also an option is provided to search the IFSC while initiating an Adhoc Transfer.
E-Receipt gets generated on successful completion of transaction in the Core Banking application. E-Receipt gets displayed in Activity Log detailed view.
To initiate domestic fund transfer:
|
Field Name |
Description |
|---|---|
|
Account Type |
Type of account associated with the payee. The type can be:
|
|
Account Number |
Account number of the payee. |
|
Account Name |
Name of the payee in the bank account. |
|
Pay Via |
Network |
|
IFSC /Bank Code |
IFSC /Bank Code of destination bank. |
|
Lookup IFSC Code |
Link to search the IFSC code. |
|
Search IFSC code The following fields appear on a pop up window if the Lookup IFSC Code link is selected. |
|
|
IFSC Code |
The facility to lookup bank details based on IFSC code. |
|
Bank Name |
The facility to search for the IFSC code based on the bank name. |
|
State |
The facility to search for the IFSC code based on the state. |
|
City |
The facility to search for the IFSC code based on city. |
|
Search IFSC code - Search Result |
|
|
IFSC Code |
The IFSC code as identified. |
|
Bank Details |
Details of the bank based on the IFSC code identified. These include the name of the bank and branch as well as the physical address of the bank. |
|
Bank Details |
Bank details based on the IFSC code of the bank. It includes:
|
|
Transfer From |
Source account from which the funds is to be transferred. |
|
Balance |
Net balance in the selected account. |
|
Amount |
Amount to be transferred along with the currency. |
|
View Limits |
Link to view the transaction limits for the user. |
|
Transfer When |
Specify when to transfer funds. The options are:
|
|
Transfer Date |
Date of transfer. This field appears if you select the Later option from the Transfer When list. |
|
Balance |
Net balance in the selected account. |
|
Purpose |
Purpose of transfer. |
|
Note |
Narrative for the transaction. |
- In the Account Type field, select the Domestic option as type of account associated with the payee.
- In the Account Number field, enter the payee’s account number.
- In the Account Name field, enter the payee name.
- In the Pay Via field, select the appropriate network for payment.
- In the IFSC Code field, enter the IFSC /Bank Code or select it from the lookup.
-
Note: Click to fetch bank details based on Bank Code (BIC).
- From the Transfer From account list, select the account from which transfer needs to be done.
- In the Amount field, enter the transfer amount.
- In the Transfer when field, select the appropriate transfer date.
- If you select the Now option, transfer will be done on same day.
OR
If you select Later option in the Transfer when field, select the appropriate future date for transfer. - From the Purpose list, select the appropriate purpose of transfer.
- Click .
OR
Click to cancel the transaction. - The Adhoc Domestic Payment - Reviewscreen appears. Verify the details, and click .
OR
Click , user is directed to Adhoc Domestic Transfer screen with values in editable form.
OR
Click to cancel the transaction and go back to the Dashboard. - The success message appears, along with the reference number, host reference number, status and payment details of the transaction.
Click to go to Dashboard screen.
OR
Click to add the adhoc payee.
OR
Click the e-Receipt link to download the electronic receipt. For more information, click here.
Adhoc Payment - International Fund Transfer
International fund transfer is a transfer of funds to an account which is maintained outside the country and beyond geographical boundaries. User can provide payee details along with the bank account number and a clearing code of destination Bank; and also specify a payment network using which the payment is to be processed. User can view the transaction limits associated with a current transaction. Also an option is provided to search the Swift and NCC while initiating an Adhoc Transfer.
E-Receipt gets generated on successful completion of transaction in the hostCore Banking application. E-Receipt gets displayed in Activity Log detailed view.
To initiate an international fund transfer:
|
Field Name |
Description |
|---|---|
|
Account Type |
Type of account associated with the payee. The type can be:
|
|
Account Number |
Account number of the payee. |
|
Account Name |
Name of the payee in the bank account. |
|
Address Line 1- 2 |
Address of the payee. |
|
City |
City of the payee. |
|
Country |
Country of the payee. |
|
Pay Via |
Network for payment. The options are:
|
|
SWIFT / National clearing code value |
SWIFT code /National Clearing code value. |
|
SWIFT code Look up Below fields appears if the SWIFT Code option is selected in Pay Via field. |
|
|
Lookup Swift Code |
Link to search the SWIFT code. |
|
Swift Code |
The facility to lookup bank details based on SWIFT code. |
|
Bank Name |
The facility to search for the SWIFT code based on the bank name. |
|
Country |
The facility to search for the SWIFT code based on the country. |
|
City |
The facility to search for the SWIFT code based on city. |
|
Swift Lookup - Search Result |
|
|
Bank Name |
Name of the bank. |
|
Address |
Displays complete address of the bank. |
|
SWIFT Code |
Displays the SWIFT code as per search criteria defined. |
|
National clearing code Look up Below fields appears if the National clearing code option is selected in Pay Via field. |
|
|
Lookup National clearing code |
Link to search the National clearing code. |
|
NCC Lookup - Search Result |
|
|
Bank Name |
Name of the bank. |
|
Branch |
Bank branch name. |
|
Address |
Displays complete address of the bank. |
|
NCC Code |
NCC code of the bank branch. |
|
Below fields appears if the Bank Details option is selected in Pay Via field. |
|
|
Bank Name |
Name of the bank. |
|
Bank address |
Complete address of the bank. |
|
Country |
Country of the bank. |
|
City |
City to which the bank belongs. |
|
Transfer From |
Source account from which the funds are to be transferred. |
|
Balance |
Net balance in the selected account. |
|
Amount |
Amount to be transferred along with the currency. |
|
Transfer When |
Specify when to transfer funds. The options are:
|
|
Transfer Date |
Date of transfer. This field appears if you select the Later option from the Transfer When list. |
|
Correspondence Charges |
The party bearing the charges for transaction. The options are:
Note: This field is displayed only for International Payee. |
|
Transfer via Intermediary Bank |
Specify whether the fund transfer is to be done through intermediary bank. Note: This field is displayed only for International Payee. |
|
Pay Via |
Network for payment. The options are:
This field appears if you select Yes option from Transfer via Intermediary Bank field. |
|
SWIFT / National clearing code value |
SWIFT code /National Clearing code value. |
|
SWIFT code Look up Below fields appears if the SWIFT Code option is selected in Pay Via field. |
|
|
Lookup Swift Code |
Link to search the SWIFT code. |
|
SWIFT Code |
SWIFT code value. |
|
Bank Name |
Bank name to search the SWIFT code. |
|
Country |
Country name to search the SWIFT code. |
|
City |
City name to search the SWIFT code. |
|
Swift Lookup - Search Result |
|
|
Bank Name |
Name of the bank. |
|
Address |
Displays complete address of the bank. |
|
SWIFT Code |
SWIFT code /National Clearing code value. |
|
National clearing code Look up Below fields appears if the National clearing code option is selected in Pay Via field. |
|
|
Lookup National clearing code |
Link to search the National clearing code. |
|
NCC Type |
NCC type of the bank branch. |
|
NCC Code |
NCC code of the bank branch. |
|
Bank Name |
Name of the bank. |
|
City |
City to which the bank belongs. |
|
NCC Lookup - Search Result |
|
|
Bank Name |
Name of the bank. |
|
Branch |
Bank branch name. |
|
Address |
Address of the bank. |
|
NCC Code |
NCC code of the bank branch. |
|
Bank Details |
Bank details based on the Swift / National clearing code selected for the bank. |
|
Below fields appears if the Bank Details option is selected in Pay Via field. |
|
|
Bank Name |
Name of the bank. |
|
Bank address |
Complete address of the bank. |
|
Country |
Country of the bank. |
|
City |
City to which the bank belongs. |
|
Payment Details |
Details about the fund transfer. |
|
Add Payment Details |
The link to add more details of the transfer. |
|
Note |
Narrative for the transaction. |
- In the Account Type field, select the International option as type of account associated with the payee.
- In the Account Number field, enter the payee’s account number.
- In the Account Name field, enter the payee name.
- In the Pay Via field, select the appropriate network for payment.
- If you select Swift option:
- In the SWIFT code field, enter the SWIFT code or select it from the lookup.
-
Note: Click to fetch bank details based on Bank Code (BIC).
- If you select National Clearing code option:
- In the National Clearing code field, enter the National Clearing code or select it from the lookup.
-
Note: Click to fetch bank details based on Bank Code (BIC).
- If you select Bank details option:
- In the Bank Name field, enter the bank name.
- In the Bank Address field, enter the complete address of the bank.
- From the Country list, select the country of the bank.
- From the City list, select the city to which the bank belongs.
- From the Transfer From account list, select the account from which transfer needs to be done.
- In the Amount field, enter the transfer amount.
- In the Transfer when field, select the appropriate transfer date.
- If you select the Now option, transfer will be done on same day.
OR
If you select Later option in the Transfer when field, select the appropriate future date for transfer. - From the Correspondence Charges list, select the appropriate correspondence charges applicable.
- In the Transfer via Intermediary Bank field, select the appropriate option.
- If you have selected Yes option in the Transfer via Intermediary Bank field, select the appropriate network for payment in the Pay Via field.
-
- If you select Swift option:
- In the SWIFT code field, enter the SWIFT code or search and select it from the lookup.
- Click to fetch bank details based on Bank Code (BIC).
- If you select National Clearing code option:
- In the National Clearing code field, enter the National Clearing code or search and select it from the lookup.
- Click to fetch bank details based on Bank Code (BIC).
- If you select Bank details option:
- In the Bank Name field, enter the bank name.
- In the Bank Address field, enter the complete address of the bank.
- From the Country list, select the country of the bank.
- From the City list, select the city to which the bank belongs.
- In the Payment Details field, enter the details about the fund transfer.
- Click .
OR
Click to cancel the transaction. - The Adhoc International Transfer – Review screen appears. Verify the details, and click .
OR
Click , user is directed to Adhoc International Transfer screen with values in editable form.
OR
Click to cancel the transaction and go back to the Dashboard. - The success message appears, along with the reference number, host reference number, status, UETR number(Unique End-to-End Transaction Reference), Transfer To, Amount, Account Number, Account Type, Bank Details, Payment Details, Transfer From, Transfer When, Pay Via, Payee Address and Intermediary Bank Details.
Click to go to Dashboard screen.
OR
Click to add the adhoc payee.
OR
Click the e-Receipt link to download the electronic receipt. For more information, click here.
- Click Add as Payee? to add the payee.
The Add Payee screen appears.
|
Field Name |
Description |
|---|---|
|
Payee Name |
Name of the payee for identification. |
|
Account Type |
Type of account associated with the payee. The type can be:
|
|
Account Number |
Account number of the payee. |
|
Account Name |
Name of the payee in the bank account. |
|
Address Line 1- 2 |
Address of the payee. |
|
City |
City of the payee. |
|
Country |
Country of the payee. |
|
Below fields appear for Domestic type of payee. |
|
|
Pay Via |
Network for payment. Domestic Networks are configurable – NEFT / RTGS / IMPS get displayed as per India region configuration. |
|
IFSC /Bank Code |
IFSC /Bank Code. |
|
Bank Details |
Bank details based on the IFSC code of the bank. It includes:
|
|
Below fields appear for International type of payee. |
|
|
Pay Via |
Network for payment. The options are:
|
|
Swift Code/NCC |
Swift /National Clearing Code. |
|
Lookup Swift Code/ National clearing code |
Link to search the Swift Code/ National clearing code. |
|
Bank Details |
Bank details based on the IFSC code of the bank. It includes:
|
|
Nickname |
Nick name to identify the payment destination (account). |
|
Access Type |
The access type for payee. The options are:
|
- In the Payee Name field, enter the name of the payee for identification.
- In the Account Type field, select the appropriate option as type of account.
- In the Account Number field, enter the payee’s account number.
- In the Account Name field, enter the payee name.
- If you select Domestic option from the Account Type list.
- In the Pay Via field, select the appropriate network for payment.
- In the IFSC Codefield, enter the IFSC /Bank Code or select it from the lookup.
- Click to fetch bank details based on Bank Code (BIC).
- If you select International option from the Account Type list.
- In the Pay Via field, select the appropriate network for payment.
- In the Swift Code/ National Clearing Code field, enter the swift code/ National Clearing Code or select it from the lookup.
Click to fetch the details .
OR
Enter the bank details, if you have selected Bank Details as payment network. - In the Nickname field, enter the nickname to identify the payment destination (account).
- Select the appropriate Access Type for payee.
- Click to add a payee.
OR
Click to cancel the transaction. - The Add Payee - Review screen appears. Verify the details, and click Confirm.
OR
Click to navigate back to the previous screen.
OR
Click to cancel the transaction.
- The success message of adding the payee appears along with the reference number, status, account details, bank details and payee address.
Click Go To Dashboard, to navigate to the dashboard.
OR
Click Pay Now to transfer the money instantly.
FAQs
![]() Can I transfer the funds to my loan account which I hold in same bank?
Can I transfer the funds to my loan account which I hold in same bank?
![]() Can I set a future date for a fund transfer?
Can I set a future date for a fund transfer?
![]() What happens if the transaction amount is less than set Transaction Limit?
What happens if the transaction amount is less than set Transaction Limit?
![]() Can I make a payment to an account which is currently not registered as my payee?
Can I make a payment to an account which is currently not registered as my payee?