Adding an Application upon Case Creation
OIPA now includes support of multiple applications per case which removes the restriction where only one application was added per case previously. Add application button will not be disabled after one application is added in the case.
The user shall be able to associate multiple applications to a case via file.
The Central add capability, Unified search and advanced search menu has one more item added in its dropdown as “Application”. The user can now create an application via Central Add and search an application via Unified Search. When the user clicks on "Application" menu in central add dropdown then user is navigated to application creation screen.
The application screen will use the PolicyScreen rule. User can see all the fields configured in PolicyScreen rule on application screen. Application shall capture all the information necessary for underwriting. PolicyScreen rule shall also be overridable at NBU system level.
When the user attempts to navigate away from the 'Orphan application' i.e. the application not associated with any case then a popup message saying "The application is not attached to any case is displayed to the user asking him whether he wishes to associate the application with any case. If user chooses 'yes' then the case search screen shall be displayed allowing user to search for the case to which he wishes to attach the application. If user chooses 'no' then user shall be allowed to navigate away from the application screen.
The application screen will have "Associate with case" button which will be displayed only if the application is not associated to any case. An application will be able to be associated with only one case. “Associate with case" button should be hidden when application is associated with one case.
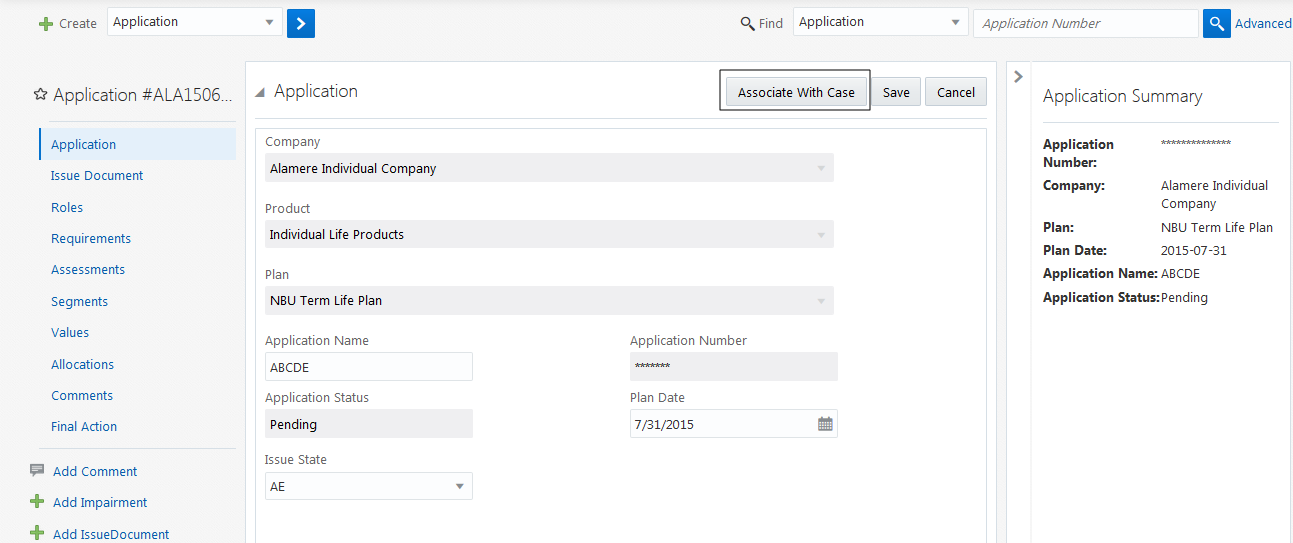
If the application is already associated with a case then on left hand navigation tree of the application shall show "Case" at the top.
Steps to Add an Application
- Once a case is created, a click on the Add Application button, Application creation screen appears.
There are two sections on the Application screen that contain application information — Application and Application Detail. The Application section contains basic application information. - Enter the basic policy details that are mandatory.
- Company is the company the application is associated with. There can be multiple companies or subsidiaries or just one primary company.
- Product is the highest level of coverage which is packaged to include all possible plan offerings, benefit packages, features and ranges.
- Plan is the brand name of the company’s proprietary product.
- Plan Date is the date used to record policy application information.
- Application Number is the unique identifier for the application.
- Application Name is an optional secondary identifier for the application. This helps identify applications during a search.
- Application Status shows an application's current status. This is updated according to the activities applied to the application.
- Issue State is a drop down box that allows an issue state to be associated with an application. If state approval support is available for the plan the policy is assigned to, then the drop down box will only contain states that have approved the plan selected in the Plan field.
- After entering data in all the mandatory fields, click on Save to save the application. All the applicable items in the navigation tree in the left shall now be available to the user.
Note: Existing functionality of application addition via AsFile is still supported.
Updating an Application
As long as an application is in the Pending state, a user may update it. To update any application:
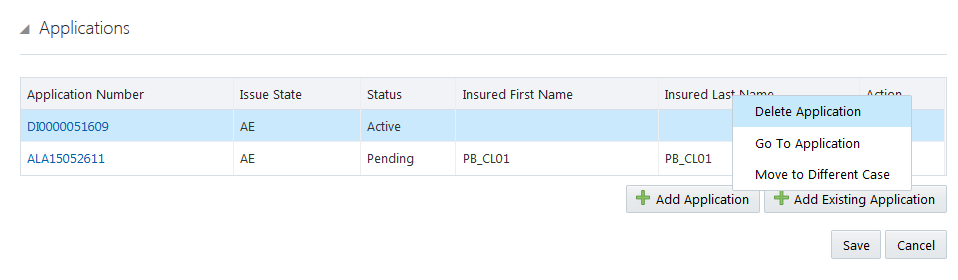
- Perform a unified search for the case to which the application is associated with.
- Select the desired case and scroll down to the Application section.
- From the table of associated applications, select the row of the application to be updated. Hover over the hamburger menu in the Actions column of the table and select Go To Application. You will be presented with the Application screen.
- Edit any field as required.
- Click Save.
Depending upon prior configuration, the Entity Navigation menu to the left of the Application screen may list Roles, Requirements, Assessments (Impairments), Segments, Comments, Final Actions, etc.
Below the Entity Navigation menu you may find the List Options like Add Comment, Add Impairment, Add Requirement, etc. Users may click on these items to add them.