14/279 14/279

Setting Up Locales — Language and Currency

You can configure SimVen to incorporate your preferred language and currency settings, so that it shows throughout the application as well as on the SimVen reports. Locale settings affect many views, chief among them, the System Maintenance view and the Deposits Entry view. SimVen reports also reflect your currency symbol, currency naming conventions, and amount separator characters such as a comma (for thousands), and a decimal point (dot) based on your country’s currency standard.

Creating a New Locale

To add a new Locale:

  1. On the toolbar, click Security, click Security Setup and Edit, and then click the Group Profiles tab. Ensure that you have the Application Locale Settings privilege fully enabled for any group profile that requires the ability to edit Locales.
  2. Log on to SimVen Management, click Setup, click Master Files, and then click Locale Settings.
  3. Enter or select information in the following fields. You can enter a number (greater than 4, leaving the pre-configured Locale IDs as they are), or you can reuse a pre-configured Locale ID number by selecting it, and then clicking the Clear button. Re-enter the number that was cleared, and then enter your own language and currency settings.

    Table 1-1 Locale Settings Fields and Descriptions

    Field Name Description

    ID

    Enter the Locale ID number associated with the Locale.

    Name

    Enter the Locale name.

    Language Code

    Enter the Language Code.

    This setting establishes a Locale’s language and affects several application views and reports. This entry is based on Language Culture Names. For example, enter en-UK for English for the United Kingdom. The Microsoft Table of Language Culture Names, Codes, and ISO Values Method [C++] contains more information about language code values.

    Language Name

    Enter the Language Name associated with the Language Code.

    Currency Symbol

    Enter the currency symbol that appears on SimVen views and reports. It can be a symbol only, a combination of a symbol and alpha characters, or only alpha characters (for example, £, UK £, or Pound Sterling).

    Currency Name

    Enter the name of the Locale’s currency.

    Thousands Separator

    Enter the character that designates the separator used to represent thousands in an amount value.

    Decimal Separator

    Enter the character that designates the separator used to represent decimals in an amount value.

    COINS Setup

    From the COINS Setup section:
    1. Enable a coin’s denomination by selecting the checkbox in the Enabled column.

    2. Enter the coin’s name in the Unit Name column.

    3. Enter a label for rolled coins in the Label As column.

    4. Enter the number of coins contained in a full roll in the Units in Roll column.

    BILLS Setup

    From the BILLS Setup section:
    1. Enable a bill’s denomination by selecting the checkbox in the Enabled column.

    2. Enter the bill’s name in the Unit Name column.

    3. Enter a label for the bill’s denomination in the Label As column.

  4. Click Save.

Using Pre-Configured Application Locale Settings

There are four pre-configured Locales available. If you select one of the pre-configured Locale IDs, the balance of the fields are auto populated with text that reflects that country’s language and typical currency symbol and naming conventions. You can edit most of these fields.
  1. On the toolbar, click Setup, click Master Files, and then select Locale Settings.
  2. Click the ellipsis (...) in the ID field.
  3. Select the pre-configured Locale ID. The four pre-configured Locale IDs are:
    • English Default USA

    • English Australia

    • English Canada

    • English United Kingdom

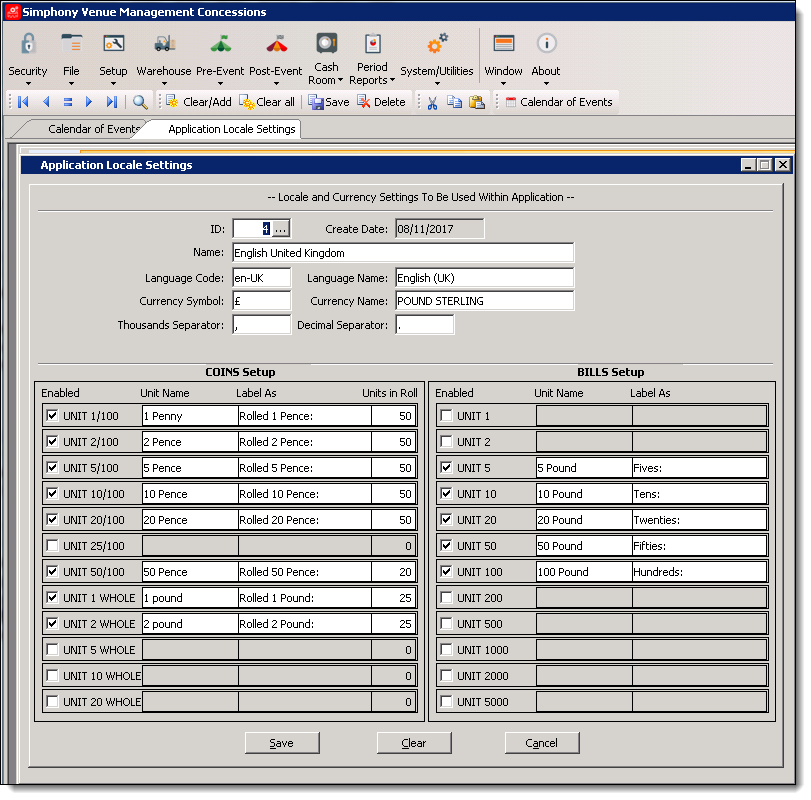
    For example, the following image shows the English United Kingdom default Locale ID:

    Figure 1-5 Application Locale Settings Form


    This figure shows the Application Locale Settings Form.
  4. Review the settings, make any changes, and then click Save.