12Administering and Using Inbox
Administering and Using Inbox
This chapter contains information about the Inbox, how users use the Inbox, and how administrators can make changes to the Inbox types that are already configured. It includes the following topics:
About the Inbox
The goals of the Inbox are to provide users with:
A single screen that shows all approval and notification items assigned to them regardless of the screen where the item originated.
Enough detailed information about the item so that users can act on the item from the Inbox and not have to navigate to other screens for more information.
The following information lists some terminology used in this chapter.
Table Inbox Terminology
| Term | Definition |
|---|---|
Inbox item |
Requests for approval and notification that are delivered to in Inboxes of users. Inbox items refer to other records, or to feature objects in the Siebel database that require review or approval. The term Inbox item is shortened to item in some text in this guide. |
Deactivated Inbox item |
An Inbox item that has been processed or has expired. The item no longer appears in the Inbox Items List view. |
Inbox screen |
A screen in which users can perform the following tasks:
|
Inbox Items List |
A view that displays Inbox items on which the user must act. |
Submitted Items List |
A view that displays deactivated Inbox items that have been submitted by the user. |
Completed Items List |
A view that displays deactivated Inbox items. Typically, the approval process is complete for these items. |
Inbox action |
The action that the user takes on the Inbox item. Typically, this action is approval, rejection, or acknowledgement. |
Inbox type |
A value that determines some characteristics of the Inbox item, such as the actions that can be taken on the item, and the expiration date for the item. |
Destination view |
A view that displays data from the feature object and that you access by drilling down on the Name field. |
Feature object |
The underlying entity that the Inbox record points to; for example, a service request record or, for ESS, a row in the SmartScript session table. When you drill down on the Name field of an item in the Inbox, you see the feature object. |
ESS |
The Siebel Employee Self-Service application. The Inbox is an important feature for this application. When this guide provides ESS-specific information, the information is noted as ESS-specific. |
Universal Inbox |
A term that is an alternative name for the Inbox. |
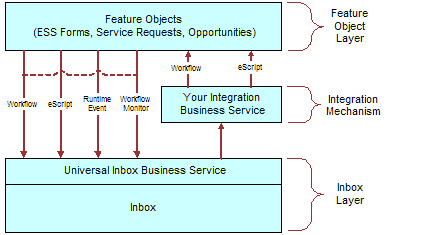
How the Inbox Interacts with the Feature Objects
Inbox items contain references to the feature objects.
Feature objects interact with Inbox items through the methods of the Universal Inbox business service. These methods can be invoked using various mechanisms, for example, run-time events can monitor the business component operations of the feature object.
The Inbox interacts with feature objects through Inbox actions that are defined as part of the Inbox type. Integration business service methods are invoked when the users take action on Inbox items. The following illustrates interaction between feature objects and the Inbox.
About the Universal Inbox Business Service
The Universal Inbox business service is the interface between the underlying feature object and the Inbox items. Universal Inbox business service methods handle creation, update, deactivation, and deletion of Inbox items. For information about the methods in Universal Inbox business service, see Universal Inbox Business Service Methods.
Scenarios for Administering and Using the Inbox
This topic describes how the inbox might be used. You might use the inbox differently, depending on your business model. The examples provided in this topic apply to an approval process. However, similar logic applies to other items such as notification. This topic includes the following scenarios:
Managing Service Requests
An organization has implemented an automated Inbox assignment and escalation policy for service requests. According to this policy, service requests are assigned using the area, and an Inbox item is created to notify the service request owner of each assignment. An Inbox item is also created for the manager of the service request owner. The item is created using the priority of the service request. The Inbox was configured when the Siebel application was initially rolled out, but this recent change in policy requires the administrator to perform some tasks.
The administrator changes the replication-level feature, which is currently set to Regional. The administrator changes the setting so that the Inbox items are downloaded to both regional and local databases.
In addition, the policy has to be implemented in Japanese installations, so the administrator adds the appropriate language translation.
Previous Inbox items have remained in the Inbox for too long, so the administrator reduces the item expiration period.
Finally, the administrator adds a new drill-down destination view for certain users who do not have access to the standard Service Request views.
Approving Personnel Action Forms Requests Captured Using ESS
The Human Resources (HR) manager at a company has outlined new personnel action policies for employees. Management has mandated that personnel change requests be filed electronically. Approvals are required in the following sequence:
A HR representative for the department in which the employee works
The immediate supervisor of the employee
The departmental vice president
This new policy is assigned to a Siebel administrator for implementation.
After using the Employee Self-Service feature to set up and activate the integrated Personnel Action Form (PAF), the administrator designs the approval flows for the business object using Siebel Business Process (Workflow) Administration. Using the Inbox, the administrator creates the required approval type. When a user submits this particular item, the approval type created by the administrator invokes the approval workflow process.
A manager at the company submits a PAF. The form is routed to the human resources representative, then the manager, and finally the vice president. Each approver can reject the form and send it back to the requestor. If approved, then the process flow results in an update of data fields.
Process of Administering the Inbox
To administer the Inbox, perform the following tasks:
This topic includes some of the straightforward changes that the administrator can make to the Inbox types that have already been configured. For detailed information about how to set up and configure Inbox, see Configuring the Inbox
Reviewing All Inbox Items
Administrators can view all the Inbox items. They can also take action on any Inbox item.
This task is a step in Process of Administering the Inbox.
To review all items
Navigate to the Administration - Inbox screen and one of the following views:
All Inbox Items. All items that are in users’ Inbox Items Lists. The administrator sees one record for each owner.
All Completed Items. All items that are in users’ Completed Items Lists. The administrator sees one record for each owner.
All Submitted Items view. All items that are in users’ Submitted Items Lists. The administrator sees one record for each originator.
Navigate to the Detail view to see information about the feature object.
Navigate to the History view to see who owns the item and which owners have taken action on the item.
Deleting Inbox Items
The administrator can delete Inbox items in the All Submitted Items view. When an item is deleted, the item is deleted for all owners and for the user who submitted the item.
This task is a step in Process of Administering the Inbox.
To delete Inbox items
Navigate to the Administration - Inbox screen, then the All Submitted Items view.
Delete Inbox records as required.
Setting Expiration Dates and Due Dates for Inbox Items
Each Inbox item that is created is associated with an Inbox type. Fields in the Inbox type record determine the expiration and due dates for items of that type.
This task is a step in Process of Administering the Inbox.
To change how item expiration and due dates are set for Inbox items of a type
Navigate to the Administration - Inbox screen, then the All Inbox Types view.
In the Inbox Types list, select a record, and edit the fields in the following table.
Field Comments Default Queue Duration (Days)
Type a value that represents the number of days for the default queue duration. This field determines the due date for the item. When the item has been in the Inbox of the owner for more than this number of days, the Past Due check box appears selected.
Item Expiration Duration (Days)
Type a value that represents the number of days for the item time expiration. This field determines the expiration date for the item. This field appears in the Submitted Items List view. By default, no action is taken when an item expires.
Changing the Destination View for an Inbox Type
If the Inbox item is set up to access a particular view by drilling down on the Name field, then you can change this destination view or add a new destination view. For example, if some users do not have responsibilities to see the current destination view, then you can add a destination view that they can see.
Multiple views can be associated with one Item type. Each view is assigned a sequence number. When users drill down on an Inbox item, the view that appears is the first view in the sequence that they have access to. Their responsibilities determine this view.
This task is a step in Process of Administering the Inbox.
Changing Inbox Downloading to Remote Databases
Inbox items can be set to download to regional and local databases. If your Inbox type is currently configured to download to remote databases, then you can change this setting.
This task is a step in Process of Administering the Inbox.
To change remote downloading for an Inbox type
Navigate to the Administration - Inbox screen, then the All Inbox Types view.
Select the Inbox type.
In the More Info form, edit the Replication Level.
Values include:
All. Downloads the Inbox items to the regional and local databases.
Regional. Downloads the Inbox items to the regional databases only.
None. Does not download items to the remote databases.
Note: If the Replication Level is currently set to None, then before you change the Replication Level, see Configuring the Inbox for Use with Remote Databases.
Adding Inbox Translations
If you have a multilingual Siebel application, and the Inbox is not currently supporting all languages, then you can use the Translations view to extend language support.
Create a translation record for each language supported in your multilingual application.
This task is a step in Process of Administering the Inbox.
To set up an Inbox translation
Navigate to the Administration - Inbox screen, then the All Inbox Types view.
Select the Inbox item, and navigate to the Translations view.
In the Translations list, create a new record, and complete the necessary fields.
Some fields are described in the following table.
Field Comments Display Name
Type the display name for the translation of the Inbox Type name.
Process of Using the Inbox
To use the Inbox, perform the following tasks:
Taking Action on Inbox Items
Users can take action on items that are sent to them for approval. The most typical actions are to approve, reject, and acknowledge items. The actions available to the user are determined by the Inbox type of the item.
This task is a step in Process of Using the Inbox.
To approve or reject an Inbox item
Navigate to the Inbox screen, then the Inbox Items List view.
From the visibility filter, select My Inbox Items or My Team’s Inbox Items.
In the Inbox Items list, select the item that you want to approve or reject.
Note: You can drill down on the Name field to review the feature object.In the Action field, select the appropriate action, for example, Approved.
(Optional) In the Comments field, enter a brief explanation.
When the record is saved, the business service and method defined in the Inbox type for the action are triggered.
Reviewing Completed Items
The History view lets users track the progress of the items through each stage of the approval process. For example, managers can review the approval decision and comments made by each approver.
This task is a step in Process of Using the Inbox.
To review items that have been previously approved
Navigate to the Inbox screen, then the Completed Items List view.
From the visibility filter, select My Completed Items or My Team’s Completed Items.
In the Completed Items List, select the item that you want to review.
Drill down on the Name field to review the feature object.
Reviewing Submitted Items
Users can review the Inbox items that they have submitted. They can check the progress of an item, for example, to see who has approved the item and who has not.
This task is a step in Process of Using the Inbox.
To review submitted items
Navigate to the Inbox screen, then the Submitted Items List view.
From the visibility filter, select My Submitted Items or My Team’s Submitted Items.
Review the Inbox items that you, or your team, have submitted.