28Global Accounts
Global Accounts
This chapter describes the administration and management tasks associated with Siebel Global Accounts. It includes the following topics:
About Global Accounts
Siebel Global Accounts is a module that provides sales professionals with global account-level visibility into the interactions that the company’s sales organization and partner’s sales organizations have had with the account. Users can view all accounts, opportunities, activities, contacts, and account team members across the account hierarchy on one screen, allowing sales professionals to build a deep understanding of target accounts.
Global Account hierarchies are not provided preconfigured with your Siebel application. They must be set up by an administrator. The administrators can set up the following kinds of account hierarchies:
Default. This type of account hierarchy is based solely on the accounts’ Parent fields. This account hierarchy is self-maintaining in that when the Parent field of any account is updated, the default hierarchy is also updated. After set up, the default hierarchy is applied to all organizations that do not already have an organization.
Custom. This type of hierarchy is created by the administrator, either by modifying the default hierarchy or from the beginning. After set up, this hierarchy is independent of the accounts’ Parent fields, and must be updated by the administrator when changes occur.
Scenario for Using and Administering Global Accounts
This topic gives one example of how global accounts might be used. You might use global accounts differently, depending on your business model.
A midsized company, Corp 123, wants to view consolidated data at the global account level. This company has a sales organization and a financial organization set up in its Siebel application. The accounts administrator sets up two account hierarchies, one hierarchy for each organization. These hierarchies allow users to view the opportunities and contact information associated with parent accounts.
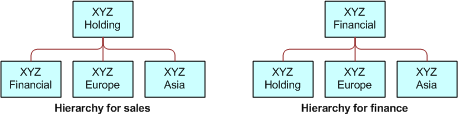
The sales organization uses the default hierarchy, which is based on the Parent account field. For various reasons, the financial organization requires a modified version of the account hierarchy. One of these reasons is that some accounts’ billing structures are different from the accounts’ purchasing structures. For example, in the case of XYZ Inc., the following four XYZ accounts are customers of Corp 123: the XYZ Holding company, two regional subsidiaries, and a financial company. The 123 sales organization wants to view the account hierarchy where all accounts report to the parent holding company. Because all account billing for the XYZ companies is funneled through XYZ Financial, Corp 123’s financial organization wants to view the account hierarchy where all accounts report to the XYZ Financial. The following figure shows the two hierarchies.
The default hierarchy used by the sales organization automatically updates when new accounts are added or Parent fields are changed. However, the accounts’ administrator updates the finance hierarchy on a weekly basis as new accounts are added and the structure of existing accounts changes.
The global accounts manager wants to review all opportunities at Corp 123. The global accounts manager navigates to the Accounts screen, and then the Global Accounts view. In this view, the manager can see the opportunities for Corp 123.
The global accounts manager can use the Enterprise Selling process (ESP) module to develop global account strategies. For information about how to use ESP with global accounts, see Enterprise Selling Process.
Process of Using and Administering Global Accounts
To use and administer global accounts, perform the following tasks:
Generating a Default Hierarchy
Follow this procedure to set up a default hierarchy. After generated, this default hierarchy is automatically assigned to organizations without an account hierarchy. To change the account hierarchy assigned to an organization, see Assigning a Custom Hierarchy to an Organization.
This task is a step in Process of Using and Administering Global Accounts.
To create a default hierarchy
Navigate to the Accounts screen, then the Global Accounts Administration view.
In the Account Hierarchy list, click Generate Hierarchy.
Tip: If the generated hierarchy does not appear in the Account Relationships lists, then refresh the view by navigating to a different view and then returning to the Global Accounts view.A new account hierarchy is created. You can see error log data after you click Generate Hierarchy if an administrator configures this error log file. For more information, see Configuring Error Log Files for Hierarchy Changes.
Some fields are described in the following table.
Field Comments Name
Displays the default name from your user ID and the date.
Default
Select the check box to indicate that the account hierarchy is the default. The default hierarchy is assigned to all organizations without an account hierarchy and is updated when new Parent fields on the account records are added or modified.
In the Account Relationships list, review the hierarchy records.
Note: If users are using the Siebel application when you generate the account hierarchy, then they must log off and log on again to see the default account hierarchy in the rollup views
Adding the Generate Hierarchy Business Service to a Batch Workflow Policy
Complete the following procedure to add the Generate Hierarchy business service to a batch workflow policy.
To add the Generate Hierarchy business service to a batch workflow policy
In Siebel Tools, create a workflow policy.
Configure the workflow policy to call the Generate Hierarchy business service.
Use the Workflow Process simulator to test that the workflow process works correctly.
Set the status of the workflow process to Active in the Workflow Deployment View.
For information about how to create and configure a workflow policy, use the Workflow Process Simulator, and set the status of a workflow process, see Siebel Business Process Framework: Workflow Guide.
Note: If you create the business service in Siebel Tools then deliver it through the workspace delivery process as part of developer workspace. This publishes the business service and creates the equivalent runtime definition. Next, use the migration application to move the respective version of workspace from the integration workspace or the main workspace.Execute the workflow policy as a batch component in the Siebel application, as follows:
Navigate to the Administration - Server Management screen, then the Jobs view.
In the Jobs view, create a new job with a Component/Job value of Workflow Process Manager.
In the Job Parameters list, add a parameter for the new job with the details in the following table.
Field Comments Name
Select a value of Workflow Process Name.
Value
Type the name of the workflow policy you created in Step 1.
In the Job Detail form, select the time and date when you want the job to start in the Scheduled Start field.
In the Jobs view, click Submit Job.
The job automatically starts at the scheduled time, and a Task ID is generated for the job.
To track the execution of the task, select the job with the Task ID that you want to track in the Jobs view, and navigate to the Tasks view.
You can view the details of the task in the Tasks view and in additional views for the Tasks view.
Enabling Users to Add Accounts with No Parent to the Default Hierarchy
If your users must add accounts that have no parent account to the default hierarchy, then follow this procedure.
To enable users to add accounts with no parent account to the default hierarchy
In Siebel Tools, select the Dynamic Hierarchy Direct Relationship business component.
Set the value of the DynHierarchy LoadAllAccounts user property to Y.
Select the Account business component, then select the Parent Account Id field.
Set the value of the ForceActive property for the Parent Account Id field to TRUE.
Deliver your changes to the Siebel runtime repository.
Creating a Custom Hierarchy
You can create a custom hierarchy by starting from the beginning and creating a series of new records in the Account Relationships list or by generating a hierarchy. For more information, see Generating a Default Hierarchy.
This task is a step in Process of Using and Administering Global Accounts.
To create a custom hierarchy
Navigate to the Accounts screen, then the Global Accounts Administration view.
In the Account hierarchy list, create a new record, and complete the necessary fields.
Do not check the Default field.
In the Account Relationships list:
Create new records for each of the highest level parent accounts.
Leave the Parent Account field blank for each of these records.
- Create new records for the child accounts, entering values in the Parent Account field for each record.
Creating a Custom Hierarchy Based on the Default Hierarchy
Complete the following procedure to create a custom hierarchy that is based on the default hierarchy.
To create a custom hierarchy based on the default hierarchy
Create an account hierarchy.
For more information, see Generating a Default Hierarchy.
Select the account hierarchy record, and make sure that the Default field is not selected.
In the Account Relationships list, edit the Parent Account field for existing accounts, and create new relationship records as required.
Accounts without parent accounts are at the start of the hierarchy and must be entered before their child records can be completed.
Assigning a Custom Hierarchy to an Organization
An organization uses the default hierarchy unless a custom hierarchy has been assigned to it.
This task is a step in Process of Using and Administering Global Accounts.
To assign a custom hierarchy to an organization
Navigate to the Administration - Group screen, then the Organizations view.
Select the organization with the account hierarchy that you want to change.
In the form in the lower part of the screen, in the Account Hierarchy field, select the custom hierarchy that you want the organization to use when viewing global accounts.
Updating a Custom Hierarchy
Custom hierarchies are static and must be updated by the administrator. Update an account hierarchy in the following ways:
Edit the account relationships in the current hierarchy.
Update the hierarchy to the default (parent account) hierarchy, and then edit the account relationships in the hierarchy.
This task is a step in Process of Using and Administering Global Accounts.
To update a custom hierarchy
Navigate to the Accounts screen, then the Global Accounts Administration view.
Select the account hierarchy record.
Perform one of the following steps:
In the Account Relationships list, edit the Parent Account fields for existing accounts, and create new relationship records as required.
In the Account Hierarchy list, click Update Hierarchy to return the hierarchy to the default, and in the Account Relationships list, edit the Parent Account fields for existing accounts, and create new relationship records as required.
You can see error log data after you click Update Hierarchy if an administrator configures this error log file. For more information, see Configuring Error Log Files for Hierarchy Changes.
Adding the Hierarchy Update Business Service to a Batch Workflow Policy
Complete the following procedure to add the Hierarchy Update business service to a batch workflow policy.
To add the Hierarchy Update business service to a batch workflow policy
In Siebel Tools, create a workflow policy.
Configure the workflow policy to call the Update Hierarchy business service.
Use the Workflow Process simulator to test that the workflow process functions correctly.
Set the status of the workflow process to Active in Workflow Deployment View.
For information about how to create and configure a workflow policy, use the Workflow Process Simulator, and set the status of a workflow process, see Siebel Business Process Framework: Workflow Guide.
Note: If you create the business service in Siebel Tools, and compile the business service into the SRF file, then make sure that you copy the SRF file to theobjects\langdirectory.Execute the workflow policy as a batch component in the Siebel application, as follows:
Navigate to the Administration - Server Management screen, then the Jobs view.
In the Jobs view, create a new job with a Component/Job value of Workflow Process Manager.
In the Job Parameters list, add a parameter for the new job with the details in the following table.
Field Comments Name
Select the value Workflow Process Name.
Value
Type the name of the workflow policy you created in Step 1.
In the Job Detail form, select the time and date when you want the job to start in the Scheduled Start field.
In the Jobs view, click Submit Job.
The job automatically starts at the scheduled time, and a Task ID is generated for the job.
To track the execution of the task, select the job with the Task ID that you want to track in the Jobs view, and navigate to the Tasks view.
You can view the details of the task in the Tasks view and in additional views for the Tasks view.
Updating a Custom Hierarchy by Processing Deleted Records
When you perform the update hierarchy procedure, the records that are deleted using Enterprise Integration Manager (EIM) are not processed. This procedure results in some records not having a parent record. To delete these records, update the custom hierarchy by processing the deleted records.
The Update Hierarchy function uses the new entries in the relationship table S_DYN_HRCHY_REL to update only the denormalized table S_DYNHR_RPT_REL. This function does not affect the user interface; the function affects only the data processing.
Before updating the hierarchy with deleted records, configure the Update with Deletion button in Siebel Tools. For information about configuring a button control, see Configuring Siebel Business Applications.
This task is a step in Process of Using and Administering Global Accounts.
To configure the Update with Deletion button
In Siebel Tools, click Applet in the Object Explorer, select Dynamic Hierarchy Admin List Applet, and then lock the object so that you can change it.
In the Object Explorer, navigate to the Applet, then create a control with the following properties:
Name = Update Hierarchy With Deletion Button
Caption = Update Hierarchy With Deletion
HTML Type = MiniButton
Method Invoked = UpdateHierarchyWithDeletion
Right-click the applet and select Edit Web Layout.
The Web Layout Editor displays.
Change the template mode in the Controls/Columns window to Edit List.
Note: The Controls/Columns window displays the available controls; including the one you created in Step 2.Relocate the new button control onto an available location. When you release the mouse, the button displays.
Click Save and then close the Web Layout Editor.
Deliver your changes to the Siebel runtime repository.
Unlock the object.
To view the new object in Siebel CRM, navigate to Accounts, then the Global Accounts Administration view.
Updating a Custom Hierarchy
Complete the following procedure to update a custom hierarchy.
To update a custom hierarchy
Navigate to the Accounts screen, then the Global Accounts Administration view.
Select the account relationships record that you want to update.
Click Update Hierarchy with Deletion.
You can see error log data after you click Update Hierarchy with Deletion if an administrator configures this error log file. For more information, see Configuring Error Log Files for Hierarchy Changes.
Configuring Error Log Files for Hierarchy Changes
A user can see error log data after clicking the Generate Hierarchy button, the Update Hierarchy button, and the Update Hierarchy with Deletion button if an administrator configures error log files for these hierarchy changes.
This task is a step in Process of Using and Administering Global Accounts.
To configure error log files for hierarchy changes
Navigate to the Administration - Server Configuration screen, then Servers view.
In the Components view, select the Sales Object Manager (ENU) component.
In the Events view, change the Log Level field to 5 for the following Event Type records:
Generate Hierarchy Event Logging
Update Hierarchy Event Logging
Update Hierarchy With Deletion Event Logging
Adding Business Objects to the Global Accounts Hierarchy View
Users often want additional business objects to appear in the hierarchy. The business objects, such as forecasts, revenues, and service requests, already exist. Administrators must configure these business objects for the hierarchy using Siebel Tools. Users then change their preferences to view the objects in their hierarchies.
This task is a step in Process of Using and Administering Global Accounts.
To add a new node to the hierarchy tree
Navigate to the Administration - Data screen, then the List of Values view.
Query for records in which the Type field is GLOBACC_USERPREF.
Create a new record with the field values in the following table.
Field Value Type
GLOBACC_USERPREF
Display Value
The name of the object (for example, Forecasts or Revenues)
Language Name
The language of the object in the tree
Note: You can verify that you correctly added the new node by navigating to the User Preferences screen, then Global Accounts view. The new node must appear in the list of global account tree objects.
Configuring the Tree Node
Complete the following procedure to configure the tree node.
To configure the tree node
In Siebel Tools, navigate to Business Component in the Object Explorer, select the business component for the node that you want to add to the tree, lock the project for that business component, and then copy and rename that business component.
For example, copy the Service Request business component and rename the copied business component Global Account Service Request.
Configure the join, field, and user properties records for the new business component by completing the following steps:
Navigate to Business Component, then Join:
Add a join record with an Alias field of DynHierarchy Visibility Position and a Table field of S_ACCNT_POSTN. Select the Outer Join Flag for the new record.
Add a join record with an Alias field of DynHierarchy Visibility Organization and a Table field of S_ORG_BU. Select the Outer Join Flag field the new record.
Navigate to Business Component, then Field:
Add a field record with a Name field of Dynamic Hierarchy ID, a Join field of S_DYNHR_RPT_REL, and a Column field of DYN_HRCHY_ID.
Add a field record with a Name field of DynHierarchy Visibility Position ID, a Join field of DynHierarchy Visibility Position, and a Column field of POSITION_ID.
Add a field record with a Name field of DynHierarchy Visibility Organization ID, a Join field of DynHierarchy Visibility Organization, and a Column field of BU_ID.
Navigate to Business Component, then Business Component User Prop:
Add a user property record with a Name field of DynHierarchy Hierarchy ID Field and a Value field of DynHierarchy Hierarchy ID.
Add a user property record with a Name field of DynHierarchy Visibility Position ID Field and a Value field of DynHierarchy Visibility Position ID.
Add a user property record with a Name field of DynHierarchy Visibility Organization ID Field and a Value field of DynHierarchy Visibility Organization ID.
Note: You can model the join, field, and user properties records of the new business component after comparable records in the Global Account Opportunity business component.Navigate to Link, select the Global Account/Opportunity link, lock the project for that link, and then copy and rename that link 3 times as follows:
For the first copy, change the Name field to Global Account/name of the business component that you copied in Step 1, and select this business component name in the Child Business Component field.
For example, change the Name field to Global Account/Service Request, and select Service Request in the Child Business Component field.
For the second copy, change the Name field to Global Account/the name of the business component that you created in Step 1 (Hierarchy Denorm), and select this business component in the Child Business Component field.
For example, change the Name field to Global Account/Global Account Service Request (Hierarch Denorm), and select Global Account Service Request in the Child Business Component field.
For the third copy, change the Name field to Global Account/the name of the business component that you created in Step 1, and select this business component name in the Child Business Component field.
For example, change the Name field to Global Account/Global Account Service Request, and select Global Account Service Request in the Child Business Component field.
Navigate to Business Object, select the Global Account Hierarchy business object, navigate to Business Object, then Business Object Component:
Add a business object component record with a Bus Comp field of the name of the business component that you copied in Step 1 and a Link field of the link that you created in Step 3 part a.
For example, add a business component record with a Bus Comp field of Service Request and a Link field of Global Account/Service Request.
Add a business object component record with a Bus Comp field of the name of the business component that you created in Step 1 and a Link field of the link that you created in part Step 3 part b.
For example, add a business component record with a Bus Comp field of Global Account Service Request and a Link field of Global Account/Global Account Service Request (Hierarchy Denorm).
Create in UI objects, such as applets, views, and screen views, and then add those objects to the Siebel application.
For more information, see Configuring Siebel Business Applications.
Navigate to Applet, select the Global Accounts Hierarchy Tree Applet, navigate to Applet, Tree, and then Tree Node, select the Opportunity Node, and then copy and rename that node.
For example, rename the copied node Service Requests Node.
Configure the new node:
In the Applet field, select the list applet for the name of the business component that you created in Step 1.
In the Business Component field, select the name of the business component that you created in Step 1.
In the Display Name field, change the display name for the node.
Note: The display name must be the same as the LOV name for the node.In the HTML Closed Bitmap field and the HTML Open Bitmap field, select the appropriate values.
In the Label Field field, select a label for the node.
- In the Position field, enter the next available position for the node.
Deliver your changes to the Siebel runtime repository.
Unlock the objects.
Verifying the New Node
Complete the following procedure to verify the new node.
To verify the new node
Navigate to the User Preferences screen, then the Global Accounts view.
If necessary, deselect the Hide column for the new object.
Navigate to the Accounts screen, then the Global Accounts Hierarchy view to see the new tree node.
Viewing Global Accounts (End User)
Available as an option, Global Accounts allow users to see (but not change) opportunities, activities, contacts, and account team information for an account and its subsidiary accounts.
Global Accounts consist of a parent account, the child accounts, the child accounts’ children, and so on. These hierarchies are determined in one of the following ways:
Hierarchies are determined by the value in the parent field on the Account Record.
Hierarchies are determined by the administrator who creates custom hierarchies.
Global Accounts are created and maintained by the administrator. If an account has no child account or the administrator has not defined a hierarchy for an account, then a message appears advising you that the selected record is not included as part of your defined hierarchy. For more information about how global-account hierarchies are created, see Creating a Custom Hierarchy.
This task is a step in Process of Using and Administering Global Accounts.
To view global accounts information
Navigate to the Accounts screen, then the Global Accounts Hierarchy List view.
From the visibility filter, select My Global Accounts.
Other visibility filter options include All Global Accounts, and All Global Accounts Across Organizations.
Following the listing of the global accounts, the explorer in the first section shows the hierarchy of the account, subaccounts, contacts, opportunities, activities, and account team, and the list in the second section shows the associated records.
Note: Navigate to the User Preferences screen, then the Global Accounts view, to hide objects or make visible additional objects, such as service requests, quotes, orders, and assets.
Accounts in the Global Accounts Hierarchy List View
Different accounts appear in the Global Accounts Hierarchy List view because Siebel Business Applications use different SQL code to generate the Global Accounts Hierarchy List view, depending on whether you define a hierarchy.
If you define a global account hierarchy, then the Global Accounts Hierarchy List view displays that hierarchy. If you define a hierarchy and use EIM to import records, then the accounts do not appear in the Global Accounts Hierarchy List view unless you update the global account hierarchy. To update the global account hierarchy, select the account hierarchy record, then click Update Hierarchy.
If you do not define a global accounts hierarchy, then the Global Accounts Hierarchy List view uses the Parent fields of the accounts to display the account hierarchy. If you do not define a hierarchy and use EIM to import records, then the Global Accounts Hierarchy List view uses the Parent fields of the accounts to display the accounts.