4Setting Up Clinical Trials
Setting Up Clinical Trials
This chapter describes how to set up a clinical program, protocol, region, and site in Siebel Clinical. It includes the following topics:
About Setting Up Clinical Trials
This chapter describes the main steps to carry out a clinical trial using Siebel Clinical. Following the procedures in this chapter you can:
Create a clinical program and clinical protocols.
Set up document tracking at the protocol, region, and site levels, and for accounts and contacts.
Set up and revise subject visit templates for a protocol.
Enter data on accounts, sites, and contacts.
Screen and enroll subjects.
View charts showing subject status and subject enrollment rates.
Review payments to the protocol.
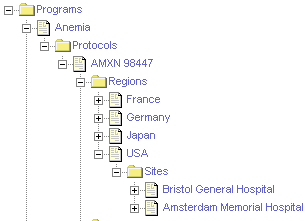
The following illustrates the important hierarchical relationship of programs, protocols, regions, and sites. In this example, the Bristol General Hospital in the USA region is participating in the AMXN 98447 protocol, which is part of the Anemia program.
Scenario for Clinical Trials
This topic gives one example of how clinical trials might be used. You might use clinical trials differently, depending on your business model.
The clinical director and the study manager, working for a CRO (clinical research organization), or pharmaceutical, biotech, or medical device company, have administrator responsibilities in Siebel Clinical to:
Set up a new program for the treatment study.
Create one or more protocols designed to assess the safety and efficacy of certain compounds in the treatment of the disease.
Set up the geographic regions where you carry out the protocols.
Compile a list of documents that are critical to the study and implement tracking at the protocol, region, and site levels, and for accounts and contacts.
Create a subject visit template to facilitate consistent application of the protocol across sites and subjects. End users can use this template to set up subject visit schedules and activities according to the guidelines laid out in the protocol.
After the program, protocol, and subject visit templates are set up, the CRAs (clinical research associates) who are the end users of the Siebel Clinical product do the following:
Enter data about the:
Sites where you carry out the protocols.
Members to assign to the teams at the site, region, and protocol levels.
Accounts or institutions, such as hospitals and clinics where the studies are conducted.
Contacts or site personnel, such as investigators, site coordinators, and nurse practitioners who carry out the protocols.
Recruited subjects for the clinical trial.
Screen and enroll subjects and, if necessary, rescreen the subjects.
Use the subject visit template to set up detailed schedules for the subject visits to the sites.
Track required documents at the protocol, region, or site level, or for accounts or contacts.
Note: Site personnel can use Siebel Site Portal to enter subject data and set up screening and enrollment schedules for subject visits. For more information about Siebel Site Portal, see Siebel Life Sciences Portals Guide.
After subjects are enrolled in the trial, the clinical director, study manager, or CRAs can use the charting features of Siebel Clinical to review the progress of the trial. Two informative metrics are the subject status and subject enrollment rate. These metrics are plotted for an individual site, for a region, and for a protocol.
Process of Managing Clinical Trials
This topic details sample tasks that administrators and end users often perform when managing clinical trials. Your company might follow a different process according to its business requirements.
Perform the tasks in this topic in the order presented. For example, a protocol must exist before you can create its subject visit template.
Administrator Procedures
The following list shows the tasks administrators typically perform to manage a clinical trial:
End-User Procedures
The following list shows the tasks CRAs (clinical research associates) typically perform at the site level to manage a clinical trial:
Creating Clinical Programs
The clinical program is the highest-level initiative in Siebel Clinical. You associate protocols, regions, sites, and subjects with a program.
You can associate multiple regulatory applications with a program. You create these application records. Before you can create an application record, you must define the product that is associated with the application. For more information about defining products, see Siebel Life Sciences Guide.
This task is a step in Process of Managing Clinical Trials.
To create a clinical program
Navigate to the Administration - Clinical screen, then the Program List view.
In the Program list, create a new record and complete the necessary fields.
Some fields are described in the following table.Field
Comments
Program
Type the name of the clinical program.
Mechanism
Select the partners associated with the clinical program.
Application
Select a record containing details of the application for the clinical program. If necessary, create an application record. This record contains values for the following fields:
Number. The number assigned to the application when it is submitted to the regulatory agency, for example the (A)NDA or IND number.
Type. The type of application, such as CTN, IND, or CTX.
Sub-Type. The application filer, for example, a company or an investigator.
Filed. Whether the application is filed with the specified regulatory agency.
Product. The applicable product for the application. You must complete this field before you can create a protocol for the program.
Indication. The clinical indication for the application.
(Optional) Drill down on the Program field of the new record and associate files with the clinical program.
Setting Up Clinical Protocols
You can associate multiple protocols with a program. When you create a protocol record, you can also add extra information about the protocol, such as financial information, central laboratory information, and so on.
This task is a step in Process of Managing Clinical Trials.
To set up a clinical protocol
Navigate to the Administration - Clinical screen, then the Protocol List view.
In the Protocol list, create a new record and complete the necessary fields.
Some fields are described in the following table.
Field
Comments
Protocol #
Type an identifying number for the protocol.
Title
Type a descriptive title for the protocol.
Status
Select the status of the protocol, such as Planned, In Progress, or Completed.
Program
Select the name of the program for the clinical trial.
Product
Select the product for the clinical trial. You can select only the products that are associated with the clinical program, through the Application field in the Program List view, in the Clinical Product and Indication dialog box. For more information about creating a clinical program, see Creating Clinical Programs.
Phase
Select the phase of clinical trial, such as Phase I, II, or III.
Objective
Type the objective for the clinical trial.
Sponsor
Select the clinical trial sponsor.
Design
Select the type of study.
Regions Required
Select this field to indicate the sites for this protocol must belong to a region. For information about regions, see Setting Up Clinical Regions.
When you select this field, you cannot create sites directly under protocols. You must create regions first, and then create sites that are associated with regions.
Type
Select the purpose of the protocol.
Team
Select the team members who need access to the protocol, such as the study manager and others who monitor the clinical trial. For more information, see Step 3.
Approval Date
Select the date that the regulatory authority approves the protocol.
Currency Code
Select the currency that is used to display the payments, costs, and budgets for the protocol. The default value is USD (United States dollars).
Note: You must specify the currency code for the protocol.Planned Start Date
Select the planned start date for the study.
Exchange Date
Select the date that determines the exchange rate of the currency. By default, the exchange date for the protocol is the date that you create the protocol.
Planned End Date
Select the planned end date for the study.
Withholding Amount
Type the amount to withhold from each of the payments to the investigators until the trial is complete. You can overwrite this value at the region and site levels.
Actual Start Date
Select the date that the study begins.
# Planned Sites
Type the number of planned sites for the protocol.
# Planned Subjects
Type the number of planned subjects for the protocol.
Withholding %
Type the percentage to withhold from each of the payments to the investigators until the trial is complete. You can overwrite this value at the region and site levels.
Actual End Date
Select the date that the study concludes.
To add team members to the protocol, click the select button in the Team field to open the Team dialog box, and complete the following steps:
Move the record for an available team member to the list of selected team members.
Click Position Rolldown.
Multi-selected team members are added to the protocol as well as to all regions and sites belonging to the protocol.
Click OK.
Each time a member is added to the team of a protocol, a tracking record is created in the Team History view with a proper start date for this tracking record. For more information, see Automatically Assigning Team Members to a Protocol Using the Position Rolldown Button.
If you remove a member from the team of a protocol, then the end date of this record is automatically populated. For more information, see About Removing Team Members From the Team of a Protocol.
Drill down on the protocol number field, and navigate to the More Info view to add more information.
Some fields are described in the following table.
Field
Comments
Central Lab
Select the name of the laboratory associated with the study. You create this name in the Accounts screen.
CRO
Select the name of the clinical research organization that sponsors the trial. You create this name in the Accounts screen.
Navigate to the Team History view to view the details of the team member that is automatically added to the protocol in a previous step.
From the Team History view you can administer and track team members who work on the protocol. This view also provides details about the role as well as the start and end dates. To administer and track the history of team members who work on a protocol and to determine their role, see Tracking and Revising Team Assignment History.
Tracking and Revising Team Assignment History
A typical clinical trial can span many months to years and often requires changes of study members. Rules and regulations require clinical organizations to keep records of study team assignments and to promote tight access controls so that only people who are assigned roles and responsibilities for a trial have the proper access to trial data.
When a person is no longer part of the clinical trial team, all access rights to the trial data cease. When necessary, the study manager can also manually create a tracking record independent of the team assignment. Similar functionality applies to region team and site team assignment. The Team History view allows you to administer and track team members who work on the protocol, region, or site. This view also provides details about the role as well as the start and end dates.
This task is a step in Process of Managing Clinical Trials.
To revise team assignment history
Navigate to the Administration - Clinical screen, then the Protocol List view.
In the Protocol list, drill down on the protocol number field of the protocol for which you want to create a new team assignment history.
Navigate to the Team History view.
In the History list, create a new record and complete the necessary fields.
Some fields are described in the following table.
Field
Comments
Role
Select the value that best describes the member’s role.
Start Date
Select the start date and time for the team member. If you add a member from the team of a protocol (either manually or by using the Position Rollup mechanism), then the start date is populated with the system date, and the end date is blank.
End Date
Select the end date and time for the team member. If you remove a member from the team of a protocol (either manually or through reverse of Position Rollup mechanism), then the end date is populated with the system date. The system date overrides the date that exists in the End Date field if the record is not read-only.
Lock Record
Select this field to make the record read-only and to make the End Date field a required field.
Automatically Assigning Team Members to a Protocol Using the Position Rolldown Button
When you add a team member to a protocol, click the Position Rolldown button to add the member to all regions and all sites under the protocol. You can add a member to the team only once.
When you click the Position Rolldown button to add a member to the team of a protocol, a record is created, where applicable, in each of the Team History views for all regions and all sites belonging to the protocol. The Position Rolldown mechanism automates the addition of team members to the Team History view for sites and the Team History view for regions as if they are manually added.
About Removing Team Members From the Team of a Protocol
When you remove a team member from the protocol, the team member is removed from either the protocol, or from all protocols, regions and sites belonging to the protocol.
When you remove a member from the team of a protocol (either manually or through Position Rollup or Position Rolldown), the End Date field of the team member’s record, if present, is updated with the system date. However, if the record is read-only, then the initial value in the End Date field is not updated. The Position Rolldown mechanism automates the update of the End Date field of the assignment records as if they are manually removed from the team of the sites and regions.
Creating and Revising Versions for Clinical Protocols
You can track and manage protocol versions using Siebel Clinical. The study manager can create a tracking record for the original protocol and for each subsequent version.
This task is a step in Process of Managing Clinical Trials.
To create a version for a clinical protocol
Navigate to the Administration - Clinical screen, then the Protocol List view.
In the Protocol list, drill down on the protocol number field of the protocol for which you want to create a new protocol version.
Navigate to the Protocol Versions view.
In the Protocol Versions list, create a new record and complete the necessary fields.
Some fields are described in the following table.
Field
Comments
Original Version
Select this field if this version is the first version of the protocol. If this field is checked, then the Amendment Version field is read-only.
Amendment Version
Select the version number of the protocol version, for example, Version 1, Version 2, and so on.
Date
Select the date and time that you approve the new version.
Associating Clinical Protocols with Accounts
An account is the institution from which you manage clinical trials. Typically, it is the facility where the investigators conduct the trials. You can track as accounts IRBs (institutional review boards), central laboratories, CROs (clinical research organizations), and other subcontractors. You can associate a clinical protocol with multiple accounts.
This task is a step in Process of Managing Clinical Trials.
To associate a clinical protocol with an account
Navigate to the Administration - Clinical screen, then the Protocol List view.
In the Protocol list, drill down on the protocol number field of the protocol that you want to associate with an account.
Navigate to the Accounts view.
In the Accounts list, create a new record and complete the necessary fields.
Some fields are described in the following table.
Field
Comments
Account
Select the name of the account.
Type
Select the type of account, such as IRB, CRO, or vendor. System administrators can configure the values that appear in the Type pick list.
Central IRB
Select this field to indicate that all sites use a central institutional review board.
Regional CRO
Select this field to indicate that a clinical research organization provides services to all sites in the clinical region.
Setting Up Clinical Regions
Clinical trials often occur in multiple countries. The region level in Siebel Clinical allows you to track and view study data by country and region.
Regions are optional for protocols. However, if you choose to use regions by selecting the Regions Required field in the protocol record, then each site associated with the protocol must belong to a region. One of the advantages of using regions is that regions provide another way of grouping sites and subjects. For example, you can chart subject enrollment by region in addition to by protocol and by site.
This task is a step in Process of Managing Clinical Trials.
To set up clinical regions
Navigate to the Administration - Clinical screen, then the Region List view.
In the Region list, create a new record and complete the necessary fields.
Create a region record for each country or geographical area where sites are or will be participating in the protocol.
Some fields are described in the following table.
Field
Comments
Protocol #
Select the protocol for the region. Only protocols that require regions are listed in the Pick Protocol dialog box.
Region
Select the geographic region to which the site belongs.
Protocol Region
Displays the name of the region. This field is automatically populated with the protocol number and the region name.
# Planned Sites
Type the number of planned sites for the region.
# Planned Subjects
Type the number of planned subjects for the region.
Team
Select the team members associated with the protocol to which the region belongs. For more information, see Step 3.
No Site Info
Select this field to indicate that no site information is available under a region. Only summary information about site enrollment is available for such a region.
Currency Code
Select the currency that is used to display the payments, costs, and budgets in the region. The default value is USD (United States dollars).
Note: You must specify the currency code for each region if multiple currencies are used for the trial.Withholding Amount
Type the amount to withhold from each of the payments to the investigators until the trial is complete. The default value is the Withholding Amount field for the protocol. However, you can overwrite the Withholding Amount field for the protocol in this field at the region level.
Withholding %
Type the percentage to withhold from each of the payments to the investigators until the trial is complete. The default value is the Withholding % field for the protocol. However, you can overwrite the Withholding % field for the protocol in this field at the region level.
Exchange Date
Select the date that determines the exchange rate of the currency. By default, the exchange date for the region is the date that you create the region.
You can change this date in response to changes in currency rates. However, changes to the exchange date at the region level take effect only when the exchange date also changes at the system level. For more information, see Siebel Applications Administration Guide.
To add team members to the region, click the select button in the Team field to open the Team dialog box, and complete the following steps:
Move the record for an available team member to the list of selected team members.
Click Position Rolldown.
Multi-selected team members are added to all the site teams of this region.
Note: The Position Rolldown button for region applies only to the sites after a region.Click Position Rollup.
Multi-selected team members are added to the protocol to which the region belongs. To administer and track the history of team members who work on a protocol in a region and to determine their role, see Tracking and Revising Team Assignment History.
Click OK.
(Optional) Drill down on the Region field, and navigate to the More Info view to add more information.
Automatically Assigning Team Members Using the Position Rollup and Rolldown Buttons
When you click the Position Rolldown and Position Rollup button, a record is created, where applicable, in each of the Team History views for the protocol and all sites belonging to the region. The Position Rolldown mechanism automates the addition of team members to the Team History view for sites and the Team History view for protocols as if they are manually added. To remove a team member from the protocol, see About Removing Team Members From the Team of a Protocol.
Creating Assignment Team History for Regions
The Team History view allows you to administer and track team members who work in the region. It also provides details about the roles as well as the start and end dates.
To create assignment team history for a region
Navigate to the Administration - Clinical screen, then the Region List view.
In the Region list, drill down on the Region field of the region for which you want to create a new team assignment history.
Navigate to the Team History view.
In the History list, create a new record and complete the necessary fields.
Associating Clinical Regions with Accounts
An account is the institution from which you manage clinical trials. Typically, it is the facility where investigators conduct the trails. You can track as accounts IRBs (institutional review boards), central laboratories, CROs (clinical research organizations), and other subcontractors. You can associate a clinical region with multiple accounts.
This task is a step in Process of Managing Clinical Trials.
To associate a clinical region with an account
Navigate to the Administration - Clinical screen, then the Region List view.
In the Region list, drill down on the Region field of the region that you want to associate with an account.
Navigate to the Accounts view.
In the Accounts list, create a new record and complete the necessary fields.
Some fields are described in the following table.
Field
Comments
Account
Select the name of the account.
Type
Select the type of account, such as IRB, CRO, or vendor. System administrators can configure the values that appear in the Type picklist.
Central IRB
Select this field to indicate that all sites use a central institutional review board.
Regional CRO
Select this field to indicate that a clinical research organization provides services to all sites in the clinical region.
Creating Accounts and Contacts for Clinical Trials
An account is the institution from which you manage clinical trials. Typically, it is the facility where the investigators conduct the trials. You can track as accounts IRBs (institutional review boards), central laboratories, CROs (clinical research organizations), and other subcontractors. You can associate multiple sites with an account, and an account can carry out multiple protocols.
A contact is a person working at a clinical site. Contacts include investigators, typically medical professionals who are also researchers, and site coordinators, who might be the practicing nurses administering the treatment plan according to the clinical protocol.
The Siebel administrator generally bulk loads data on accounts and contacts, but end users can create and modify these records as needed. For information about importing data into your Siebel Life Sciences database, see Siebel Life Sciences Guide.
This task is a step in Process of Managing Clinical Trials.
Creating Accounts
Complete the procedure in this topic to create an account.
To create an account
Navigate to the Accounts screen, then the Accounts List view.
In the Accounts list, create a new record and complete the necessary fields.
To access more fields, click the show more button in the account form.
Some fields are described in the following table.
Field
Comments
Site
Type a description of the location or function of the account, such as headquarters, corporate, or San Francisco.
Account Type
Select the type of account, such as Hospital, Clinic, IRB, and so on.
Account Team
Select the members assigned to the account team. The team member who creates the account record is the primary team member.
Address
Select the addresses for the account by picking from existing addresses or by entering new addresses. Avoid duplicating addresses by checking if an address exists before entering a new one.
Drill down on the Name field of the account, and navigate to the More Info view to add more information.
Some fields are described in the following table.
Field
Comments
Synonyms
Select the synonyms for the account. This field allows you to refer to accounts in the way that you prefer. For example, an account named A/B Products, Inc., might have the following synonyms: AB, A/B, and AB Products.
When you search for an account or enter an account in another part of your Siebel Business Application, you can use a synonym instead of the actual name.
Territories
Select the territories that are associated with the account.
Navigate to views, such as the Activities view, the Addresses view, and so on to add more information to the account record.
For more information about creating and maintaining account affiliations, see Siebel Life Sciences Guide.
Creating Contact Records
Complete the procedure in this topic to create a contact record.
To create a contact record
Navigate to the Contacts screen, then the Contacts List view.
In the Contacts list, create a new record and complete the necessary fields.
Some fields are described in the following table.
Field
Comments
My Address
Select the addresses for the contact. A contact can have more than one address. You must specify one address as the primary address. Each CRA (clinical research associate) assigned to the contact can specify a different address as the primary address. For example, one CRA might specify a private office as the primary address, while another CRA might specify a hospital department as the primary address.
Team
Select the CRAs assigned to the contact. The team member who creates the contact record is the primary team member.
Navigate to other views to add or associate additional information with the contact record.
For example, use the Relationships view to associate site coordinators and other site personnel with the contact. For more information about creating and maintaining contact records, see Siebel Life Sciences Guide.
Creating Sites for Clinical Trials
The site is an account that a principal investigator manages for a particular protocol. In Siebel Clinical, a separate site record must exist for each unique combination of a protocol, account, and principal investigator. Before starting to create sites for clinical trials, review Process of Managing Sites and Contacts for Clinical Trials for more information.
This task is a step in Process of Managing Clinical Trials.
To create a site for clinical trials
Navigate to the Site Management screen, then the Protocol Site List view.
In the Protocol Site list, create a new record and complete the necessary fields.
Some fields are described in the following table.
Field
Comments
Satellite Site
Read-Only field. A star in this field indicates that this is a satellite site.
Site #
Type the number to assign to the site. This field is not required when the Status field for the site is Planned or Not Initiated. This field becomes required after a site is initiated.
Protocol #
Select the protocol from the list of existing protocols in the Pick Protocol dialog box.
Region
Select the region name if regions are required for the protocol.
Parent Site
Read-Only field. Populated only for satellite sites, this field indicates the name of the parent site to which the satellite site belongs.
Status
Select the status of the site, for example, Planned, Initiated, Enrolling, and Closed. A preconfigured state model allows for a structured state transition.
PI Last Name
Select the last name of the principal investigator for the site. To change the principle investigator for the site, you select a different contact in this field. For more information about adding other contacts to the site, see Associating Sites with Contacts.
When you click the select button in this field, the Pick Contacts dialog box appears. After you select an account for the site, click the Affiliated Contacts button in this dialog box to view only those contacts who are affiliated with the account for the site.
Account
Select the primary account (the institution where the protocol is managed) for the site. To change the primary account for the site, you select a different account in this field. For more information about adding other accounts to the site, see Associating Sites with Accounts.
Team
Select the team members for the site. The Primary field is populated for the site record creator, and only the team manager can change this field through the My Team’s Sites view. Resource management is a manager’s responsibility. For more information, see Step 3.
No Subject Info
Select this field to indicate that no subject information is available for a site. Only summary information about subject enrollment is available for such a site.
Last Completed Visit Date
Select this field to use the date of the last completed visit for rescheduling subject visits.
Deselect this field to prompt the user to enter a new start date for rescheduled visits. All uncompleted subject visits are rescheduled using the new date.
Versions
Select the version of the subject visit template for the site. For more information, see Step 4.
Currency Code
Select the currency that is used to display the payments, costs, and budgets for the site.
Withholding Amount
Type the amount of the total payment to withhold from the investigators until the trial is complete. You can set the default value at the region or protocol level, but you can overwrite the value at the site level.
Withholding %
Type the percentage of the total payment to withhold from the investigators until the trial is complete. You can set the default value at the region or protocol level, but you can overwrite the value at the site level.
Exchange Date
Select the date that determines the exchange rate of the currency. By default, the exchange date for the site is the date that you create the site.
You can change this date in response to changes in currency rates. However, changes to the exchange date at the site level take effect only when the exchange date also changes at the system level. For more information, see Siebel Applications Administration Guide.
To add team members to the site, click the select button in the Team field to open the Team dialog box, and complete the following steps:
Move the record for an available team member to the list of selected team members.
Click Position Rollup.
If the Regions Required field is selected for the protocol record, then multi-selected team members are added to the region and protocol to which the site belongs.
Click OK.
Click the select button in the Versions field and complete the following steps:
Select the version of the subject visit template to use at the site.
Only the template versions related to your protocol are available for selection.
Enter a date in IRB Approval Date field for the selected version.
You cannot activate the template version without the IRB (institutional review board) approval date.
Select the Active field to make the selected version the active version at the site.
Only one version can be active at a time. The active template is used when activities are generated for a subject. For more information about protocol versions, see Tracking and Revising Team Assignment History.
Click OK
(Optional) Drill down on the site number field, and navigate to the More Info view to add more information.
Some fields are described in the following table.
Field
Comments
Address
Select one of the principal investigator’s addresses as the site address.
# Screen Failure
Displays the number of subjects that fail the screening.
Last Subject Off Study
Displays the date that the last subject completes the study. (This field is automatically rolled-up from the subject data.)
First Subject Enrolled
Displays the date that you enroll the first subject in the study. (This field is automatically rolled-up from the subject data.)
# Early Terminated
Displays the number of subjects who terminate the study before it is complete.
Contract Amount
Displays the sum of all contract amounts for the site. For more information, see Associating Contracts with Sites.
Paid To Date
Displays the amount of money that you paid to date to the investigators.
Earned To Date
The amount of money that investigators earned to date.
Activate for Synchronization
Select this field to activate the site for synchronization. This field is required for integration with Oracle Health Sciences InForm. When this field is checked, a new integration object for the protocol site is sent to Oracle Health Sciences InForm. The integration object creates the site in Oracle Health Sciences InForm, or updates the site, if it already exists.
This field is read-only until the following conditions are met:
The Synchronize Active Study Sites field of the protocol is set to true.
The Primary Site Address field is populated.
Primary Site Address
Select the primary address for the site. This field sets the primary location of the site for the study in Siebel Clinical. The Addresses dialog box displays all addresses for the site.
This field is required for integration with Oracle Health Sciences InForm, and populates the site address when the site is created in Oracle Health Sciences InForm.
Automatically Assigning Team Members to a Site Using the Position Rollup Button
When you add a member to a team for a site (either manually or through the Position Rollup mechanism), a record is created in the Team History view, with the Start Date field set to the system date by default, and with a blank End Date field. To remove a team member from the protocol, see About Removing Team Members From the Team of a Protocol.
Creating Assignment Team History for Sites
The Team History view allows you to administer and track team members who work on the site. It also provides details about the roles as well as the start and end dates.
To create assignment team history for a site
Navigate to the Site Management screen, then the Protocol Site List view.
In the Protocol Site list, drill down on the site number field of the site for which you want to create a new team assignment history.
Navigate to the Team History view.
In the Team History list, create a new record and complete the necessary fields.
About Removing Team Members From the Team of a Site
When you remove a member from the team of a site (either manually or through Position Rollup), the End Date field of the team member’s record, if present, is updated with the system date. However, if the record is read-only, then the initial value in the End Date field is not updated. The Position Rollup mechanism automates the update of the End Date field of the assignment record as if it is manually removed from the team.
Creating Satellite Sites for Clinical Trials
The satellite site is a study site that is linked to an existing parent site where the parent site and the satellite site share the same principal investigator. Subjects are seen by the same principal investigator and visit both the parent site and the satellite site according to their own business requirements. Before starting to create satellite sites for clinical trials, review Managing Satellite Sites and Contacts for Clinical Trials for more information.
This task is a step in Process of Managing Clinical Trials.
To create a satellite site for clinical trial
Navigate to the Site Management screen, then the Protocol Site List view.
In the Protocol Site Visits list, select My Sites in the visibility filter.
All site visits that you own appear.
In the Protocol Site list, drill down on the Site Number field of the site under which you want to create the satellite site.
Navigate to the Satellites Sites view.
This view contains the following information:
Subject Info. Shows the subject enrollment data accrued for a parent site from all the satellite sites under it.
Financials. Shows the financial data accrued for a parent site from all the satellite sites under it.
Satellite Sites. Lists all the satellite sites for the parent site and provides the ability to create a new satellite site for the parent site.
In the Satellites Sites list, create a new record and complete the necessary fields.
Some data is inherited from the parent site and cannot be changed. Some fields are described in the following table.
Field
Comments
Satellite Site Number
Type the number to assign to the satellite site.
Account
Select the primary account (the institution where the protocol is managed) for the site. To change the primary account for the site, you select a different account in this field. For more information about adding other accounts to the site, see Associating Sites with Accounts.
PI Last Name
Read-only field. The last name of the principal investigator, inherited from the parent site, for the satellite site. This is a read-only field.
PI First Name
Read-only field. The first name of the principal investigator, inherited from the parent site, for the satellite site. This is a read-only field.
Status
The status of the satellite site, which is Planned by default. Other statuses are Initiated, Enrolling, and Closed.
Site Initiated
The date the satellite site was created. This field is blank by default.
Site Terminated
The date the satellite site was terminated. This field is blank by default.
Team
Read-only field. The team for the satellite site, inherited from the parent site. For more information, see Creating Sites for Clinical Trials (Step 3.).
Drill down on the Satellite Site Number field to complete more fields as required.
Some data is inherited from the parent site and cannot be changed. Some fields are described in the following table.
Field
Comments
Protocol #
Read-only field. The protocol, inherited from the parent site, for the satellite site.
Region
Read-only field.The region, inherited from the parent site, for satellite site.
Parent Site
Read-only field. The parent site for the satellite site.
Versions
Read-only field.The version of the subject visit template, which is inherited from the parent site. Only one version can be active at a time. The active template is used when activities are generated for a subject. For more information about protocol versions, see Tracking and Revising Team Assignment History
Exchange Date
Select the date that determines the exchange rate of the currency. By default, the exchange date for the site is the date that you create the site.
You can change this date in response to changes in currency rates. However, changes to the exchange date at the site level take effect only when the exchange date also changes at the system level. For more information, see Siebel Applications Administration Guide.
Withholding Amount
Type the amount of the total payment to withhold from the investigators until the trial is complete. You can set the default value at the region or protocol level, but you can overwrite the value at the site level.
Withholding %
Type the percentage of the total payment to withhold from the investigators until the trial is complete. You can set the default value at the region or protocol level, but you can overwrite the value at the site level.
Currency Code
Read-only field. The currency, inherited from the parent site, that is used to display the payments, costs, and budgets for the satellite site.
Last Completed Visit Date
Select this field to use the date of the last completed visit for rescheduling subject visits.
Deselect this field to prompt the user to enter a new start date for rescheduled visits. All uncompleted subject visits are rescheduled using the new date.
(Optional) Navigate to the More Info view to add more information.
Some fields are described in the following table.
Field
Comments
Address
Select one of the principal investigator’s addresses as the site address.
# Screen Failure
Displays the number of subjects that fail the screening.
Last Subject Off Study
Displays the date that the last subject completes the study. (This field is automatically rolled-up from the subject data.)
First Subject Enrolled
Displays the date that you enroll the first subject in the study. (This field is automatically rolled-up from the subject data.)
# Early Terminated
Displays the number of subjects who terminate the study before it is complete.
Contract Amount
Displays the sum of all contract amounts for the site. For more information, see Associating Contracts with Sites.
Paid To Date
Displays the amount of money that you paid to date to the investigators.
Earned To Date
The amount of money that investigators earned to date.
Activate for Synchronization
Select this field to activate the site for synchronization. This field is required for integration with Oracle Health Sciences InForm. When this field is checked, a new integration object for the protocol site is sent to Oracle Health Sciences InForm. The integration object creates the site in Oracle Health Sciences InForm, or updates the site, if it already exists.
This field is read-only until the following conditions are met:
The Synchronize Active Study Sites field of the protocol is set to true.
The Primary Site Address field is populated.
Primary Site Address
Select the primary address for the site. This field sets the primary location of the site for the study in Siebel Clinical. The Addresses dialog box displays all addresses for the site.
This field is required for integration with Oracle Health Sciences InForm, and populates the site address when the site is created in Oracle Health Sciences InForm.
Satellite Site Count
Displays the number of satellite sites associated with this site.
Assign subject visits to the satellite site as follows:
Navigate to the Subjects view.
Create a new Subject record and complete the necessary fields.
Drill down on the Screening # field.
Create a new Visit Plan record and complete the necessary fields.
Some fields are described in the following table. For more information about subjects visits, see Defining Subject Visits.
Field
Comments
Site
Select the site for the subject visit. The Sites pick list includes the parent site and all satellite sites under the parent site.
Assigned To
Select the user ID of the person assigned to the subject visit.
Sequence
Type the sequence number of the visit.
Type
Read-only field. The type of visit, which is Unscheduled Visit by default.
Name
The name of the visit.
Add Activities to the subject visit as required and complete the necessary fields. For more information about activities, see Defining Activities for Subject Visits and Associating Activities with Sites.
Transfer (uncompleted) subject visits to or from the satellite site as required:
Navigate to the Subjects view.
Drill down on the Screening # field.
The Visits view of the Subjects screen appears showing the Visit Plans.
In the Site field, select the site to which you want to transfer the (uncompleted) subject visits to.
The Sites pick list includes the parent site and all the satellite sites under the parent site. You can transfer subject visits from one satellite site to another satellite site or to the parent site as required. For more information about transferring subjects, see Transferring Clinical Subjects.
Navigate to the Transfer History view and review all subject transfers against the subject.
The Transfer History view includes the following information for each subject transfer: Source Site Name, Destination Site Name, Transfer Date, Transferred By, Status at Transfer, Description.
Navigate to the Site Management screen, then the Subject Transfer History view and review all subject transfers against the site.
The Subject In applet lists all subject visits transferred to the site.
The Subject Out applet lists all subject visits transferred from the site.
Associating Sites with Accounts
An account is the institution from which you mange clinical trials. Typically, it is the facility where the investigators conduct the trials. You can track as accounts IRBs (institutional review boards), central laboratories, CROs (clinical research organizations), and other subcontractors. In the Accounts view of a site, you can associate the site with multiple accounts.
A record for the account that you select in the Account field of the site record is automatically created in the Accounts view of the site. This record is automatically populated with a value of Site Primary in the Type field. You cannot delete this record or change its field values unless you select a new primary account in the Account field of the site record.
You can associate accounts for clinical protocols and for clinical regions with sites. For more information, see Associating Accounts with Sites.
This task is a step in Process of Managing Clinical Trials.
To associate a site with an account
Navigate to the Site Management screen, then the Protocol Site List view.
In the Protocol Site list, drill down on the site number field of the site that you want to associate with an account.
Navigate to the Accounts view.
In the Accounts list, create a new record and complete the necessary fields.
Some fields are described in the following table.
Field
Comments
Type
Select the type of account. The Site Primary value for this field is automatically populated for the primary account of the site. In the Accounts view, you cannot change this value, or assign this value to another account. To change the primary account for the site, you change the value in the Account field of the form for the site record.
End Date
Select the date that the account is inactive to inactivate the account. You can select a past date, but not a future date. You might want to inactivate accounts instead of deleting them so that you can view the accounts that are no longer associated with the site.
If you select a new primary account in the Account field of the form for the site record, then this field is automatically populated with the current date for the prior primary account, but you can change this date to a date in the past.
Risk Assessments for Clinical Trials
You can create risk assessment templates and perform risk assessments for clinical trials at the following levels:
Clinical (for generic assessment of a program, protocol, region, or protocol site)
Clinical Program
Clinical Protocol
Clinical Region
Clinical Protocol Site
For more information, see Creating Risk Assessment Templates and Performing Risk Assessments for Clinical Trials.
Creating Risk Assessment Templates
A Risk Assessment and Categorization Tool (RACT) template for the Clinical level of risk assessment is available in the preconfigured Siebel Clinical application. Administrators select a level (or type) of risk assessment in the Type field when they create an assessment template. They can create additional assessment templates with associated attributes using the RACT Templates view of the Administration - Clinical screen.
To create a risk assessment template
Navigate to the Administration - Clinical screen, then the RACT Templates view.
In the RACT Templates list, create a new record and complete the necessary fields.
Some fields are described in the following table.
Field
Comments
Assessment
Type in the name of the template.
Type
Select a value that specifies the type of risk assessment template, which can be one of the following:
Clinical
Clinical Program
Clinical Protocol
Clinical Protocol Site
Clinical Region
Active
Select this check box to indicate that the risk assessment template is active, otherwise clear the check box.
Description
Type in a description of the risk assessment template.
In the Assessment Questions list, create a new record for each question you want to assess and complete the necessary fields.
Some fields are described in the following table.
Field
Comments
Order
Enter the order number for the assessment question.
Category
(Mandatory field) Select a category for the assessment question, which can be one of the following:
Safety
Study Phase
Complexity
Subject Population
Technology
Data Collection, CRF source
Endpoints
Organization Experience
Investigational Product/Study Medication
IP Logistics/Supply Chain
Blinding
Operational Complexity
Geography
Questions
Type in the assessment question.
Weight
Type in the weight for the assessment question. The default value is 1.
Considerations
Type in any additional information relevant to the assessment question that should also be considered. Any information that you enter in this field automatically appears on screen (for example, as a tool tip) when the user places the mouse over the respective question during an assessment.
In the Question Values list, create records to further describe the assessment questions you created in the previous step, and complete the necessary fields.
Some fields are described in the following table.
Field
Comments
Order
Enter the order number that corresponds to the assessment question.
Type
Select from the following values to describe the assessmenquestion:
Impact
Probability
Detectability
Value
Select the value that applies to the option that you select in the Type field.
For Impact and Probability, the values available are:
High (3)
- Medium (2)
- Low (1)
For Detectability, the values available are:
Difficult to detect 3)
Medium to detect (2)
Easy to detect (1)
Score
Enter the score for the value that you select.
Performing Risk Assessments for Clinical Trials
To perform a risk assessment for a clinical trial, you select an appropriate risk assessment template for a program, protocol, region, or site in that clinical trial. This template facilitates uniformity in the assessment process.
After you save the selected risk assessment template, a list of attributes that you must evaluate appears in the Assessment Attributes list. Attributes are frequently questions that you answer to evaluate the risk of adverse outcomes or the integrity of data for the program, protocol, region, or site. To evaluate an attribute, you enter an appropriate value for the attribute. In the Assessment Attributes list, you cannot add attributes to or delete attributes from the risk assessment template.
To perform a risk assessment for a clinical trail
Complete one of the following steps:
To perform a risk assessment of a clinical program, navigate to the Clinical Programs screen, then the Program List view and drill down on the Program field of the clinical program that you want to assess.
To perform a risk assessment of a clinical protocol, navigate to the Protocols screen, then the Protocol List view, and drill down on the Protocol # field of the protocol that you want to assess.
To perform a risk assessment of a clinical region, navigate to the Regions screen, then the Region List view, and drill down on the Region field of the region that you want to assess.
To perform a risk assessment of a site, navigate to the Site Management screen, then the Protocol Site List view and drill down on the Site # field of the site that you want to assess.
Navigate to the RACT Assessment view.
In the Assessment Templates list, create a new record and complete the necessary fields.
Some fields are described in the following table.
Field
Comments
Name
When you save the record, displays the name of the template that you select followed by an automatically generated number that uniquely identifies the assessment, but you can change this name.
Template Name
Select a template that includes the appropriate attributes to assess the program, protocol, region, or site.
Description
Displays the description of the template that you select.
Updated
Displays the date and time that you last updated the record.
Score
Displays the sum of the Weight field multiplied by the Score field for the assessment attributes that are associated with the template. This field is populated after you assign values to assessment attributes.
Percent
Displays as a percentage the result of the Score field for the template divided by the Maximum Score field for the template. This field is populated after you assign values to assessment attributes.
Maximum Score
Displays the highest score possible for the template that you select. For each assessment attribute in the template, the Weight field is multiplied by the highest value possible in the Score field. The sum of these results is the maximum score for the template.
In the Assessment Questions list, enter a value for each question to assess the program, protocol, region, or site in the clinical trial.
Some fields are described in the following table.
Field
Comments
Order
(Read-only) Displays the order number for the question when you save the assessment template record. Administrators set up the order number for each question when they set up the template.
Category
(Read-only) Displays the category for the question, such as Safety, Technology, Operational Complexity, and so on.
Questions
(Read-only) Displays the assessment question when you save the assessment template record. Administrators set up questions when they set up the template.
Impact
Select an impact value for the question, which can be one of the following:
High (3)
Medium (2)
Low (1)
This value determines the impact of the individual risk on the trial.
Probability
Select a probability value for the question, which can be one of the following:
High (3)
Medium (2)
Low (1)
This value determines the probability of occurrence of the individual risk.
Detectability
Select a detectability value for the question, which can be one of the following:
Difficult to detect 3)
Medium to detect (2)
Easy to detect (1)
The higher the detectability of individual risk, the lower the overall risk to the trial
Weight
(Read-only) Displays the weight for the attribute when you save the assessment template record. Administrators set up the weight for each attribute when they set up the template.
This field is essentially ranks the importance of the category. If all categories have a default value of 1.0, then all categories are of equal importance.
Risk Score
(Read-only) Displays the risk assessment score for the individual question. Individual risk scores are calculated automatically from the values in the following fields: Impact, Probability, Detectability, Weight. The default formula for calculating individual risk score is product of Impact, Probability, Detectability and Weight.
Risk Level
Select a value that specifies the type of risk assessment template, which can be one of the following:
Program
Protocol
Program/Protocol
Rationale
If required, type in any explanatory information to capture the rationale for category risk level assessment.
Functional Impact
Select a functional impact value for the attribute, which can be one of the following:
Medical Monitoring Plan
Safety Plan
Data Plan
Statistical Analysis Plan
Monitoring Plan
Training Plan
Quality Plan
Risk Management Log
Communication Plan
This field highlights the specific functional plans that might be impacted by this assessment.
Mitigation
If required, type in the mitigation actions or plans for categories with the highest category risk score.