Working with the Reports Page for Subcontractors
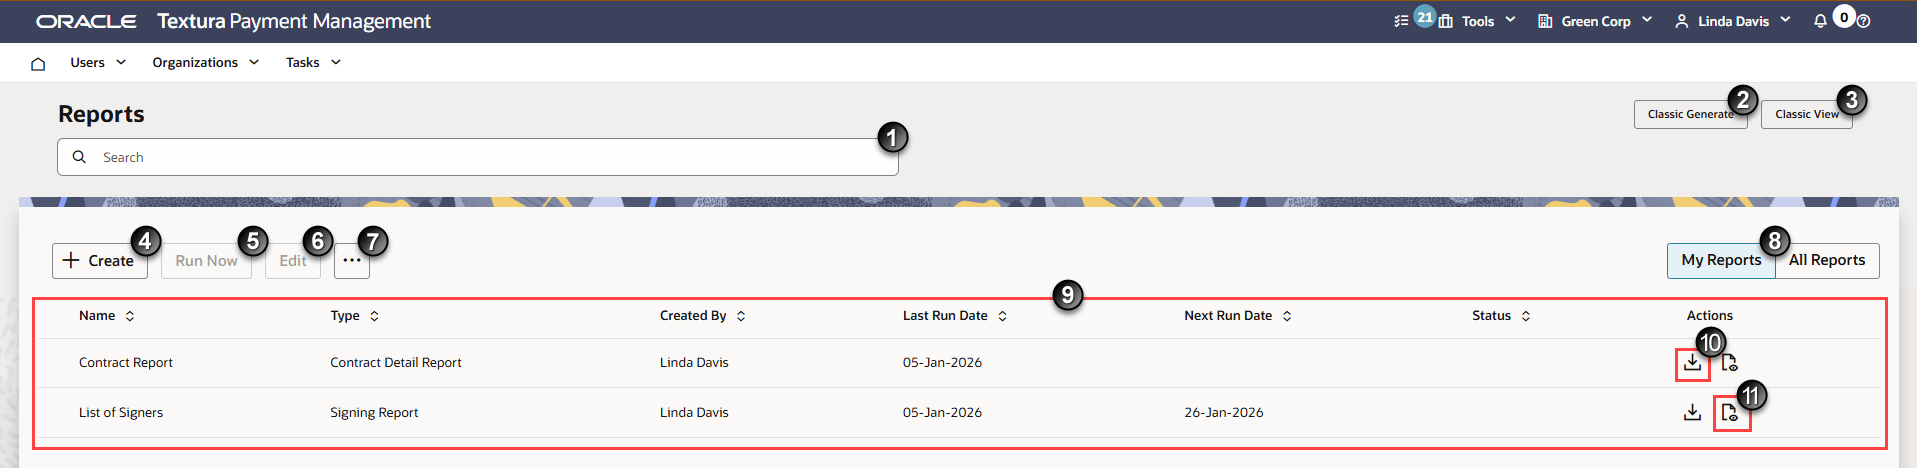
- Search: Enter part of a report name or type to narrow down the list of reports displayed in the table.
- Classic Generate: Navigate to the Generate Reports page.
Note: Selecting Classic Generate will take you to a legacy page in the application. Textura will retire this page in a future update.
- Classic View: Navigate to the View Reports page.
Note: Selecting View Reports will take you to a legacy page in the application. Textura will retire this page in a future update.
- +Create: Opens the New Report Guided Process, where you can select and customise the settings for your report.
See Creating a Report for information on how to generate a new report.
- Run Now: Choose a report from the Reports table and select Run Now to generate a report you have previously defined. The report will use the settings you last specified when you either created or edited the report.
- Edit: Choose a report from the Reports table and select Edit to change the settings associated with a report. You can amend the report file type, projects included in the report, or other criteria depending on the report type.
See Editing a Report for further information.
- Actions Menu: Choose a report from the table and then select the … (Actions) menu to view additional actions you can take on the Reports page.
- View History: Opens a History drawer on the right-hand side of the page. The drawer lists records for each time Textura, or someone in your organisation, ran the selected report. Each record includes the date the report was generated and a report number. You can also download the reports listed, or audits of the respective report jobs.
Note: The History drawer only maintains records for reports generated in the past 60 days from the current date.
- View Settings: Opens a Settings drawer on the right-hand side of the page. Settings include: Report Type, Report Description, Output Format, and Fields. Depending on the report type, the drawer may include further settings, such as User Status or Projects. Reports arranged to run automatically at a set interval will include information about the frequency and time when Textura generates the report.
Select Edit to update report settings on the Edit Report page.
- Delete: Opens a confirmation dialogue box with the option to delete the selected report. Deleted report definitions or historic files generated in the past 60 days cannot be recovered.
- View History: Opens a History drawer on the right-hand side of the page. The drawer lists records for each time Textura, or someone in your organisation, ran the selected report. Each record includes the date the report was generated and a report number. You can also download the reports listed, or audits of the respective report jobs.
- My Reports | All Reports: The My Reports tab is displayed by default. View all reports you have defined across your projects in Textura. Users with the appropriate permission can select the All Reports tab to view report definitions created across their organisation.
- Reports Table: Lists the reports you or other users in your organisation have generated, depending on whether My Reports or All Reports is selected.
- Name: The name given to the report at the time it was defined.
- Type: Lists the type of Textura report.
- Created By: The name of the user who defined the report.
- Last Run Date: The most recent date someone in the organisation ran the corresponding report.
- Next Run Date: Only relevant when a report runs on a schedule; the date Textura will next generate the report, based on the schedule specified in the report settings.
- Status: Displays the current status of a generated report.
- In Progress: Textura is currently generating your report.
- Failed: The report encountered an error during generation. You may attempt to run the report again. If you continue to experience errors, contact Oracle Support.
- No Status: A report has been successfully generated or has not yet been generated.
- Actions: Use the icon in the Actions column to download the latest generated file or view the audit associated with the most recent report run.
- Download: Choose a report from the table, then select the Download icon to save the most recently generated version of the report. The downloaded file type will depend on the output file type you selected when first setting up the report.
- View Audit Report: Choose a report from the table, then select the Audit Report icon to open an Audit Report drawer on the right-hand side of the page. The audit report includes information about the last time someone generated a report and details about the report itself.