| Oracle® Retail Enterprise Inventory Cloud Service Administration Guide Release 17.0 E97808-03 |
|

 Previous |
 Next |
| Oracle® Retail Enterprise Inventory Cloud Service Administration Guide Release 17.0 E97808-03 |
|
Previous |
Next |
This chapter contains the following:
Using Oracle EICS Data Seeding, you can load data in bulk, including inventory and stock holding entities, from an external data source into Oracle EICS.
Data Seeding is most suitable for:
Loading initial inventory holding data
Loading large volumes of data
Typically, you use data seeding for an initial data seeding and maintain the data in Oracle EICS thereafter, or through near-real time data integration with external systems.
The following table shows the business objects that can be seeded from external data source to EICS using BDI-Based Data Seeding. For the initial data seeding, data objects must be loaded the group order shown here to respect dependencies between objects.
Table 2-1 EICS Data Loading Dependencies
| Group Order | Business Object | Dependency |
|---|---|---|
|
1 |
Warehouse |
None |
|
Warehouse Address |
None |
|
|
Partner |
None |
|
|
Partner Address |
None |
|
|
Supplier |
None |
|
|
Supplier Address |
None |
|
|
Merchandise Hierarchy |
None |
|
|
2 |
Partner Org Unit |
Partner |
|
Item Header |
Supplier |
|
|
UDA (User Defined Attribute) |
None |
|
|
Differentiator Group (N/A) |
None |
|
|
Code Head |
None |
|
|
3 |
Pack Item |
Item Header |
|
Related Item |
Item Header |
|
|
4 |
Item Supplier |
Item Header, Supplier |
|
Item Supplier Country Dimension |
Item Header, Supplier |
|
|
Item Supplier Country |
Item Header, Supplier |
|
|
Item Supplier Manufacturing Country |
Item Header, Supplier |
|
|
Item Supplier UOM |
Item Header, Supplier |
|
|
5 |
Store |
None |
|
Store Address |
None |
|
|
6 |
Item Location |
Store, Warehouse, Partner, Item |
|
Inventory Available Store |
Store, Item |
|
|
7 |
Replenishment Item Location) |
Store, Item |
|
Price History (for Store/Item |
Store, Item |
|
|
8 |
Item Image |
Item |
|
UOM Class |
None |
|
|
UDA Item Date |
UDA |
|
|
UDA Item Free Form |
UDA |
|
|
UDA Item LOV |
UDA |
|
|
UDA Values |
UDA |
|
|
9 |
Code Detail |
Code Head |
|
Delivery Slot |
None |
|
|
Differentiator |
None |
|
|
UOM Conversion |
UOM Class |
When a full installation of the EICS application takes place there is no inventory data in ECIS tables. The initial inventory positions will need to be seeded from an external system. By default, EICS seeds its data from Oracle Retail Merchandise Cloud Service System as its out-of-box solution.
EICS initial inventory data seeding is applicable for new or fresh full EICS installation, and should only be run once.
Once the initial set of data is seeded into ECIS, the subsequent inventory changes are communicated between sourcing/destination applications via Oracle Retail Integration Cloud Service.
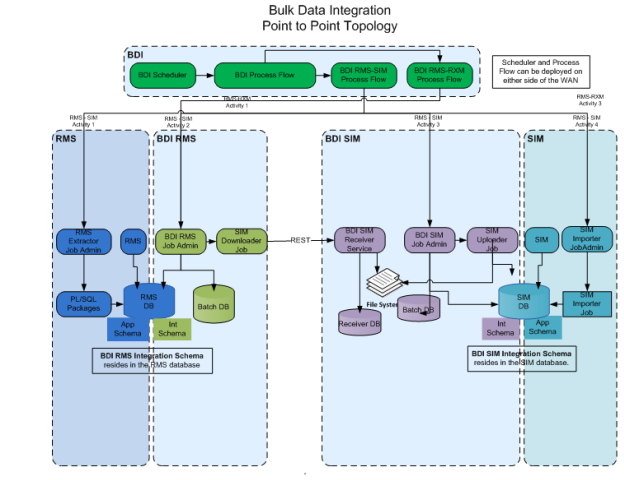
EICS data seeding uses the Oracle Retail Bulk Data Integration (BDI) process to extract source data from external system and load the same data into Oracle EICS application tables.
The BDI data seeding process:
An Extractor extracts data from external system into an outgoing intermediate integration interface table.
A Downloader moves data from the intermediate table to an intermediate file.
An Uploader moves the intermediate file to an incoming intermediate integration interface tables.
An Importer imports the data from the interface tables into EICS application tables.
The following figure shows the key stages of the data seeding process using Oracle BDI-Based Data Seeding.
This topic contains the following:
EICS System Ops user must be assigned to following EICS application security permissions:
| Permission Name | Description |
|---|---|
| Access Batch Admin | Allows access to EICS batch job screen. |
| Access Data Seed | Allows EICS user to manually run data seeding importer jobs via EICS batch job admin. |
The EICS Data Seeding Importer process in EICS loads data from the staged or intermediate tables into ECIS application tables. The configuration parameters determine how the importer process operates in EICS.
Because the full set of data should only be loaded once for foundation inventory data and store Inventory data, when EICS is initially installed, the data seeding system configuration flags are disabled.
The following table shows the configuration parameters and their default values.
| Configuration Name | Description |
|---|---|
| Enable Seed Foundation | The foundation data can be used for initial bulk load of EICS foundation data (such as Supplier, Merchandise Hierarchy, Item and others) from external source during initial setup of ECIS system. This option should be disabled after EICS data seeding is completed. |
| Enable Seed Store Data | The seed store data can be used for initial bulk data load of EICS store inventory data (such as Store Item, and Store Item Stock) from an external data sourcing system. |
| Enable Seed By Store | Enables functionality for a single store. By default, all stores and inventory will be seeded when the seed by store option is turned off. To rollout a single store, enable this configuration allow only a single store's inventory data to be seeded. |
| Data Seed Chunk Limit | Controls the data seeding transaction size limit. |
| Data Seed On Error Continue | This flag determines how the error should be handled during data seeding import process. If the flag is turned on (true), the process will skip the current chunk of data, and continue to process next chunk of data. If the flag is turned off (false), the data loading process will be terminated when an error occurs. |
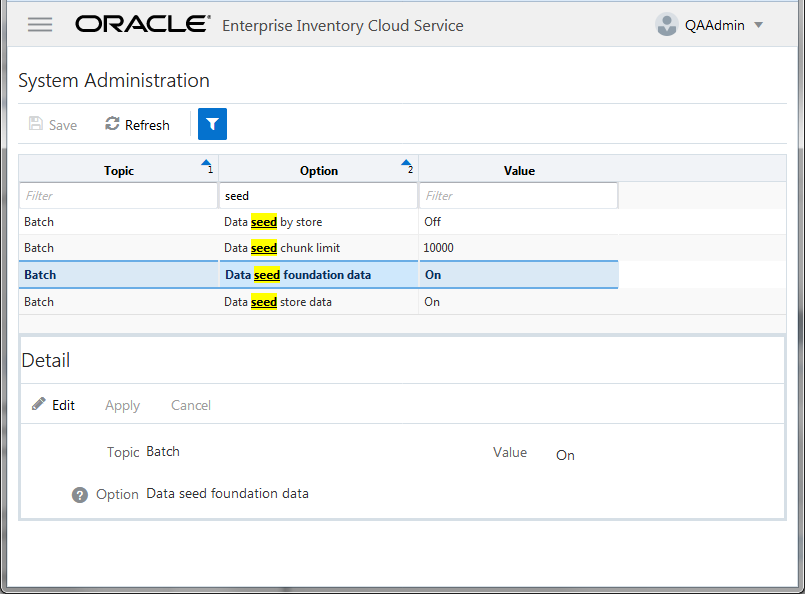
To change configuration values:
Login to Oracle Enterprise Inventory Cloud Service page as ECIS System Ops user. Note that full details about the configuration screens can be found in the Configuration chapter of the Admin Guide.
On Main Menu, Select Admin/Configuration/System Administration.
Search for data seed in option field, change value and save the change.
When using the BDI-based data seeding:
If you set seed data options to disabled, then once the BDI process flow process upload the data to the stage tables, EICS importer will skip loading step, no attempt is made to load the data to application tables. You run the load process separately. You can review the results of this process and correct any import errors before proceeding with data load to the application tables. This is the recommended approach when you want to load data by a single store.
If you set the data seed options to enabled, then the application imports data to the stage tables and all objects imported successfully are loaded automatically to the EICS application tables. You may prefer this approach when you want to load data for all stores.
The data seeding can be seeded to application tables automatically or can be loaded into stage tables and then from stage tables to applications in separate steps.
To seed data from source system directly into ECIS application tables, set the following values:
Enabled Seed Foundation: true
Enable Seed Store Data: true
To seed data from source system to BDI inbound staging table and then import data via manual trigger to application tables, set the following values before running BDI process flow:
Enabled Seed Foundation: false
Enable Seed Store Data: false
Once BDI process flow uploads the data into stage table, you need to turn on these two flags when manually start importer jobs to load stage data into application tables.
For additional details, please see Appendix: Run Importer Separately from EICS Job Admin and Appendix: EICS Data Loading Performance Consideration
This topic contains the following:
BDI-Based Data Seeding Pre-requisites
BDI-Based Data Seeding Process Flow Execution Order
BDI-Based Data Seeding Procedure
BDI-Based Data Seeding Post-Load processes
Sourcing System (for example, Oracle RMS)
The sourcing system is installed and initial inventory holding entities and data set up is completed within the external system.
EICS
EICS database and applications installations are completed.
BDI Components
The following BDI components have been installed as part of Oracle Retail Integration Cloud Service.
BDI Process Flow: Provides a mechanism to run multiple dependent batch jobs.
BDI-RMS Batch Job Admin: Provides management of BDI for RMS batch jobs.
BDI-SIM Batch Job Admin: Provides management of BDI for EICS batch jobs.
Please refer to the Oracle Retail Bulk Data Integration Installation Guide for BDI installations.
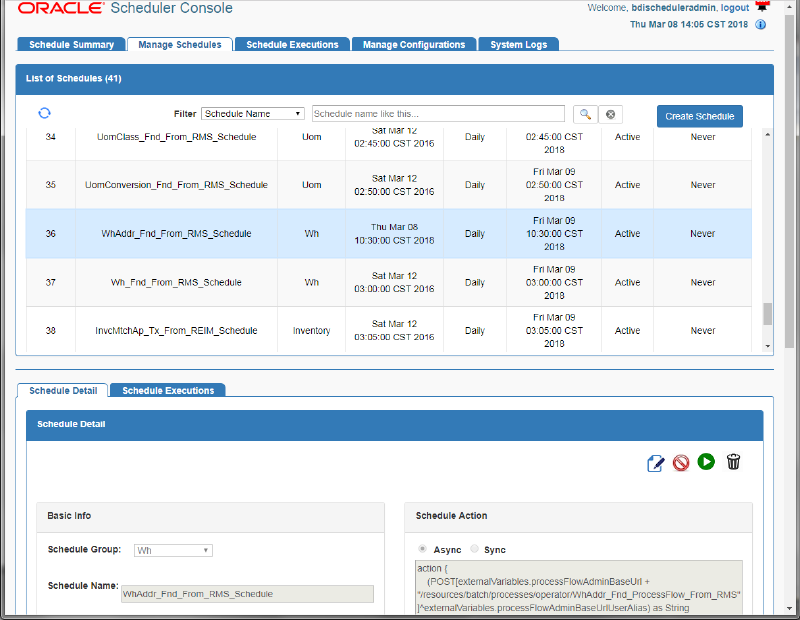
You can setup Data seeding schedule in BDI Scheduler Console.
Login BDI scheduler admin console, navigate to Manage Schedules, you can start the pre-defined schedule using Run Schedule Now icon or you can modify the schedule detail by changing the schedule frequency/start date (Alternatively you can create your own schedule based on the default schedule by setting the schedule frequency to One time only)
Please follow the schedule list dependencies (Note: There is no dependencies within the same schedule list).
List 1: BDI-Based Data Seeding Schedule List dependencies:
| Schedule List# | Default Scheduler Name |
|---|---|
| 1 | MerchHier_Fnd_From_RMS_Schedule |
| Supplier_Fnd_From_RMS_Schedule | |
| SupplierAddr_Fnd_From_RMS_Schedule | |
| Partner_Fnd_From_RMS_Schedule | |
| PartnerAddr_Fnd_From_RMS_Schedule | |
| Wh_Fnd_From_RMS_Schedule | |
| WhAddr_Fnd_From_RMS_Schedule | |
| 2 | PartOrgUnit_Fnd_From_RMS_Schedule |
| ItemHdr_Fnd_From_RMS_Schedule | |
| Uda_Fnd_From_RMS_Schedule | |
| DiffGrp_Fnd_From_RMS_Schedule | |
| CodeHead_Fnd_From_RMS_Schedule | |
| 3 | PackItem_Fnd_From_RMS_Schedul |
| RelatedItem_Fnd_From_RMS_Schedule | |
| 4 | ItemSupplier_Fnd_From_RMS_Schedule |
| ItSupCtryDim_Fnd_From_RMS_Schedule | |
| ItSupCtry_Fnd_From_RMS_Schedule | |
| ItSupCtryManCtry_Fnd_From_RMS_Schedule | |
| ItemSuppUom_Fnd_From_RMS_Schedule | |
| 5 | Store_Fnd_From_RMS_Schedule |
| StoreAddr_Fnd_From_RMS_Schedule | |
| 6 | ItemLoc_Fnd_From_RMS_Schedule |
| InvAvailStore_Tx_From_RMS_Schedule | |
| 7 | ReplItemLoc_Fnd_From_RMS_Schedule |
| PriceHist_Fnd_From_RMS_Schedule | |
| 8 | ItemImage_Fnd_From_RMS_Schedule |
| UomClass_Fnd_From_RMS_Schedule | |
| UdaItemDate_Fnd_From_RMS_Schedule | |
| UdaItemFF_Fnd_From_RMS_Schedule | |
| UdaItemLov_Fnd_From_RMS_Schedule | |
| UdaValues_Fnd _From_RMS_Schedule | |
| 9 | CodeDetail_Fnd_From_RMS_Schedule |
| DeliverySlot_Fnd_From_RMS_Schedule | |
| Diff_Fnd_From_RMS_Schedule | |
| UomConversion_Fnd_From_RMS_Schedule |
As initial data seeding should only be run once, you can disable daily scheduler after data seeding is completed.
For additional detail on BDI scheduler, please see BDI scheduler chapter in Oracle Retail Bulk Data Integration Implementation Guide.
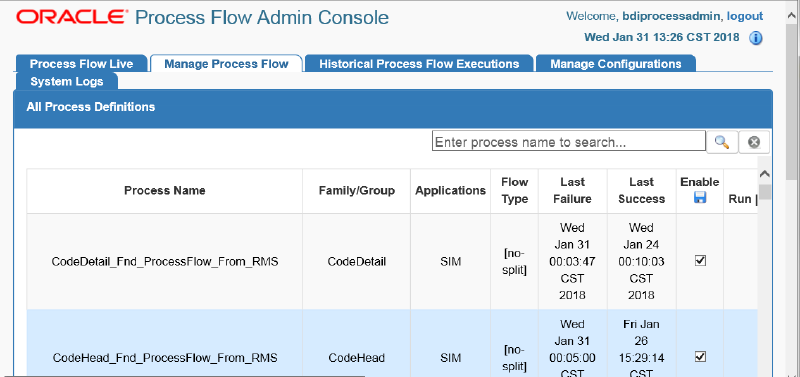
To view BDI Process Flow details, use the following steps:
Login to BDI Process Flow Console, navigate to Process Flow Execution tab to track the status of process flow.
View Process Flow component details:
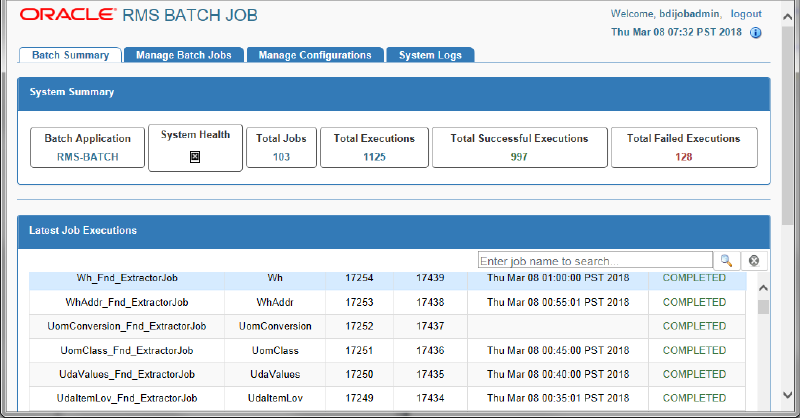
Extractor
To view extract data from source app, launch edge app batch job admin. Following shows the steps to view extractor from RMS: launch RMS Batch Job admin console, login as BDI job Admin user.
For details, please see Oracle Retail Bulk Data Integration Implementation Guide.
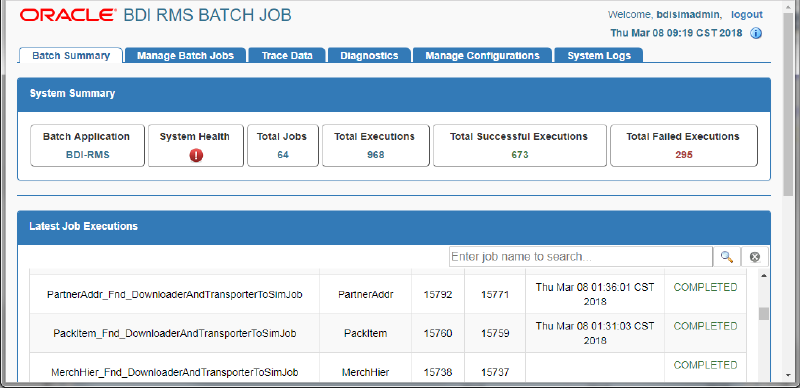
Downloader
To view BDI Downloader job details, launch BDI for edge app batch admin console. Following shows the steps to view download from RMS. Launch BDI RMS Batch Job admin console, login as BDI RMS Job Admin user.
For details, please see Oracle Retail Bulk Data Integration Implementation Guide.
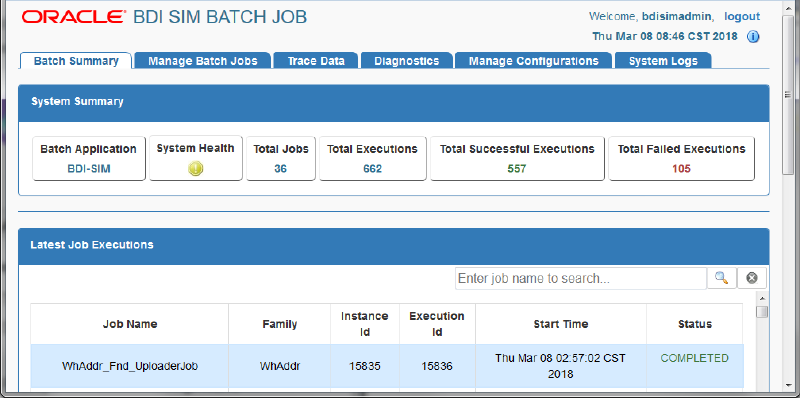
Uploader
To view BDI SIM uploader details, Launch BDI SIM Batch Job admin console, login as SIM BDI Job Admin user.
For details, please see Oracle Retail Bulk Data Integration Implementation Guide.
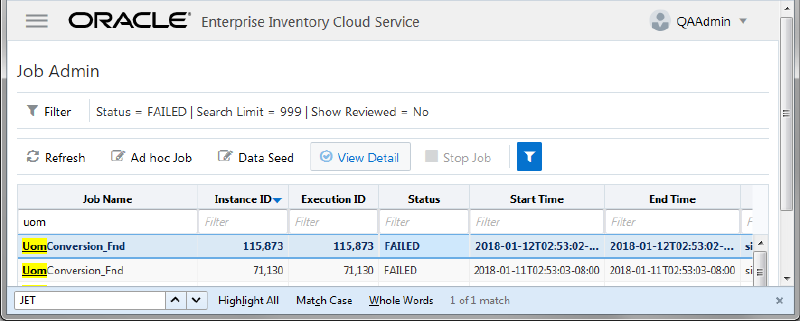
Importer
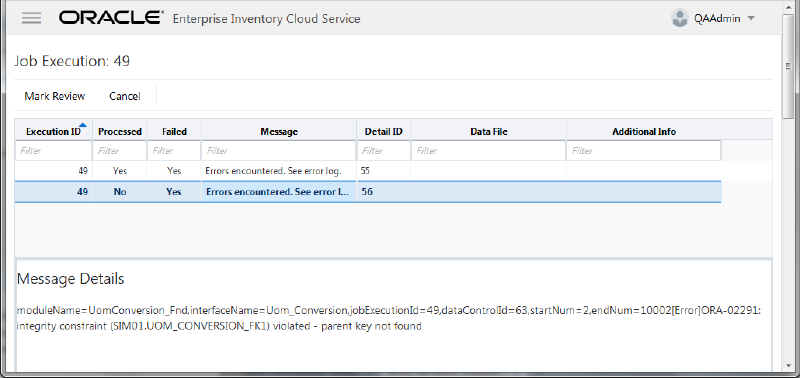
To View ECIS Importer details, launch EICS application, login ECIS as System Ops user, on Main Menu, Select Admin/ Technical Maintenance/Job Admin.
To view detail record, select the record, then click View Detail button, this will bring you to the Job Execution Detail screen.
If you set the EICS seed options to enabled, the data from external source system is automatically loaded into application table, and you can skip the following steps.
If you set the seed options to disabled, and want to load data from staging table to applications through manual steps, please refer to the following:
| Task | Step |
|---|---|
| Enable Data Seed Flags | Login ECIS as System Ops userOn Main Menu, Select Admin - Configuration - System AdministrationSearch for data seed on option field, change to desired value and save the change. Enabled Seed Foundation: true Enable Seed Store Data: true |
| Load data from stage tables to application tables | See Appendix A Run Importer Separately from EICS Job Admin |
After correcting the errors during process flow, you may re-run the initial data seeding process flow.
Important: Before executing additional runs of data seeding, please choose the appropriate re-seed options in EICS Job Admin Console.
|
Note: To import data for a specific store, please see Addition Notes: Importing Data for Single Store section |
EICS system ops ser login EICS, from Main Menu, navigate to Admin Technical Maintenance/Job Admin
On Job Admin Screen, click Data Seed Button, this will bring you to the Data Seed screen, follow following steps:
| Task | Step |
|---|---|
| Delete the previous seeded module data | Choose desired module from job drop-down list, and then select Data Seed Option Deleted
For example: Choose Job Name Store_Fnd Select Seed Option Delete Seeded If you enter the store id, then only the seed data for that store is deleted. |
| Re-load data from stage tables
(see re-import data from Source System, Re-import data step) |
Choose Job Name Store from job drop-down list, and then select Data Seed Option Seed
For example: If you enter the store id, then only the seed data for that store is seeded. If you want to import all stores, leave the store id as blank. |
| Re-Import data from Source System | Delete the previous seeded module data
Go to BDI process flow, choose the flow to be re-run, start the BDI process flow |
Enable EICS constraints after data seeding.
As EICS system ops user, login EICS, from Main Menu, navigate to Admin/Technical Maintenance/Job Admin
On Job Admin Screen, click Data Seed. This will bring you to the Data Seed screen.
Select Job Name Database Constraints.
From Seed Option drop-down list, select Enable Constraint, then click Start Job.
Purge data from inbound data seeding stage tables:
To purge the data from inbound staging tables, login EICS as EICS system ops user, from Main Menu, navigate to Admin Technical Maintenance/Job Admin.
On Job Admin Screen, click Data Seed button, this will bring you to the Data Seed screen.
Select Each Importer Job Name (for example Code Head), then choose Seed Option Delete In, click Start Job.
Turn off EICS Data Seeding System Configuration Flags.
Login Oracle Enterprise Inventory Cloud Service page as ECIS System Ops user.
On Main Menu, Navigate to Admin/Configuration/System Administration.
Search for data seed on option field, change value and save the change.
Enabled Seed Foundation: set value to false.
Enable Seed Store Data: set value to false.