| Oracle® Retail Store Operations Cloud Service User Guide Release 17.0 E88477-05 |
|

 Previous |
 Next |
| Oracle® Retail Store Operations Cloud Service User Guide Release 17.0 E88477-05 |
|
Previous |
Next |
This chapter covers Direct Store Delivery (DSD). The following topics are covered:
Overview: Introduction to DSD.
Functionality: Description of available screens.
A direct store delivery is a delivery in which the supplier drops off merchandise directly at the store. These deliveries, received directly at the store, can be against a planned delivery, an existing purchase orders raised by the corporate or by the store, or a purchase order on the fly. The delivery supports containers coming in directly with advance shipment notice (ASN) or the system will create a container when the ASN is loaded in SOCS. Even for receipts without ASN the system will allow the user to create containers.
The store can receive partial shipments, resulting in multiple deliveries against a single purchase order.
Features:
Direct deliveries against a Purchase Order (PO) and with Advance Shipment Notice (ASN) from the supplier. This feature also supports containers coming directly from the source and allows the user to create additional containers.
Direct Deliveries against a PO and without ASN from the supplier. The user can receive the delivery by creating one or more containers.
Direct deliveries without a PO.
Business Cases
DSD Receiving Process for PO based delivery with ASN:
Corporate office places a purchase order to the vendor and instructs the vendor to supply the goods directly to the store.
Supplier ships the goods with the ASN to the store and the store receives the goods against the ASN.
DSD Receiving Process for a PO based delivery without ASN:
Corporate office places a purchase order to the vendor and instructs the vendor to supply the goods directly to the store.
Supplier ships the goods, but no ASN is sent to the store and the store receives the goods against the PO.
DSD Receiving Process without PO:
Stores that are allowed receiving the goods without purchase order can verbally place the order to the vendor and create those receipts on the fly.
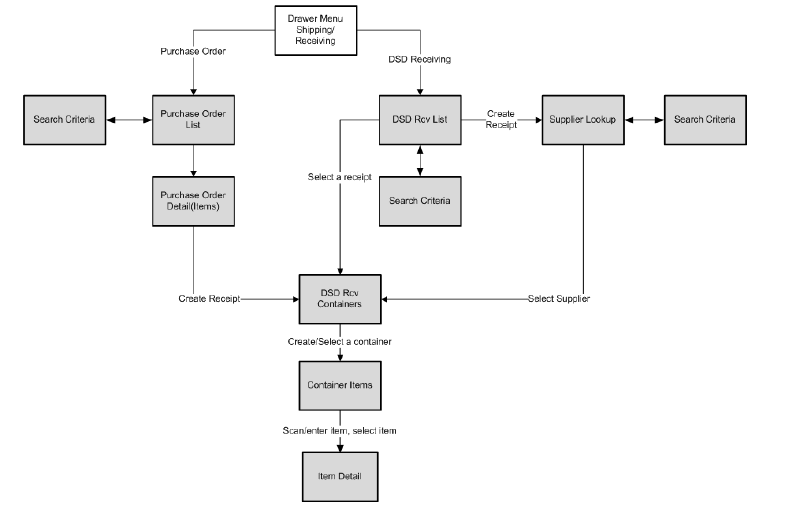
The user can access the DSD Receiving and Purchase order from the Shipping and Receiving menu. The DSD Receiving List screen that appears after selecting the DSD Receiving option lists all the active deliveries that are available and allows the user to create or modify a receipt. The user can also create a new receipt on the fly without any purchase order by selecting the create receipt button.
After selecting the ASN, active delivery, or supplier for creating an on the fly delivery, the DSD Receiving Containers screen appears and allows the user to proceed with detailed receiving using the Container Items screen.
The user can access various footer menu options such as Info, Edit Receipt, Customer Orders, External Adjustments, Notes, and so on from the DSD Receiving Containers screen to perform various individual functions.
Similarly the user can access various footer menu options such as Default Qty, Document option to select the PO for the PO based deliveries, Notes, and so on from the Container Items screen to perform various individual functions.
The Purchase Order List screen that appears after selecting the Purchase Order allows the user to view the Purchase Order detail and create a receipt against a PO.
When the user selects to create a receipt, the system takes the user to the DSD Receiving Detail screen and follows the same flow as described above.
This section describes the available screens.
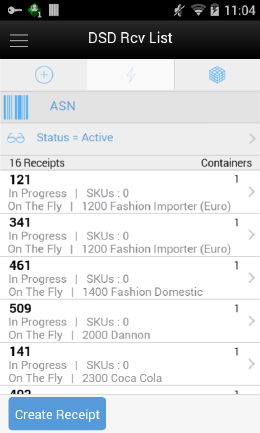
The DSD Receiving List screen is accessed when the user clicks on the DSD Receiving button from the Shipping and Receiving menu.
The DSD Receiving List by default shows all the active deliveries, that is In Progress and New for the user to do the detailed receiving. It includes all types of deliveries. If the supplier has sent an ASN, it is uploaded and listed here with New status. The user can select a delivery and do the detailed receiving. If the user has started the delivery process, it shows the delivery with the In Progress status. The user can select the In Progress deliveries to continue the receiving. The user can also select the completed deliveries to do the adjustment.
The deliveries created in SOCS are shown with the type On The Fly.
The deliveries that have ASN from the source are shown with the type ASN.
The deliveries that are PO based and no ASN are shown with the type PO.
DSD Receipts that are affiliated with a customer order will be indicated with the text 'CO' at the receipt level on this screen.
From the DSD Receiving List window, the user can do the following:
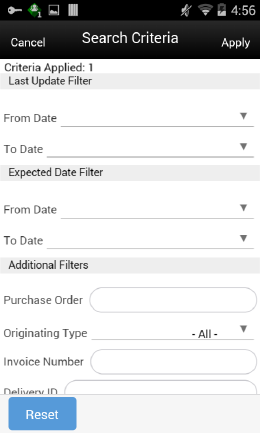
Select the search criteria option which is shown with the pair of eye glasses to filter the list based on the given criteria. Upon selecting the search criteria option, the user is taken to the Search Criteria screen which is described below.
Select the Create Receipt button or from the footer menu to create a delivery without any PO (on the fly). Upon selecting this option, the user will be taken to the DSD Receiving Containers screen.
Select the delivery from the list and do detailed receiving or edit the delivery. Upon selecting the delivery record from the list, the user is taken to the DSD Receiving Containers screen to access the existing delivery.
The DSD Receiving List search criteria screen is accessed by selecting the search criteria option with the pair of eye glasses from the DSD Receiving List screen (DSD Rcv List). By default, the DSD Receiving List screen lists the active deliveries; the user can use this screen to search for deliveries on various other criteria. After applying the filter, the user will be returned to the DSD Receiving List screen with the deliveries displayed based on the entered criteria. The user will be able to filter on DSD Receipts that are for customer orders as well as search for receipts that are for a specific customer order or fulfillment orders.
The user can select the 'Include Item Packs' check box which is enabled only if the item is entered to search for deliveries that include the pack item of the entered item.
The user can use the Reset button on this screen to reset all the filtering criteria to default values.
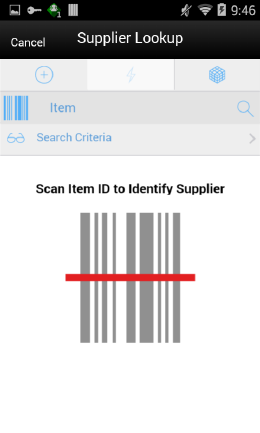
The user can create a new direct delivery on the fly without any ASN or PO by selecting the 'Create Receipt' option from the DSD Receiving List screen. The system displays the supplier lookup screen for the user to search the supplier and select to create the delivery.
This supplier lookup screen appears when the user selects the Create Receipt option on the DSD Receiving List screen to create an on the fly receipt that does not have a PO in the system.
The user can identify the supplier by entering or scanning the item id or select the search criteria option to filter the supplier based on the entered criteria.
Based on the item id or on the values entered in the search criteria, the supplier(s) are listed and allowed to select a supplier who delivered.
After selecting the supplier, the system takes the user to the DSD Receiving Containers screen to create new containers and do detailed item level receiving. See DSD Receiving Containers.
The selected supplier must be allowed to create new Purchase Orders or the Ignore the Supplier DSD indicator to create a PO on the fly parameter has to be set to Yes to receive a delivery without a PO from that supplier.
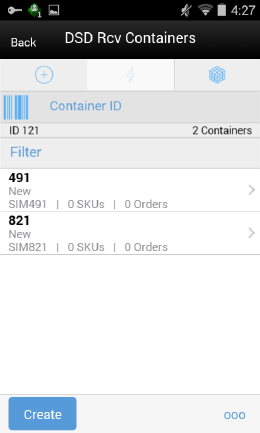
The user can see the DSD Receiving Containers (DSD Rcv Containers) screen for all type of deliveries. It appears under the following conditions:
When the user selects the delivery from the DSD Receiving List screen
When the user selects the Create Receipt button from the Purchase Order Items screen
After selecting the supplier, when the user selects the Create Receipt button from the DSD Receiving List to create an on the fly delivery
If the user is receiving a delivery with an ASN type of delivery, it shows the containers. The user has to select the container to go to the Container Items screen to do the detailed item level receiving. The user can also create a new container using the Create Container option which takes the user to the Container Items screen to receive unexpected containers or when adding a container for a delivery without ASN.
The Create option is only available if the user has permission and for the New and In-progress deliveries.
The user can also optionally scan or enter the container id to do the detailed item level receiving for that container.
The user can tap on the filter field and do the text based search on the containers to refine the search on what is listed.
The list will be empty with zero containers initially in case the user is creating a new receipt without a PO or with a PO and no ASN. The user has to select Create Container in that case to start the receiving process.
On this screen, the user can also do other operations by selecting the respective option from the footer menu which can be accessed by selecting the ellipsis (…) from the lower right hand corner of the screen.
Create: This menu is same as Create button for the user to create a new container.
Info: The user can select the info option to view the invoice particulars and delivery related information. More details are explained in the later part of this guide.
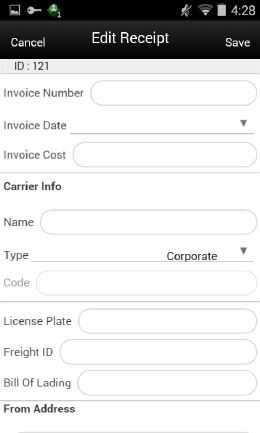
Edit Receipt: This menu option allows the user to enter the receipt information such as carrier and invoice details. When selected, the user will navigate to the Edit Receipt screen which is discussed in later part of this guide. This menu option is available only for the deliveries in New or In-Progress status.
Default Qty: The default quantity option will help the user to default the remaining expected quantity to the received quantity in the containers. The system will not default the quantities for the items that are processed earlier and contains a value including zero. This button is not enabled for the on the fly delivery. The user will be able to do this process from this menu for all the containers in the current delivery with the New and In-Progress status. For specific containers, the user has to go into the detail, that is, Container Items screen.
If the delivery is flagged for quality control, user cannot default the quantity and user would be prompted with a message.
Confirm: Upon selecting this option, the system will confirm the delivery. The status of the container is moved to Received or Damaged or Missing or Submitted.
If all the items in the container are zero received, the status of the container is updated to Missing.
See Delivery Rejections and Supplier Discrepancy Check section for more details.
Reject: The user can select the Reject menu if the delivery has to be rejected. This will reject the delivery and move all the containers to canceled status and move the status of the delivery to Rejected. Rejection of a delivery is possible only for the deliveries that are in In Progress or New status and it will not allow rejecting if there are any received or damaged containers in the delivery.
Delete: The user can select the Delete menu if the delivery has to be deleted. This will cancel the delivery and all the containers inside the delivery.
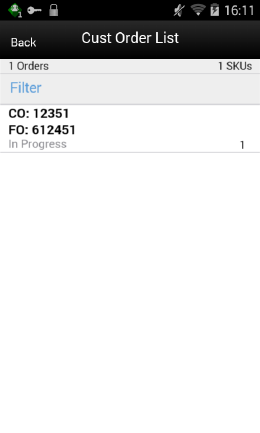
Customer Orders: The user can select this menu to view the customer orders associated to the delivery. More details are explained in the later part of this guide.
Ext. Adjustments: The user can select this menu to view any adjustments done by the external system for the delivery. More details are explained in the latter part of this guide.
Notes: The user can use this option to access the Notes dialog to enter any notes for the delivery.
Back: This will act similar to the back button which takes the user back to the previous screen.
List header fields on this screen are as follows:
| Field | Description |
|---|---|
| Receipt ID | Unique ID generated internally by the system. |
| X Containers | X is the number of active containers currently shown on the list. |
Detail fields on this screen are as follows:
| Field | Description |
|---|---|
| ID | Unique container ID created by the system internally. |
| Status | Current status of the container.
|
| Customer Order | The DSD Receiving Containers has a customer order field at the container line level to indicate if the container is for a customer order. If all items in the container are for a customer order, it will be displayed as 'CO'. If no items in the container are for a customer order, it will be blank. Lastly, if some items are for a customer order and some are not, it will be shown as 'CO Mix.' |
| Container ID | Container ID that came in ASN from the external vendor system. |
| Number(X) of SKUs | Number of SKUs present in the container. |
| Number(X) of Orders | Total number of purchase orders the container is associated to. |
| Tracking ID | Tracking Id displayed if available. |
Delivery Rejections and Supplier Discrepancy Check
The system does the discrepancy check based on the supplier level Supplier Delivery Exception Attribute. The attribute can indicate to Allow Any Discrepancy, Do Not Allow Any Discrepancies, or Allow OveragesBut Not Short Receipts. Discrepancy checking only happens for those deliveries that have an expected quantity; this includes DSD deliveries for PO deliveries with or without ASN. Deliveries on the fly do not check for any discrepancies.
Discrepancy checking is done at the container level against the expected quantity. For an ASN, this would be the expected quantity of the container, while for a delivery on the fly against an existing PO, it is the remaining quantity of the PO.
The user has the ability to override the discrepancy check at the container level based on the Override supplier discrepancies security permission. Once a container is moved to Submitted or Received, no additional validation is performed.
Depending on the type of DSD, some containers will move to submitted and require the whole delivery to be confirmed, while others will move to a received status. The reason for this is transactional integrity.
With an ASN, the received container can move to a received status, which indicates that the Stock on Hand is updated and the merchandising system is notified that the container is received. The transaction will automatically move to confirmed when all containers are received.
PO on the fly do not update inventory until the delivery is confirmed, hence the containers move to a submitted state. At that time, the delivery transaction is confirmed, the merchandizing system is notified of the whole delivery, inventory is updated and the submitted containers move to received.
PO deliveries without an ASN fall into a unique case. If there is a discrepancy check performed, the container will move to submitted and require the delivery to be completed for any updates and integration. If on the other hand, the supplier does not require a discrepancy check or the supplier allows overage and it is a short receipt that is overridden, the container will be moved to a received state, the Stock on Hand will be updated, and the merchandizing system will be notified when it is confirmed. Manual closure of the delivery transaction is required in all cases because additional containers may need to be added.
The following table describes the state the container moves into or when the user is stopped when confirming a container.
| Delivery Type | On the Fly | Without ASN | With ASN |
|---|---|---|---|
| Discrepancy check on carton confirm | No | Yes | Yes |
| Supplier Restricted, carton confirm status | Submitted | Submitted | Received |
| Supplier Restricted and No override discrepancy allowed | Submitted | Hard Stop | Hard Stop |
| Supplier Restricted and override discrepancy allowed | Submitted | Confirm Prompt
Submitted |
Confirm Prompt
Received |
| Supplier Allow Overage, No override allowed and carton has short receiving | Submitted | Hard Stop | Hard Stop |
| Supplier Allow Overage, override allowed and carton has short receiving | Submitted | Confirm Prompt
Received |
Confirm Prompt
Received |
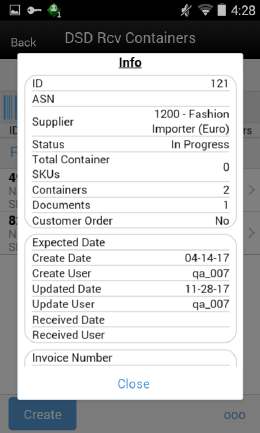
This screen is accessed from the DSD Receiving Containers screen when the user selects the Info option from the Footer menu.
This screen provides the read only information such as ID which is internally created in the system, ASN, supplier, number of containers, status, create date, expected date, invoice particulars, carrier particulars, user details, and so on
This screen appears when the user selects the Customer Orders footer menu option from the DSD Receiving Containers screen. It will display the customer order and fulfillment order IDs, along with the container ID, status, total number of orders and total SKUs. If there are no customer orders associated, it will display an error upon selecting the option. This menu option is available only for ASN and PO based deliveries regardless of delivery status and not for on the fly deliveries.
This screen is for the user to capture the invoice and carrier particulars of the delivery.
This screen is accessed by selecting the Edit Receipt option from the footer menu on DSD Receiving containers screen by selecting the ellipsis (…) on the right hand side lower corner.
| Field | Description |
|---|---|
| Invoice Number | This field is to capture the supplier invoice number of the delivery received. This field will display depending on the configuration. |
| Invoice Date | To capture the invoice date. This field will display depending on the configuration. |
| Invoice Cost | This field is for the user to enter the invoice cost. This field will display depending on the configuration |
| Carrier Info | |
| Name | This field holds the name of the carrier that delivers the products. This is a text entry field. |
| Type | This field holds the type of carrier, whether it is Corporate or Third Party. This is a drop-down list. |
| Code | This field holds the Standard Carrier Alpha Code if the carrier type is Third Party. This field is only available when Third Party is selected. This is a text field. |
| License Plate | This field holds the license plate from the Carrier's delivery vehicle. This is a text field. |
| From Address | This field holds the address where the delivery came from. This field is only available when Third Party is selected. This is a text field. |
| Freight ID | This field holds the industry standard freight codes. This is a text field. |
| Bill of Lading | This field holds the bill of lading identification number and will default if included on the ASN. This is a text field. |
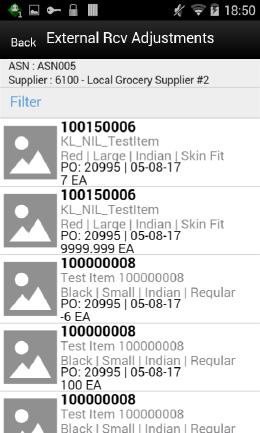
The user can access this screen from the DSD Receiving Containers screen by selecting the Ext. Adjustments footer menu option. This read-only screen displays the ASN and supplier information at the header level and at detail level it displays Purchase Order Number, Date, Item, Description, adjusted quantity and its UOM for the external receiver adjustments that exists for the delivery. Users will be able to access this screen only when there are any adjustments created for the delivery from the external system. Store users internally adjusted deliveries in the system are not shown here.
This screen is accessed when the user selects Create Container option or selects an existing container on the DSD Receiving Containers screen. This is the screen seen by the user for detailed item level receiving irrespective of the type of deliveries.
The user must have proper permissions assigned to come to this screen for both creating a new container and editing an existing container.
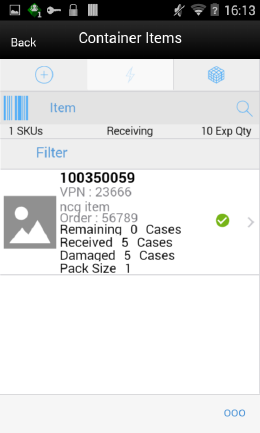
This screen displays the list of items that are in the container and details for a container on an ASN, or on the fly delivery. All this information is initially coming from the supplier ASN with the exception of the received and damaged cases. For a new based delivery, the items from the container are pre-loaded on the container items screen from the source. The user is allowed to add additional items to the container if permissions are granted to over receiving and adding items.
For ASN based deliveries if the item added exists in more than one Purchase Orders and if the user has not set any PO for receiving, the system prompts the user to select the PO to assign to the item. The user can use the Select Purchase Order screen by tapping the info bar or 'Select PO' footer menu option to select the PO and add items from that PO.
For a new container created for the on the fly delivery, the user can enter/scan the items to receive.
For a new container created for a PO based but no ASN, the user can use 'Select PO' screen by tapping the info bar or select the 'Select PO' footer menu option and add the items and also populate the remaining quantity optionally.
On this screen, the user can also do other operations by selecting the respective option from the footer menu which can be accessed by selecting the ellipsis (…) from the lower right hand corner of the screen.
Info: The user can select this option to access the Info screen to capture the container information.
Notes: The user can use this option to enter any notes for the delivery.
Default Regular Qty: This menu option will allow the user to default the expected quantity to the received quantity field. This menu option is only available when the container is in New or In-Progress status and user having proper permissions.
If the expected quantity is zero (in the case of adding an unexpected item), the received quantity is updated to zero.
If the delivery is flagged for quality control, user cannot default the quantity.
Select PO: This menu option will allow the user to select the Purchase Order for an ASN based delivery.
Clear Qty: This menu option allows the user to clear the received quantity and damaged quantity fields for all items. This menu option is only available when the container is in New or In-Progress status.
Damage Mode: This menu option will allow the user to scan/enter items and update the Damage Qty field. Once selected, the list header bar is updated to 'Damages' and any item entered or scanned will update the damages quantity. This menu option is only available when all of the following conditions are met:
The Container status is New or In Progress.
This menu option will display when the user is in Regular Mode.
The user has the proper permissions.
Regular Mode: This menu option will allow the user to switch to scan/enter items and update the Received Qty field. Once selected, the list header bar is updated to 'Receiving' and any item entered or scanned will update the receiving quantity. This menu option will only display when all of the following conditions are met:
The Container status is New or In Progress.
When the screen is set to Receiving Damages.
Edit Container: This menu option will allow the user to enter container information.
Adjust: This option on the DSD Receiving Container Items screen allows the received container to be reopened for receiving. The system allows the user to add items, delete items, modify the quantity, save, or confirm the delivery. All options are available as if the container was never received.
The period at which the user is allowed to adjust the deliveries from the time the receipt is confirmed is based on the parameter and also the user should also have security permissions to adjust the container. Once the container is moved back to In Progress, the user can work on it as if it was never received.
Damage Remaining Qty: This menu option will allow the user to update the Damaged Qty for all items in the container where Expected - Received Qty is greater than zero.
If the user has not received any items in the container, all items in the container are marked as damaged.
If the user has received some items and the Expected - Received Qty is greater than zero, the Damaged Qty field is updated with the remaining qty.
This menu option is only available when the container status is in New or In Progress.
Display Only Discrepancies: This menu option will allow the user to display only items with a Received + Damaged Qty which does not equal the expected quantity.
This menu option is only available when the screen is in a 'Display All Items' mode.
The discrepancy check will apply to all items, even those with an expected quantity of zero. When an item is added to a container the Expected Qty will have a zero. The unexpected items will always be discrepant.
Display All Items: This menu option will allow the user to reset to display all items after selecting to Display Only Discrepancies. This menu option is not available for on the fly deliveries.
Confirm: This menu option is for the user to confirm the container. Refer discrepancies portion described in this guide for additional information.
Save: This menu option is for the user to save the container with current changes.
Delete: The user can use this menu option to delete the container.
Back: This menu is for the user to go back to the previous screen.
Cancel: This menu option is for the user to cancel any changes and go back to the Containers screen.
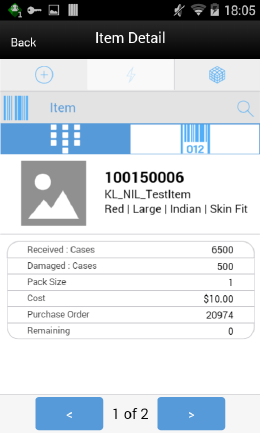
The Item Detail screen is accessed from the Container Items screen by the user when scanning an item that is already in the container or adding a new item to the container.
Scanning or entering an item on this screen in the scan bar updates the quantity per the scan mode and refreshes the Item Detail screen for the item and quantity scanned.
The user can edit the received or damaged quantity if it is in edit mode and if the user has permissions.
The item header portion displays the item information including the image if configured to show. The bottom portion which is detail allows the user to edit the quantities if the state of the container allows and the user has permissions. The system displays the following fields on the bottom portion.
| Field | Description |
|---|---|
| Received | This field shows the UOM based on the UOM mode.
The value on this field is the received quantity. When this is editable, the user is allowed to enter the quantity via a popup. User needs permissions to edit the quantity |
| Damaged | This field shows the UOM based on the UOM mode.
The value on this field is the damaged quantity. When this is editable, the user is allowed to enter the quantity via a popup. User needs permissions to edit the quantity. |
| Pack Size | This is the pack size of the item. This field is editable. |
| New Cost | This field is populated with the item supplier cost in case of on the fly deliveries.
This field is displayed and editable for on the fly. The user can enter the cost of the item at which the item is received from the supplier. This field is displayed only if it is configured to show. In general, if a PO was created by the merchandizing system, the system does not allow the store user to edit the cost as it was defined by the external system. It will also not communicate any cost information to the merchandising system. If the delivery is on the fly, the system will use the cost based on item supplier country information. It is possible with the right permissions to edit this cost and the cost can be communicated to the external system |
| Original Cost | This field is a read only field and only for PO and ASN based deliveries |
| Purchase Order | PO assigned to the current item shown to the user. |
| Expected | Expected quantity to be delivered from the ASN/PO. |
| Remaining | Balance quantity to be delivered in the order. |
The user can navigate through the existing items on the container using the two arrows on the bottom. In between the arrows the system displays the current item number position out of the total number of items.
The user can do the additional below operations by selecting the respective footer menu options.
Damage Mode- This menu option will allow the user to scan/enter items and update the Damage Qty.
The value selected will update any item entered or scanned after changing.
The receiving mode will stay the same until it is changed by selecting the footer menu again.
When the user navigates to this screen from the Container Items screen, the receiving mode will be the same on this screen.
If the user changes the Receiving mode from this screen and navigates to the Container Items screen, the receiving mode will also be changed on the Container Items screen.
The user will remain on this screen.
Regular Mode - This menu option will allow the user to scan/enter items and update the Received Qty.
The value selected will update any item entered, scanned or tapped after changing.
The receiving mode will stay the same until it is changed by selecting the footer menu again.
When the user navigates to this screen from the Container Items screen, the receiving mode will be the same on this screen.
If the user changes the Receiving mode from this screen and navigates to the Container Items screen, the receiving mode will also be changed on the Container Items screen.
The user will remain on this screen.
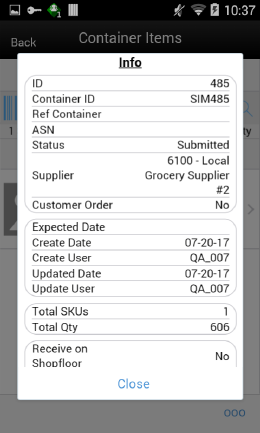
This screen is accessed from the DSD Receiving Container Items screen when the user selects the Info option from the footer menu. This is a read only screen and provides below information about the container.
| Field | Description |
|---|---|
| ID | Unique container ID created by the system internally. |
| Container ID | Container ID that came in ASN from the external vendor system. |
| Reference Container | This field is used to identify a misdirected container. |
| ASN | Advance shipment number of this delivery. |
| Status | Current status of the container |
| Supplier | This field shows the supplier id and the name of the supplier who delivered. |
| Customer Order | This indicates whether customer is associated. If a customer order is associated with all the items in the container, it will display <Yes> and if the container contains items with and without customer associated, it will display <Mix>. If there is no CO, it will display <No |
| Expected Date | Original expected date of the delivery. |
| Create Date | Date of creation of the container in the system. |
| Create User | User who created the container. |
| Updated Date | The date on which the container was last update. |
| Updated User | The user who updated the container lately. |
| Received Date | The date on which the container was received. Shown only after if it is received. |
| Received User | The user who received the container. Shown only if it is received. |
| Total SKUs | Total number of items. |
| Ordered Qty | This field displays the total remaining ordered quantity. This appears only for the PO based delivery. |
| Expected Qty | This field displays the total expected quantity. Unlike the Container Items screen at the individual item level this is not depending on the permission. This appears only for ASN based delivery. |
| Total Qty | This field displays the total received quantity including the damaged. |
| Receive on Shop floor <Yes/No> | This field displays Yes or No, to indicate whether the receiving happens at the shop floor. |
| Damage Reason | This field displays the damage reason if the user has captured. |
| SSCC | This field displays the GS1 barcode container id if the user enters one on the DSD Receiving Edit Container screen. |
| Tracking ID | This field displays the tracking id assigned to the container if the user enters one on the DSD Receiving Edit Container screen. |
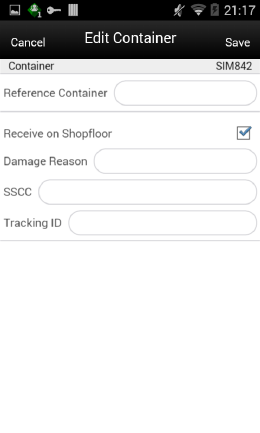
This screen is for the user to capture the container information such as reference container, to indicate whether the container is received at shop floor, damage reason, SSCC and Tracking Id of the container.
This screen is accessed by selecting the Edit Container option from the footer menu on Containers Items screen by selecting the ellipsis (…) on the right hand side lower corner.
The user has to complete the following fields that are enabled and then save to return to the DSD Receiving Container Items screen:
Reference Container: This field is to capture a reference to a container that was not intended for the current location.
Receive on Shop Floor: The default will be based on the store parameter ' Direct Delivery Default to Shop floor Receiving'. If set to Yes, the check box will default to marked. The user is required to have Receive Direct Delivery on Shop floor permissions to change the value. This field is editable until the container is confirmed. When the user adjusts (reopens) the container after confirming the field is again editable. When filling the Shop floor, the 'Direct Delivery Receive Item Capacity' will be considered.
Damage Reason: This field allows the user to identify the reason for damage on the container, when items in the container have been damaged during transport. This field is optional.
SSCC: This field allows the user to identify a GS1 bar code used with the container. There is no validation on this field and it is optional. This is the full 18 digit number.
Tracking ID: This field allows the user to type in a tracking id from the delivery service. This is a text field and is not validated. This is an optional field used to track information only.
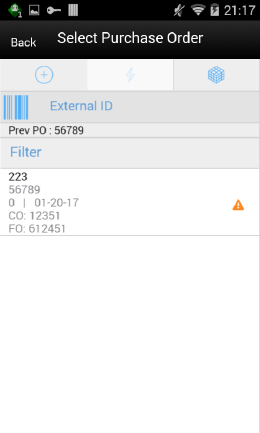
This screen can be reached through the Container Items screen by the user by tapping the document bar or by selecting the select PO footer menu. This screen will show the purchase orders and, when the user selects the purchase order the user is prompted with a popup with the below purchase order options.
Use Purchase Order: This menu option will set the PO document referenced in the container to the user selection. Any items added will be added/updated to the selected document.
There will be validation to see if the item exists on the PO document, but the items are not automatically added to the container.
This will be the option by default selected.
Apply Item(s): This menu option will add all items from the selected PO document to the container without applying the remaining quantity to the received quantity and the system will de-fault the received quantity to zero.
Add Item(s) & Remaining Qty: This menu option will add all items along with their corresponding remaining quantity to the received quantity in the container.
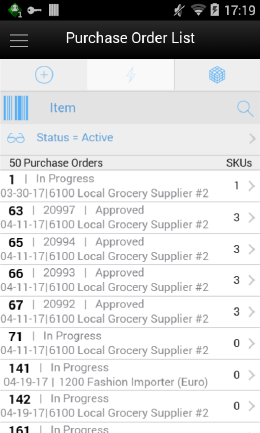
This screen is accessed when the user selects the Purchase Order menu from the Shipping / Receiving drawer menu.
The Purchase Order List is a screen that allows users to view purchase orders placed to the suppliers to supply goods for the user's store. The default is to display the list of all active status that is Approved and In Progress purchase orders. The user can use the search criteria screen to filter out the records.
This screen provides the following header level information about the Purchase Order including the ID which is system internally generated, External ID, Supplier, Create date of the PO, current status of the PO, total number of SKUs, and customer order id and fulfillment order id if customer order is associated with the PO.
On the List header, it shows the total number of Purchase Orders listed.
From the Purchase Order List screen, a user can select a Purchase Order to go the Purchase Order Items screen to view the item details for the PO.
Purchase Orders created internally in the system for on the fly deliveries are also shown in this list.
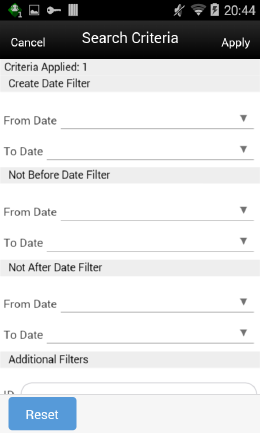
This is the Purchase Order List Search Criteria screen. It is accessed by tapping the search criteria option shown with the pair of glasses from the Purchase Order List screen. The user can filter the purchase orders with a variety of search criteria. After applying the criteria, the user will be returned to the Purchase Order List screen with the Purchase Orders displayed per the entered criteria.
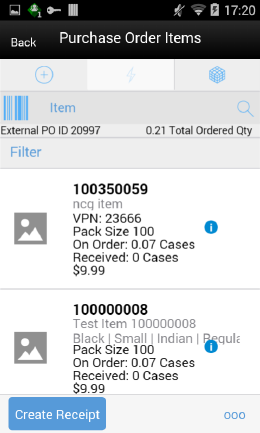
The Purchase Order Items screen is accessed when the user selects a Purchase Order record from the Purchase Order list screen.
The Purchase Order Items screen displays all of the Purchase Order header and item details for the selected purchase Order. This screen is view only for informational purposes.
The header contains the header information including: Supplier, system created unique Id, External Purchase Order ID, Customer Order (if applicable), Fulfillment Order (if applicable), current status of the PO, Create Date, Not before date, Not after Date, and UOM. The user can select the UOM from the drop-down to view the items based on the selected UOM.
The ordered quantity is the total quantity remaining in the order for all the items, the expected quantity is the total ordered quantity in the order for all items and the received quantity is the total of how many quantities quantity received.
The detail level has the item, description, Pack Size, as well as the On Order, Expected and Received.
The user can create a receipt from the Purchase Order Items screen by selecting the create Receipt button which will navigate to the DSD Receiving Containers screen with the existing Purchase Order applied to the delivery. The user can create container and start the receiving process as previously described.
The user can select the Info option from the footer menu to view the PO details.
DSD Receiving can be configured to reserve inventory for customer orders upon receiving and also to auto pick the inventory. For additional details on this process, see Customer Orders.