| Oracle® Retail Store Operations Cloud Service User Guide Release 17.0 E88477-05 |
|

 Previous |
 Next |
| Oracle® Retail Store Operations Cloud Service User Guide Release 17.0 E88477-05 |
|
Previous |
Next |
Inventory Adjustments allow a user to change the number of units in stock or mark them as non-sellable due to damage and other reasons:
The following features are available:
Search for inventory adjustments
Create a new inventory adjustment
Copy an existing inventory adjustment
View or edit an existing inventory adjustment
Delete In Progress adjustments
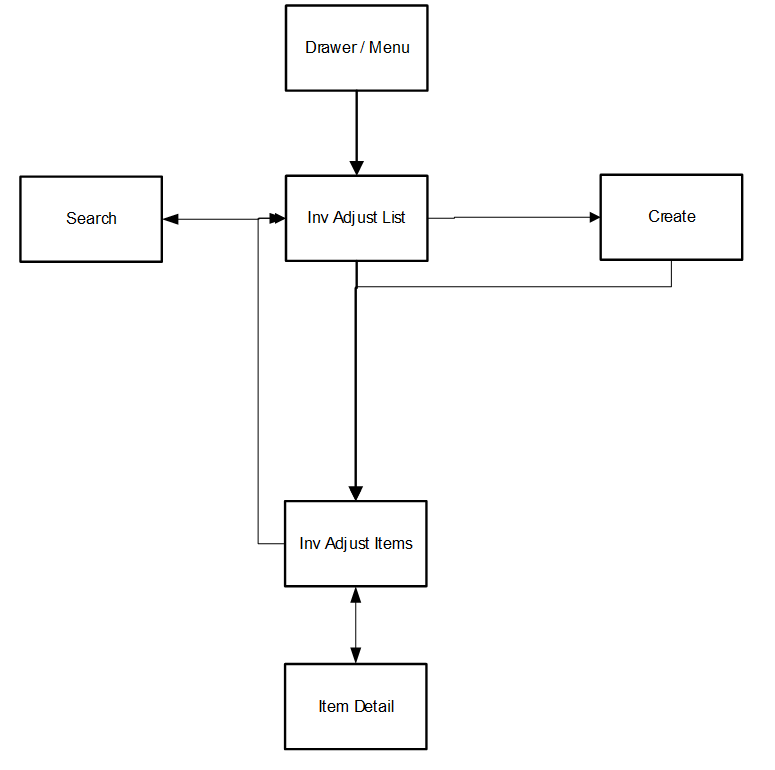
Inventory Adjustments are accessed through the Inventory Adjustment menu within the drawer. Selecting the menu option takes you to the Inv Adjust List screen. On this screen, you have the option to search for adjustment records that are presented on the Inv Adjust List screen. You can create an inventory adjustment, edit, or view an adjustment. When creating, editing, or viewing an inventory adjustment, you are first directed to the list of items on the Inv Adjust Items screen. You can add, view, and edit the details of the items on the Item Detail screen.
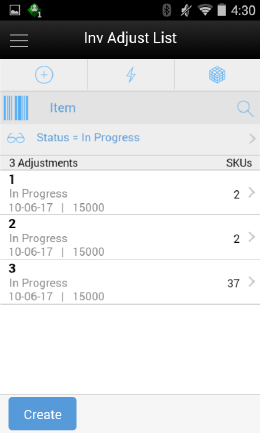
When navigating to Inventory Adjustments, the Inv Adjust List screen displays the 'In Progress' adjustments as the default list. All manually created inventory adjustments as well as those created by an external system, such as through the web service, appear in the list screen.
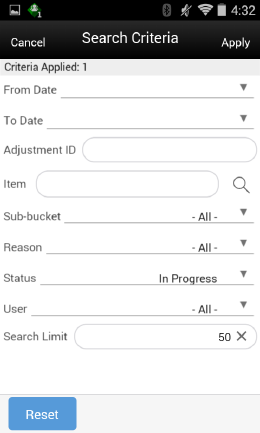
You can use the search criteria eye glasses to navigate to the Inventory Adjustment Search Criteria screen to enter search criteria for inventory adjustments. When scanning/entering an item in the scan bar, the system adds the item to the entered search criteria and narrows down the current list of adjustments.
Creating a new adjustment directs you to the Inv Adjust Items screen with no details (items) to build a new inventory adjustment. Selecting an adjustment from the list navigates you to the details for that adjustment.
The Inventory Adjustment Search Criteria Screen is accessed by the eye glasses on the Inventory Adjustment List (Inv Adjust List) screen. After applying the search criteria, the results are listed on the Inv Adjust List screen and the criteria applied is shown.
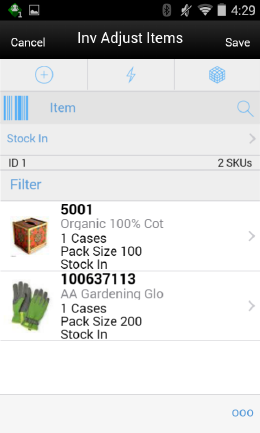
The Inv Adjust Items screen is where a new adjustment is created. Initially, this screen will not have any items. The items are listed for the adjustment. The item image for the line items is displayed per configuration.
Line items appear in a list and selecting a line item navigates to the item details of that item. If an item has been changed in the current session, it is indicated by a bar on the left of the item. Scrolling in the list of items displays a filter. The filter can be used to narrow down the list of items. Filtering can occur by item ID, description, reason, and unit of measure.
A reason code must be selected before being able to add or edit an item on the adjustment. The reason code selected is at the header level and is applied to all newly added items until it is changed to a different reason in which the newly changed reason is added to the items. The reason codes have a disposition associated to them which determines stock movement of the item.
Scanning or entering an item in the scan bar navigates you to the Item Detail screen for that item. The quantity may be updated depending on the scan mode.
The item must be unique on the adjustment.
The ellipsis in the lower right hand corner accesses the footer menu which contains all of the functions that can be performed on an inventory adjustment.
Footer Menu
The footer menu is accessed from the ellipsis footer menu on the Inv Adjust Items screen. The menu functions include the following:
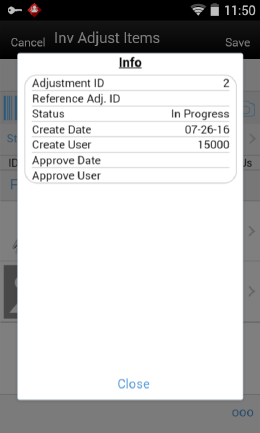
Info: Accesses the Info popup.
Notes: Accesses the notes dialog to capture notes.
Confirm: Confirms and completes the adjustment. All stock on hand updates are made and the adjustment is published out.
Save: Saves the adjustment in 'In Progress' status to be completed later.
Saving an adjustment does not publish the adjustment nor does it reserve any inventory; it simply saves it. The Save button can be used to implement a Save and Approval process.
Delete: Marks the inventory adjustment to 'Canceled' status.
Cancel: Exits the adjustment; changes made in that session are not saved.
Copy: The copy function is only available for those adjustments in a 'Completed' status. It takes the current adjustment, copies the items, reasons and quantities, and creates a new editable adjustment with a new ID. It references the copied adjustment's ID.
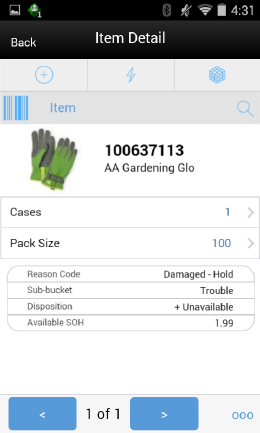
The Item Detail screen is used for selecting or scanning an item from the Inv Adjust Items screen. Scanning or entering an item on this screen in the scan bar, updates the quantity per the scan mode and refreshes the Item Detail screen for the item and quantity scanned.
The quantity can be edited and updated manually if permissions allow. The system validates the inventory bucket based upon the disposition associated to the reason code. A reduction adjustment in inventory may exceed available inventory, bringing total available as a negative value. However, an unavailable inventory adjustment can never make the non-sellable unavailable bucket go negative. The same is true for sub-buckets, when sub-buckets are used, the reduction of a sub-bucket must be less than or equal to total quantity of such a sub-bucket. Increases for available, or non-sellable unavailable have no restriction.
The item information including the image (which is system configured) displays in the header. The bottom portion of the screen contains information fields for reason code, disposition, sub-bucket (if system configured), and the stock on hand pertaining to the bucket in which the stock is coming from.
The footer menu, ellipsis button, contains a reset function as well as remove and restore functions. You can page through existing items on the adjustment using the arrows on the bottom.