| Oracle® Retail Store Operations Cloud Service User Guide Release 17.0 E88477-05 |
|

 Previous |
 Next |
| Oracle® Retail Store Operations Cloud Service User Guide Release 17.0 E88477-05 |
|
Previous |
Next |
The lookup features provides a robust system for searching information. The user is able to search for items, suppliers, and shipping containers.
The Item Lookup functionality provides the business user with the ability to view information related to an item. In addition, the Item lookup can also be used in conjunction with other screens to assign items to a transaction. The system provides real-time information on inventory positions and other item detail information.
The following features are available:
Status
Item Suppliers
Item Attributes
Pricing and Price Information
Ordering Attributes
Stock on Hand and Non-sellable Inventory
Ordered Quantity
Merchandise Hierarchy
Pack / Component Details
Planned Deliveries
Related Items
Stock Locator
UDA
Customer Orders
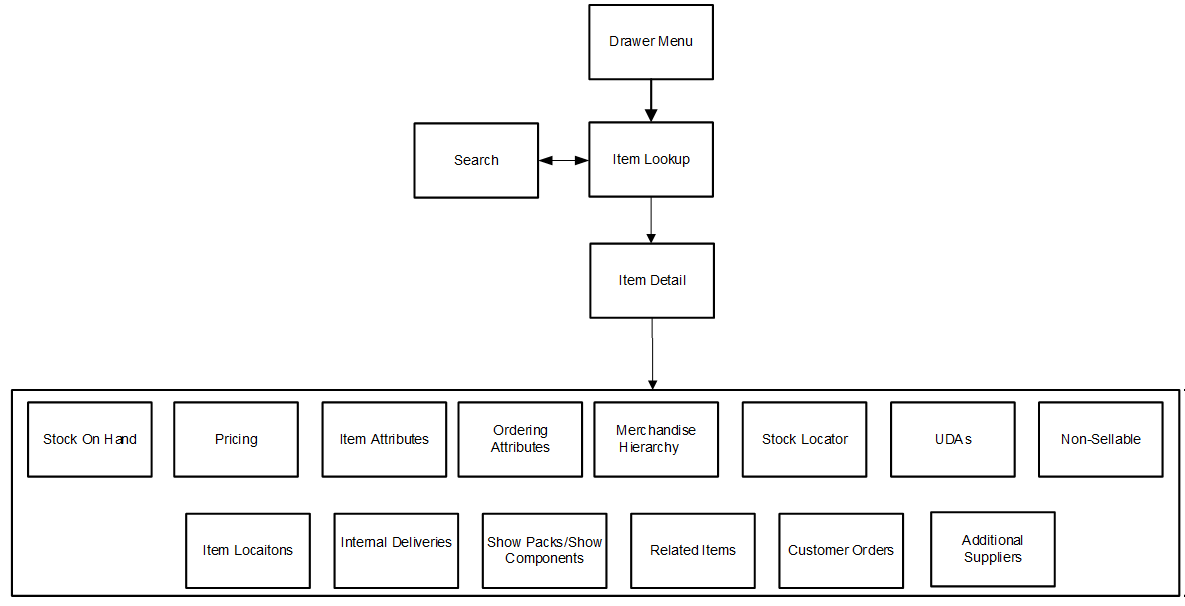
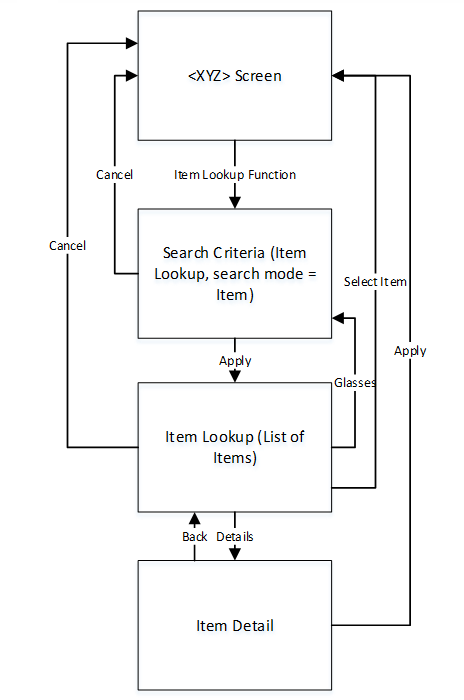
This is a screen flow for the Item Lookup functionality. Selecting Item Lookup from the menu drawer directs to the Item Lookup screen. From Item Lookup, the user can search for items and view different details about the item. Details that can be viewed include:
Stock on Hand
Pricing
Item Attributes
Ordering Attributes
Merchandise Hierarchy
Stock Locator
UDAs
Non-Sellable
Item Locations
Deliveries
Show Packs
Show Components
Related Items
Customer Orders
Additional Suppliers
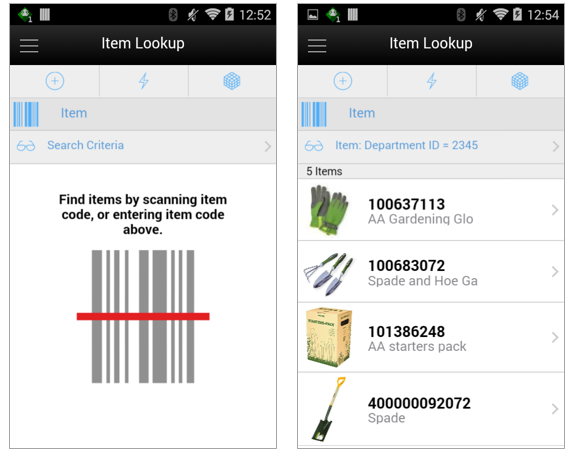
When navigating to Item Lookup, the user is taken to a blank list screen where no item results are displayed.
The user can use the search criteria, eye glasses, and to navigate to the Item Lookup search criteria screen to enter search criteria for items to find. After applying the search criteria, the results are listed on the screen and the criteria applied is shown next to the eye glasses. Selecting an item from the results list navigates to the item detail for that item.
When scanning or entering an item in the scan bar, the system ignores all entered search criteria and searches for the item entered. If it results in a single item, the system takes the user automatically to the item details. If more than one item is found, it provides an item selection to select the proper item.
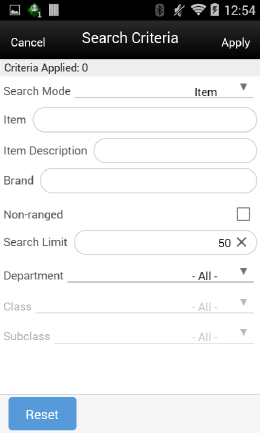
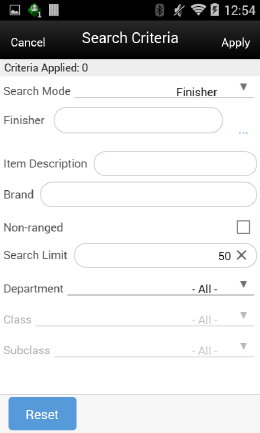
From Item Lookup, selecting the search criteria button, which looks like a pair of eye glasses, takes you to the Item Lookup Search Criteria screen. This screen is used to search for items using specific search criteria.
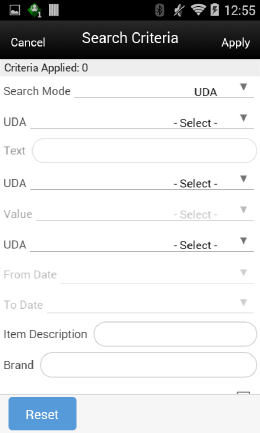
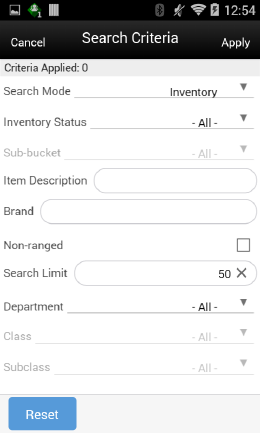
The Item Lookup Search Criteria screen will be different and contain different search criteria depending on the Search Mode. The user can choose to find items by item number, supplier, warehouse, finisher, UDA, Inventory Status, or style. Depending on which search mode is selected, the search criteria fields change. All search modes, with the exception of searching by style, have common search criteria consisting of item description, brand, non-ranged indicator, search limit, department, class, and sub-class.
This field holds an item description, which the user enters to search. The user can search on partial description as well, meaning that as long as the Item Description contains what is entered in this field, results are returned. This search criterion can be used for any other search type except when searching by Style.
This field holds the brand, where the user enters to search. The user enters in a brand for the item. The system returns all items for the brand specified. This search criterion can be used for any other search type except when searching by Style.
This field allows the user to select from a list of available Departments for the selected group. This search criterion can be used for any other search type except when searching by Style.
This field allows the user to select from a list of available classes for the selected department. This field is only enabled if a department has been selected. This search criterion can be used for any other search type except when searching by Style.
This field allows the user to select from a list of available sub-classes for the selected department/class. This field is only enabled if a department and class has been selected. This search criterion can be used for any other search type except when searching by Style.
When the Include Non-Ranged check box is checked, the system returns items that exist but may not have been ranged to the user's store, in other words, the item record does not exist for the user's store. When it is not checked, only those items that are for the user's store are returned. If searching for an item by item number, the system ignores this indicator and navigates to the details regardless if the item is ranged or non-ranged.
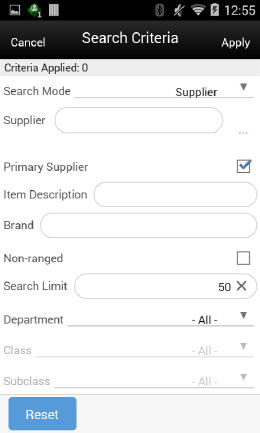
This field holds a supplier number, which the user enters to search. The user can search for items by primary and non-primary suppliers.
The Primary Supplier Check Box determines whether to display all items supplied by the entered supplier (based on the Supplier or Supplier Name search fields) or only display items where the entered supplier is the primary supplier for that item:
If the indicator is checked, the system only displays items where the entered supplier is the primary supplier of the item. This is the default.
If the indicator is not checked, it displays all items supplied by the supplier ID that was entered in the search criteria field, regardless of whether or not the entered supplier is the primary supplier. In this case, the user may see items in the search results that have a different supplier ID and name than what was entered in the search criteria. This means the item is supplied by the entered supplier, but has a different primary supplier.
The user can search on a style item ID. The Item Description, Brand, Department, Class, and Sub-Class search options do not display when the Style Search option is selected. The user enters in a style item (style is where the item level is above the transaction level), and the system returns all the transaction level children that are related to the style parent/grandparent.
Example:
Enter Style ID
10001001 Shirt Item level 1, tran level 2
Search Returns
10001011 Shirt 1, green shirt item level 2, tran level 2
10001012 Shirt 2, blue shirt item level 2, tran level 2
10001013 Shirt 3, red shirt item level 2, tran level 2
This field allows the user to pick a specific User Defined Attribute (UDA) and enter the corresponding search criteria. In order for an item to be returned, it must match all criteria entered.
This field allows the user to search by available or unavailable inventory status. The system returns all items that match the status selected by the user. If Available is selected, the system returns the items that have available inventory. If unavailable is selected, the system returns the items that have non-sellable unavailable inventory. This search feature gives the user a way to search for items that have unavailable inventory which might need further action. It can be especially useful when looking up items when creating inventory adjustments.
This field allows the user to continue to filter down by sub-bucket. Sub-buckets are only an option if the system is configured to use sub-buckets. The Inventory Status must be selected as Unavailable for the Sub-bucket filter to be enabled. The system returns all items that match the selected Inventory Status and Sub-bucket.
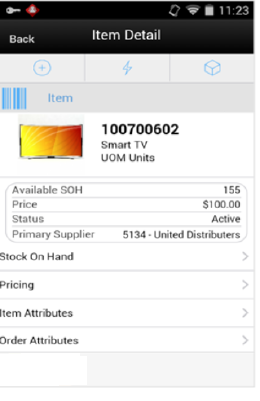
Selecting an item on the Item Lookup screen brings the user to the Item Detail screen. The header shows the item number, description, unit of measure, and item image if configured to show images. Additional header information includes the available stock on hand, price, status, primary supplier ID, and primary supplier name.
Upon scanning an item, the screen refreshes and the details for the newly found item are displayed. The bottom of the screen has various different features, that when selected, navigate to a screen to display the details for that feature such as stock on hand, pricing, item attributes, and so on.
The details include the following:
Stock on Hand
Pricing
Item Attributes
Ordering Attributes
Merchandise Hierarchy
Stock Locator
UDAs
Non-Sellable (only if configured for sub-buckets)
Item Locations (only if the Display Sequence Locations system admin = Yes)
Deliveries
Show Packs
Show Components (only for pack items)
Related Items
Customer Orders
Additional Suppliers
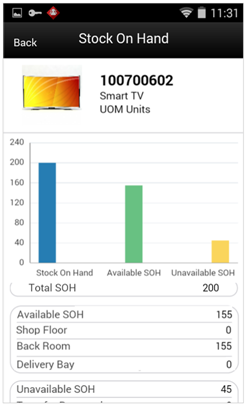
This is the Stock on Hand Details for an item. It was accessed by selecting the Stock on Hand option from the Item Detail screen within Item Lookup. This screen shows all the various stock on hand buckets including total SOH, available SOH, shopfloor, backroom, delivery bay, unavailable SOH, transfer reserved, RTV reserved, customer order, and nonsellable. Note that the shopfloor, backroom, and delivery bay buckets are only displayed when Display Sequence Fields = Yes.
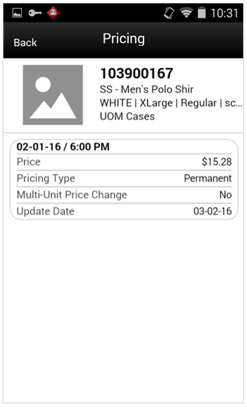
Pricing is accessed by selecting the Pricing option on Item Detail. The Pricing screen displays the Pricing Details for the item and user's store. Each price event is represented in as a set. The sets of price events are ordered by Effective Date with most recent on the top (descending).
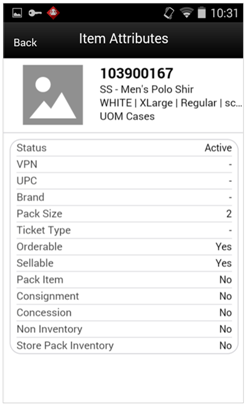
Item Attributes is accessed by selecting the Item Attributes menu option from Item Detail. It displays the Item Attributes for the item at the user's store.
Additional information may also be helpful to view about an item. The following are some additional item attributes available on this screen.
Status: Item status as the location.
VPN: Vendor product number for the primary supplier of the item.
UPC: UPC for the item.
Brand: Brand of the item.
Pack Size: This field holds the pack size (number of items in a supplier case) of this item:
The pack size is populated from the item/supplier/country record for the primary supplier.
For non-ranged items, this value is pulled from the master item data, for the default supplier.
Ticket Type: Merchandising suggested ticket type code/format.
Orderable: Check box; checked if the item is orderable.
Sellable: Check box; checked if the item is sellable.
Pack Item: Check box; checked if the item is a pack item.
Consignment Item: Check box; checked if the item is a consignment item.
Concession Item: Check box; checked if the item is a concession item.
Non-inventory: Check box; checked if the item is flagged as non-inventory.
Store Pack Inventory: Check box; tells the system when an item will only be sold and tracked as a pack.
|
Note: SOH and any reference to inventory will not be available for non-inventory, consignment, or concession items. |
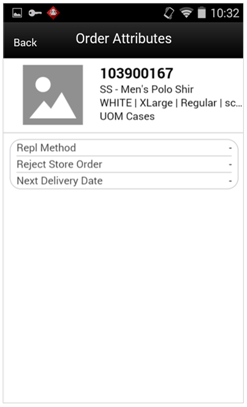
Order Attributes is accessed by selecting the Order Attributes menu option from Item Detail. It displays the Ordering Attributes of Replenishment Method, Reject Store Order, and Next Delivery Date (if they exist) for the item at the user's store.
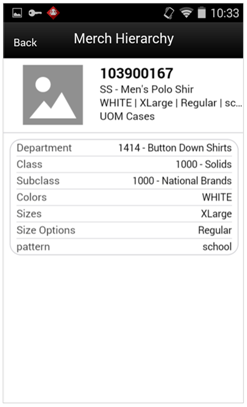
The Merchandise Hierarchy screen is accessed by selecting Merchandise Hierarchy from Item Detail. This screen displays the merchandise hierarchy associated to the item.
If the item has differences, those are also displayed:
<Diff1> <Diff 1 Value> if it exists
<Diff2> <Diff 2 Value> if it exists
<Diff3> <Diff 3 Value> if it exists
<Diff 4> <Diff 4 Value> if it exists
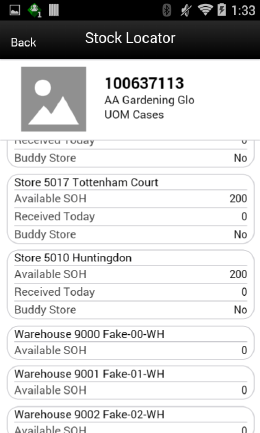
The Stock Locator screen is accessed by selecting Stock Locator from Item Detail. This screen shows stock on hand for the item at other locations, which could be stores and warehouses. Each store or warehouse is grouped together in a set.
Stores have available SOH, received today and buddy store listed. If transfer zones are used, only the stores within the transfer zone should appear. If no transfer zone is associated, the store is available for all transfer zones. Warehouses will only display the available SOH. The locations are ordered first by buddy stores (Yes) at the top and second by available SOH (greatest at the top).
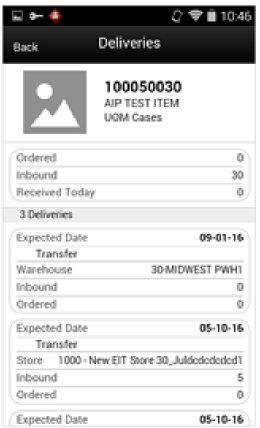
The Deliveries screen is accessed by selecting Deliveries from Item Detail. All quantities are in the SUOM.
The header contains:
Ordered: Displays the total quantity remaining on the order. (Transfers + Purchase Orders)
Inbound: Is the total shipped quantity from transfers, allocations, and POs on an ASN that have not been received yet.
Received Today: Is the total received quantity for the current date.
The list portion of the screen represents the deliveries for the item. The user can scroll through the list of Deliveries that are coming from a Transfer or Purchase Order. The deliveries are ordered by Delivery Date with the oldest delivery at the top (ascending). If there are no deliveries, the list will be blank.
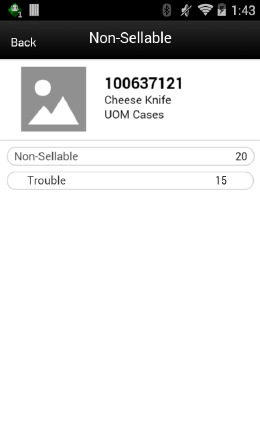
Clicking the Non-Sellable option on Item Detail displays the Non-Sellable sub-bucket information for the item at the user's store. The system displays all sub-buckets that have inventory for the item at the user's store along with the corresponding inventory.
The Non-Sellable menu option only displays when the system is configured for sub-buckets.
The Non-Sellable field is displayed in the Stock On Hand tab as well. This field represents how much stock is unavailable not associated to customer orders, RTVs or transfers. It is increased or decreased every time an inventory adjustment is made to or from unavailable inventory. It also gets updated when receiving damaged items into the store as well as returning unavailable items.
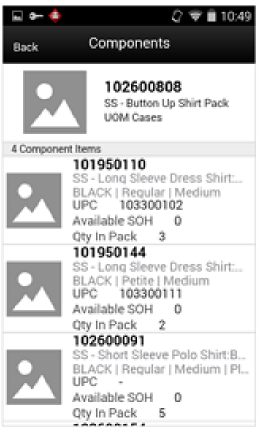
Selecting the Show Components option on Item Detail displays the components that exist for the item on the Components screen. The Show Components option is only available for those items which are a Pack item. All quantities are in the SUOM.
Tapping a component item navigates the user to the Item Detail for that item. The user remains in that item and does not return to the original item.
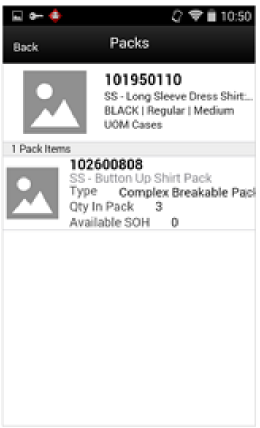
Selecting the Show Packs option on Item Detail displays the packs that exist for the item on the Packs screen. The Show Packs option is available even if the item is not part of a pack. If it is not part of a pack, no content is displayed for the item. All quantities are in the SUOM.
Tapping a pack item navigates the user to the Item Detail for that item. The user remains in that item and does not return to the original item.
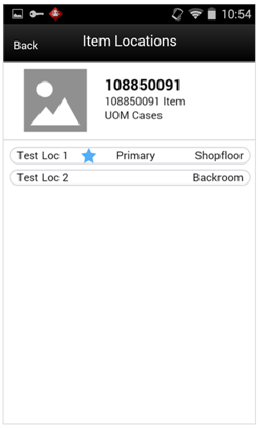
Selecting the Item Locations option on Item Detail displays the sequenced locations that exist for the item on the Item Locations screen. The Item Locations menu option is only displayed when the system is configured for Display Sequence Fields = Yes. If the system is configured to display sequence fields but there are no locations defined for the item, the screen is blank.
The macro locations with the area are displayed. If the location is a primary location, it is indicated with a star.
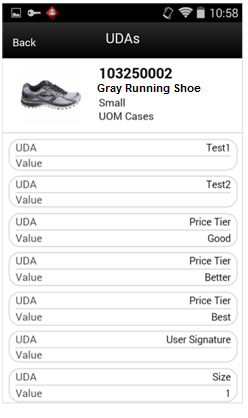
Selecting the UDAs menu option displays the UDA information for the item at the user's store on the UDAs screen. Each UDA and value are represented in a set. The list is ordered by UDA. If there are no records, the details are blank.
The Related Items screen is accessed by selecting the Related Items menu option on the Item Detail screen. The Related Items screen displays the related items for the item at the user's store. All quantities are in the SUOM. The related item types of cross sale, up sale, substitute, and style are listed. There is a type filter at the top of the screen allowing the user to filter by the type of related item. All items display, even if they are not ranged to the store.
Only Active related items are listed, where today's date is within the effective date and end date for the related item. If there is no effective date, the item is assumed to be active.
If the user selects a related item record in the list, the user navigates to the Item Detail screen for that item. The user is then in the details for that item. There is not a way to navigate back to the original item. If there are no related items, the details are blank.
|
Note: The Substitute item types are used within the Customer Order Picking and Shelf Replenishment Picking dialogues when a substitute item is allowed. |
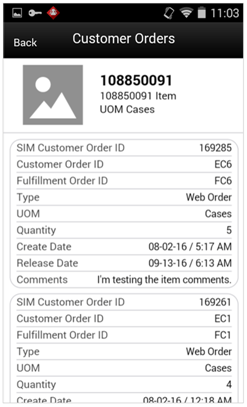
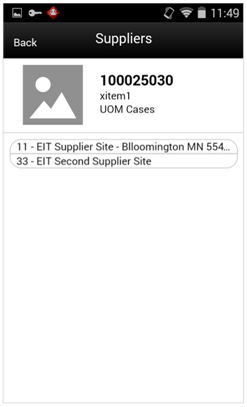
Selecting the Customer Orders option on Item Detail displays the customer orders that exist for the item and store. All customer order details are grouped together in a set. The Customer Order sets are ordered by Customer Order ID in ascending order. If there are no open customer orders for the item at the user's store, nothing displays on this screen. All quantities are in the SUOM.
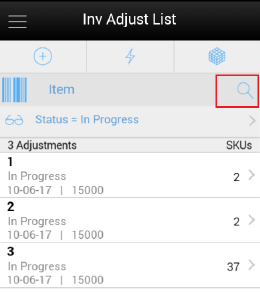
Universal Item Lookup is the Item Lookup dialog that is accessed from within another transaction or other area of the application. For example, a user is searching for an inventory adjustment and must first lookup the item. The user would search for the item within the universal item lookup dialog and then navigate back to Inventory Adjustments.
User starts out on a screen accesses the Universal Item Lookup via the magnifying glass. The user will direct to the Search Criteria screen within Item Lookup. Once selecting the search criteria the list of items will be returned. From here an item can be selected from the list and applied to the original item field from where the universal item lookup was executed. Or, the user can then choose to view the details of a specific item in Item Detail and apply from there.
The item lookup dialog will be accessed via other areas within the application when an item can be scanned or typed in. The user will have the magnifying glass that will be used to navigate into the Item Lookup dialog Search Criteria screen. The user can search for an item and once applied the user will exit out of Item Lookup and return to the dialog in which they started with the selected item applied.
The Supplier Lookup functionality provides users with the ability to view information about the supplier. The following information is available, but is not limited to this list:
ID
Name
HQ Address, Phone, Contact, Contact Email
Return Address, Phone, Fax, Contact Email
Status
Return Allowed
Return Authorization Required
This dialog may be used in conjunction with other dialogs (Return to Vendor, Store Orders to a Vendor, Direct Store Delivery) to look up suppliers and assign the supplier to the transaction.
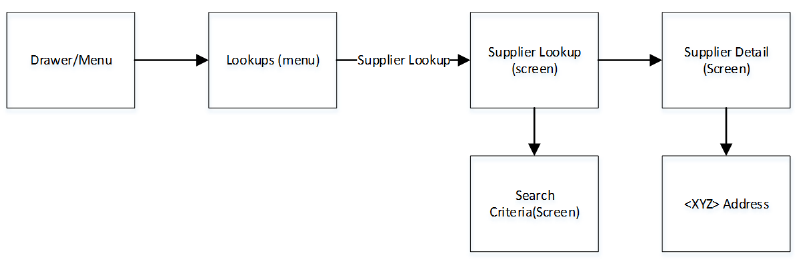
This is the screen flow for the Supplier Lookup functionality. The user will select Supplier Lookup from within the Lookups menu. From there the user will navigate to Supplier Lookup which will list the suppliers, initially this screen will be empty with no suppliers listed. The user can search for suppliers by tapping the eye glasses (search criteria) and navigating to the search criteria screen. Once a supplier is selected from the list, the user will go to the Supplier Detail for that supplier and the header level supplier info will be displayed. The user can view the details of the various addresses by selecting an address option.
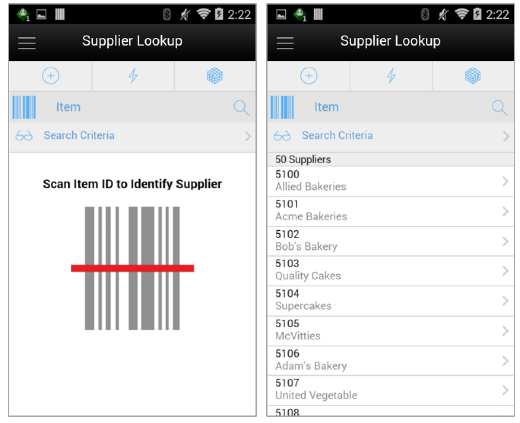
When navigating to Supplier Lookup, the user is taken to a blank list screen without any supplier results being displayed. The scan type is the only header function that is used in Supplier Lookup, which is used to determine what type of item is scanned when entering or scanning an item to identify the supplier.
The user can use the search criteria, eye glasses, to navigate to the Supplier Lookup search criteria screen to enter criteria search for suppliers. Search criteria include supplier ID, supplier name, and item. After applying the search criteria, the results are listed on the supplier lookup screen together with the applied criteria. Selecting a supplier from the results list navigates to the Supplier Detail screen for that supplier.
When scanning/entering an item in the scan bar, the system adds the scanned item to the entered search criteria and narrows down the list of suppliers by the item that was scanned. If it results in a single item, the system finds the supplier(s) based upon that item and presents them in the list. If there is more than one item found based upon the scan it provides an item selection to select the proper item. The item is applied to the search criteria and the supplier results are returned.
The Supplier Lookup Search Criteria screen is accessed through the eye glasses search criteria function on Supplier Lookup. The user can enter various search criteria to find a supplier. The results are listed on the Supplier Lookup screen.
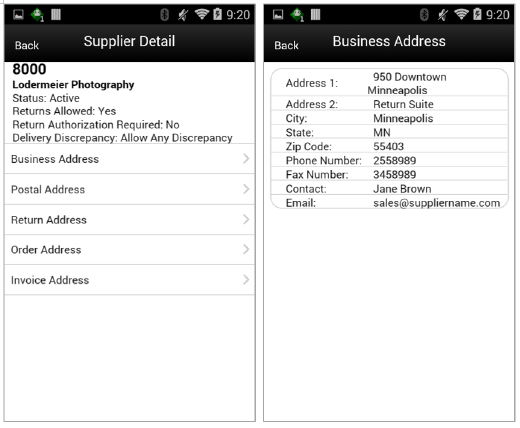
From Supplier Lookup, selecting a supplier displays the Supplier Detail screen. This is a read-only screen to display the details of the supplier being looked up.
The header shows the supplier ID, supplier name, status of the supplier, whether returns are allowed, if a return authorization number is required, and if supplier deliveries allow for discrepancies. In the bottom of the screen there are options for various different address types for the supplier. The types may be different per supplier, and types may be duplicated per supplier. The types are based upon the types in the system which came from the merchandising system. Selecting a type will navigate to the details of that address. Address fields include address, phone, fax, contact name, and email if they exist for the supplier.
The Container Lookup functionality provides users with the ability to view information about a warehouse/finisher delivery container. The following information is available, but is not limited to this list:
Container ID
ASN Number
Status (Received, In Transit, and so on)
Receipt Date and Time
From Location
Number of Cases
Damages
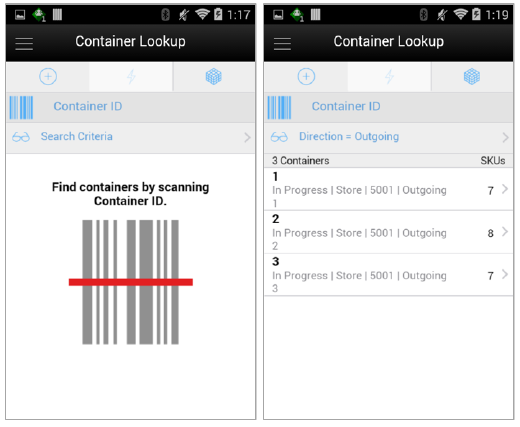
Container Lookup is accessed from the Container Lookup menu option within Lookups in the drawer menu. Once the user enters into the details, the user sees the details for the container based upon the type of container being looked up. No changes can be made to the container or its content from this screen.
The Container Lookup screen is accessed using the Container Lookup menu option within Lookups in the drawer. The search criteria screen is accessed using the eye glasses where the user can search for a container. The user can also scan a container (External ID (SSCC), Internal ID, or Tracking ID) and navigate to the details for that container. Container Lookup can be used for looking up containers for Transfers Shipping and Receiving, DSD Receiving and RTV Shipment.
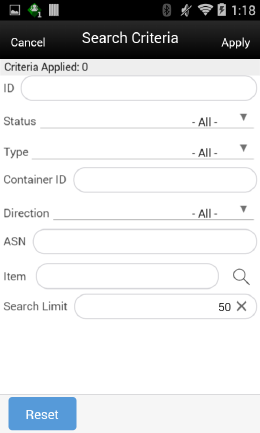
The Search Criteria screen is accessed using the eye glasses search criteria on Container Lookup. The user can enter in various criteria and the system returns the results on the Container Lookup screen.
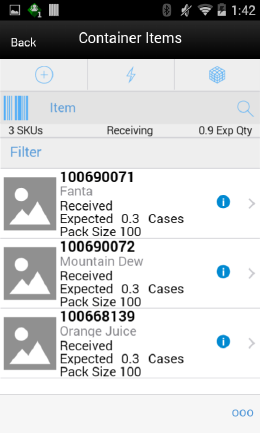
The Container Items screen is accessed after going into the details for a specific container. This screen lists the items in the container. The screen details vary depending on the type of container. For example, expected quantities for an outbound container will not be displayed.
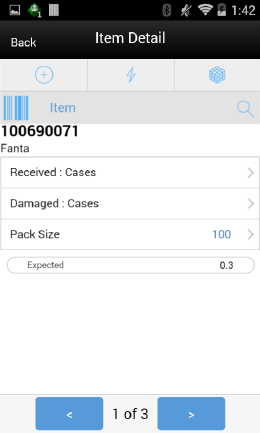
The Item Details screen is accessed after going into the item details of an item on the container. The screen varies depending on the type of container.
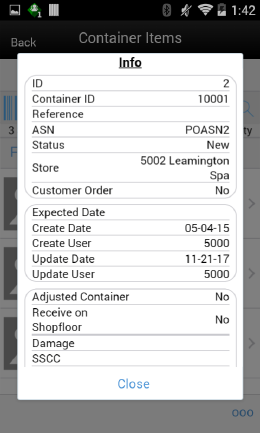
The Info screen is accessed after selecting the Info menu option from the footer menu of the Container Items screen. The screen varies depending on the type of container. The Info screen in Container Lookup is the same as that in the actual transaction, that is Transfer Receiving. This screen is view only.