| Oracle® Retail Enterprise Inventory Cloud Service Administration Guide Release 18.0 F13732-01 |
|

 Previous |
 Next |
| Oracle® Retail Enterprise Inventory Cloud Service Administration Guide Release 18.0 F13732-01 |
|
Previous |
Next |
This chapter describes the Batch Processing that is built on Java EE 7 onwards and Java Batch (JSR 352) specifications and standards.
This document provides information about the processing and operating details of batch job administration and operations, and covers the following topics:
EICS provides an independent user interface for executing and scheduling of the batch jobs. These user interface screen will facilitate users to perform following operations:
Execute Ad hoc Jobs
Manual Data Seeding Importer Jobs
View the Job Execution Log
View the list of Jobs executed
Schedule Jobs for execution on specific intervals
The batch jobs are installed and configured by the EICS application installer. The batch processes are designed to process large volume of data. The batch jobs can be scheduled as per the retailer's choice to be executed on the specific intervals during the on EICS GUI.
The batch processed which are available for the retailer can be differentiated in following categories:
Data Seeding Importer Jobs
Data seeding jobs facilitates the retailer to load the foundation data for the application. These jobs process the specific data from BDI staging tables to the application tables.
|
Note: System must be integrated with BDI for these jobs to perform the data seeding. |
Operational Jobs
These jobs are mostly used to perform back ground operations on the transaction and includes such tasks as generation of a transaction, closing the transaction after a specified date is passed, auto confirmation of the transaction, and so on.
Data Purge Jobs
These jobs are used to perform the purge operation on the application table. Each job is designed to purge the data from specific functional database tables. The number for day to retain the records in database can be configured separately via System Administration parameters.
Batch processing is the execution of series of 'jobs' that are suitable for non-interactive, bulk-oriented and long-running tasks. These tasks are typically data or computationally intensive, execute sequentially or in parallel, and may be initiated through various invocation models, including ad hoc, scheduled and on-demand.
JSR 352 defines a programming model for batch applications and a runtime for scheduling and executing jobs.
JSR 352 defines a programming model for batch applications and a runtime for scheduling and executing jobs.
Job
A Job is an instance that encapsulates an entire batch process. A job is typically put together using a Job Specification Language and consists of multiple steps. The Job Specification Language for JSR 352 is implemented with XML and is referred as 'Job XML'.
Step
A Step is a domain object that encapsulates an independent, sequential phase of a job. A step contains all of the information necessary to define and control the actual batch processing.
Job Operator
A job operator provides an interface to manage all aspects of job processing, including operational commands (such as start, restart, and stop) as well as job repository commands (such as retrieval of job and step executions).
Job Repository
A job repository holds information about jobs currently running and jobs that ran in the past. A job operator provides access to this repository.
Batchlet
JSR 352 also defines roll-your-own batch pattern, called as Batchlet. This batch pattern is invoked once, runs to completion, and returns an exit status. This pattern must implement and honor a 'cancel' callback to enable operational termination of the Batchlet.
Reader-Processor-Writer
This pattern is the primary pattern and is given the term chunk-oriented processing. In this process, an item reader reads one item at a time, an item processor processes the item based upon the business logic (such as calculate inventory balance) and hands it to an item writer for aggregation. Once the 'chunk' number of items are aggregated, they are written out, and the transaction is committed.
|
Note: This pattern is currently not implemented for EICS Batch Job Processing. |
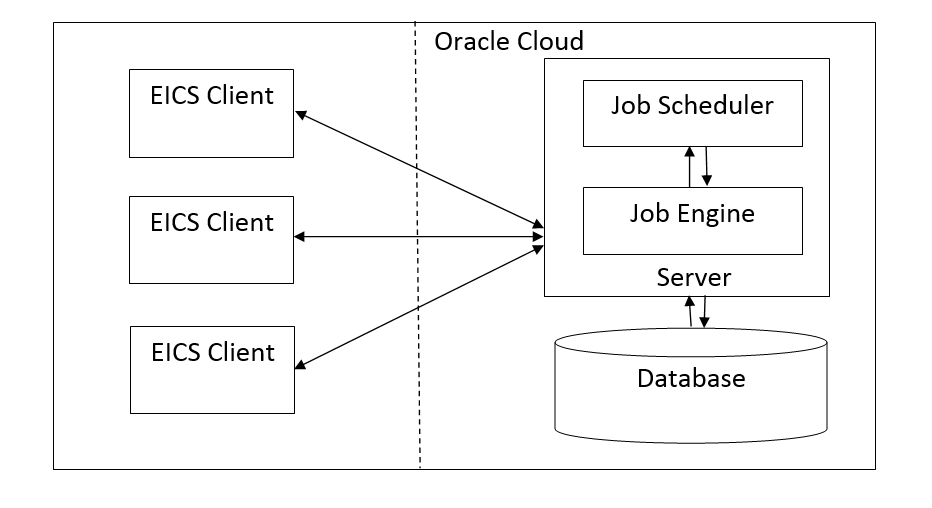
The following diagram illustrates the high level architecture of the current batch processing implemented for the EICS Application Server.
EICS Client - Server Communication
EICS client provides an option to the retailer to run the batch jobs on demand. This call to the server is made via HTTP REST service call. The batch job selected and the parameter selected by the user are set on the request and sent to the server on this call. The server handles this request and invokes a start job on the batch engine for the respective job.
Job Engine
The job engine manages the state of a running job and guarantees the execution of each step defined for the job. The call made from the client or job scheduler is passed onto the job engine to start a new instance of the batch job. Users also have an option to stop the running job or to restart any particular job which failed during the processing.
Job Scheduler
This feature of EICS allows a retailer to schedule the batch jobs to run at a specific time interval. Each batch job will initially execute at a pre-configured schedule interval. Retailers will have an option to enable or disable specific batch job schedules as well. For more information please refer to Job Scheduler Section below.
|
Note: A few of the jobs which are system required will not be available for the retailer to change the schedule interval or disable them. These jobs will always be enabled and can be managed only by cloud admin. |
The EICS user setup and management are documented in the Oracle Retail Enterprise Inventory Cloud Service User Guide.
The following list shows the batch related users. For additional details, please see the Oracle Retail Enterprise Inventory Cloud Service User Guide.
Table 5-1 Batch Users and Roles
| User | Roles | Description |
|---|---|---|
|
BDI user |
sim_integration_users |
The EICS REST service users for inbound BDI REST service connections (for example, BDI importer). BDI user is setup in OID by Cloud Engineer manually. |
|
Batch Administrator |
sim_batch_users |
The user can access EICS JET application and perform batch administration operations. |
To access the Job Admin screen, navigate Main Menu/Admin/Configuration/System Administration.
To view the Batch configuration, filter by Batch topic.
Table 5-2 Batch Admin System Configuration Options
| Option | Description |
|---|---|
|
Batch Maximum Threads |
Maximum number of threads to be instantiated for batch execution. |
|
Batch data staging path |
Base staging directory for the file processing. |
|
Inventory outbound staging path |
Staging directory for the inventory extract file. |
|
Stock count outbound staging path |
Staging directory for the U/A Stock Count export file. |
|
POS transaction inbound staging path |
Staging directory for the POS transaction import file processing. |
|
Price Change inbound staging path |
Staging directory for the Price change import file processing. |
|
Retail sale audit inbound staging path |
Staging directory for the Sales audit import file processing. |
|
Stock count inbound staging path |
Staging directory for the Third party stock count import file processing. |
|
Store sequence inbound staging path |
Staging directory for the Sequencing data import file processing. |
|
Warehouse item stock inbound staging path |
Staging directory for the Warehouse inventory import file processing. |
|
Days to Hold Archived and Rejected Files |
Number of day to hold the archived and rejected files after being processed. |
|
POS transaction import file path |
Incoming directory for POS transaction zip files. |
|
Price change import file path |
Incoming directory for Price change zip files. |
|
Retail sale audit import file path |
Incoming directory for Sales audit zip files. |
|
Third party stock import file path |
Incoming directory for Third party stock count zip files. |
|
Store sequence import file path |
Incoming directory for store sequencing zip files. |
|
Warehouse item stock import file path |
Incoming directory for warehouse inventory import zip files. |
|
Inventory export file path |
Outgoing directory for inventory extract zip files. |
|
Stock count export file path |
Outgoing directory for U/A Stock count extract zip files. |
|
Search Limit Default for Batch Job Days |
Default number of days search limit to load the job activity. |
|
Batch Scheduler Enabled |
Enables/Disables the job scheduler operations. |
|
Maximum Job Instances Per Scheduler Execution |
Maximum number of jobs execution per run. |
|
Maximum Processing Hours For Scheduled Job |
Maximum time to mark job execution as failed by scheduler. |
|
Stock Count Import Chunk Limit |
Chunk limit for stock import records. |
|
Data seed by store |
Enables/Disables data seeding per store. |
|
Data seed chunk limit |
Chunk limit for records processed in data seeding. |
|
Data seed foundation data |
Enables/Disables the foundation data seeding. |
|
Data seed store data |
Enables/Disables the store data seeding. |
|
Batch Scheduler Execution Interval |
Interval in seconds to run the scheduler instance. |
|
Note: For batch file related system configuration options, please see File Import/Export section. |
EICS Job Admin is a web application that provides the runtime and GUI for managing batch jobs.
The key features of EICS Job Admin includes:
Batch Configuration
Batch Job Admin
View Batch Activities
Batch Security
The following diagrams show the Batch Admin and relevant GUI components:
This screen view the list of the job that have been instantiated on the server. User can filter the list of the job loaded on screen on Job Status, Reviewed and Search Limit. The default filter will load the list of the failed job when the screen is initially loaded.
User requires appropriate permission to access this screen on EICS. Navigation path for the Job Admin screen is:
Admin/Technical Maintenance/Job Admin
Screen Options
Search
Allows user to filter the list of the batch jobs instantiated by user and the scheduler.
Refresh
This option refreshes the list loaded on the screen, calls is made to server to load the list of batch jobs with current state.
Ad hoc Job
This option refreshes the list loaded on the screen, calls is made to server to load the list of batch jobs with current state.
Data Seed
This option navigates user to Data Seed Job Launcher screen. User can start a new data seed job from this screen by setting the required parameters and data seeding options on the job. User will require appropriate access permission to view this option on the screen.
Stop Job
This option allows user to stop a running job. This option is available only when selected job is in running state that is, STARTED and STARTING.
Table Information
Execution ID
This column displays the job execution identifier generated by the job engine.
Job Name
This column displays the name of the batch job.
Instance ID
This column displays the job instance identifier generated by the job engine.
Status
This column displays the current status of the batch job.
Start Time
This column displays the time when job was started.
End Time
This column display the time when job was completed. If the job is currently in running state the end time will not be available.
User
This column displays the user name of the user who started the job. The job started by the scheduler will have server user name in this column.
Reviewed
This column denote if user has review this job.
Parameter
This column displays the parameter if entered while starting the batch job.
This screen display the execution details for the batch job. Users can navigate to this screen by clicking Job Execution ID on the Job Admin screen. This screen is designed to view the error logs for the batch jobs and to mark the job as reviewed.
Review flag denotes the selected job has been reviewed by the user. By this user can keep a track which of the failed job are already been review and take necessary actions as required.
The execution detail table load the entries of the execution record if exist for the select batch job.
Screen Options
Mark Review
This option allows user to mark the batch job as review. Once the job is marked as review user is navigated back to the Job Admin screen.
Cancel
This option allows user to navigate back to the Job Admin screen.
Table Information
Detail ID
This column displays the execution identifier generated by the job engine.
Processed
This column denotes if the execution record for the job was successfully processed.
Failed
This column denotes if the execution records was failed during the processing.
Message
This columns displays the message from the server to viewing the further details on the job status. This column will be empty for the execution records which are been successfully processed.
Data File
This column displays the file name for which the execution record was created. This column holds data only if the job details with file import processing for example, Retail Sales Audit Import Job.
Additional Info
This column hold the addition info if any for the execution record.
Message Details
This section in non-editable and displays the detailed explanation for the job failure. This section will display respective data on selection job execution record. The log traces of the exact point of failure shall be printed on this section of the screen.
This screen allow user to start a new instance for a job. Select the batch job and enter the parameter, if required, to start job.
The job launcher screen has the following categories:
This screen allows user to run an ad hoc job. All the job which are either operational or purge job can be started from this screen. All the batch job will not support the execution date and store identifier parameters. The job for which store level processing can be performed will consider these parameter. User will not receive an error or confirmation if the parameters are not valid for the selected job.
User will required appropriate data permissions to select and run a particular job. Navigation to this screen is as follows:
Admin/Technical Maintenance/Job Admin /Ad hoc Job
Screen Options
Start Job
This option allows user to start a new instance of the selected job. When the user select this option a call is made to server to start a selected batch job. Server internally makes a call to Batch Operator specifying the Job Name and the parameter if any.
Cancel
This option navigates user back to Job Admin Screen.
Menu Options
Job Name
Allows user to select the job to be started. This is a required field on this screen. The user will be able to view only those jobs in the drop down list which are permitted to the user via data permissions.
Store ID
Allow user to enter the store identifier if the job is expected to be executed for specific store. Not all job accepts store identifier as parameter. For the jobs which doesn't take store identifier as parameter for execution shall ignore this parameter.
Execution Date
Allows user to enter the execution date for the job, if not entered the job will consider the current date for the execution. Not all job accepts execution date as parameter. For the jobs which doesn't take execution date as parameter for execution shall ignore this parameter.
Data Set Id
The Data Set Id is optional parameter for importer job to process the specified data set from bulk data interface table.
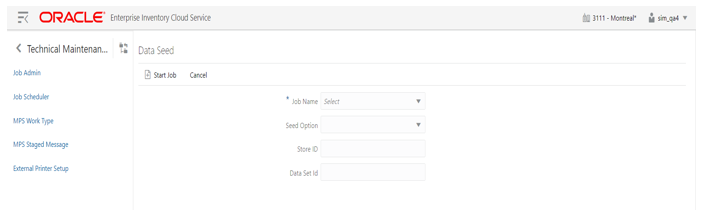
This screen allows user to start data seeding importer specific jobs only. For additional details, please refer to Data Seeding.
User will need appropriate access privileges to navigate to this screen.
Navigation to this screen is as follows:
Admin /Technical Maintenance/Job Admin/Data Seed
Screen Options
Start Job
This option allows user to start a new instance of the selected job. When the user select this option a call is made to server to start a selected batch job. Server internally makes a call to Batch Operator specifying the Job Name and the parameter if any.
Cancel
This option navigates user back to Job Admin screen.
Menu Options
Job Name
Allows user to select the job to be started. This is a required field on this screen. The user will be able to view only those jobs in the drop down list which are permitted to the user via data permissions.
Seed Option
User can select one of the option available as per the operation to be performed. The seed options are more over job specific and are not applicable for all job. If the invalid seed option is selected for the job, server will ignore it and perform a normal seed operation.
The options available are:
Seed: Seeds the data from BDI integration tables to the application tables.
Delete and Seed: Deletes the data from the application tables and reseed the available data in BDI integration tables.
Delete Seeded: Deletes the data from the application tables.
Delete In: Deletes the data from BDI integration tables.
Disable Constraint: Disable the constraints for all the application tables.
Enable Constraint: Enable the constraint for the application tables.
For example, if user selects Disable Constraint Option for Store Job, this won't disable the constraint for store table. The server will simply ignore the seed option and continue this as not seed operation.
Store ID
Allows user to perform store level data seeding. The store identifier is not applicable for all the job. For the job which does not support store level data processing for example, Item Header or Supplier will simply ignore the store identifier if entered.
Data Set Id
The Data Set Id is optional parameter for importer job to process the specified data set from bulk data interface table.
Login to EICS and navigate to Job Admin screen.
Click on Ad hoc Job Menu to navigate to Ad hoc Job screen
Select the required Job from the drop down menu.
Set the required job parameter for the job, that is, Store ID and/or Execution Date.
|
Note: Job Parameter doesn't apply to all available batch jobs, for the job which do not take any parameter input will simply ignore the value in case entered.Some of batch jobs belongs BDI TX (Transaction) category, see Appendix A, BDI Transaction (TX) Importer Jobs section for details. |
Click on Start Job to start the new instance of job.
The new execution record will be populated on the Job Admin Screen List.
Login to EICS and navigate to Job Admin Screen.
Click the Job Execution Id to navigate to details.
To navigate back to Job Admin screen, click Cancel.
To mark job execution reviewed, click Mark Reviewed.
Login to EICS and navigate to Job Admin Screen.
Click on Data Seed Menu to navigate to Data Seed Screen.
Select the required job populated in the drop down menu.
Select required Seed Option from drop down.
Enter Store ID if required.
|
Note: Store ID is not supported by all job, will be applicable only for jobs which processed store level data |
Login to EICS and navigate to Job Admin Screen.
Select the job which is currently in running state that is, STARTED or STARTING.
Click on Stop Job to stop the execution of the running job.
Prompted to confirm if the job needs to be stopped. Click Yes to continue.
Request is sent to job engine to stop the instance of the job. In case the job is already completed or stopped appropriate message shall be displayed to user.
Refresh the list on the screen to view the changes.
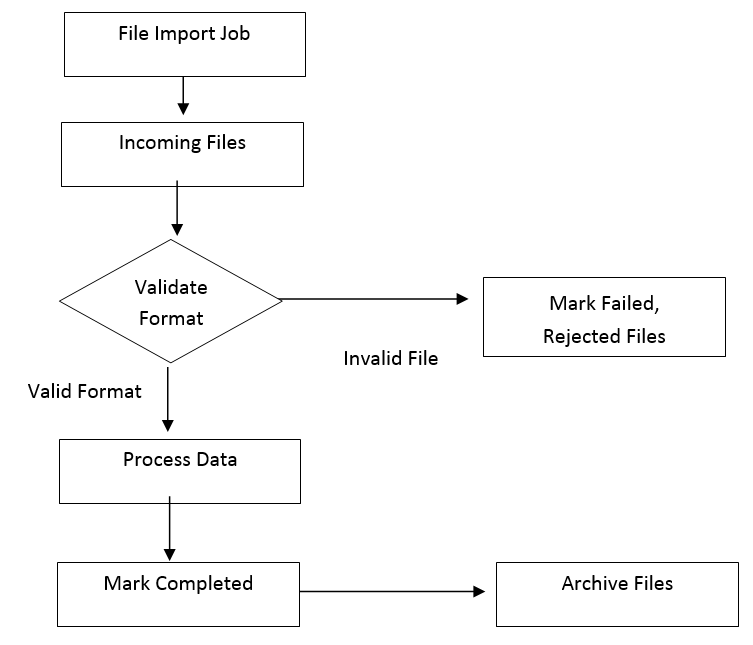
EICS File processing can be started automatically via EICS Job Scheduler or manually by starting Ad hoc job. The following topics are covered:
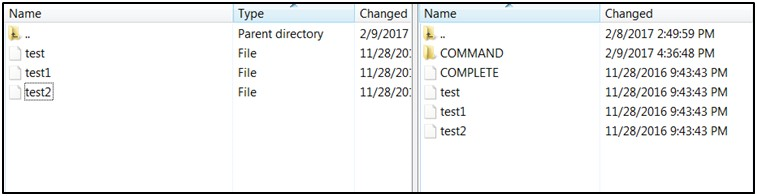
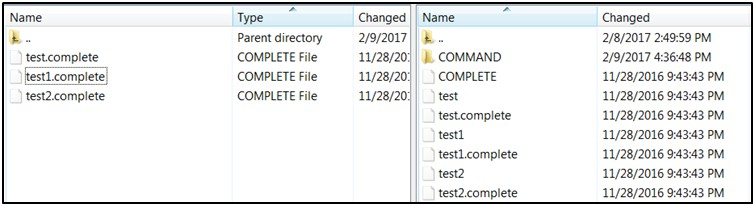
The file import job processes each file from incoming directory when a corresponding completer file presents. The completer is a zero byte file which indicates file transfer is complete and ready for processing.
The batch file process also handle the movement of input, output and reject files to the respective directories.
Output files and reject files will be pushed to outgoing for client review and usage.
Incoming files can be NFS mounted file system or SFTP (for external integration) as single file or zipped by each file type.
Outgoing files will be zipped by file type and pushed to outgoing location.
Table 5-3 File Import Module List
| Module Name | Description | Name Pattern (see Note below table) |
|---|---|---|
|
Clearance Price Change Import |
This batch process imports the clearance price changes from flat files into item price table. Application uses this data to update price information of the items. |
Prefix: CLRPC_ Suffix: .zip Completer: .zip.complete Job Parameter: none |
|
Promotion Price Change Import |
This batch process imports the promotion price changes from flat files into item price table. Application uses this data to update price information of the items. |
Prefix: PRMPC_ Suffix: .zip Completer: .zip.complete Job Parameter: none |
|
Regular Price Change Import |
This batch process imports the price changes from flat files into item price table. Application uses this data to update price information of the items. |
Prefix: REGPC_ Suffix: .zip Completer: .zip.complete Job Parameter: none |
|
POS transaction import |
This batch imports POS Transaction records from the flat file, that came from POS into the database staging table where polling timer framework will pick those staged requests and update the stock tables. |
Prefix: SIMTLOG_ Suffix: .zip Completer: .zip.complete Job Parameter: none |
|
Retail Sale Audit Import |
This batch program imports sales/order transaction data (SIM-ReSA file) that originated in Oracle Retail Xstore Point of Service. The batch also writes each failure record into a transaction log table. |
Prefix: SIMT_ Suffix: .zip Completer: .zip.complete Job Parameter: none |
|
Store Sequence Import |
This batch file import sequencing information like store sequence areas and items mapped to those areas from a flat file. |
Prefix: SSEQ_ Suffix: .zip Completer: .zip.complete Job Parameter: none |
|
Warehouse Item Stock Import |
This batch imports the inventory of an items in a warehouse from flat files into warehouse item table. |
Prefix: WHIMS_ Suffix: .zip Completer: .zip.complete Job Parameter: none |
|
Note: Incoming File Pattern: The integration incoming files from file provider which are in old release (such as ORPM16.0.x, ORMS 16.0.x) which are not using the .zip and completer indicator file. EICS 17.0 is backward compatible with the incoming files which are not in zip and without completer indicator file. |
Table 5-4 File Export Module List
| Module Name | Description | Name Pattern (see Note below table) |
|---|---|---|
|
Inventory Extract |
This batch extracts the inventory to a file that has been altered on or after the specified date for the specified store. The store id is not mandatory for the batch process. In case store id is not passed the files will be generated per store. The scheduled job will always generate files for all stores. |
Prefix: PRODUCT_LOCATION_INV_ Suffix: .zip Job Parameter: storeId (optional) |
|
Stock Count Export |
The stock count export files are generated when unit amount stock count is authorized. |
Prefix: STK_ Suffix: .zip Completer: .zip.complete Job Parameter: n/a |
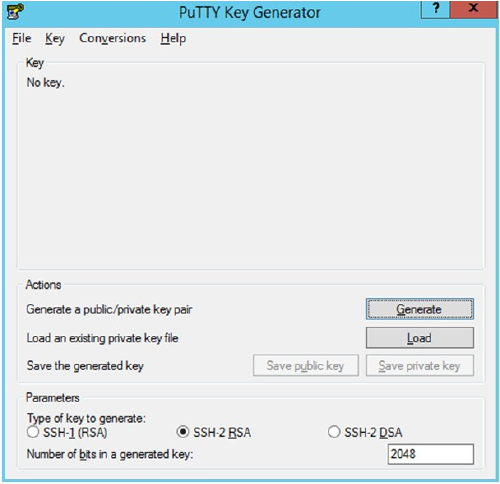
The following is the file upload process. The Private/Public Keys must be generated and the public Key must be associated with your SFTP Account for the file uploads. The Adding Authorized Keys section describes the step-by-step method to generate the Keys (2048 bit RSA Keys).
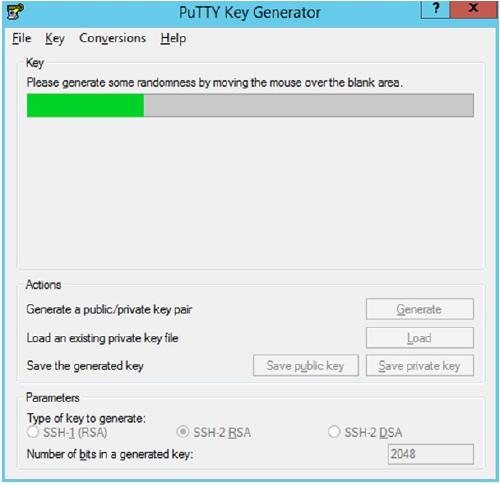
Use this process to generate a 2048 bit RSA key and add the same to the SFTP server. With Windows, use the WinSCP tool or with Linux, use ssh-keygen.
Launch WinSCP and select Tools/Run PuttyGen.
Select SSH-2 RSA for the type of key to generate and enter 2048 for the number of bits in a generated key field and click Generate.
Move the mouse over the blank space in the window until the key is generated.
Once the key is generated, click Save public key to save the public key to a file.
Click Save private key to save the Private key to a file. Confirm to save it with or without a passphrase.
Open an SR with Oracle Support, to associate the Public half of the Key with your SFTP account (attach the Key with the SR).
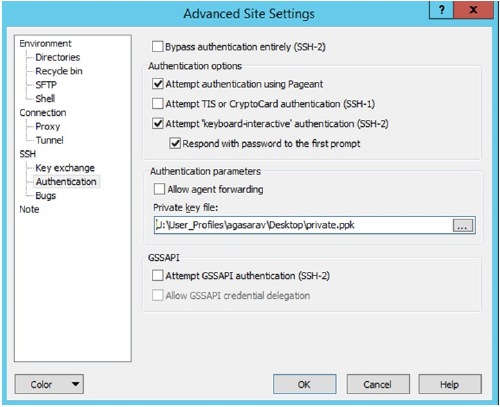
These upload steps use the private key generated in section, Adding Authorized Keys.
Launch WinSCP and connect to <SFTP Server> using port 22.
Enter the username and then click Advanced.
Click Authentication.
In the Private Key File field, click Browse and select the private key created in the section, Adding Authorized Keys.
After loading the private key file, click OK.
Click Login. The window does not prompt for a password and logs into the SFTP server. Provide a passphrase if one has been set up.
|
Note: Login can only be performed using the authorized keys. Login with username / password is not supported. |
Login to the WinSCP by following the steps in Login to WinSCP.
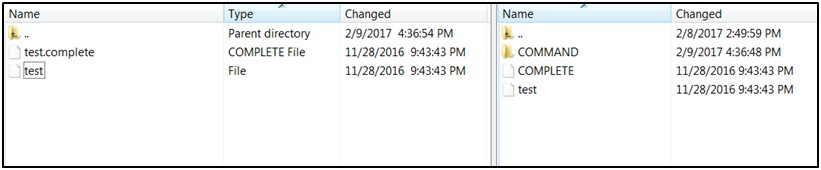
Transfer the file to be copied (for example, test) to /<SFTP User>.
Transfer an empty file <filename>.complete (for example, test.complete) to the directory /<SFTP User>.
If multiple files have to be transferred, copy all the files to /<SFTP_user>.
Transfer all the corresponding <filename>.complete files to the /<SFTP_user> directory for the transfer to complete.
The following steps show the download file process.
Login to the WinSCP by following the steps in Login to WinSCP.
Change the directory to /<SFTP User>/EXPORT.
Download all data files.
EICS Job Scheduler allows user to schedule the job available to run under Ad hoc Job screen.
The key features of Job Scheduler are as follows:
Interval Based Schedule
User can schedule the job to run on interval basis. User will be provided below specified interval to be set for each job for execution.
Table 5-5 Interval Based Schedule
| Interval | Detail | Execution Hour |
|---|---|---|
|
30th Minute |
Job execution will be every 30th minute of the hour starting from 01:00. |
01:00, 01:30, 02:00, 02:30, 03:00, 03:00 … 23:00, 23:30, 00:00, 00:30. |
|
! Hour |
Job execution will be every 1 hour starting from 01:00. |
01:00, 02:00, 03:00, 04:00, 05:00 … 22:00, 23:00, 00:00. |
|
2 Hours |
Job execution will be every 2nd hour of the day starting from 01:00. |
01:00, 03:00, 05:00, 07:00, 09:00 … 21:00, 23:00. |
|
3 Hours |
Job execution will be every 3rd hour of the day starting from 01:00. |
01:00, 04:00, 07:00, 10:00, 13:00, 16:00, 19:00, 22:00. |
|
4 Hours |
Job execution will be every 4th hour of the day starting from 01:00. |
01:00, 05:00, 09:00, 13:00, 17:00, 21:00. |
|
6 Hours |
Job execution will be every 6th hour of the day starting from 01:00. |
01:00, 07:00, 13:00, 19:00. |
|
8 Hours |
Job execution will be every 8th hour of the day starting from 01:00. |
01:00, 09:00, 17:00. |
|
12 Hours |
Job execution will be every 12th hour of the day starting from 01:00. |
01:00, 13:00. |
|
24 Hours |
Job execution will be every 24th hour of the day starting from 01:00. |
01:00. |
Schedule Management
User will have an option enabling or disabling the scheduler feature for a job at any given point of time. Once disabled the auto execution on the future scheduled interval will be stopped.
Scheduler Configuration
User will have option of configuring the scheduler related configuration.
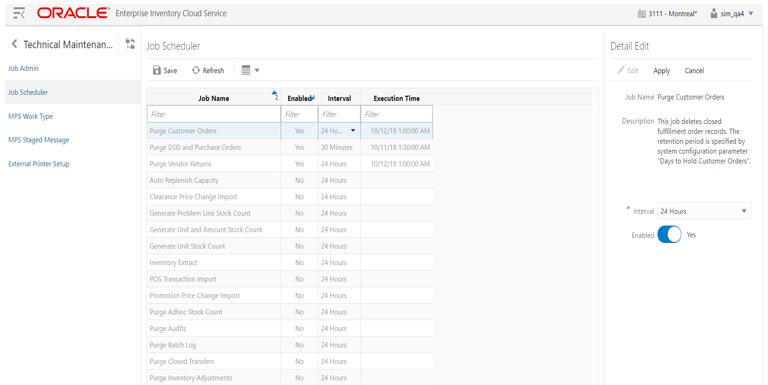
This screen allows user to manage the schedules for the batch jobs. The list of job available to be scheduled will be sort by the enabled flag followed by Job Name alphabetically that is, the jobs for which the scheduling is enable will be on the top of the list sorted by the Job Names in alphabetical order.
User can edit the batch job and perform following operations:
Enable / Disable a schedule.
Setting the execution interval for a batch job.
User will require appropriate authorization to access this screen. Retailer will not be able to view or disable the batch jobs which are system required. This batch jobs will be accessible to Cloud Admin user will have a predefined schedule. Navigation to this screen is as follows: Admin/Technical Maintenance/Job Scheduler
Screen Options
Save
This option allows user to save the changes made to the job schedules. User can make changes to multiple schedule in edit mode and apply the changes, however the changes will take affect only when the save operation is performed.
Refresh
This option refreshes the list of values on the screen.
Edit
This option will be enable only when a schedule is selected to be edited and user have privileges to edit the job schedule. This option takes user to the edit mode in which user can change the execution interval for the job and enable or disable the schedule.
Apply
This option will only apply the changes which are been made during edit mode. This option does not save the changes, it only apply the changes for the job and exit the edit mode. Click the Save option to save the changes.
Cancel
This option is enabled only when user is in edit mode. This option allows user to discard any changes made to the schedule on edit mode or to exit the edit mode.
Menu Options
Interval
User have option to select the appropriate interval for the batch job execution. Depending on the selected interval, server calculates the execution time for the batch job and runs it according. The base time for calculating the execution time on basis of the interval is 01:00 AM. For the store based job this is as per the store time zone and for system jobs this is as per the server time zone.
Option for selecting the execution interval are as follows:
30 Minutes - Runs every 30 minutes.
1 Hour - Runs every hour.
2 Hours - Runs every second hour of the day.
3 Hours - Runs every third hour of the day.
4 Hours - Runs every fourth hour of the day.
6 Hours - Runs every sixth hour of the day.
8 Hours - Runs every eight hour of the day.
12 Hours - Expected to be executed twice a day.
24 Hours - Expected to be executed only once a day.
Enabled
Table Information
Job Name
This column displays the name of the job.
Enabled
This column denotes whether a job is current scheduled.
Interval
This column denotes the interval of the job execution.
Execution Time
This column denote the next execution time for the batch job. This column will not contain data for the jobs which are been disabled.
Login in EICS and navigate to the Job Scheduler screen.
Select the desired job from the list.
|
Note: If the Edit option is not available in the menu section, the user is not authorized to edit the batch job. Kindly assign appropriate user group or contact system admin for desired changes.Some of batch jobs belongs BDI TX (Transaction) category, see Appendix A, BDI Transaction (TX) Importer Jobs section for details. |
Edit the Job details on right panel.
Set required interval for execution and Enabled to Yes.
Click Apply to exit the edit mode.
For configuring multiple jobs on a go, repeat Step 2 for each job.
Click Save to save the current changes made on the screen.
Login in EICS and navigate to Job Scheduler screen.
Select the job from the list which needs to be disabled.
Edit the Job details on right panel.
Set Enabled as No.
Click Apply to exit the edit mode.
For disabling multiple jobs on a go, repeat Step 2 for each job.
Click Save to save the current changes made on the screen.