| Oracle® Retail Enterprise Inventory Cloud Service User Guide Release 19.3 F44222-02 |
|

 Previous |
 Next |
| Oracle® Retail Enterprise Inventory Cloud Service User Guide Release 19.3 F44222-02 |
|
Previous |
Next |
The Data Setup chapter covers functionality found within the Data Setup menu of the inventory desktop application.
Feature include:
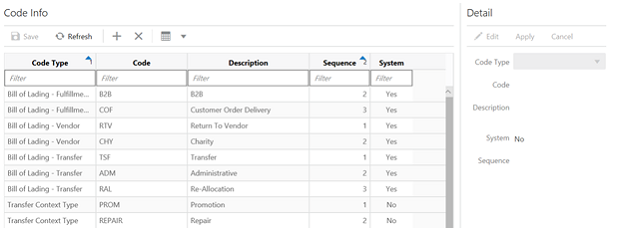
The Code Info is an administrative screen for maintaining the code information in the system. You can access this screen by selecting Code Info menu from the Admin / Data Setup menu after logging into the desktop application. You need proper permissions to access this screen.
You can create or edit the code information for the below code types in the system. The values setup here should correspond to the same values set up in the external merchandising system to ensure integration.
Table 4-1 Code Types
| Code Type | Code Type Description | Usage in the System |
|---|---|---|
|
RTV |
Label RTV |
Not used. |
|
RTVR |
Return to Vendor Reasons |
Not used. |
|
RM |
Replenishment |
This value is displayed on the Item Lookup under the Replenishment method. Retailers can integrate different display values for replenishment. These values should align with the values received from the merchandising system. |
|
RTW |
Label RTW |
Not used. |
|
RTWR |
Return to Warehouse Reasons |
Not used. |
|
CNTX |
Transfer Context Type |
Context Types drop down selected while creating the new transfer request and creating a new transfer. Example values are PROMOTION, REPAIR. If promotion is selected, you can enter the context value. Context value is enabled if the Context Type is set to 'promotion' (Database value of PROM). If the field is enabled, you can optionally enter a valid or invalid promotion ID. The system will display the promotion ID and the promotion description. Valid promotions are of promotion type and exist in the database. In case the promotion does not exist in the database, the promotion ID will still display, but the promotion description will be unknown. |
|
RTF |
Label RTF |
Not used. |
|
RTFR |
Return to Finisher |
Not used. |
|
BOLT |
Bill of Lading - Transfer |
The motive for the shipment for the Transfer functional area. These values will be listed on the drop down on the Motive field on the BOL detail screen on the transfer shipment. |
|
BOLR |
Bill of Lading - Vendor |
The motive for the shipment for the Return to vendor functional area. These values will be listed on the drop down on the Motive field on the BOL detail screen on the RTV shipment. |
|
BOLF |
Bill of Lading - Fulfillment Order |
The motive for the shipment for the Customer Order Delivery functional area. These values will be listed on the drop down on the Motive field on the BOL detail screen on the customer order delivery shipment. |
|
RCNX |
Return Context Type |
Context Types drop down selected while doing the return. |
The following are the list of codes that are predefined and available after the deployment in the system for you.
You are not allowed to edit or delete the codes that are marked as System.
Table 4-2 Predefined Code Types
| Code Type | Code | Description | Sequence | System |
|---|---|---|---|---|
|
Item Basket Type |
INV |
Investigation |
1 |
Yes |
|
Item Basket Type |
GR |
Gift Registry |
2 |
No |
|
Item Basket Type |
LB |
Line Bust |
3 |
No |
|
Transfer Context Type |
PROM |
Promotion |
1 |
Yes |
|
Transfer Context Type |
REPAIR |
Repair |
2 |
No |
|
Replenishment |
C |
Constant |
5 |
Yes |
|
Replenishment |
D |
Dynamic |
3 |
Yes |
|
Replenishment |
F |
Floating Point |
2 |
Yes |
|
Replenishment |
M |
Min/Max |
6 |
Yes |
|
Replenishment |
T |
Time Supply |
4 |
Yes |
|
Replenishment |
SO |
Store Order |
1 |
Yes |
|
Bill of Lading - Vendor |
RTV |
Return to Vendor |
2 |
Yes |
|
Bill of Lading - Vendor |
CHY |
Charity |
1 |
Yes |
|
Bill of Lading - Transfer |
TSF |
Transfer |
1 |
Yes |
|
Bill of Lading - Transfer |
ADM |
Administrative |
2 |
Yes |
|
Bill of Lading - Transfer |
RAL |
Re-Allocation |
3 |
Yes |
|
Bill of Lading - Fulfillment Order |
COF |
Customer Order Delivery |
1 |
Yes |
|
Bill of Lading - Fulfillment Order |
B2B |
B2B |
2 |
Yes |
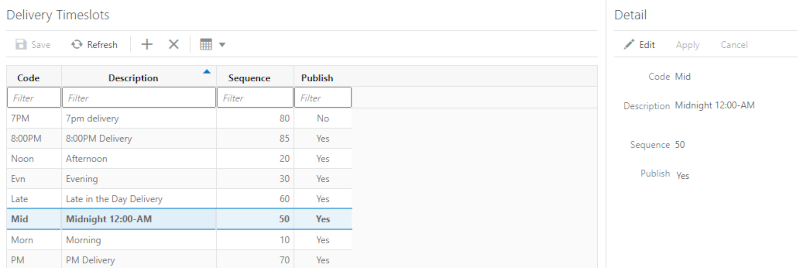
The Delivery Timeslot screen is an administrative screen for the creating, editing and deleting of delivery timeslots to be used within the system. The timeslots are used within store orders. The screen is accessed from the Admin/ Data Setup menu, the user must have proper permission. Upon initial install, a list of default delivery timeslots will be available. The delivery timeslots defined here need to match that of the merchandising system, they are not integrated between the two systems.
Each delivery timeslot will require the user to give it a unique alphanumeric code. A description is also required to describe the delivery timeslot. A sequence needs to be assigned, which will be used to give an order to the delivery timeslots when populated on the store orders UI. Lastly, there is a publish indicator that will define if the delivery timeslot on the actual store order is published.
Once a delivery timeslot is created it is saved and it can be edited with the exception of the code, which is not editable. Delivery Timeslots can also be deleted, as long as it is not attached to a store order.
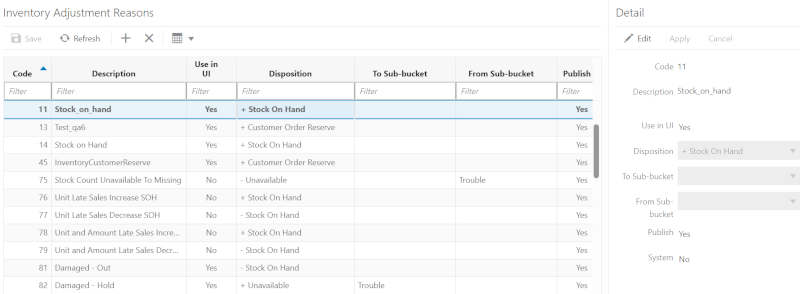
The Inventory Adjustment Reason screen is an administrative screen for the creation and maintenance of inventory adjustment reason codes to be used within the system. The reason codes are used within inventory adjustments. Upon initial install, a list of default inventory adjustment reason codes is available. The reason codes defined here need to match that of the merchandising system.
The following table provides the list of Inventory Adjustment reason codes:
Table 4-3 Inventory Adjustment Reason Codes
| Code | Reason | Disposition | To Sub-bucket | From Sub-bucket | UI | System | Transaction | Published Ind |
|---|---|---|---|---|---|---|---|---|
|
1 |
Wastage |
-Stock on Hand |
No |
Yes |
Wastage |
Yes |
||
|
2 |
Shrinkage |
-Stock on Hand |
Yes |
No |
Yes |
|||
|
3 |
Repair - In |
-Unavailable |
Trouble |
Yes |
No |
Yes |
||
|
75 |
Stock Count Unavailable to Missing |
-Unavailable |
Trouble |
No |
Yes |
Stock Count for UIN |
Yes, all types except Unit and Amount |
|
|
76 |
Unit Late Sales Increase SOH |
+Stock on Hand |
No |
Yes |
Late Sales |
Yes |
||
|
77 |
Unit Late Sales Decrease Sales |
-Stock on Hand |
No |
Yes |
Late Sales |
Yes |
||
|
78 |
Unit and Amount Late Sales Increase SOH |
+Stock on Hand |
No |
Yes |
Late Sales |
Yes |
||
|
79 |
Unit and Amount Late Sales Decrease SOH |
-Stock on Hand |
No |
Yes |
Late Sales |
Yes |
||
|
81 |
Damaged - Out |
-Stock on Hand |
Yes |
No |
Yes |
|||
|
82 |
Damaged - Hold |
+Unavailable |
Trouble |
Yes |
Yes |
Receiving of Damages |
Yes |
|
|
83 |
Theft |
-Stock on Hand |
Yes |
No |
Yes |
|||
|
84 |
Store Use |
-Stock on Hand |
Yes |
No |
Yes |
|||
|
85 |
Repair - Out |
+Unavailable |
Trouble |
Yes |
No |
Yes |
||
|
86 |
Charity |
-Stock on Hand |
Yes |
No |
Yes |
|||
|
87 |
Stock Count In |
+Stock on Hand |
No |
Yes |
Stock Count |
Yes, all types except Unit and Amount |
||
|
88 |
Stock Count In |
-Stock on Hand |
No |
Yes |
Stock Count |
Yes, all types except Unit and Amount |
||
|
89 |
Dispose from on Hold |
-Stock on Hand and -Unavailable |
Trouble |
Yes |
No |
Yes |
||
|
90 |
Dispose from SOH |
-Stock on Hand |
Yes |
No |
Yes |
|||
|
91 |
Stock - Hold |
+Unavailable |
trouble |
Yes |
No |
Yes |
||
|
92 |
Admin |
-Stock on Hand |
Yes |
No |
Yes |
|||
|
93 |
Store Customer Return |
+Stock on Hand |
Yes |
No |
Yes |
|||
|
94 |
Product Transformation In |
+Stock on Hand |
Yes |
No |
Yes |
|||
|
95 |
Consignment |
-Stock on Hand |
Yes |
No |
Yes |
|||
|
96 |
Ready to Sell |
-Unavailable |
Trouble |
Yes |
Yes |
RUA Decrease Receiving. |
Yes |
|
|
98 |
Product Transformation Out |
-Stock on Hand |
Yes |
No |
Yes |
|||
|
180 |
Customer Order Reservations - In |
+Customer Order |
No |
Yes |
Reserve Customer Order In POS |
Yes |
||
|
181 |
Customer Order Reservations - Out |
-Customer Order |
No |
Yes |
Cancel Fulfill Customer Order in POS |
Yes |
||
|
182 |
Stock In |
+Stock on Hand |
Yes |
Yes |
Yes |
|||
|
183 |
Stock Out |
-Stock on Hand |
Yes |
Yes |
Yes |
|||
|
184 |
Unit Late Sales Inventory Adjustment Increase SOH |
+Stock on Hand |
No |
Yes |
Inventory Adjustment Late Sales Unit |
Yes |
||
|
185 |
Unit Late Sales Inventory Adjustment Decrease SOH |
-Stock on Hand |
No |
Yes |
Inventory Adjustment Late Sales Unit |
Yes |
||
|
186 |
Unit and Amount Late Sales Inventory Adjustment Increase SOH |
+Stock on Hand |
No |
Yes |
Inventory Adjustment Late Sales UA |
Yes |
||
|
187 |
Unit and Amount Late Sales Inventory Adjustment Decrease SOH |
-Stock on Hand |
No |
Yes |
Inventory Adjustment Late Sales UA |
Yes |
||
|
188 |
Receipt Hold |
-Unavailable |
Trouble |
No |
Yes |
Receiving Unavailable |
Yes |
All reason codes have a disposition associated with them. The disposition is used to define the direction of stock movement for the adjustment. The following table lists the available dispositions:
Table 4-4 Available Dispositions
| Display Value | Stock Movement |
|---|---|
|
- Stock On Hand |
Decrease Total SOH Decrease Available SOH |
|
+ Unavailable |
Decrease Available SOH Increase Unavailable SOH |
|
+ Stock On Hand |
Increase Total SOH Decrease Available SOH |
|
- Unavailable |
Increase Available SOH Decrease Unavailable SOH |
|
+ Customer Order Reserve |
Decrease Available SOH Increase Customer Order Reserve |
|
- Customer Order Reserve |
Increase Available SOH Decrease Customer Order Reserve |
|
- Stock On Hand and - Unavailable |
Decrease Total SOH Decrease Unavailable SOH |
|
-Unavailable and + Unavailable |
Decrease Unavailable SOH Increase Unavailable |
Those reason codes that have the Use in UI indicator set to 'Yes' appear as reason codes in the Inventory Adjustment dialog.
System reason codes cannot be removed and can only have the description edited. System reason codes are those used within the system for making stock on hand updates, for example, Stock Count-In which is used within stock counts.
|
Note: These are not considered inventory adjustments as the stock count itself represents the transaction of the change. |
If the system is configured to use sub-buckets, then the sub-buckets are enabled. Sub-buckets are linked with the inventory adjustment reason codes to make it easy for users to move inventory to, from, and between sub-buckets when adjusting unavailable stock. An example is stock reserved for display or demonstration purposes versus stock that is unavailable because it needs to be repaired. A sub-bucket is a pre-populated list which is defined in the database.
If using sub-buckets, all reason codes that have a disposition which is "to unavailable" stock require a "to sub-bucket" to be selected. Those reason codes that have a disposition which are from unavailable stock require a "from sub-bucket" to be selected.
Note that the -Unavailable and + Unavailable is a disposition used for those retailers that are configured to use sub-buckets. It allows movement of inventory from one sub-bucket to another only within the inventory system. The inventory stays within the unavailable bucket. These adjustments are not published.
The Publish indicator is used for integration purposes. If this check box is checked, the adjustments associated with that reason code are published upon completion of the adjustment. This indicator can only be modified for those reason codes which are normally editable (non-system reason codes). All reason codes installed on setup have this indicator checked, meaning they are published.
|
Note: A common use of the Publish indicator is the support of initial inventory position seeding from the merchandise system during implementation. Inventory adjustments may come to the inventory system (through a web service) and then updates the inventory per the adjustment; the adjustments do not get published out to the external system per the Publish indicator. Also, the Publish indicator can be used to update inventory positions, from the inventory system, in a custom RMFCS or third-party implementation to synchronize both inventory positions with the corporate system. |
The purpose of the ISN Type screen is to create and maintain user defined ISN types in the system and ISNs those are created via external system or using the ISN Lookup screen can be associated to the types created here. Examples: Serial Number, Part Number, IMEI, Key Number, and so on.
This screen can be accessed from Admin\Data Setup menu on the desktop application. The user must have appropriate security permission to access this screen.
The ISN Types created here will be used while creating item scan number for an item in the Item Scan Number Lookup
Upon initial install, a list of default ISN types is available in the screen. The user can create more ISN types.
The user will be able to provide a label for the ISN Types and set the ISN Type restricted or not, which indicates whether the ISN belonging to this type is PII type. On the ISN lookup screen, ISN data will get filtered based on the restrict flag of the ISN type associated with the ISN record.
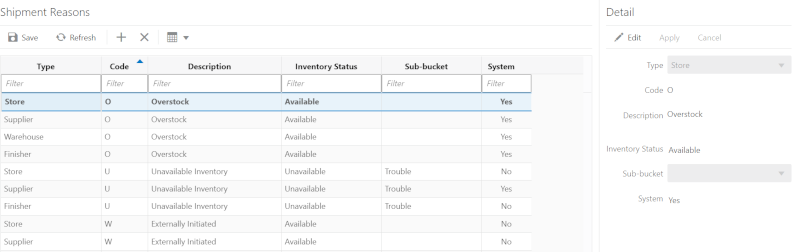
The Shipment Reasons screen is an administrative screen for the creation and maintenance of shipment reason codes to be used within the system. The reason codes are used within Transfer Documents, RTV Documents, Transfer Shipments, and RTV Shipments. Upon initial install, a list of default shipment reason codes will be available. The reason codes defined here need to match that of the merchandising system.
The following table provides the list of shipment reason codes:
Table 4-5 Shipment Reason Codes
| Type | Type ID | Code | Description | Use Available | Nonsellable | System |
|---|---|---|---|---|---|---|
|
Finisher |
4 |
F |
Externally Initiated |
Yes |
Yes |
|
|
Store |
1 |
O |
Overstock |
Yes |
No |
|
|
Warehouse |
3 |
O |
Overstock |
Yes |
No |
|
|
Finisher |
4 |
O |
Overstock |
Yes |
No |
|
|
Supplier |
2 |
O |
Overstock |
Yes |
No |
|
|
Finisher |
4 |
U |
Unavailable Inventory |
No |
Trouble |
Yes |
|
Store |
1 |
U |
Unavailable Inventory |
No |
Trouble |
Yes |
|
Warehouse |
3 |
U |
Unavailable Inventory |
No |
Trouble |
Yes |
|
Supplier |
2 |
U |
Unavailable Inventory |
No |
Trouble |
Yes |
|
Store |
1 |
W |
Externally Initiated |
Yes |
Yes |
|
|
Supplier |
2 |
W |
Externally Initiated |
Yes |
Yes |
|
|
Warehouse |
3 |
W |
Externally Initiated |
Yes |
Yes |
All reason codes have an inventory status associated to them. The inventory status is used to define the inventory bucket which will be relieved when the shipment is dispatched.
Those reason codes that are for the type of Store, Warehouse, or Finisher appear as reason codes in the Transfer dialog. The reason codes that are for the type of Supplier appear as reason codes in the RTV dialog.
System Reason codes cannot be edited or removed. System reason codes are required to be available for use in the system. These values are populated upon install and the system check box is only checked during that process. For those non-system reason codes, once the reason code is saved, only the description can be edited.
If the system is configured to use sub-buckets, then the sub-buckets field will be enabled. Sub-buckets are linked with the shipment reason codes to make it easy for users to move inventory to, from, and between sub-buckets when adjusting unavailable stock. Some examples of these are stock reserved for display or demo purposes versus stock that is unavailable because it needs to be repaired. Sub-buckets can be setup and maintained within the Sub-buckets dialog.
If using sub-buckets, all reason codes that have an inventory status of unavailable will require a sub-bucket to be selected.
|
Note: Before a reason can be accessed, it is important to associate that reason code to a role that you has the privileges to use in that store. |
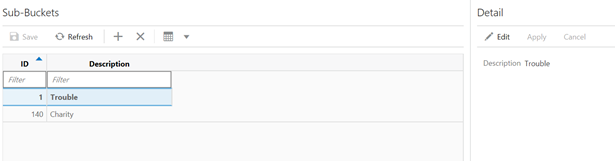
The Sub-buckets screen is an administrative screen for the creation and maintenance of sub-buckets to be used within the system. They allow for breaking down the unavailable (non-sellable) inventory bucket further into smaller buckets or what we call sub-buckets.
The system is configurable to use sub-buckets. If the system is configured to use sub-buckets, they will be available within Inventory Adjustments, RTVs, and Transfers. Sub-buckets are attached to reason codes that update unavailable inventory. The reason codes would be either inventory adjustment reasons or shipment reasons. When you use the reason code on a transaction, the system updates the proper sub-bucket associated with the reason code.
Sub-buckets can be added, deleted and edited via this dialog. Sub-buckets will have a system generated ID along with a user defined sub-bucket description.
Sub bucket id for 'Trouble' is predefined in the system when the system is deployed.
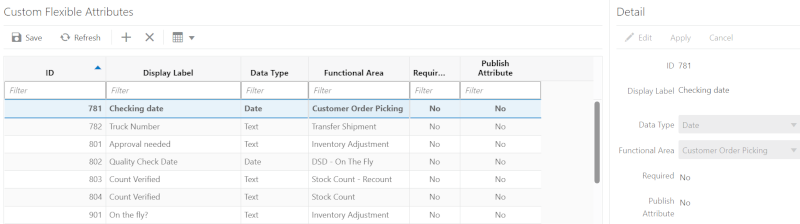
The Custom Flexible Attributes screen is an admin screen used to setup and maintain transaction level flexible attributes for transactions including:
Customer Orders
Customer Order Picking
Customer Order Reverse Picking
Customer Order Delivery
Inventory Adjustment
Transfer Document
Transfer Shipment
Transfer Shipment Container
Transfer Receive
Transfer Receive Container
RTV Request Approve
RTV Shipment
RTV Shipment Container
Stock Count
Stock Count - Recount
DSD - PO, DSD - PO & ASN, DSD - On the fly
DSD Container
Replenishment Pick List, Scan List, Shelf Adjustment
Item Basket
Item ISN
Store Order
The flexible attributes set up here will be available in mobile in the respective transactions and you can capture values for these attributes. Appropriate permissions are needed to access, edit and delete flexible attributes.
The flexible attributes can be set up to have values in any of the following data types: Text, Date, Decimal and Long. You can also set minimum and maximum range for values that you can enter for these flexible attributes in the transactions in mobile. The retailer also has the flexibility to set up certain flexible attributes as mandatory. This requires the user to specify values for them before confirming the transaction in mobile. The retailer can also set up to publish certain flexible attributes to external systems.
The Units of Measure screen is an administrative screen for the creating, editing and deleting of Units of Measure to be used within the system. The screen is accessed from the Admin / Data Setup menu, the user must have proper permission. Upon initial install, a list of units of measure will be available.
Each Unit of Measure record will require a UOM, which is the alphanumeric code to identify the unit of measure. The code is what is displayed on the UI. It does not need to be unique. Next a UOM type is assigned to the Unit of Measure, this is selected from a list which is hard coded in the system, that is, 'VOL' or 'MASS'. Lastly, the unit of measure needs to have a description to describe the UOM.
Once a unit of measure is created it is saved and can be edited with the exception of the UOM code, which is not editable. Unit of Measures can also be deleted, as long as it is not being used by an item or a transaction in the system.
UOM codes need to match those in external systems to ensure correct processing.