| Oracle® Retail Enterprise Inventory Cloud Service User Guide Release 19.3 F44222-02 |
|

 Previous |
 Next |
| Oracle® Retail Enterprise Inventory Cloud Service User Guide Release 19.3 F44222-02 |
|
Previous |
Next |
The Operations chapter covers functionality found within the Operations menu of the desktop. Features include:
Within the system, product groups are used to group items in order to perform various actions on them. Merchandising system are constantly adding, editing, and removing items to be sold. Creating groups of products based on attributes of an item is an efficient way of automatically including or excluding changed items when repeatable transaction is created. Product groups can be comprised of entire areas of the merchandise hierarchy (for example, an entire subclass) or can be simply a group of individual and unrelated items. A scheduling tool can then be used to extract the items for further processing at set intervals. Product groups are used by various functional areas.
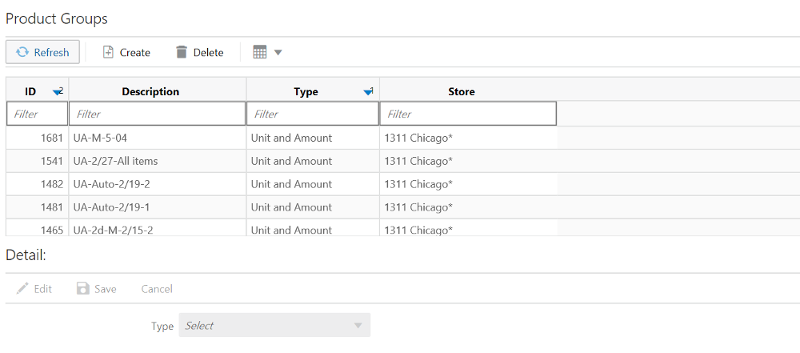
This is the Product Groups screen which is accessed by selecting Product Group from within the Operations menu. It lists all types of product groups that are created in the system, fields include ID (system generated), description, type and store. From this screen you can filter down the list.
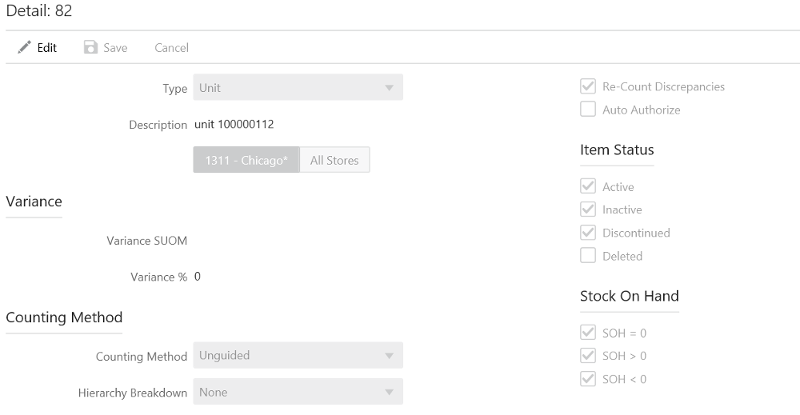
Selecting a product group displays the details in the detail portion of the screen (see below). From there the details can be viewed or edited. Unit and Amount product groups that are attached to schedules can only be edited if the [(start date - today) >= stock count lockout days].
New product groups can be created by clicking on Create. Product groups can be created and maintained for Unit, Unit and Amount, Problem Line, Store Orders, Auto Ticket Print, and Shelf Replenishment types. Each type has unique attributes and functionality. Deleting of a product group is also possible (assuming proper permissions) by selecting the group and clicking on Delete. Product groups which are attached to schedules cannot be deleted.
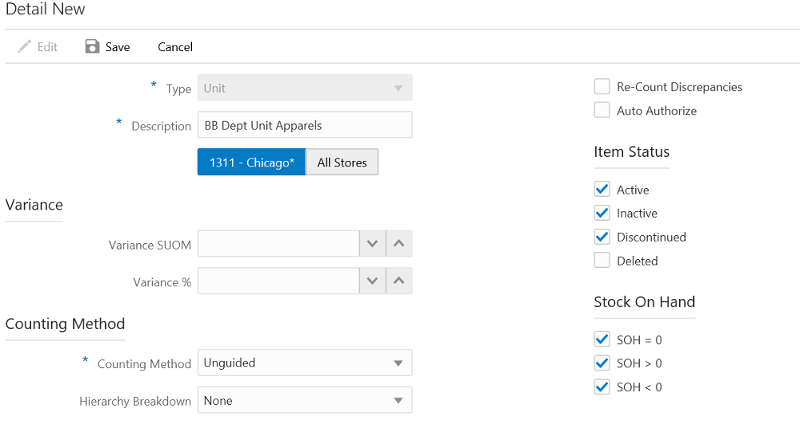
This is the Product Groups screen with focus on the Detail section. New product groups can be created by selecting the New menu option. Each type has unique attributes that are required which will drive different functionality. Once all the appropriate attributes have been added for the product group, the product group can be saved, and it will be available in the Product Group Component dialog to assign components.
Common fields for all product group types include:
Type: Type of product group. Defined at time of creation.
Unit, Unit and Amount, Problem Line, Store Orders, Auto Ticket Print, and Shelf Replenishment
Types dependent upon data permissions
Description: Entry field to describe the product group.
Store: User's Store (single store) or All Stores. All Stores is only displayed if All Stores permission exists.
User's store (single store) - Product Group is only available to that store
All Stores - Product Group is available for all users that have the All Stores permission at all/any store
This is the Product Groups screen with focus on the Detail section for a Unit type product group. Specific fields pertaining to Unit, Unit and Amount, and Problem Line Stock Counts include:
Variance SUOM
Variance is defined in terms of SUOM (standard unit of measure). It is used to determine if an item is discrepant on the stock count. The system compares the total SOH inventory level with the quantity entered on the count by you.
An item is discrepant if it deviates + or - over or equal to the Variance SUOM unless the variance SUOM is 0. If the variance is 0 and the count equals the SOH, then the item is not discrepant.
Used for Unit, Unit and Amount and Problem Line stock counts.
A blank value means that it will not be used to determine discrepancies. Can only be blank if the variance % or variance value has a value.
A value of 0 means that the item cannot be discrepant at all and the exact quantity must be counted.
Variance %
Variance is defined in terms of percentage. An item is discrepant if it deviates + or - over or equal to the Variance % unless the variance % is 0. If the variance is 0 and the count equals the SOH, then the item is not discrepant.
Used for Unit, Unit and Amount and Problem Line stock counts.
A blank value means that it will not be used to determine discrepancies. Can only be blank if the variance SUOM or variance value have a value.
A value of 0 means that the item cannot be discrepant at all and the exact quantity must be counted.
Variance Value
This will be a cash amount that will be compared to the number of discrepant units x current retail price of the item. If the calculated value exceeds the Variance Value, then the item would be considered discrepant.
Only Unit and Amount types.
A blank value means that it will not be used to determine discrepancies. Can only be blank if the variance % or variance SUOM have a value.
A value of 0 means that the item cannot be discrepant at all and the exact quantity must be counted.
Counting Method - method of counting
Guided - system will guide you through the items on the stock count when counting.
If the store does not sequence items (Display Sequence fields store parameter), the Guided option will not be available
Unguided - system does not guide you through the items on the stock count.
Third Party
Must have Third Party data permission
Hierarchy Breakdown - used to determine if the system should break down the stock count into multiple child stock counts.
None - stock count will not be broken down.
Location - master count with child counts grouped by location.
Department - master count with child counts grouped by department.
Class - master count with child counts grouped by class.
Sub-class - master count with child counts grouped by sub-class.
Re-count Discrepancies - defines whether a recount should be done for discrepant items.
Unchecked and disabled when the counting method is Third Party.
Auto Authorize - if checked the stock count will be automatically authorized and there will not be a manual authorization stage.
Item Status - status of items to include on the product group.
Only enabled for Unit types
Must have at least one status checked
Statuses
Active
Inactive
Discontinued
Deleted
Unit - Active, Inactive and Discontinued checked
All statuses enabled
Unit and Amount - Active, Inactive, Discontinued, and Deleted checked
All statuses disabled
Problem Line - Active, Inactive and Discontinued checked
All statuses disabled
Stock on Hand - used to determine what inventory state of items will be put on the stock count.
Values
SOH = 0
SOH > 0
SOH < 0
Unit
SOH = 0, SOH > 0, SOH < 0 checked and all enabled
Unit and Amount
SOH = 0, SOH > 0, SOH < 0 checked and all disabled
Problem Line
SOH = 0 and SOH > 0 checked and disabled
SOH < 0 checked and enabled
This value must be checked if none of the Problem Line criteria are checked
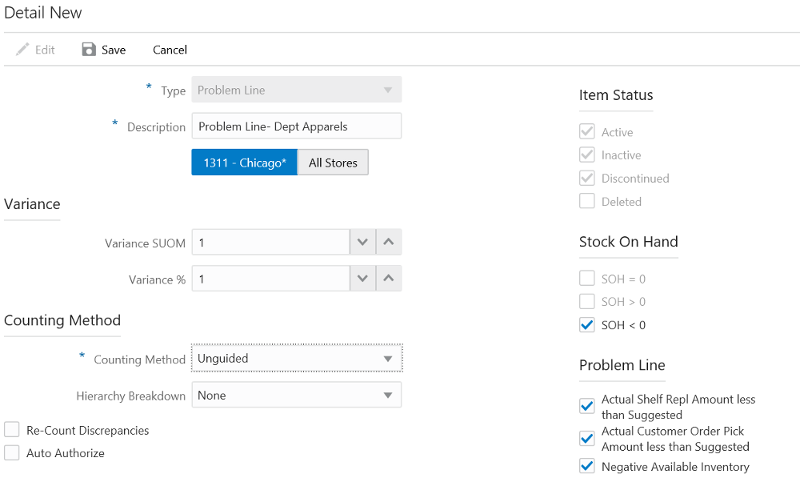
This is the Product Groups screen with focus on the Detail section for a Problem Line type product group. Note that problem line product groups have additional attributes that are noted in the section above, however these three fields are specific only to Problem Line product groups.
Actual Shelf Repl Amount less than Suggested - If checked, the item will be added to the problem line count if the actual amount on the shelf replenishment pick list is less than that of what was suggested.
Actual Customer Order Pick Amount less than Suggested - If checked, the item will be added to the problem line count if the actual pick amount for customer order entered for the item on the pick list was less than the suggested system pick amount.
Negative Available Inventory - If checked, the item will be added to the problem line stock count if the item has negative available inventory.
UIN Discrepancies - If checked, the item will be added to the problem line stock count if the item has UIN discrepancies.
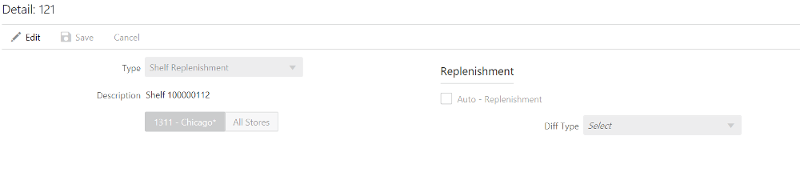
This is the Product Groups screen with focus on the Detail section for a Shelf Replenishment type product group. The attributes specific to Shelf Replenishment includes:
Auto-Replenishment - indicates whether the product group items will be adjusted during the nightly batch.
Once the product group is scheduled (if this is checked), complete the shop floor function of the end of the day batch will run nightly and adjust for the product groups which have been scheduled for that time.
If unchecked, no auto replenishment will run.
Diff Type - indicates the diff that will be used for the Display shelf replenishment method.
Values: Diff1, Diff2, Diff3, Diff4
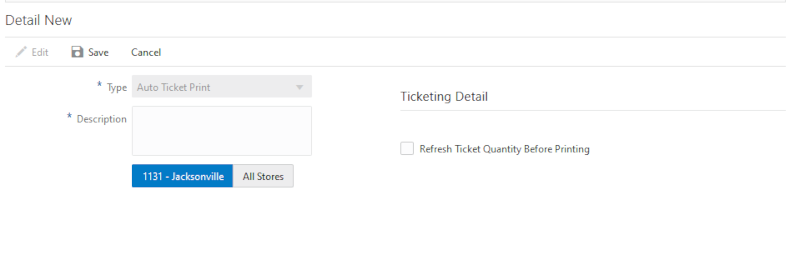
This is the Product Groups screen with focus on the Detail section for an Auto Ticket Print type product group.
This option allows the user to indicate if they want a stock on hand refresh of the tickets before printing.
The print quantity is updated with the Stock on hand based on the refresh quantity indicator in the product group.
For the format type=Item Ticket, the system populates the print quantity of the item tickets with current SOH.
For an item with the format type=Shelf Label, the system populates the print quantity of the shelf label quantity with the shelf capacity quantity defined in the sequence table.
For an item with format type = Item, ticket, if the SOH > 0 then the ticket qty = SOH. If SOH <=0 then ticket qty = 0.
For an item with format type = shelf label, if the label quantity > 0 then the ticket qty = label quantity. If label<=0 then the ticket qty = 0.
If the ticket contains the print date, the system sends the tickets to the printer based on the print date. (PRINT DATE <=CURRENT DATE)
For the manually created tickets, the system checks the auto print flag which indicates whether the system must consider the ticket for the auto printing.
If the qty = 0 to print, the system prints nothing.
The system auto generates tickets and shelf edge labels for the price changes, clearance events, promotions and description changes depending on the below store parameters.
If the parameter is on, the system generates the ticket when the respective price change event or description change data comes into the system from the merchandising system.
The auto ticket printing batch further submits the generated tickets to the printing service based on the product group schedule.
Auto Generate Item Tickets for Clearance Price Changes
Auto Generate Item Tickets for Description Changes
Auto Generate Item Tickets for Promotion Price Changes
Auto Generate Item Tickets for Regular Price Changes
Auto Generate Shelf Edge Labels for Clearance Price Changes
Auto Generate Shelf Edge Labels for Description Changes
Auto Generate Shelf Edge Labels for Promotion Price Changes
Auto Generate Shelf Edge Labels for Regular Price Changes
The purpose of this is to send tickets that match the product group items setup in the store for printing. First it finds pending Item Tickets within the store that matches the Auto Ticket Print product group for the day. Then it updates the quantity of the tickets if the refresh flag was enabled for that product group.
It further sorts the tickets and will also consolidate tickets and update across all batches within a batch generation method (Product Group, External or Manual generated) those item tickets matching all the following:
Item number
Print date
Format type
Format
The system breaks it in to blocks as configured in Maximum Ticket Quantity to Print store parameter and sends the request to the 3rd party service for the print.
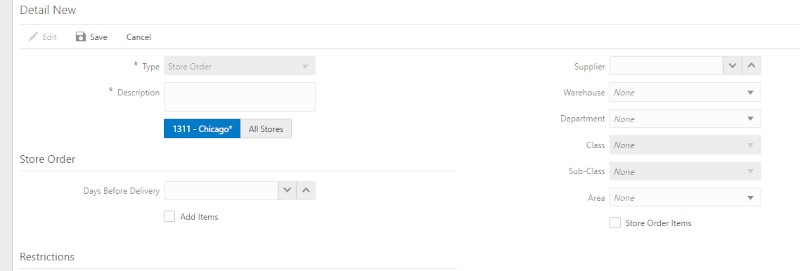
This is the Product Groups screen with focus on the Detail section for a Store Order type product group. Creating and scheduling a product group for store orders, allows for the generation of a system generated store order. The store order will be generated online for schedules for today's date, otherwise the store order will be generated via the nightly batch schedule. The store order will be editable and allow for items to be added, edited and removed.
The product group attributes specific to Store Orders includes:
Days Before Delivery - The date the user wants the Store Order to be delivered by. Will be used to set the Request Date on the Store Order.
Store Oder Create Date + Days Before Delivery = Request Date
Add Items
Checked - the user will be able to add additional items manually to the store order once it is generated by the system.
Unchecked - the user cannot add any other items to the store order, only the items that were added by the system can be ordered.
Restrictions - restrictions can be assigned to the store order product group. The assigned restrictions will be used to restrict the items that get added to the system generated store order on the mobile. These are the same restrictions that are available when creating a manual store order on the mobile. See the Oracle Retail Store Operations Cloud Service User Guide - Store Order chapter for details around these restrictions. The restrictions will not be validated/enforced when adding components to the product group.
Supplier
Warehouse
Department
Class
Sub-Class
Area
Store Order Items
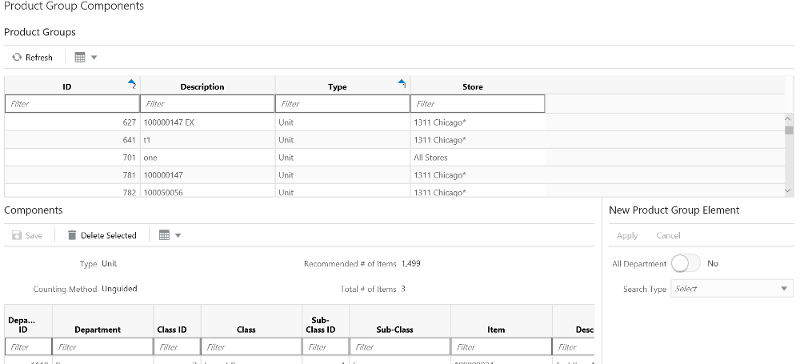
This figure shows the Product Group Components screen. It is accessed by selecting Product Group Component under the Operations menu. The screen consists of two parts. The top part lists of all product groups in the system. The bottom part displays the component details for the selected product group in the top part. Product Groups are created in the Product Groups dialog, see above. Initially after a product group is first created there are no components assigned and the bottom part will be blank, until components get added.
The Recommended # of Items field will display the maximum number of items allowed for the type of product group selected. This field always displays and is pre-populated based on either the system option associated with the product group. Note that the items on the product group may still exceed this value, it is just a recommendation and will also be used at the time of generation/extraction when doing the UI break down.
The Total # of Items in Group field will display the estimated number of items in the group based on the criteria selected. This estimate includes the number of ranged transaction level items added. It does not take into account other factors such as status, stock on hand, pack breakdown, and so on. When the actual extraction happens, these factors will be taken into account.
You can select components on the screen using various selection criteria. You can create a combination of items and/or hierarchies for a group.
All Departments - Unit, Unit and Amount, Problem Line
All Departments get added to the product group
Cannot be used in conjunction with any other component type
Item - Unit, Problem Line and Shelf Replenishment
Hierarchy (Department / Class /Sub-class) - Unit, Unit and Amount, Problem Line, Auto Ticket Print, Store Order, and Shelf Replenishment
Supplier - Unit, Problem Line, Auto Ticket Print, Store Order, and Shelf Replenishment
Items for the supplier will be added to the product group including non-ranged and 'Q' status items.
Style - Unit, Problem Line, Auto Ticket Print, Store Order, and Shelf Replenishment
All child level items (transaction level = item level) for the entered item are added. Non-ranged and 'Q' status items included.
Item Basket - Unit, Problem Line, Auto Ticket Print, Store Order, and Shelf Replenishment
User can select an Item Basket and all the items present in the item basket get added to product group. The item baskets that are 'completed' and 'static' will be in the list.
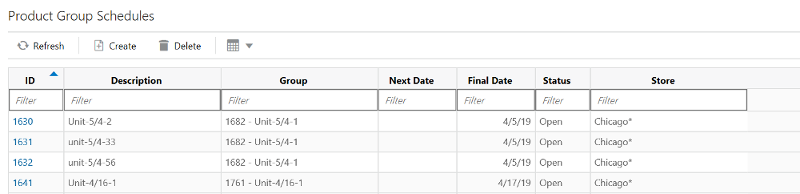
Product Group Schedules (List)
The Product Group Schedules (list) screen displays a list of product groups which have been scheduled. It is accessed by selecting Product Group Scheduler from the Operation menu. All product groups appear in the list and you can filter the list down further if necessary. Fields include a system generated ID, description, (product) group, next date the schedule is supposed to take place, final date of the schedule, status and store which will display the store it was created for or 'multiple' if for more than one store.
Product group schedules can be deleted (assuming proper permissions). If a schedule is deleted that has a stock count created which is in 'new' status, the stock count will also be deleted. If a stock count exists, but it is not in 'new' status, the stock count will remain and only delete the schedule.
Selecting a schedule will navigate into the details for the schedule on the Product Group Schedule Detail screen. By choosing the create icon, you navigate to the Product Group Schedule Detail screen to create a new product group schedule.
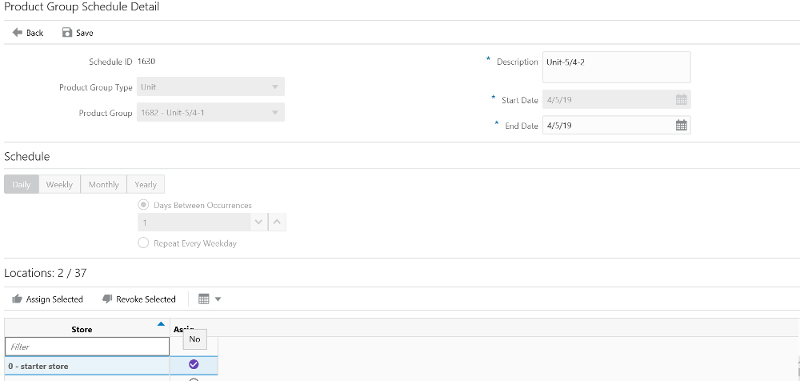
This is the Product Group Schedule Detail screen which is accessed by either creating a new product group schedule or selecting an existing product group schedule from the Product Group Schedules screen. The product group schedule will be editable for all open status product groups with one exception for unit and amount types. Unit and Amount Schedules can be edited if they are 'open' and the [(Start Date - Today) >= Stock Count Lockout Days].
This screen allows you to schedule specific types of product groups. The type of product groups that can be scheduled are Unit, Unit and Amount, Problem Line, Auto Ticket Print, Store Order, and Shelf Replenishment. Once a type is selected different fields for the schedule will be applicable.
The product group can be scheduled for a date range. For Unit, Problem Line, Auto Ticket Print, Store Order, and Shelf Replenishment the start date must be > = today and the end date must be > = start date. For Unit and Amount the start date must be > = today + Stock Count Lockout Days and the end date is set to that of the start date and is not editable.
The schedule portion of the screen allows to setup when the schedule should occur. It can be scheduled daily, weekly, monthly, and yearly as applicable. This portion is only allowed for Unit, Auto Ticket Print, Store Order, and Shelf Replenishment types. Note that caution needs to be taken when creating schedules as there may be situations where a schedule may not be always applicable. For example, a schedule that starts Jan 1 through Dec 31 that is to occur every month on the 31st of the month is not applicable in all months, February has 28 days, April has 30 days, and so on. In this case those months will not have anything generated by the batch.
Lastly, a store or stores needs to be assigned to the schedule. If the Product Group was created for a single store, the available locations list is restricted to the single store the product group was created for. If the product group was created for All Stores, the available locations lists all available locations that you have privileges for.
Once a product group schedule has been saved the system may execute the processing to generate the transaction if it was scheduled for today. For stock counts (Problem Line and Unit) if there is an existing 'New' status stock count, the system will update that stock count, otherwise it will generate a new one. For Store Orders, the system will always create a new store order.
An area consists of one or more item baskets that are grouped together to make up an area. The area can be associated with a physical location/area of a store or it may just be a logical grouping from a merchandise hierarchy. Area examples could be: Men's Department, third floor, or aisle 27.
Areas are used within:
Customer order picking. When doing a pick, if the store is configured, the user may choose an area to pick.
Store Orders Restrictions - Both when creating a manual store order on mobile as well as a system generated via a product group.
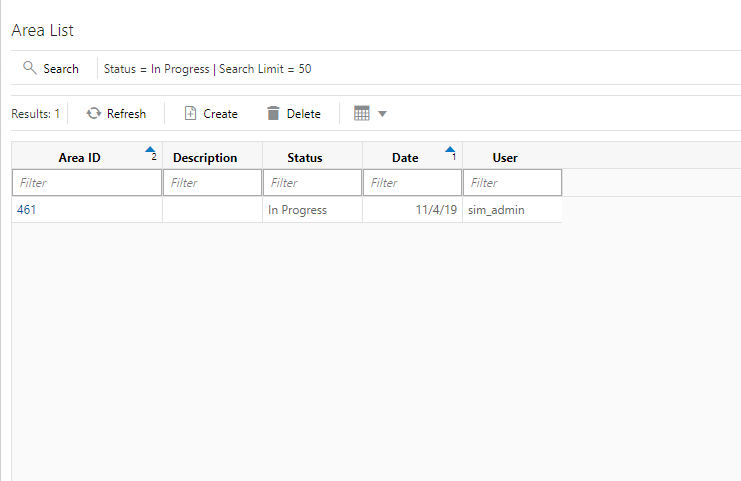
The Area List screen is accessed by selecting Area from the Operations menu. The screen lists existing areas that have been created for the user's store, the default is for In Progress areas. The search option directs the user to the Search Criteria screen to search for other areas, search criteria are displayed. The create option will go to the Area Detail screen to create a new area. Delete will allow for deletion of an In Progress or Completed area in which it will get marked to Canceled status. Lastly, a user can select an area to navigate into the details of that area to view or edit.
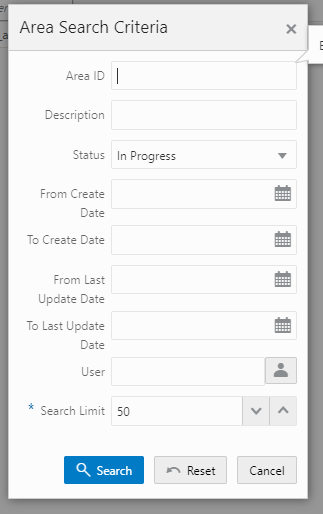
The Area Search Criteria screen is accessed by selecting the Search option from the Area List screen. This screen allows a user to enter in various criteria to search for additional areas. Once a criteria has been entered, when search is selected, the user returns to the Area List with the list of area results being displayed based upon the entered criteria. The search criteria entered will remain until the user exits the dialog. There is a search limit default which is defaulted based upon a system configuration.
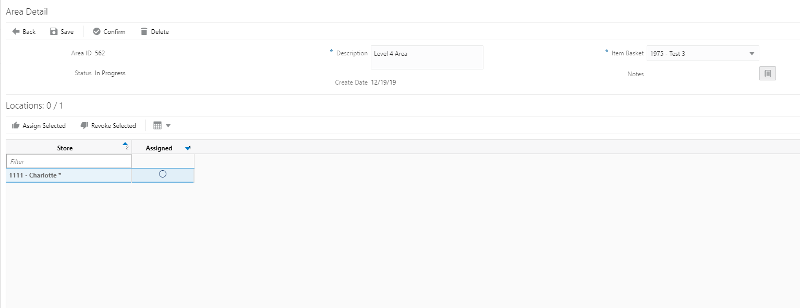
The Area Detail is accessed from the Area List by either selecting an existing area record or selecting the create option. To create a new area, the system generates a unique Area ID, and the user would enter a description for the area. The user selects an item basket ('static' or 'dynamic') from a list of item baskets that are Completed status for the user's store or All Stores, which are 'hierarchy' or 'All Department' (created on the desktop). The last step is to select a store or stores for the area. If the item basket selected was for the user's store, the stores list will include only the user's store. If the item basket was for 'All Stores' the store list will include a list of all stores in which the user has privileges. After all fields have been entered, the user can either save or confirm the area. Save will update the area as In Progress which will allow for editing and it will not be available for use on a customer order pick. Confirm will mark the area to Completed status and it will no longer be editable, and the area will be available for use on a customer order pick.
The Format Assignment screen is used to auto assign the formats when generating a ticket event based on a Format type and price event. This allows the retailer to override the default ticket format for specific categories of items and/or events. For example, if the retailer has both clothing and electronics, they could print a hangtag and a ticket with a sticky back label. Since it is by price event, they could for the hangtag create a clearance ticket that has a sticky back.
Formats can be assigned at the selected item basket level for all stores or selected stores. It could be done for price type wise such as Permanent, Clearance and Regular.
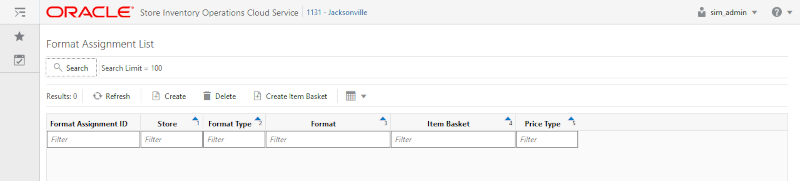
This screen can be accessed from Operations / Format Assignment. When this screen is accessed, the system displays the Format Assignment Search Criteria and allows the user to refine the search for the system to show the results.
To create a new assignment, the user can select the create option and go to the detail screen and save the assignments.
From this screen, the user has an option to create new item baskets. When the user selects the Create Item Basket, the system takes the user to the Item Basket dialog and use the item basket to assign the format.
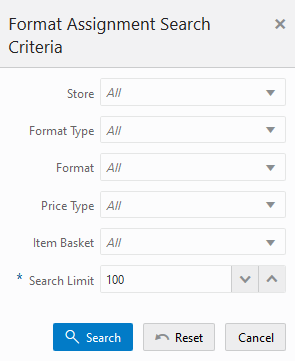
The Format Assignment Search Criteria appears automatically when the user selects the Format Assignment. The user can also select the search option to access this screen and enter the search criteria to refine the search.The format assignment list displays the results based on the criteria given here.There is a search limit default which is defaulted based upon a system configuration.
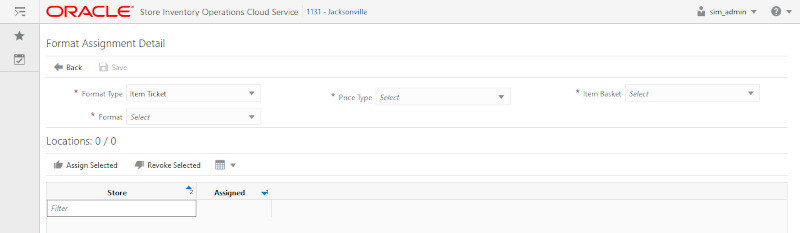
The format assignment detail screen is accessed when the create option or an existing format assignment id is selected from the Format Assignment List.Format can be assigned based on the Item Basket and assigned store wise.
If the Item Basket was NOT created for 'All Stores' (single store), the Available locations list will be restricted to the single store the Item Basket was created for.
If the Item Basket was created for 'All Stores', the Available locations will list of all available locations that the user has privileges for.
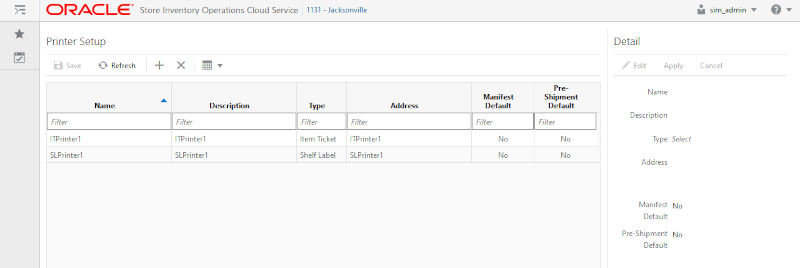
On this screen, the user can create printers for the Item Ticket, Shelf label and Postscript types.
When tickets are generated and submitted to printers for printing, the system sets the printer to which it must be printed. The printers created in this dialog for ticket and labels are used in the ticketing dialog when user submits to print the tickets.
Printer details are sent as part of Manifesting or the pre-shipment notification. The Printer Setup screen is an admin screen to create new printers and assign the address of the printers. Printers can be added, modified and deleted using this screen. The printers that are setup in this screen are specific to the store. You will also be able to specify the default printer for manifesting and pre-shipment notifications.
On this screen, the user can also create printers for the Item Ticket and Shelf Label types.
The screen is accessed via the menu: Operations / Printer Setup.
You must have Access Printer permission in order to access this screen.
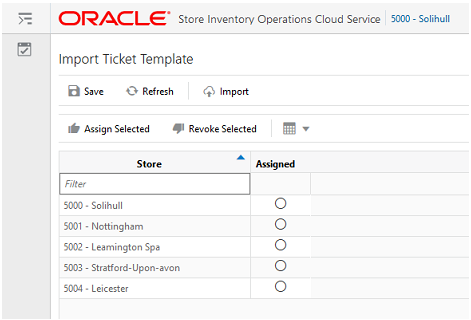
This screen can be accessed in the desktop application from Operations/Import Ticket Template menu.
This screen is for the user to import the 3rd party file templates such as ZPL for ticket printing.
The imported files contain the format/layout design for the ticket. It will be used in the application when sending the print jobs to the printer based on the format to which the file is assigned.
The files are created using the external application and uploaded for the system to understand the design layout of the ticket.
On this screen, the user can import multiple template files and assign it to the ticket format on the Ticket Print Format screen.
The user when selects the Import button, the system allows to drag and drop or select a file, provide the description and the type in free text and import of the file.
These files are listed on the Ticket Print Format screen.
The delete option allows the user to delete a file which is not used.
|
Note: The system does not validate the content of the file whether it is as per the standard of the printer. It just validates to make sure the Non-ASCII file is not allowed to import. |
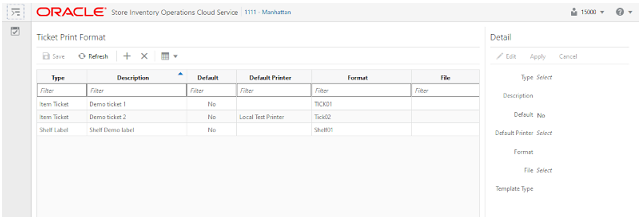
The Ticket Print Format screen is accessed from the Operations menu.
The Ticket Print Format screen is an administrative screen used to set up item tickets and shelf label formats to support ticket printing.
The purpose of this screen is to create a new ticket format by specifying a format name, associate to Item Ticket or Shelf Label, and optionally associate a 3rd party template file for example, ZPL file, to it. File layout which contains the layout of the tickets is to support the specific 3rd party printer. The screen also allows a user to select a default format and default printer for each type of format. The template files uploaded using the Import Ticket Template option will be listed here.
The system allows only one default format/printer to be set up for a specific format type. An error message will display if the user has selected more than one format as the default format. This is set up by store location. A user should select a default printer. If a default printer is not selected.
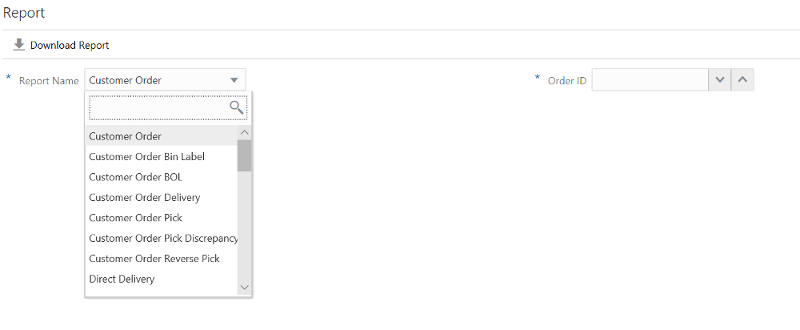
The Report screen is used to generate a pdf report for a specific transaction ID that can be printed from a pdf viewer (not supplied by Oracle). The list of reports that you can download depends on the data permission (Report Type) assigned. You can select a report type and enter the transaction ID for the report to be downloaded. A report request is sent to the server and the report gets downloaded to the default 'Downloads' folder set up by you.
The Report screen will be accessed via the menu: Operations-Report. You must have Access Reports security permission to access this screen.
List of Reports and Data Permissions:
The following table lists the report names and the data permission that is required to be able to download the report.
Table 5-1 Report Data Permissions
| Report Name | Data Permission |
|---|---|
|
Customer Order |
Customer Order |
|
Customer Order Bin Label |
Customer Order Bin Label |
|
Customer Order Delivery |
Customer Order Delivery |
|
Customer Order BOL |
Customer Order BOL |
|
Customer Order Pick |
Customer Order Pick |
|
Customer Order Pick Discrepancy |
Customer Order Pick Discrepancy |
|
Customer Order Reverse Pick |
Customer Order Reverse Pick |
|
Direct Delivery AGSN |
Direct Delivery AGSN |
|
Direct Delivery Label |
Direct Delivery Label |
|
Direct Delivery |
Direct Delivery |
|
Direct Delivery Discrepant Item |
Direct Delivery Discrepant Item |
|
Inventory Adjustment |
Inventory Adjustment |
|
Inventory Adjustment AGSN |
Inventory Adjustment AGSN |
|
Item Basket |
Item Basket |
|
Item Detail |
Item Detail |
|
Purchase Order |
Purchase Order |
|
RFID History |
RFID History |
|
RTV |
RTV |
|
RTV Shipment |
RTV Shipment |
|
RTV Shipment BOL |
RTV Shipment BOL |
|
RTV Shipment Container |
RTV Shipment Container |
|
RTV Shipping Label |
RTV Shipping Label |
|
Scan List |
Scan List |
|
Shelf Adjustment |
Shelf Adjustment |
|
Shelf Replenishment |
Shelf Replenishment |
|
Stock Count Allocation |
Stock Count Allocation |
|
Stock Count Detail |
Stock Count Detail |
|
Stock Count Export |
Stock Count Export |
|
Stock Count Rejected Item |
Stock Count Rejected Item |
|
Store Order |
Store Order |
|
Transfer |
Transfer |
|
Transfer Receiving |
Transfer Receiving |
|
Transfer Receiving AGSN |
Transfer Receiving AGSN |
|
Transfer Receiving Exception |
Transfer Receiving Exception |
|
Transfer Receiving Label |
Transfer Receiving Label |
|
Transfer Shipment |
Transfer Shipment |
|
Transfer Shipment BOL |
Transfer Shipment BOL |
|
Transfer Shipment Container |
Transfer Shipment Container |
|
Transfer Shipping Label |
Transfer Shipping Label |
The Operational Views are accessed by selecting the Operational Views menu option under the Operations menu.
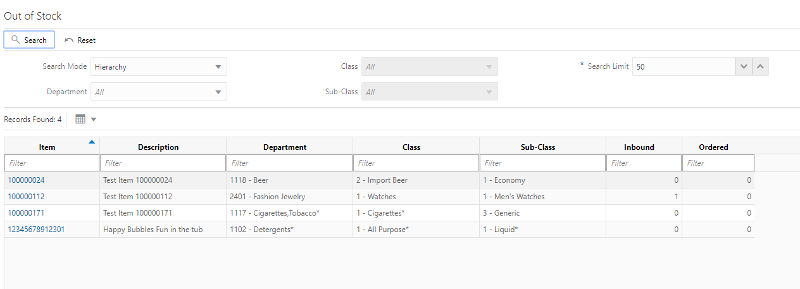
The Out of Stock operational view displayed above is for a search mode of 'hierarchy'. The view will display the 'Active' items that are out of stock based upon the selected 'hierarchy'. A search limit is defaulted based upon the system admin. The results for the view are displayed in the grid. Selecting the item link will navigate to the Item Details for that item.
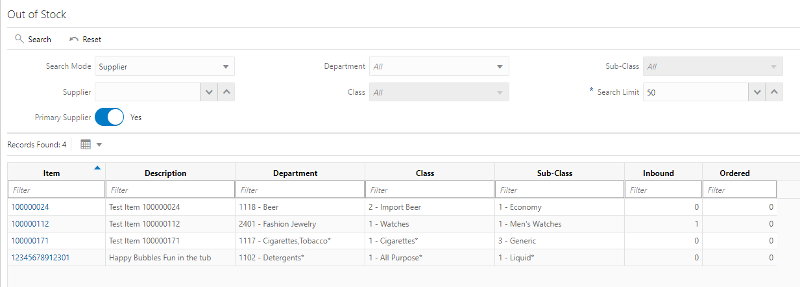
The Out of Stock operational view is displayed above for a search mode of 'supplier'. The view is the same as that above for 'hierarchy' with the exception of being able to search for out of stock items by supplier or primary supplier.
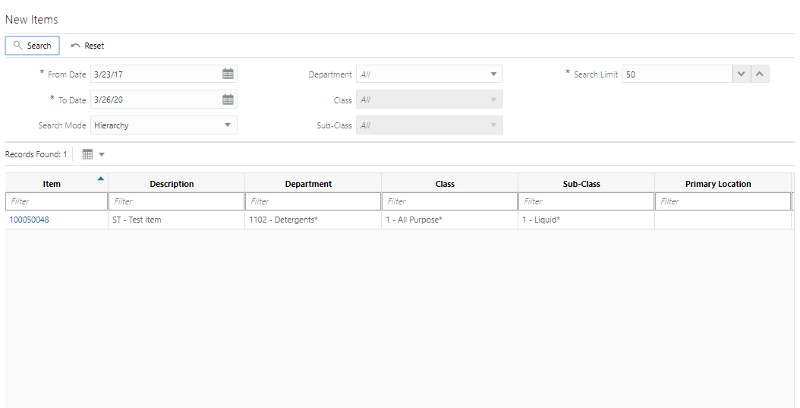
With the New Items operational view, the user will be able to find out the list of items that are newly received on a delivery for the first time for the user's store. The user will be required to enter a date range for the search and hierarchy is optional. The system will return the list of items that meet the criteria. An item can be selected and the user will navigate to Item Detail for that item.
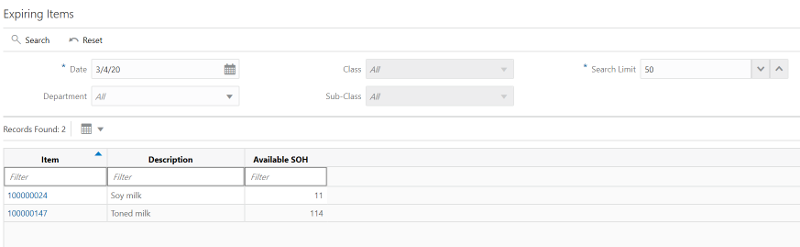
Using this operational view, the user will be able to find out the list of items expiring on a particular day, in the user's store. This will allow for a single date to be passed in, which will initially default to today's date and it will return the list of items which have a Sell By or Use By date is equal to the date being passed in. An item can be selected and the user will navigate to Item Detail for that item.
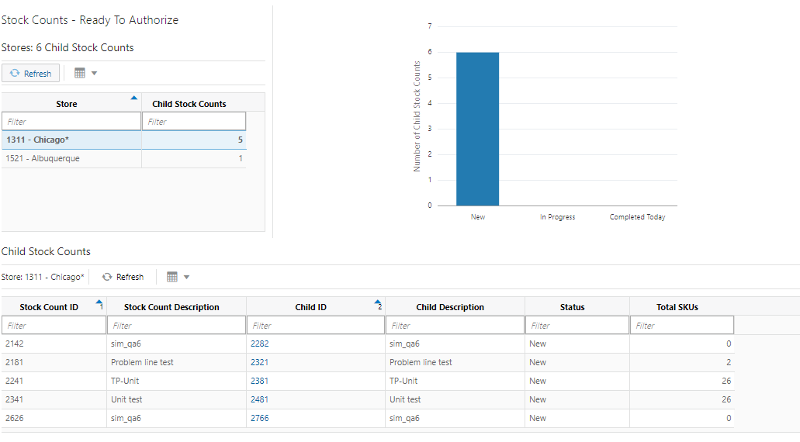
The Stock Counts - Ready to Authorize operational view will display those stock counts that are still open. The store grid will display all stores in which the user has permissions. Once selecting a store, the grid at the bottom will display all stock counts that are New or In Progress in the authorized stage based upon the selected store. The graph displays all authorized stock counts for all stores the user has permissions for that are New, In Progress or Completed today.
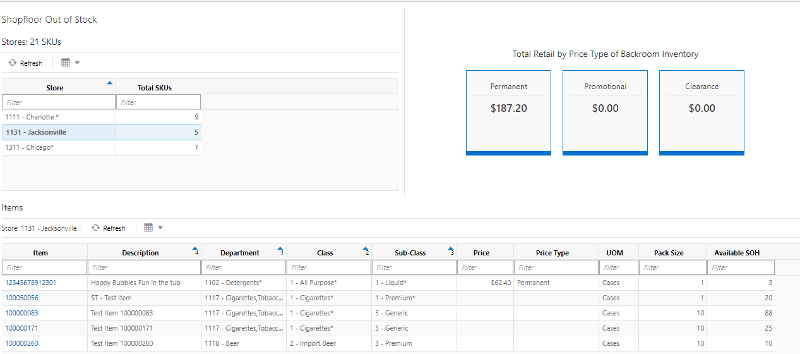
The Shop Floor Out of Stock operational view allows a user to see what items do not have any shop floor inventory but have Available inventory. There is a list of stores that the user has permissions too with the total SKUS that do not have shop floor inventory. The user selects a store to inquire about. The grid at the bottom populates based upon the selected store with the items that do not have shop floor inventory but have available inventory. Fields will include item, description, hierarchy, current price type and price, and available inventory. Selecting an item from the grid will navigate to Item Detail for that item. The operational view also has a three block price section. It displays the total retail of the available inventory for the selected store for each price type: permanent, clearance, and promotional.