Manage Accounts
Use the Accounts link on Admin page of the ISR Dashboard to manage accounts in the ISR network.
The Accounts page in the ISR Dashboard allows you to add new Account(s) and configure account parameters. This function also allows you to view, edit, and delete existing Accounts on the ISR.
For each account, you can configure account branding and configure route defaults. You can configure multiple accounts (supports multi-tenancy) if required, and assign specific users or edit user parameters for each account.
Note:
A default System Account exists under the Accounts page and should not be renamed or deleted. This account includes all users and routes configured on the ISR. Users assigned as Super Users and Account Administrators can edit the System Account. For more information about users, see Chapter 6, Managing Users.You can also use other applications (i.e., Microsoft® Excel, Notepad®) to specify the parameters for an account, and then import the contents of the file into the ISR Dashboard.
Select Accounts from the Admin page to manage Accounts.
Accounts Page

The following table describes the information displayed on the Accounts page.
| Column | Description |
|---|---|
| Name | Name of the account. |
| Description | Description of the account. |
| Number of Routes | Number of routes configured for the account. |
| Recording is | Identifies whether or not recording
is enabled or disabled on the account.
|
| Sessions Capacity | Total number of available sessions currently allowed for this account. |
| Displays details for the account and allows you to edit the details. | |
| Deletes the account. |
Adding an Account
You can add an account(s) in the ISR Dashboard using the New Account link on the Accounts Page. After adding an account, the settings are applied as the default settings for all routes under that account.
Note:
You can create an account using any application that can save to a comma separated value (CSV) file (i.e., Microsoft® Excel, Notepad®, etc.). Using the ISR Dashboard, you can then import the account information from the file (<filename>.csv) to the ISR database.For more information about importing account information into the ISR database, see Importing an Account CSV File.
Only a Super User and Account Administrator can add new accounts.
To add an account:
-
Click
Create. The
following dialog box displays.

Configuring/ Editing Details for an Account
Super Users and Account Administrators can configure or edit the details for any of the accounts on the Accounts page. Tenant Administrators can configure or edit the details for their own accounts only.
After selecting an account on the Accounts page, you can perform the following:
- Edit general account information
- Configure or edit branding features to the account
- Configure or edit account route defaults
- Configure or edit account recording file permissions
- Configure or edit account routes
- View or edit account users
Edit General Account Information
You can edit the general information for an account when required.
To edit the general account information:
-
Select an account
from the list and click the Details icon. The following page displays.

Archival
To add an Account-specific Archival destination:
-
Click
Enable
Archival by Account.

Configuring MD5 Checksum Validation
-
Click
Update.
If a checksum violation occurs, the Recording Details page displays something similar to the following example:

Verifying Archival Success
To verify successful Archival for a specific recording.
-
Click the
File
Location section.
The Archival Status and Archival Remarks fields provide information about the Archival of a specific recording.

Site Archival Configuration with Account Archival Enabled
To edit Archival:
-
Confirm a recording
made on an Account not specifically configured for Archival.
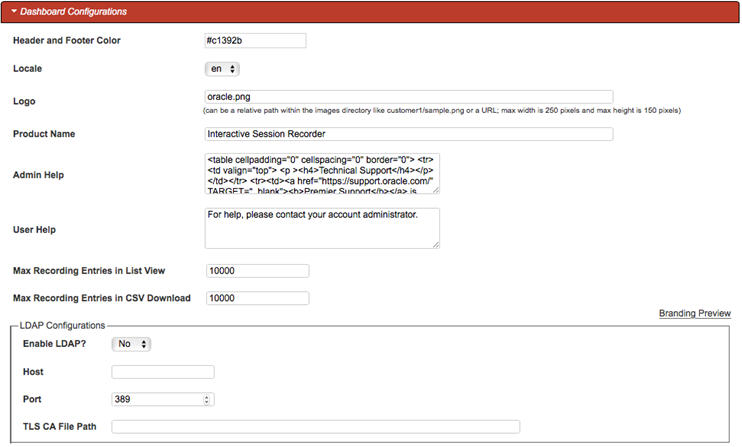
Dashboard Configurations
You can customize the ISR Dashboard for each account if required, using the Account Branding feature. Via the Account page's Dashboard Configurations section, you can do the following:
- Customize the Dashboard’s header and footer color
- Specify a logo to display
- Customize Admin and User Help
- Set the maximum recordings
in the list view and in a CSV download
To apply branding to an account:
-
Click
Dashboard
Configurations to expand the branding information.
-
In the
Header and
Footer Color field, click on
 and select the company color to apply to the Header
and Footer, as well as all the button names in the ISR Dashboard. Or enter the
Company’s color code, in Hex format, in the text box. For example, #F4AB00.
and select the company color to apply to the Header
and Footer, as well as all the button names in the ISR Dashboard. Or enter the
Company’s color code, in Hex format, in the text box. For example, #F4AB00.
-
Admin Help—Enter any
help information that you want to display when an Administrator clicks the Help
icon from any page in the ISR Dashboard. Valid values are text or HTML code.
For example:
For help or support, contact ABC, Inc. via support@abc.com.
The default value for this field is:
<table cellpadding="0" cellspacing="0" border="0"> <tr> <td valign="top"> <p ><h4>Technical Support</h4></p> </td></tr> <tr><td><a href="https://support.oracle.com/" TARGET="_blank"><b>Premier Support</b></a> is available for this product.</td></tr> <tr><td>For questions and problems that cannot be answered by our <a href="http://docs.oracle.com/cd/E50378_01/index.htm" TARGET="_blank">documentation</a>, please open a service request through the Oracle Support Portal: <br/><br/> <a href="https://support.oracle.com" TARGET="_blank">https://support.oracle.com</a> <h4>In your service request, please:</h4> <ol> <li>Identify the component on which you believe the problem resides</li> <li>Provide a detailed description of the behavior</li> <li>Attach the appropiate logs: <ul> <li><b>Core Recorder (On RSS Host): ISR.log</b> -- /cxc_common/ISR/ISRLogs/ISR.log</li> <li><b>Routing API (On RSS Host): IsrApi.log </b> -- /cxc_common/ISR/ApiLog/IsrApi.log</li> <li><b>Recording Dashboard (On Dashboard VM Host): production.log</b> -- /var/www/dashboard/current/log/production.log</li> </ul> </li> </ol> </td> </tr> </table>

Note:
In the “Admin Help” and User Help fields, you can resize the text box as required by left-clicking and holding your mouse button on the bottom-right corner of the box, and dragging it to the size you require.
Permissions
The Permissions section of the Edit Account page allows you
to configure Account-level playback, deletion, and download recording file
permissions through the
ISR Dashboard.

Route Defaults
The Route Defaults section on the Accounts page is applied as the default settings for all routes under the selected account. This page allows you to configure:
- Recording Defaults
- Recording Editing Permissions
- Record and Save Mode Defaults
- Sessions Capacity Defaults

Route Defaults
The Route Defaults allow you to specify whether or not recording is enabled by default for the routes that are created on the account. You can also specify the Route mode to use for the recording, the percent of recordings allowed, and the recording format.
To configure recording defaults:
Recording Editing Permissions
Recordings in the ISR Administrator Dashboard have specific metadata information that is stored with the actual recording. Some of this information includes Agent ID, rating, notes, and whether or not the recording was completed. For more information about recordings, see Managing Recordings.
You specify whether or not routes created for the account allow uesrs, by default, to edit recording information by setting the Recording Editing Permissions parameters.
To set recording editing permissions:
-
Allow Editing of Agent ID?—Select whether or not you want users for this route to edit the Agent ID for a recording. Valid values are:
-
Yes - Allow editing of Agent ID for a recording.
-
No (default) - Prevent editing of Agent ID for a recording.
-
-
Allow Editing of Rating?—Select whether or not you want users for this route to edit the Rating assigned to a recording. Valid values are:
-
Yes - Allow editing of rating for a recording.
-
No (default) - Prevent editing of rating for a recording.
-
-
Allow Editing of Completed Transaction?—Select whether or not you want users for this route to be able to indicate that a recording represents a complete transaction. Valid values are:
-
Yes - Allow editing of completed transaction information for a recording.
-
No (default) - Prevent editing of completed transaction information for a recording.
-
-
Allow Editing of Notes?—Select whether or not you want users for this route to edit the Notes specified for a recording. Valid values are:
-
Yes - Allows editing of notes specified for a recording.
-
No (default) - Prevent editing of notes specified for a recording.
-
Record and Save Mode Defaults
When the Route Mode is set to Record and Save (see Recording Defaults), you can set the DTMF key that indicates the recording is to be saved. If any other key is pressed, or no key press is received, the recording is discarded.
Note:
The Route Mode parameter MUST be set to Record and Save to enable this Record and Save on DTMF parameter.To set the record and save mode defaults:
- Record and Save on DTMF—Select the type of keypress that allows the caller to save their recording from their phone’s keypad. This parameter allows you to assign a specific DTMF key (keypress), that when pressed by the caller, stores the recording at their location. The value
dtmf-disableddisables this feature. Valid values are:
- dtmf-pound # (default)
- dtmf-star *
- dtmf-0
- dtmf-1
- dtmf-2
- dtmf-3
- dtmf-4
- dtmf-5
- dtmf-6
- dtmf-7
- dtmf-8
- dtmf-9
- dtmf-disabled
Sessions Capacity Defaults
The ISR allows you to set the maximum number of sessions available by default for routes created under the current account. When the maximum session capacity is reached across all routes on the account, a recording may indicate to the caller that all lines are busy and to call back at another time.
You can also set the number of additional call recording sessions available by default for routes to use after the maximum number of sessions has been depleted. The additional burst sessions are used ONLY when the maximum session capacity is reached.
-
Session Capacity—Enter the maximum number of sessions to assign by default to new routes for the account. Default is 24. Valid values are:
-
-1 to 999999999 (must indicate total number of licensed sessions)
-
-1 indicates no limit (default)
-
The maximum session limits for an Account are subject to your licensing agreement.
-
The maximum session limit data is included in the Usage and Billing Reports. For more information about generating reports, see Managing Reports.
-
-
Additional Burst Session Capacity—Enter the number of additional call recording sessions to assign by default to routes for the account. These are only used after the maximum number of sessions has been depleted. Default is 6. Valid values are:
-
-1 to 999999999 (must indicate total number of licensed sessions)
-
-1 indicates no limit (default)
-
The additional burst session limits for an Account are subject to your licensing agreement.
-
The additional burst session data is included in the Usage and Billing Reports. For more information about generating reports, see Managing Reports.
-
- Click Update to save the default route parameters. The Edit Account page displays.
Routes
The Routes section of the Edit Account page allows you to view and edit routes associated with this account.

Users

Video
You can enable or disable video recording for an Account.
- On the Admin page, click Accounts.
- Select an account from the Accounts page and click the Details icon for that account.
- Click
Video to expand the
video information.

- In the Video recording is field, enable or disable video recording. By default, video recording is disabled.
- In the Video Access Permissions field, specify whether users are allowed to access video recordings. By default, users are enabled.
- Click Update.
Deleting an Account
You can delete accounts in the ISR Dashboard as required.
Note:
The System account is the default account in the Dashboard and cannot be deleted.To delete an account:
-
Select an account
from the Accounts page and click the Delete icon for that account.

The following message and prompt displays.
“Deleting this account will delete all recordings, routes, and user types associated with it!
Are you sure you want to delete this account?”
Importing an Account CSV File
You can define accounts in a CSV file and import the data from the file into the ISR database.
To import account information from a CSV file:
-
Using any
application that can save to a CSV file, create a file that contains the
parameters required for creating an account.
-
Boolean (yes/no) values must be entered using 0 (yes or enabled) and/or 1 (false or disabled).
-
The ISR does not ignore any leading and/or trailing spaces, so ensure your CSV file does not have any.
The following table provides the parameters you must enter in the CSV file. Parameters must be entered in the same order presented below.
Parameter Heading Valid Values account_name text account_description text account_misc text percent_to_record 0 to 100 recording_enabled 0 | 1 recorder_state 0 | 1 default_recording_type 1 None: Account or System default (default) 2 WAVE Linear/8bit/8KHz stereo
3 WAVE Linear/16bit/8KHz stereo
4 WAVE Linear/8bit/8KHz mono
5 WAVE Linear/16bit/8KHz mono
6 WAVE uLaw 8bit/8Khz stereo
7 WAVE aLaw 8bit/8Khz stereo
8 WAVE uLaw 8bit/8Khz mono
9 WAVE aLaw 8bit/8Khz mono
10 Raw uLaw 8bit/8Khz mono
11 Raw aLaw 8bit/8Khz mono
12 Raw PCM 8bit/8KHz mono
13 WAVE ADPCM 4bit/8KHz mono
14 WAVE ADPCM 8bit/8KHz stereo
agent_id_editable_flag 0 | 1 rating_editable_flag 0 | 1 completed_editable_flag 0 | 1 notes_editable_flag 0 | 1 application pass_through conference
record_and_save
call_parking
vam_sip_test
maximum number of ports digits (-1 for no limit) number_of_burst_ports digits (-1 for no limit) acct_port_limit digits Example File with Parameters and Values

-
-
Click
Accounts. The
Accounts page displays.


