Manage Sites
Use the
Sites link on the
Admin page of the
ISR Dashboard to manage
ISR sites in your
network. A site is a physical location, a group of recording servers, or a
single
ISR.
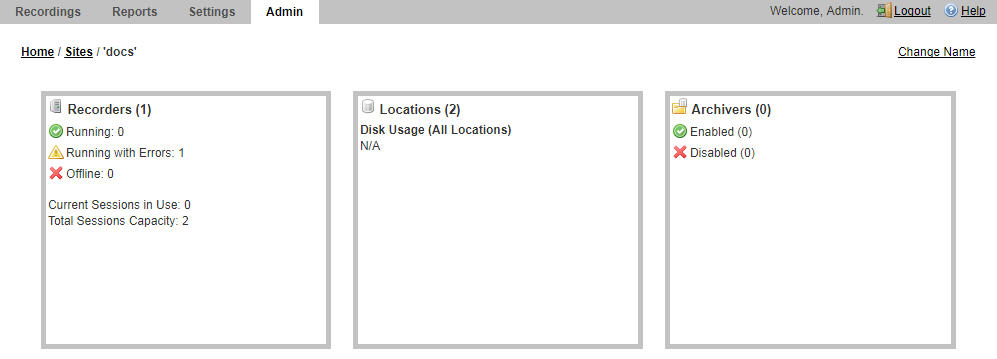
Managing sites includes adding, editing, and deleting sites that contain configurations for the following components:.
| Site Item | Description |
|---|---|
| RSS | Allows you to view RSS (recording server) information, delete an RSS, modify an RSS, or add a new RSS associated with a site. The configuration parameters include the RSS name, IP Address, XML-RPC port number, and utilization of available ports for each RSS. |
| Location | Allows you to edit or delete information about the current Location of the RSS, or add a new Location for the RSS associated with a site. The configuration parameters include Location name, the source directory path on the RSS (where recordings are stored), the HTTP URL path to the recordings, and the amount of free space on the RSS in Kilobytes and Percentage. |
| Archiver | Allows you to edit or delete information about an Archiver(s), or add a new Archiver to a site. An Archiver can move recording files from a single location to one location only. However, you can configure multiple archivers to each move files to corresponding destination locations. The configuration parameters include the Archiver’s IP address, the source from which to get the recordings, the destination for which to send the recordings, Archiver threads, number of move attempts, the mode of the archiver (primary or failover), and the state of the archiver (active or paused). |
Select Sites from the Admin page to manage Sites.
Note:
Only Super Users have access to managing sites. Account Administrators can view the site configurations but do not have access to managing the information.Sites Page

The following table describes the information displayed on the Sites page.
| Column | Description |
|---|---|
| Name | Name of the managed Site. |
| Displays configuration details of the RSSs, Locations, Archivers, Session Agents, and Web Appliances, in the ISR network, and allows you to edit the details. | |
| Deletes the managed Site. |
Adding a Site
Superusers can add a Site to the ISR using the New Site link on the Sites page. Once the Site is created and saved to the ISR database, configure the following applicable components for the Site:
- RSS (required)
- RSS Location (required)
- Archiver (optional)
- Session Agent (optional)
- Web Appliance (optional)
To add a site:
Managing an RSS
After adding a Site to the ISR database, you must add an RSS to the Site configuration. The RSS configuration is the recording server information required for the Site’s ISR. You can add, edit, and delete RSSs from the ISR database.
Note:
Oracle recommends you contact your Technical Support representative before adding or changing an RSS configuration.
Sites RSS Summary
| RSS Information | Description |
|---|---|
| Name | RSS name |
| VoIP IP | RSS Voice network IP address |
| Status |
|
| Uptime | Number of Days RSS has been available |
| Current Sessions In Use | Number of active sessions |
| Sessions Capacity | Total number of simultaneous sessions allowed |
Adding an RSS
After adding a Site to the ISR, you must add an RSS to the Site’s configuration.
To add an RSS to a Site:
Editing an RSS
Once you’ve added an RSS, you can edit the RSS parameters if required.
To configure the RSS:
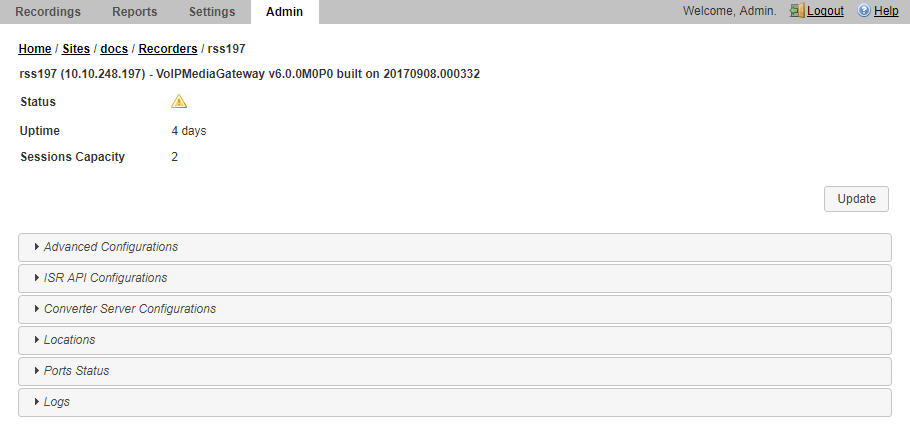
Advanced RSS Configurations
The following fields may be changed in an RSS's Advanced Configurations settings:
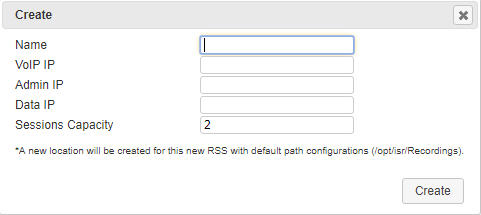
- Name—Enter a name that describes the RSS you are adding.
- VoIP IP —The RSS Voice network IP address.
- Admin IP —The IP address to connect to the RSS host over the "Admin" network.
- Data IP—The IP address to connect to the RSS components (for example, the Converter, API, and Recorder processes) over the "Data" network.
- Sessions Capacity— Total number of licensed ports on the RSSs on this Site.
- SIP ISR UCID Header Field— The administrator may set the SIP header name whose value is to be parsed as the ISR's UCID. The default value is "X-ISR-UCID".
- Config update interval—How often the Recorder attempts to update its configuration.
- Webservice SSL Enabled?—Enables the Recorder webservice for HTTPS communications. This is enabled by default.
- Rest webservice ssl cert file— The path of the file offered in the certificate exchange. The default value is "/opt/isr/security/keys/rss_cert.pem".
- Log Level— Recorder process logging level. The default value is "INFO".
Note:
The remaining fields in the Advanced Configuration section are not available for configuration.RSS API configurations
The following settings are available to configure the internal RSS API:
- API URL Scheme—The protocol used for the API URL. The default value is "https".
- API URL Port—The port number on which the API listens. The default value is "8443".
- API URL Base Path—The base path serving the API application. The default value is "/IsrApi/rest/".
- API Cache Update Interval—The number of seconds before the API cache is updated. The default value is "300".
RSS Converter Server Configurations
The following settings are available for configuring the Converter Process:
- Codec map update interval— The number of seconds between Codec Map updates of transmission and playable codecs. The default value is "300".
- Config update interval— The number of seconds before the Converter updates its broader configurations. The default value is "300".
Note:
The remaining fields in the Converter Server Configurations section are not available for configuration.RSS Locations
The following settings configure where the Recorder process writes its files:
- Location— The primary location for writing recorded files. The default value is "<RSS name (IP)> Primary".
- Failover location— The failover location for writing recorded files. The default value is "<RSS name (IP)> Secondary".
Managing an RSS Location
Note:
When you add your first RSS, the ISR automatically adds an RSS Primary Location to the Locations page.Adding a Location
Note:
A single configured Archiver can move recordings to only one destination location. If you need recordings to go to other destination locations, you must configure an Archiver for each of those locations. For more information about configuring an Archiver, see Managing Archivers.- From the Sites page, choose
a Site and click the Details icon.
The Sites page displays.
- Click on the
Location component.
The following table describes the information displayed on the Location page.
Column Description Name Name of the RSS Location. Local Recordings Directory Specifies the directory path associated with the Location. Remote Access URL Specifies the Web URL path for accessing the recordings via a browser. Disk Usage Indicates the percentage of storage disk used for recordings in the directory location. Valid values are 0% to 100%. 
Delete the RSS Location from the ISR database. - Click
Create. The New
Location dialog box displays.
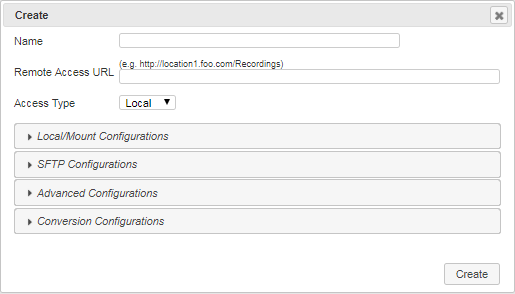
- Name—Enter a name that describes the Location you are adding. For example, RSS1 (1.1.1.1) Primary.
- Remote Access
URL—Enter the URL that identifies the Web location for accessing
the recordings via a browser. For example, http://location1.foo.com/Recordings.
Note:
Locations created automatically by the addition of a valid RSS configure the URL and serve recordings from it. If you add custom locations, you must configure them to be served by a web server and then set this URL if you want them to be playable via the Dashboard or APIs. - Access Type—Select
one of the following:
- Local - Local disk
- Mount - NFS Mount shared directory
- SFTP - SFTP server
The following sections describe the additional configuration parameters available in the Location page's section. When you are finished configuring all of the parameters for your environment, click Create to complete creating the Location.
Local/Mount Configurations - Local Recordings Directory
- Local Recordings
Directory—Specifies the directory path to where the Archiver stores the
recordings on the RSS associated with the Location. For example,
/opt/isr/Recordings.
Note:
When Access Type is set to SFTP, the Archiver attempts to move the Account's recordings to the SFTP user "home" path on the SFTP server.
SFTP Configurations
- SFTP Host—Specify the Location's SFTP host.
- SFTP User—Specify the Location's SFTP user.
- SFTP Password—Specify the Location's SFTP password.
Advanced Configurations
- Global? (Accessible to all
Sites)—Select whether or not this Location may be used in Archival
configurations on all Sites. Valid Values are:
- Yes - This Location may be used in all Sites.
- No (default) - This Location configuration may apply to this Site only.
- Checksum—Enables the MD5 Hash for Recordings feature. For more information, see "Configuring MD5 Checksum Validation".
- Able to Delete
Recordings—Select whether or not this Archiver has permission to delete
recordings and metadata stored longer than specified in Route and Account
configurations. Valid values are:
- Yes (default) - Archiver deletes files older than specified in Route and Account configurations.
- No - Archiver does not delete files, regardless of the date specified in the Route and Account configurations.
- Store in Date
Directory—Select whether or nto the Archiver stores the recording files in a
folder identified by the current date. Valid values are:
- Yes (default) - Archiver stores recordings in a folder by date.
- No - Archiver does not store recordings in a folder by date.
- Store in Account
Directory—Select whether or not the Archiver stores the recording files in a
folder identified by the associated account. Valid values are:
- Yes - Archiver stores recordings in a folder by account.
- No (default) - Archiver does not store recordings in a folder by account.
- Purge Index of Missing
Recordings—Select whether or not the Archiver removes recording entries
containing no recorded media files, from the main recording table, and sends
them to a different "problem" table that can be reviewed at a later time. By
enabling this feature, you prevent a user from viewing recording files with no
recorded media files when they perform a search. However, an Administrator can
view the "problem" table if required, for troubleshooting purposes. When this
field is disabled, the Archiver keeps the recording file with no recorded media
in the main recording table. Valid values are:
- Yes - Archiver moves recordings containing no recorded media from the main recording table to a "problem" table. Users cannot view these recordings, but Administrators may view the "problem" table.
- No (default) - Archiver keeps recordings with no recorded media files in the main recording table. Users may view these recordings.
- Create Empty
Recordings—When enabled, the Archiver creates a recorded file even when no
media was available for writing (for example, a session terminates immediately
after INVITE is negotiated). Valid values are:
- Yes -
Archiver creates an empty recorded file when media is not available for writing.
- No (default) - No empty recorded files are created.
- Yes -
Conversion Configurations
- Converter IP
Address—Enter the IP address (in dotted decimal format) of the
media converter (RMC). For example, 172.53.45.6.
Note:
For more information on managing the media converter, see "ISR RMD". - Converter REST Webservice SSL Enabled?—Enables or disables secure communications with the Converter process webserver. The default is "Yes".
- Mode—Select whether all
RPDD recordings (currently G.729 recordings or recordings from routes set to
Always
record as raw RTP) are converted, a percentage of recordings are
converted, or no recordings are converted when the Archiver moves them to the
destination location.
- Disabled (default) - The RMC does not convert RPDD recordings from .rpdd format to .wav format.
- Convert All - The RMC converts all RPDD recordings from .rpdd format to .wav format
- Converty by Percentage - The RMC converts only a percentage of all RPDD recordings from .rpdd format to .wav format, based on the value entered for the Percent of Recordings to Convert parameter.
- Percent of Recordings to Convert - Select a number to indicate the percentage of recordings to be converted by the RMC. The Mode field must be set to Convert by Percentage in order to set the percentage value. Valid values are 0 to 100. Default is 100 percent.
Editing a Location
You can edit an existing Location if required.
To edit a Location:
- On the Sites page, choose a Site with a Location and click the Details icon. The Viewing Site page displays.
- Click on the Locations component. The Locations page displays.
- Choose a Location to edit and click the Details icon. The Update dialog box displays.
- Edit the parameters for the RSS Location as applicable using the procedures defined in Adding a Location, starting at Step 4.
- When you are finished editing the RSS Location, click Update. The changes are saved to the ISR database and display on the Locations page.
Managing Archivers
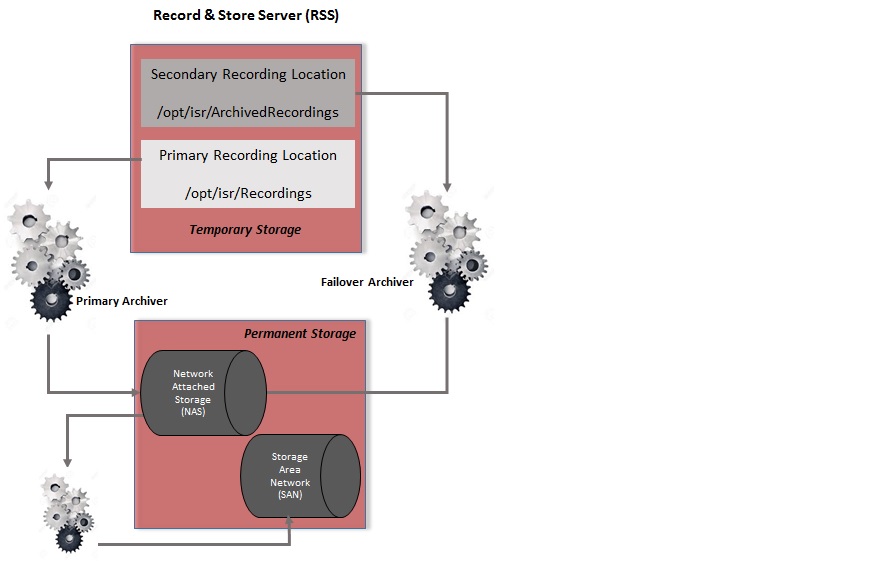
You configure an Archiver(s) to store recordings. The Archiver(s) moves recording files from one Location to another Location, often from a local disk to a Network Attached Storage (NAS) or a Storage Area Network (SAN). It is important to consider your archival requirements before assigning servers to sites, as Archivers are ISR-specific.
When you first install the ISR, you specify a Primary location for where recordings are written in real time. This can be a partition on the ISR server (RSS) or on another drive or server on the network. (The primary source location in the illustration below is /opt/isr/Recordings on the RSS).
You can also specify a secondary (failover) source location for the recordings. In the event that the primary location is inaccessible (i.e., it is full, or it can’t be reached on the network, etc.), the ISR begins writing the recordings to the secondary location in real time. (The secondary source location in the illustration below is /opt/isr/ArchivedRecordings).
Note:
Oracle recommends that you specify a secondary location for your recordings in the event the primary is inaccessible for any reason. For more information about setting up your secondary (failover) location, see the Interactive Session Recorder Installation Guide.For ISR installations that do not require large capacity storage spaces for recordings, the primary and secondary locations may provide sufficient space to store the recordings. However, for installations that may have a very large quantity of recordings, additional storage devices such as a Network-Attached Storage (NAS) or a Storage Area Network (SAN), may be required to off-load the recordings from the ISR, to a more permanent location on the NAS or SAN.
On the ISR, you can configure a Primary and Secondary (Failover) Archiver to move recordings from the primary and secondary locations, to more permanent storage devices as required. The Primary Archiver moves recordings from the primary location (source location) to the NAS or (destination location). The Secondary or Failover Archiver moves recordings from the secondary location (source location) to the NAS or (destination location). Since the recordings in the secondary location are flagged as being stored in this location, the Failover Archiver looks for these flagged recordings and moves them to the more permanent storage location.
The following illustration shows the use of the Primary and Failover Archiver in a network.
A single configured Archiver can move recordings to only one destination location. If you need recordings to go to other destination locations, you must configure an Archiver for each of those locations.
The Archivers box on the Viewing Sites page displays the current status of any Archivers for the site. The following table describes the information that displays in the Archivers component box.
| Archivers Information | Description |
|---|---|
| Total number of Archivers enabled on this Site. | |
| Total number of Archivers disabled on this Site. |
Clicking on the Archiver box on the Viewing Sites page allows you to add a new Archiver to the site, edit the configuration of an existing Archiver, or delete an Archiver if required.
Adding an Archiver
You can add an Archiver to a Site if required.
Note:
You may also configure Archiving on a per Account basis. For more information, see "Archival" in the "Managing Accounts" chapter.To add an Archiver:
Editing an Archiver
You can edit an Archiver configuration if required.
To edit an Archiver:
- From the Sites page, choose a Site with an Archiver and click the Details icon. The Viewing Site page displays.
- Click on the Archivers component. The Archivers page displays.
- Choose an Archiver to edit and click the Details icon. The Archivers dialog box displays.
- Edit the parameters for the Archiver as applicable using the procedures defined in Adding an Archiver, starting at Step 4.
- When you are finished editing the Archiver, click Update. The changes are saved to the ISR database and display on the Archivers page.


